November 2025 Hort Tips
Saturday, November 1, 2025
November Pecan Management
Becky Carroll, Senior Extension Specialist
During November, pecan growers are deep into harvest. After a hard freeze, leaves fall making it easier to begin harvesting native trees. A heavy leaf load dampens the shaking and pecans don’t fall easily. Many “nut houses” are opening to sell fresh pecans and festivals are planned to celebrate the important resource.
Tree Spacing
Continue evaluating tree spacing and consider marking trees for removal. Marking those trees without a crop over the next few seasons will help with those decisions – 3 strikes and you’re out! Using spray paint on the same side of trunk is helpful.
Fact Sheet HLA-6208: Improving Native Pecan Groves provides details on tree removal decisions, considering factors such as irregular bearing, small or poor-quality pecans, insect and disease susceptibility, late ripening, or harvest difficulty.
Harvest Early for Best Quality
After a hard freeze and leaves drop, pecans should be picked up as soon as possible. Weather will often throw a wrench in the season with heavy rainfall but as soon as the grove/orchard floor is dry, harvest should be continued. The longer the pecans are on the ground, the more that will be lost to depredation.
Run the harvested nuts through a pre-cleaner to remove light weight nuts and trash before transporting them to the cleaning plant. A pre-cleaner can save money on transportation costs and help with better nut quality. Pre-cleaner trash should be burned later in the season to rid the area of disease or insect pests.
Pests
Continue wildlife control or scare tactics to keep crows, squirrels, and other critters from harvesting a bigger portion of the crop. Remember to switch up methods regularly to keep them worried. Propane cannons can be moved around the area, predator sounds, parking vehicles in the orchard, will help keep the wildlife nervous. The longer the pecans are in the field, the more that will be depredated. Some depredators may be the two-legged type. Post “no trespassing” signs to protect the crop.
Marketing
If not selling directly to consumers, call multiple buyers to find best prices. Be aware that prices can change frequently.
Select Pecans to Enter in State Pecan Show
Send samples in by January 23, 2026. Details can be found in this Hort tips edition.
For additional information, videos, and webinar recordings on pecan management topics, visit the Oklahoma Pecan Management website.
Don’t Forget to Collect & Enter Pecans for the 2025 State Pecan Show
Becky Carroll, Senior Extension Specialist
The 2025 crop will soon be coming in as harvest will begin in the next couple of weeks. From visiting with people around the state, it seems like we will have a good crop this year. Samples can be from commercial growers, hobbyists, or homeowners.
Don’t get too busy that you forget to set aside some of your best pecans to enter the Oklahoma State Pecan Show. Entry numbers have been low for the last few years. Send in your samples to compete for Best in Show!
If you’d like to learn more about the Oklahoma State Pecan show and how to submit a winning sample, the Pecan Topics for November 2020 webinar has a presentation that you can view on YouTube.
If no county/area show is available, growers may enter pecans directly by sending samples to:
Cimarron Valley Research Station
Attn: Becky Carroll
10820 South Jardot
Perkins, OK 74059
Samples should arrive by January 23, 2026.
Samples should be entered in a sealed plastic or paper bag. Label the bag on the outside and place a label inside the bag. Information should include exhibitors name and address, county, and type of pecan entered. Be sure to follow the guidelines that are listed below before sending entries.
A Few Helpful Hints
Take the time to select pecans that are all the same cultivar, or same size and shape natives – don’t send mixed pecans (they will be disqualified). Select uniform, clean, uncracked pecans. Presentation can make the difference between two very similar samples. Make sure to send 2 pounds of pecans in a labeled and sealed bag.
General Rules and Guidelines
- All entries must be grown in Oklahoma during the current season.
- Each entry shall consist of two pounds of nuts.
- Entries deemed unworthy by the judges will not compete for awards.
- Label each entry as to exhibitor’s name, address and cultivar of nuts. If more than one native (seedling) pecan exhibit is made, identify the nuts from separate trees by numbers. Only one exhibit of each cultivar or native tree may be entered by one individual.
- Each entry will compete in one of the following 26 classes:
- Barton
- Burkett
-
Cheyenne
-
Choctaw
-
Comanche
-
Gratex
-
Kanza
-
Kiowa
-
Lakota
-
Maramec
-
Mohawk
-
Nacono
-
Oconee
-
Pawnee
-
Peruque
-
Podsednik
-
Schley (eastern)
-
Shoshoni
-
Squirrels Delight
-
Stuart
-
Waco
-
Western
-
Wichita
-
Other Cultivars
-
Large Native (seedling) 60 nuts/lb or larger
-
Small Native (seedling) more than 60 nuts/lb
-
Each grower is allowed to participate at one county show of his or her choice.
-
Each grower is allowed to enter one entry in each show class with the exception of Class 24 (Other Cultivars), Class 25 (Large native) and Class 26 (Small native).
-
Each grower may enter one entry from each native (seedling) tree.
Entries should be shipped or mailed to arrive at the show at least one day prior to the deadline.
-
County pecan shows will not be affected by these rules and procedures.
-
Samples will be placed in cold storage and judged prior to the Oklahoma Pecan Growers Annual Meeting. At that time, the winning entries will be displayed with awards and recognitions. All entries will become the property of the OPGA.
-
First, second, and third place winners in each class at the State Pecan Show will receive ribbons.
-
State Pecan Show Special Awards – Plaques will be awarded for the largest pecan entry, the entry having the highest kernel percentage, the champion native, and the best entry of the show. The plaques are presented at the Award luncheon during the annual meeting.
-
If a qualifying show is not available, growers may submit entries in accordance with these guidelines directly to the State Show. Entries in the state show must be received by January 23, 2026.
Please reach out with any questions – becky.carroll@okstate.edu.
Fall Cleanup
As plants in the landscape go dormant or are killed off by colder temperatures, it is a good time to do some fall cleaning in the landscape.
Leaves falling from trees are a good source of mulch and compost. If there are groundcovers or turfgrasses growing in the area, then it is best to remove the leaves and compost them or use them as a mulch. Many beneficial insects and pollinators survive in leaf litter through the winter months. When removing leaves from turf areas, consider raking them into landscape beds instead of composting them. In wooded areas where there is little understory growth it is best to leave the leaves to decay naturally, which will also provide habitat for beneficial insects.
Many beneficial insects as well as pollinators also survive in stems of perennials. Don’t cut perennials back until late winter/early spring just before new growth, and even then, cut those with hollow or pithy stems back to about 12 to 18 inches; hibernating insects are usually in the lower portions of the stems. Stems that you do cut back to the ground if needed should not be chopped up but let them fall to the ground or throw them into a corner of the landscape to allow any insects to emerge unharmed.
Other types of landscape debris like prunings from trees and shrubs or soft tissue perennials (i.e., canna, hosta) can be chipped or ground up to be used in compost piles or as a mulch. However, if plants have been plagued with diseases and insects it may be best to remove them completely from the garden by burning them (if allowed in your community) or sending them off to collection facilities. Debris infected with diseases or harmful insects remaining in the landscape will only become a source of infection next year.
Sanitation is an important step in reducing outbreaks of pest problems. A good example is the twigs that frequently fall from trees like pecans. It is very possible they are infected with the larvae of a twig girdler. Larvae overwinter in the dead twigs, eventually pupating in the twig and emerging as an adult next summer. Another good example is the numerous foliar diseases that also overwinter on dead leaves and debris only to spread to new growth the following spring. Removing these organisms from your garden will reduce the chances of them recurring the following year.
Finding that balance of leaving some material for the good guys and removing debris infected with pests can be challenging. Use your best judgment.
Another practice during the fall and winter months that helps keep pests at bay is occasionally tilling fallow ground. Flower or vegetable beds that remain empty during the winter months can be tilled just before freezing temperatures. Hibernating insects are brought to the surface where they will be exposed to and killed by the cold temperatures.
Protecting Young Trees
Trunks of some newly planted trees, especially those with green trunks or smooth, thin bark, require protection from direct sunlight during all seasons. They are especially susceptible to sunscald (blistering and cracking of the bark) during winter months when leaves are absent. Protect the trunk with a commercial tree wrap such as a polyurethane spiral wrap or material such as burlap. The wrap should be applied in the fall but should be removed prior to trunk expansion each spring.
The most reported damage from trunk protective wraps is trunk girdling or constriction because the wrap was too tight or left on too long. Generally, a tree will only need to be wrapped the first season or two after planting.
Tie the wrap firmly, but not tightly. Polyurethane wraps expand without binding the trunk. Start at the ground and wrap up to the first branch slightly overlapping as you go. Do not attach wraps with wire, nylon rope, plastic ties, or electrical tape.
Plants prone to winter desiccation, such as broadleaf evergreens, when planted in open windy areas may require additional protection. Temporary protective barriers such as sheets of burlap, lathe fencing, bales of hay etc. can be constructed to provide protection from the drying winds. Unfortunately, antidesiccants generally do not relieve plant stress in Oklahoma in winter or summer.
Protect young trees and shrubs from animal damage. Polyurethane wrap, wire mesh collars or rodent repellent paint can be used. Holly, honeylocust, elm, and fruit trees are particularly susceptible. Remember snow will change the height of the bite.
For more information on protecting landscape plants during the winter see OSU fact sheet HLA-6404 “Winter Protection of Landscape Plants.”
Possible Pine Problems
Courtney Myers, Assistant Extension Specialist
As deciduous trees lose their leaves in the fall, gardeners may look to evergreen plants for year-round color. While pines are an appealing addition to the landscape, they are susceptible to diseases and environmental stresses. Below are some common problems that may occur in pines.
Pine Wilt
Pine wilt begins with wilted, brown needles that remain attached to the tree and ends with symptoms spreading throughout the entire canopy. Pine sawyer beetle larvae introduce the nematodes to the tree. The nematodes clog the tree’s transport system, causing it to wilt even when water is available. The disease primarily affects non-native pines, including Scotch, Austrian, jack, and mugo. There is no cure for pine wilt once infection begins. Affected trees should be removed before spring to prevent further spread of the disease in the landscape. For more information on pine wilt, see EPP-7674 Pine Wilt Disease.
Dothistroma Needle Blight
Symptoms of Dothistroma needle blight appear in the fall, starting with a band in the middle of the needle. The needle eventually dies above the band, where the base will remain green. Austrian and ponderosa pines are particularly susceptible to needle blight. If a tree is affected, make sure to clean up any fallen needles to prevent the disease from overwintering. Apply fungicide in the following spring. For more details on needle blight, see EPP-7331 Dothistroma Needle Blight of Pine.
Diplodia Tip Blight
Diplodia tip blight is most common on more mature trees that have undergone environmental stresses, like drought. Needles emerge stunted in the spring. As the disease progresses, entire candles (growing points) will eventually die. It’s common to see resin droplets on the dead needles. Trees may eventually die after many seasons of infection. It’s important to prune out and destroy infected branches. Fungicides can be used in late March and early April. For additional information on tip blight, see EPP-7330 Diplodia Tip Blight and Canker of Pine.
Nantucket Pine Tip Moth
Nantucket pine tip moths will also kill candles in pine trees. Moth larvae feed on the base of the needles and migrate to the shoot tips. Their feeding hollows out the candle, distinguishing Nantucket pine moth damage from Diplodia tip blight. Insecticides can be used to control Nantucket pine tip moth once their presence is confirmed. For more details on Nantucket pine moth and survey methods, see EPP-7645 Nantucket Pine Tip Moth.
Pine Chlorosis
Chlorosis refers to the loss of green color in foliage. Pine species typically prefer acidic soil, with a pH of 5.2 to 6. Most Oklahoma soils are alkaline, with a pH well above 7. When planted in these soils, pines struggle to absorb necessary nutrients and take on a chlorotic appearance. Pine chlorosis is often more pronounced in the late winter, when the tree is preparing to grow new needles in the spring.
Needle Drop
Pines will naturally shed their older needles in October and November. This needle drop is normal and not a cause for concern. Natural needle drop differs from pine wilt in that needles on the lower parts of branches are affected. Needle drop typically occurs in October and November and can be more pronounced in some years.
Forcing Bulbs for the Holidays
We have been busy planting bulbs in the gardens, but we do not have to wait until spring to enjoy these blossoms. Many spring-flowering bulbs can be forced indoors for a colorful winter display. What better way to brighten up a winter day than with fresh flowers?
"Forcing" is the term used to describe the process that stimulates bulbs to bloom out of season. The easiest bulbs to force are Paperwhite Narcissus because they don't require chilling. Other commonly forced bulbs include amaryllis, muscari and hyacinths. More challenging bulbs for forcing include colchicum and miniature iris. When selecting bulbs for forcing look for varieties that are specifically recommended for this purpose. Most bulbs require a chilling period or period of cold temperatures before they will bloom, but bulbs sold specifically for indoor forcing are pre-chilled, removing this step for the gardener.
Paperwhites are quick and easy to start and will bloom within four to six weeks. Start by selecting a container without any drainage holes. A clear glass vase can be used so you can see the roots of the bulbs growing, but many different types of containers can be used, if it is deep enough to hold about 3 inches of media.
When forcing bulbs, it is not necessary to use soil as the medium, though you may. It may be easier to use washed pea gravel or glass pebbles that can be purchased at craft stores. The stones or gravel will hold the bulbs in place as they grow. Fill the container with about 2 inches of growing medium. Then, place the paperwhite or other bulbs on top of the pebbles. For a nice display, set 7 or more bulbs close together so they almost touch. A large bunch of bulbs will be more dramatic. Set the bulbs so they are perfectly upright. Wiggle the bulbs down into the pebbles a little bit and then fill in around the bulbs with more pebbles. You do not want to completely bury the bulbs, instead, leave 1/2 to 1/3 of the bulb exposed.
Once you have the bulbs in place, add just enough water to the container to reach the base of the bulbs, but not touch the bulbs. Do not let the bulbs sit in water or they may rot. One of the reasons to use a glass container is that it is easy to see the level of the water. If you are using a solid container, just dig a small hole next to a bulb so you can see the water depth.
To start the rooting process, place your container in a cool room that gets low light or no light, such as a windowless room. Keep your container at low light levels until the roots begin to grow well and the shoots start showing - usually about 1-2 weeks. Keep an eye on the water level and refill as necessary to keep the level just below the bottom of the bulbs.
Once you have good root growth, move your bulbs into a warmer bright, sunny window and watch them grow! Once the bulbs begin to flower, move them out of direct sun so your blooms will last longer. Your home will be filled with beautiful flowers and the refreshing aroma of spring in the middle of winter. Plant batch after batch to keep flowers blooming all winter long. Paperwhite containers make beautiful centerpieces for the table during the holidays and are also great to give as holiday bouquets. Or force paperwhites with your children to create unique gifts for their teachers or grandparents.
Houseplant Care
With cooler temperatures of fall and winter fast approaching our gardening interest often turns from plants outside to plants indoors. Success with houseplants is governed by one’s careful management of light, temperature, water, nutrients, and humidity, along with using the proper potting medium.
Light
Very few plants tolerate dark corners. Most houseplants require light that would be found within four to eight feet of a bright south window. Some will tolerate a spot very near the window, while others will prefer less light some distance away. Too little light can result in tall, lanky, small-leafed plants. Too much light can cause leafburn on sensitive species like African violet. If the room is not naturally lit, artificial lights should be used.
Temperature
Most houseplants prosper in a temperature of 65°F to 75°F, but the humidity of the average home is too low to suit them. A plant prospers in relative humidity of about 50 to 60 percent, which is more than most people like. This can be helped by using a humidifier or by setting the pot on a tray of moist gravel or pebbles. Do not allow the water to touch the bottom of the pot, as the water would then be wicked into the potting medium and keep the plant too wet.
Watering
More houseplants succumb to improper watering than from any other single cause. In general, most houseplants need to be thoroughly watered and then allowed to nearly dry before the next irrigation. Use tepid water when watering houseplants. Enough water needs to be poured over the potting medium to allow water to drain freely through the drain hole at every watering. If water does not drain out the bottom, rewater until it drains freely. Never leave a houseplant standing in water, as this will cause the roots to rot.
Drainage
Drainage is an integral part of watering a plant. Do not include aggregates in the bottom since the aggregate actually slows water’s movement through a pot. If a decorative, drainless pot is desired, it would be better to use a “pot within a pot” technique: pot the plant in a container with drain holes and then set that into the larger, decorative pot. Never allow excess water to collect in the outer pot.
Potting Medium
Consult your local garden center, greenhouse, or florist for help selecting an appropriate potting medium. It is important that the potting medium has good water holding capacity yet is loose enough to promote good drainage and aeration.
Fertilizers
The easiest way to fertilize your houseplants is while watering. Select a houseplant fertilizer and dilute according to label directions. Houseplants can be fertilized at every watering with a very dilute rate or fertilized at a slightly higher rate once every third or fourth watering. Do not fertilize as often or as much in the winter, in dimly lit rooms, or in potting mixes that contain soil.
For more information about growing and maintaining houseplants see OSU Extension Fact Sheet HLA-6411 Houseplant Care.
Protecting Spring Bulbs from Squirrels and Other Critters
If you haven’t planted your spring flowering bulbs yet and have had problems in the past with critters destroying your plants, here are a few suggestions to protect them this winter.
Squirrels and rodents cannot resist digging their teeth into the juicy bulbs we so conveniently place in the ground for them each fall. Though our intention is not to feed wildlife, this can be the ultimate fate of many flower bulbs. An easy trick can help protect bulbs over the winter to ensure abundant spring blooms. The tool of choice is hardware cloth with ½ inch openings.
To make use of this trick, dig out a small planting bed, rather than plant each bulb individually. Remember that proper planting depth is important. The general rule is to plant bulbs at a depth equal to 3 times their height. Your mulch layer should be included in the final depth of your bulbs.
Dig a bed a few inches wider on all sides than the intended bulb planting and set the bulbs. Remember to place them with the growing tip pointing up. Once all the bulbs are set, begin filling the bed with soil until the bulbs are covered, but do not completely fill the planting bed.
Stop adding soil an inch or two below grade. Place the hardware cloth over the planting area, securing the edges in the soil with stakes. Finish filling the planting area with soil and mulch. The wire will prevent animals from digging up your bulbs, but the openings are wide enough to allow the foliage and flower stalks of the bulbs to move freely through.
If your bulb problems are caused by burrowing rodents such as gophers, you may need to line the bottom of the area with hardware cloth too. Another trick is to construct small boxes or baskets out of hardware cloth and place the bulbs inside. Then plant the entire cage in the ground. This method is also useful if you are trying to squeeze bulbs in among perennials and don’t have room to dig a larger planting bed.
Deer find tulips to be a delicacy; once tulips emerge in spring, keep new growth sprayed with repellents, or where feasible use a fence around the area. Fences need to be at least 8 feet high to keep deer out.
Critters do not find all bulbs to be delicious and even avoid some. Consider planting a less favored bulb in the landscape, such as daffodils, muscari, hyacinth, scilla or fritillaria.
Gypsum Improves Clay Soils - A Garden Myth
It is a common gardening myth that adding gypsum to clay soils will help loosen the clay and make growing conditions better. However, there is no scientific basis or research to support the claim. One speculation on how this myth may have come about is that perhaps an enthusiastic homeowner heard that some gypsum would be a good source of sulfur (which it is) for plants. Since gypsum was only a few dollars a ton, the gardener probably purchased a pick-up load of the off-white-colored material for the garden. After spreading it, the gardener would have found it necessary to till it in many times to get it thoroughly mixed and restore the soil to its original color. The gardener may have experienced the greatest crop in years and attributed this to the gypsum. More likely the garden benefited from the good deep tillage occasionally needed to break up hard pans or compacted layers of soil that form at the normal tillage depth. The high rate of gypsum served as a good marker, or indicator of when the job was done. Gypsum does have a place in the landscape as an amendment for correcting sodic or alkali soils but does not really contribute to improving clay soils.
Caring for Pansies Through the Winter
Courtney Myers, Assistant Extension Specialist
Pansies, and the closely related Johnny-jump-ups, are a delightful addition to the winter landscape. In a season where the landscape is dominated by browns and grays, pansies can add a lively pop of color. The plants thrive in cool weather and are hardy to roughly 20°F. If well maintained, pansies will continue adding color well into the spring.
Pansies (Viola x wittrockiana) are available in many different colors and often feature different bloom markings. Pansy cultivars are often sold as part of a series, offering a range of colors with the same general flower form and growth habit. When mixing pansies in a planting, it’s best to stay in the same series to maintain consistency. Johnny-jump-ups (Viola tricolor) are closely related to pansies and have similar maintenance characteristics. They differ from pansies by having smaller but more frequent flowers.
For plantings, choose an area with well-drained soil that receives full sun to part-shade. Mix a slow-release fertilizer into the soil at planting time. Water thoroughly after planting. Follow with a layer of organic mulch such as cedar chips, pine bark, or pine straw. The mulch will help limit weed growth, retain soil moisture, and provide insulation during extreme cold.
Pansies are relatively easy to care for after they’re planted. Supply additional irrigation if rainfall is less than 1” per week. Be cautious of overwatering, as this can encourage root rot. Deadheading, or removing spent flowers, encourages more blooms throughout the winter season. As the weather warms up, a complete fertilizer can be added so that plants have a strong finish in the spring. Avoid overapplying nitrogen-only fertilizer, which can cause plants to become leggy.
If extreme cold (<20°F) is in the forecast, it is advisable to add further insulation to pansy plantings. Water pansy plantings and then cover with a blanket, overturned pots, or additional mulch. Remove the covering as temperatures return to average winter conditions. If pansies are planted in pots, move them to a protected area during harsh cold snaps.
Ornamental kales and cabbages pair nicely with pansies and can overwinter if protected. For an especially showy spring display, plant tulip bulbs among your pansies.
Cool-Season Cover Crop Options for Oklahoma Vegetable Producers
Tyler Mason, Ph.D.
Cover cropping over winter is a valuable management tool in vegetable production systems. It affords the producer a number of benefits including:
- Preserving topsoil, which may otherwise be susceptible to high winds;
- Improved soil quality via increased organic matter, soil aggregation, and moisture retention;
- Weed competition;
- Increased available nitrogen in the soil, if you incorporate a legume.
Approximate Seasonal Timeline (Cool-Season)
- Nov. 1 (or a week-two before): Seed via drill or broadcast methods.
- Feb. 25: Terminate cover at least three weeks before planting using a flail mower. Flail mowers chop/shred cover into small mulch pieces.
- Figure 1. Shows the shredded mulch after using a flail mower.
- Mar. 10: Disk harrow the remaining cover.
- Mar. 25: Rototill and bed shape.
Approximate Time Investment
- Nov. Planting takes about 2-3 hours/acre.
- Feb. Flail mowing takes about 2 hours/acre.
- Mar. Disking takes about 1 hour/acre.
- Mar. Tilling takes 4 hours/acre.
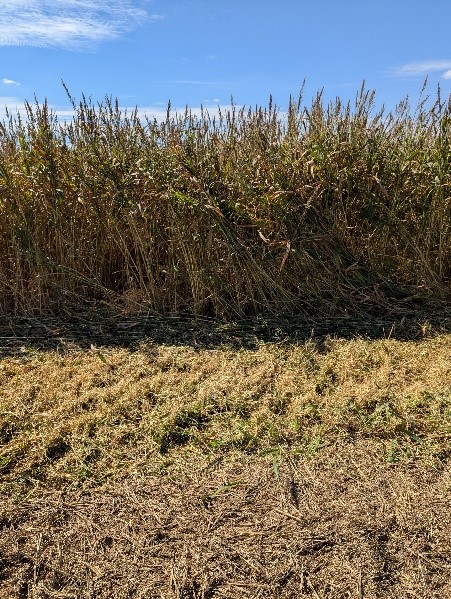
Figure 1. Sorghum Sudan grass terminated with a flail mower (Sept. '25)
| Cover | Season | Depth | Drilled Rate (Pounds/Acre) |
Broadcast Rate (Pounds/Acre) |
Cost/Acre |
|---|---|---|---|---|---|
| Rye | Cool | 1-2" | 60-120 | 90-150 | $35 |
| Wheat | Cool | 1" | 60-120 | 60-150 | $22 |
| ‘Dixie’ Crimson Clover | Cool | 0.5-1" | 10 | 12 | $25 |
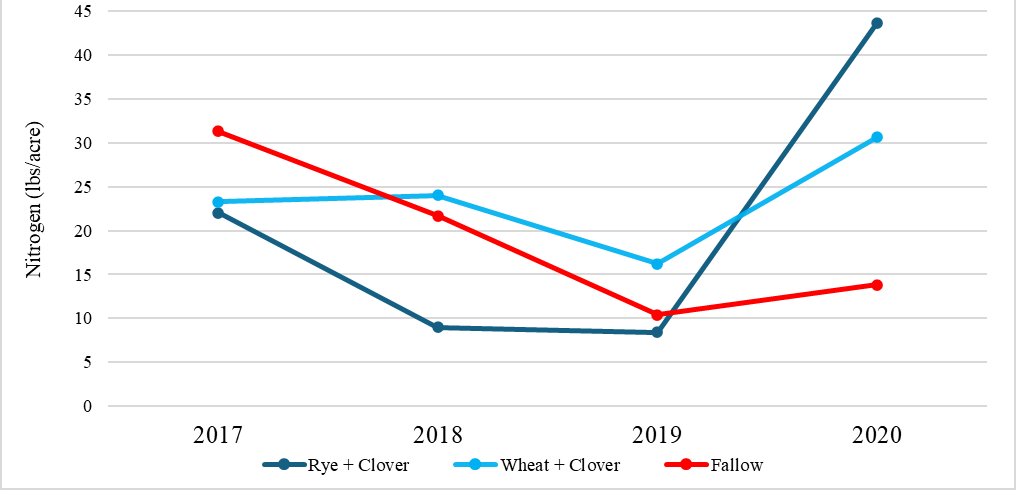
Figure 2. A Comparison of Nitrogen Changes Over Time in Cool-Season Clover Plated and Fallow FIelds in Perkins, OK