Using Google EarthTM for Mapping and Assessing Grazeable Land
Key
Estimating total grazeable land in an operation is key for sustainable management. However, on-site measurements of grassland area among woodlands, water sources, and buildings can be a slow, laborious, and costly process. Thankfully, new online tools available to the public can facilitate this process. Google Earth is a geographic browser that uses satellite imagery, aerial photography, and geographic information systems to represent Earth as a 3D globe. It has been widely used for many years for searching, marking, and finding directions to any location in the world. Its high imagery resolution, achieved in the last few years, also allows producers to easily distinguish buildings, grasslands/pastures, woodlands, and water sources on their own land. This feature combined with others tools available on the “Pro” version, such as calculating acreage of custom areas (i.e. shapefiles), enables producers to use Google Earth as a grazing management planning tool. The objective of this factsheet is to describe specific tools available in Google Earth Pro and to demonstrate how to use them to estimate grazeable land of specific pastures without any field measurements.
Downloading and Installing Google Earth Pro
The first step is to download and install Google Earth Pro for PC or Mac, which is available for free downloading.
For downloading and installing:
- Access: https://www.google.com/earth/download/gep/agree.html
- Click on "Agree and Download"
- After downloading the setup file, start the installation process by clicking “open” at the file link located at the low right corner of your browser
- Allow the software to install on your computer by clicking "Yes"
Getting to Know Google Earth Pro
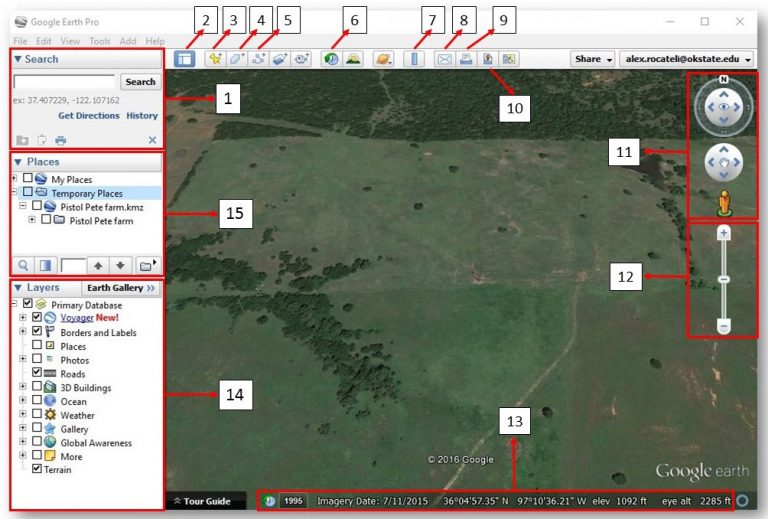
The following diagram shows some features available in Google Earth Pro Version 7 main window (Figure 1). Selected tools in the software which are useful to our goals, i.e., map and assess grazeable land, will be described here. For a complete tutorial, access the Google Earth Help Center by clicking on “Help” and selecting “Help Resources” from the Google Earth Pro dropdown menu.
Figure 1. Overview of main Google Earth Pro Version 7 window.
Google Earth Pro contains the following features (Figure 1):
- Search panel - Use this to find places and directions and to manage search results. Google Earth may display additional tabs here.
- Hide/Show sidebar - Click this to conceal or to display the side bar which contains Search (1), Places (15) and Layers (14) panels.
- Placemark - Click this to add a placemark for a specific location of interest for future retrieval.
- Polygon - Click this to delineate a specific area of your property such as pastures, building, woodlands, and water resources.
- Path - Click this to add a path (line or lines). This is very useful for estimating the traveled distance between two locations. Keep in mind that the traveled distance does not necessarily have to be a straight line; therefore, this tool might be more appropriate than the Ruler (7) in some cases.
- Image overlay – It will allow to select all available satellite imagery from later dates. This feature can be used to search for recent changes in agricultural lands.
- Ruler – Click this to measure the linear distance between two points or the perimeter and area of a polygon or circle.
- Email – Click this to email a screenshot image, shapefile, or placemark to other recipients.
- Print – Click this to print the current view of the main window.
- Save image – Click this to save your current view of the main window as a PDF file.
- Navigation controls – Use these to tilt and move around your viewpoint. Also, explore the street view feature by clicking and dragging the “pegman” (i.e., the featureless orange figure) to the place of interest.
- Zoom controls – Zoom in or out by clicking “+” or “-“. This feature can also be performed by spinning the wheel button of the mouse.
- Current view info – Data are displayed from left to right: 1) year of oldest available imagery, 2) date of the displayed imagery, 3) latitude and longitude, and 4) elevation.
- Layer panel – This contains a variety of points of interest such as map, road, terrain, building data, etc., arranged in layers. Check or uncheck boxes to either activate or deactivate points of interest.
- Places panel – This contains all placemarks (3), polygons (4), path (5) and ruler measurements (7) saved by the current user for future retrieval. All saved data can be organized in folders/sub-folders.
Estimating Grazeable Land Using Google Earth Pro
Steps:
- Look for desired pasture by typing the closest mailing address in the Search Panel (1) and locate it by using the Navigation (11) and Zoom (12) controls.
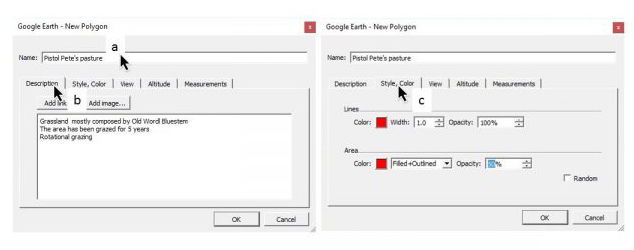
- Click on the polygon (4) icon and a "New Polygon" window will pop up (Figure 2)
- Write the land name at the top field "Name" (Figure 2.a).
- Important land information such as vegetation type and previous management can be inserted in the "Description tab" for future reference (Figure 2.b).
- Change either the lines and area color, opacity, and line width for the polygon/area
at tab "Style, Color" (Figure 2.c). This is very helpful for identifying each area
as grazing land, woodland, water resources, etc.
Figure 2. New polygon window
- Outline the area by clicking in the imagery:
For creating polygons: place the cursor at one of the pasture edges, mouse left click, move the cursor to the next edge, mouse left click, again. Repeat this until the area of interest has been outlined
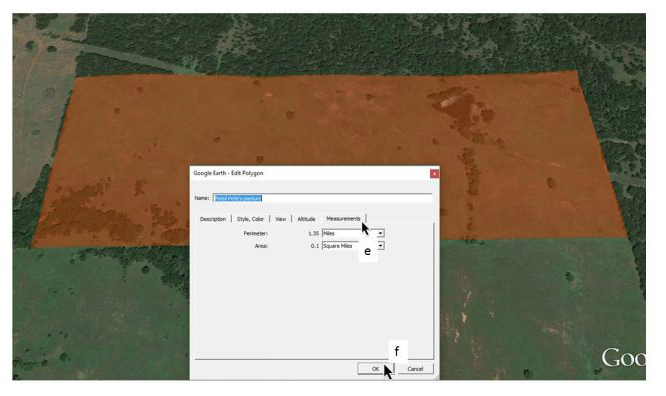
For creating free shapes: Place the cursor at one of the pasture edges. Click and hold left mouse button, the cursor will change, to an up arrow, then move the mouse around the field edges while holding down the right mouse button. drawing until the starting point binds with the ending point. - Return the cursor to the polygon window after finishing. Click on the “Measurements” tab (Figure 3. e) for assessing the perimeter and area of the polygon. Click the dropdown icon to change the units.
- Click the "OK" button to save the outlined area to he Places Panel (15) (Figure 3.f).
Figure 3. Measuring area using the polygon feature.
- Draw the total land and all the land sections that are not grazeable, such as woodland,
water resources, and buildings using steps 2a – 2f. It is recommended to create free
shapes for woodlands and water sources. Also, use different colors for each land category.
For instance, total land in orange, woodland in green, water resources in blue (Figure
4).
Figure 4. Organizing and retrieving all created shapefiles.
- Organize the saved areas in folders and subfolders in the Places Panel (15). To create a sub-folder, right click in any Places Panel folder and select “Add” then “Folder” from the dropdown menu (Figure 4).
- Retrieve the area of each land section by right clicking in saved polygons in the Places Panel (15) and select “Properties”. The “Edit Polygon” window will open. This window is similar to the “New Polygon” window described in Step 2 (Figures 2 and 3). Click on the “Measurement” tab for assessing the area for this specific land section (shapefile).
- The final step is to subtract all non-grassland subsections from the total land section which will give us the total grazeable land. This can be done using a simple calculator or an Excel spreadsheet.
Final Considerations
An accurate assessment of grazeable area is the first step for sustainable management in a grazing operation. Using Google Earth, based on the steps outlined in this fact sheet, can achieve this. The next step is to estimate forage availability. The Web Soil Survey developed by Natural Resources and Conservation Systems provides access to the largest natural resource information system in the world, including soil type and potential grass production. This online tool can be combined with Google Earth Pro to estimate total available forage for a specific location. To learn how to use the Web Soil Survey for estimating forage availability, access the factsheet: CR-2597: Assessing Potential Forage Production Using the NRCS Web Soil Survey at: CR-2597 Assessing Potential Forage Production Using the NRCS Web Soil Survey.
Alex Rocateli
Forage System Extension Specialist
Laura Goodman
Range Extension Specialist


 Figure 2. New polygon window
 Figure 3. Measuring area using the polygon feature.
 Figure 4. Organizing and retrieving all created shapefiles.