Design of Closed-loop Fumigation Systems for Grain Storage Structures
Effective control of insects in stored grain with phosphine requires exposing the insects to the appropriate concentration of fumigant for the correct amount of time. For wheat in Oklahoma, it is recommended that a phosphine concentration of at least 200 parts per million be maintained for 100 hours to kill all life stages of insects. Research has shown that in many applications, the fumigant is not evenly distributed and some parts of the grain bin receive less than the lethal dosage. This leads to ineffective fumigation and can also promote development of phosphine resistance in insects over time.
Phosphine gas tends to naturally diffuse through a grain bin, although several factors can lead to uneven distribution:
- Leaks allow phosphine out and fresh air in.
- Foreign material in grain can restrict fumigant movement to some areas of the bin.
- Large spaces require more time for fumigant to diffuse throughout the bin. Low temperatures slow phosphine release and diffusion rates.
To overcome these factors, the following measures are often employed:
- More phosphine pellets/tablets are used in an attempt to attain the minimum dosage in all parts of the bin.
- Applying phosphine pellets/tablets throughout the grain with grain probes or by adding pellets/tablets while turning the grain.
These measures cause increased material and/or labor costs and can increase risks to workers from exposure to fumigants and entry into enclosed spaces. Unnecessary turning of grain incurs shrinkage costs due to kernel damage and moisture and grain loss.
Closed-loop Fumigation Systems
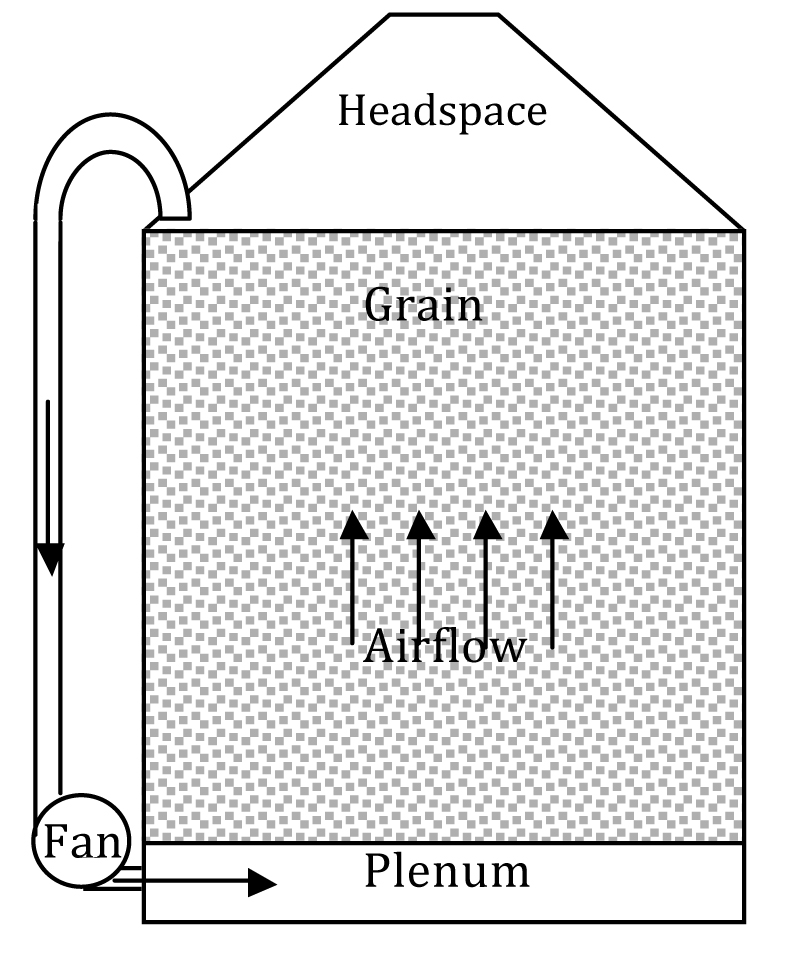
A closed-loop fumigation (CLF) system can be added to many grain storage structures to speed up the distribution of phosphine gas and make the concentration more uniform throughout. A drawing of a CLF system on a round grain bin is shown in Figure 1. For a typical closed-loop fumigation, aluminum or magnesium phosphide pellets or tablets are placed on top of the grain where they react with moisture in the air to produce phosphine gas (PH3). The CLF system uses a small fan to recirculate air/PH3 in the bin by drawing it out of the headspace and introducing it back into the bottom of the bin. There the fumigant passes through the perforated floor and into the grain mass. The fumigant passes upward through the grain until it enters the headspace where the cycle repeats. The CLF system is operated after the tablets/pellets are completely reacted. After several cycles through the bin, the fumigant is evenly distributed. Following the initial redistribution of air/PH3 the CLF fan is operated only when periodic monitoring shows the concentration of PH3; has become uneven.
At the end of fumigation, residual phosphine must be removed from the bin. If the bin is not equipped with an aeration fan, the CLF fan can be used to purge phosphine by disconnecting the fan intake duct and introducing fresh air into the bin. This will push fumigant out through roof vents and eventually the PH3 concentration will drop to safe levels.
Figure 1. CLF system on a typical round grain bin. Arrows represent airflow path.
Design of CLF Systems
Every grain storage facility is different and a designer must take many factors into consideration when designing a CLF system for a grain storage facility. The sections that follow suggest steps in the design of a CLF system and present example calculations and photographs.
Airflow Rate
When designing a CLF system for a grain storage facility, the first step is to determine the appropriate flow rate of air/fumigant through the structure. The flow rate of the CLF system should provide several air exchanges per day in the bin to ensure good mixing. The CLF flow rate can be calculated by dividing the volume of air in the grain bin by the desired air exchange time. The volume of air in the bin includes the air in between the grain kernels plus the air in the headspace above the grain and in any aeration plenums. If a bin is only partially filled or has a large headspace, as in the case of some flat storage facilities, the air exchange times will be longer for a given flow rate because the grain is not displacing air in the bin. For many bins, the headspace and plenum volume are small compared to the grain volume and can be ignored. In this case, recommended CLF airflow rates should be between 0.002 and 0.010 CFM/bushel of grain. These airflow rates result in air exchange times ranging between 4.2 and 0.8 hours respectively, as shown in Figure 2. These airflow rates are much less than recommended for aeration cooling of grain. Low airflow rates reduce pressure differentials across the grain, thus reducing leakage. Lower airflow rates also reduce capital and energy costs for the CLF system.
Figure 2. Air exchange time in stored grain for different CLF airflow rates. (Assumes grain porosity = 40%)
Example:
- Calculate the CLF airflow rate for a 36-foot-diameter round bin with sidewalls 32 feet high, similar to Figure 1. The bin has a perforated floor with a 1-foot high aeration plenum. The roof is conical and the peak extends 10 feet above the sidewall. Assume the bin is filled level with wheat to the sidewall height and we want an air exchange time of 2.5 hours (150 min):
Solution:
- Wheat volume: π x Radius2 x Height = Volume in ft3
3.14 x (18 ft)2 x 31 ft = 31554 ft3; or
31554 ft3 x 0.8 bu/ ft3 = 25365 bu
- Air in the wheat (assume 40% porosity):
31,554 ft3 x 0.40 = 12,622 ft3
- Plenum air volume: π x Radius2 x Height = Volume in ft3
3.14 x (18 ft)3 x 1 ft = 1,018 ft3
- Cone airspace: π x Radius2 x Height/3 = Volume in ft3
3.14 x (18 ft)2 x 10 ft x 1/3 = 3,393 ft3
- Total airspace is: 12,622 +1,018 +3,393 = 17,032 ft3
- CFM requirement is: 17,032 ft3 / 150 min = 113 CFM
A simplified calculation, ignoring air in the headspace and plenum, can be used here because the bin is mostly full:
- From Figure 2: an air exchange time of 2.5 hours requires a flow rate of 0.0033 CFM/bu
- Total flow rate: 0.0033 CFM/bu x 25,365 bu = 84 CFM.
- Therefore the CLF fan should provide a flow rate of about 100 CFM.
Airflow Path
After the airflow rate is determined, the next step is to determine the fumigant circulation path through the structure. The direction of air flow is generally not important although flow from bottom to top through the grain is most common. For bins with an aeration plenum or ducts at the bottom, as shown in Figure 1, the fumigant circulation path is fairly straight forward because it usually makes sense to use existing equipment. In flat storage facilities or concrete silos without aeration, the design of the airflow path can be more challenging. The injection point(s) into the grain mass should be located geometrically opposite the gas exit point(s). A sufficient amount of perforated area is needed to allow the fumigant to freely exit the duct and enter the grain mass. The holes should be as large as possible, but not so large that grain falls through. For minimum pressure loss the total open area of the perforations should be one square foot per 300 CFM of airflow. If less open area is provided, an engineer should calculate the static pressure developed across the perforated duct.
In a concrete elevator the air/PH3 injection point can be through a manhole cover (Figure 3) or unloading spout (Figure 4) near the bin bottom. The fumigant can exit the silo at the top through either a manhole cover (Figure 5) or a vent fitted to accept the suction hose from the CLF fan. A concrete elevator typically has multiple grain bins. A single CLF fan can be connected to a distribution manifold (Figure 6 and Figure 7) that connects multiple bins. Individual bins can be isolated from, or connected to, the fumigation by opening and closing ball valves (Figures 3 and 4) at the entry and exit to each individual bin. These valves can also be used for pressure testing the ducts to detect leaks before fumigation. The CLF duct(s) from the top of the elevator to the bottom can either be routed through service shafts internal to the structure or on the outside.
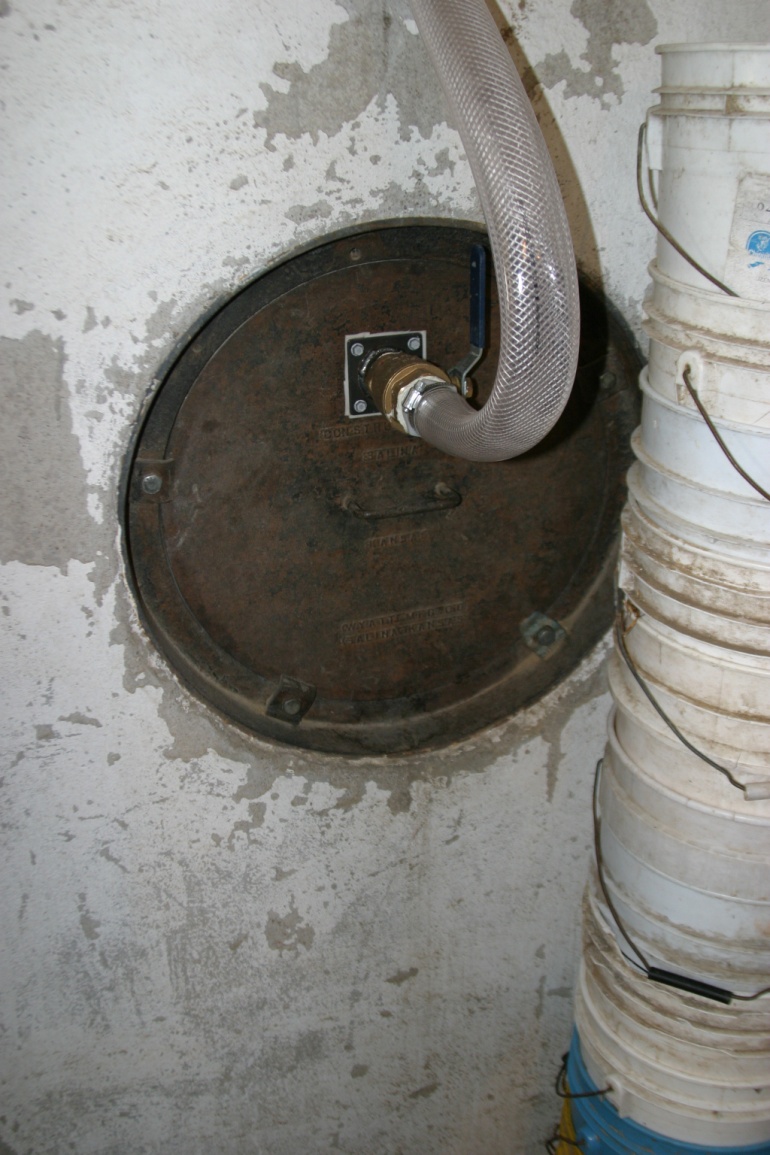
Figure 3. Manhole cover in concrete silo with CLF injection point and ball valve to isolate bin.
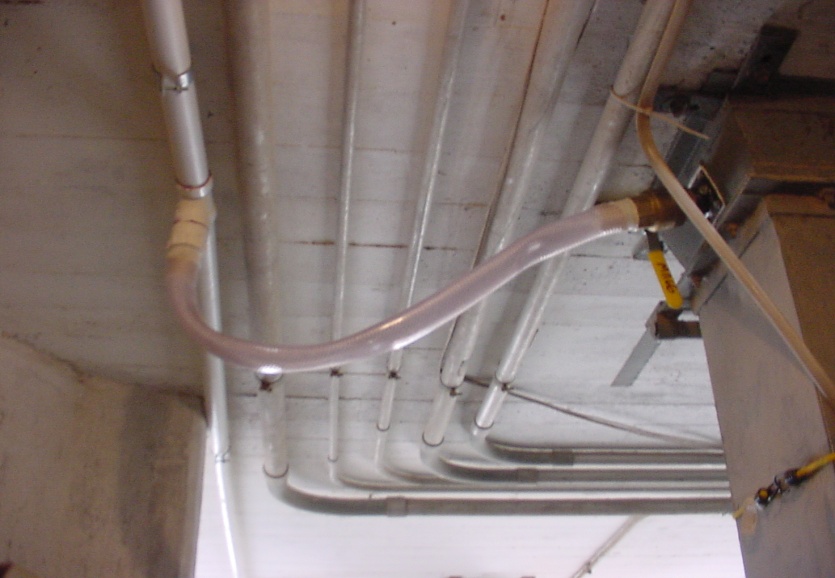
Figure 4. CLF injection point with ball valve into discharge spout of concrete elevator bin.
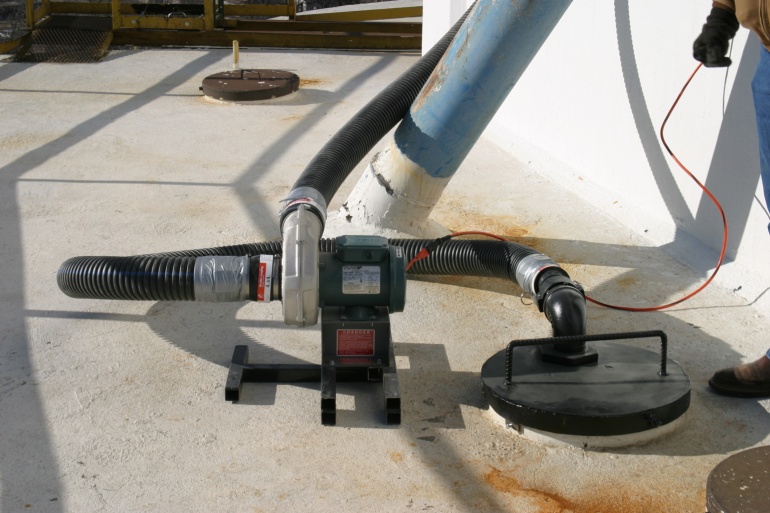
Figure 5. CLF fan pulling gas through manhole cover on top of concrete silo. Flexible corrugated drain hose is used for temporary connections.
For flat storage, injection of air/PH3 can be through perforated ducts buried at the bottom of the grain. The fumigant exits these ducts and then moves up through the grain into the headspace of the structure to be recaptured and recirculated by the CLF fan. Multiple injection locations are required for large flat storage structures to decrease the time required to evenly distribute phosphine. Spacing between injection points should be no more than the depth of the grain. Distance from the sidewalls to the nearest injection point should not exceed one half the grain depth.
CLF duct selection and routing
Permanently mounted CLF ducts can be made from PVC pipe anchored to the structure’s walls with commercially available pipe hangers (Figure 6). A wide variety of fittings, valves and attachment hardware are readily available for schedule 40 PVC pipe for routing ducts around obstructions and making distribution manifolds (Figure 7). Black plastic corrugated drain hose in 3-inch, 4-inch, and 6-inch diameters can be used where temporary flexible connections are required (Figure 5). For smaller diameter flexible connections, reinforced hoses can be used (Figures 3 and 4). Exposure to ultraviolet light from the sun can degrade PVC and other plastic duct materials over time. If this is a concern, the duct can be covered or painted per the manufacturer’s recommendations.
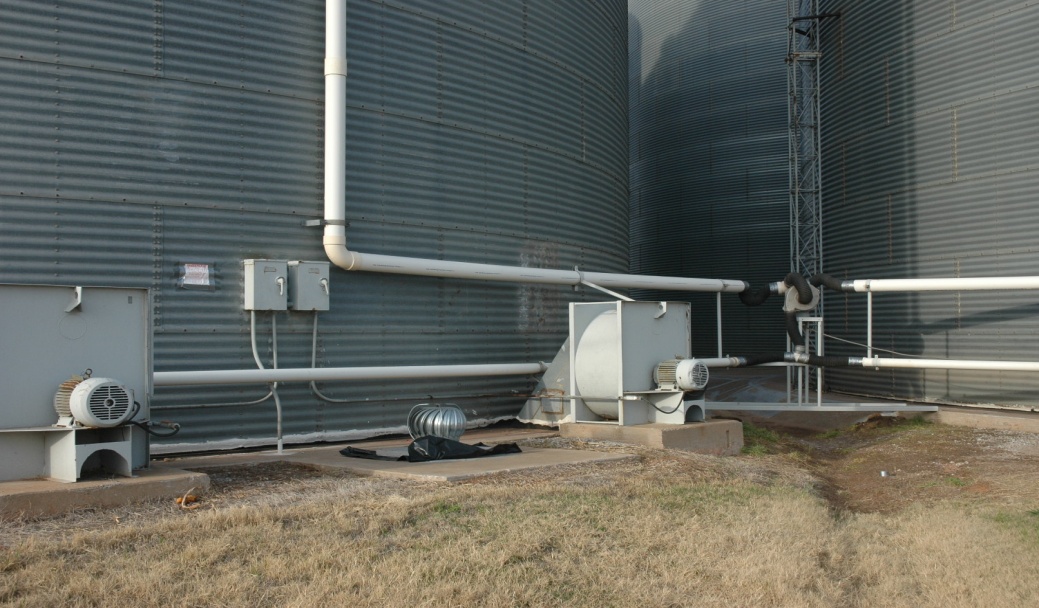
Figure 6. CLF system on steel bins.
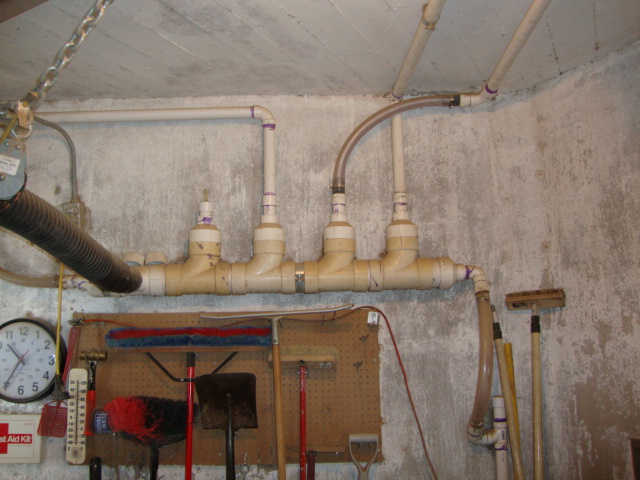
Figure 7. PVC distribution manifold for CLF system.
If the fan and other electrical components are located inside the bin or head house they must conform to explosion-proof design criteria. Mounting them outside in open air away from explosion hazards (Figure 5) can save on installation costs, but this may make duct routing more difficult and require shielding from the weather.
If the CLF system will be used to purge the bin at the end of fumigation, provisions in the duct system should be made to vent residual PH3 in a safe area. Furthermore, personnel should not have to enter hazardous areas to operate valves or other controls when purging bins.
Ducts should be sized to minimize cost of the entire CLF system. Smaller ducts have lower material costs and require less labor to install. However smaller ducts result in higher air velocities to get the desired airflow rate. Increased velocity increases resistance to airflow which in turn increases the power and cost of the fan.
Example continued:
- Propose a duct system for the 36- foot-diameter round bin with sidewalls 32 feet high similar to Figure 1.
Solution:
- A PVC elbow enters the bin on the roof near eave. From that elbow, a PVC duct runs down the side of the bin to the fan inlet. From the fan inlet, another PVC duct runs to the aeration fan inlet plenum, which is connected to the raised aeration floor. The total length of PVC duct is approximately 55 feet with three elbows. The diameter of the duct will be determined later.
Static Pressure Calculation and CLF Fan Selection
The CLF fan must overcome the static pressure of air flowing through the duct system and grain. Once the airflow rate, duct system, and airflow path have been determined, the static pressure can be calculated so a fan can be selected. Most of the static pressure will be due to resistance of air flowing through the CLF ducts. For typical CLF flow rates below 0.010 CFM/bu the static pressure through the grain is low and can generally be ignored for most installations. For higher CLF flow rates and/or very tall structures, the static pressure through the grain can be calculated from Fact Sheet BAE-1102, Aeration Systems for Flat-Bottom Round Bins or Fact Sheet BAE-1103, Aeration Systems for Cone-Bottom Round Bins or from the web based aeration calculator.
The static pressure of the ducts can be estimated by using the data in Table 1, which gives the static pressure through a 10-foot long PVC duct. Bends and fittings in the duct system cause additional static pressure in the system. To approximate static pressure due to fittings, it is suggested to add five feet of length for each fitting. More accurate estimates of duct losses can be calculated by an engineer or estimated using the calculator.
Table 1. Static pressure per 10 ft of PVC duct at different airflow rates.
| Flow rate (CFM) |
Static pressure per 10 feet of duct (inches of water) Diameter of PVC duct (inches) |
||||
|---|---|---|---|---|---|
| 2 | 3 | 4 | 6 | 8 | |
| 25 | 0.13 | 0.02 | 0 | 0 | 0 |
| 50 | 0.44 | 0.06 | 0.02 | 0 | 0 |
| 100 | 1.52 | 0.22 | 0.05 | 0.01 | 0 |
| 200 | 5.34 | 0.75 | 0.19 | 0.03 | 0.01 |
| 300 | -- | 1.57 | 0.39 | 0.06 | 0.01 |
| 500 | -- | 3.98 | 0.987 | 0.14 | 0.04 |
| 700 | -- | -- | 1.823 | 0.26 | 0.06 |
| 1000 | -- | -- | 3.506 | 0.49 | 0.12 |
| 1500 | -- | -- | -- | 1.03 | 0.26 |
| 2000 | -- | -- | -- | 1.75 | 0.43 |
| 3000 | -- | -- | -- | 3.69 | 0.91 |
| 5000 | -- | -- | -- | -- | 2.34 |
The CLF fan must be a sealed fan so phosphine gas does not leak out around the motor shaft. Plastic or aluminum blades and housings are recommended to reduce sparking potential and are chemically resistant to PH3. Centrifugal fans are the most common form of fan for CLF systems. These fans typically work most effectively for static pressures less than 12 inches of water.
Once the flow rate and static pressure are known, consult fan manufacturer datasheets to select a fan for the application. An estimate of the horsepower of the fan can be obtained using the following equation:
- Fan Horsepower = CFM x Ps ÷ 3200
where:
- CFM = airflow of CLF system
- Ps = static pressure in CLF system, inches of water.
Example continued:
- Calculate the static pressure of the proposed duct system for the 32-foot tall by 36-foot diameter round bin. Specify the fan for the CLF system.
Solution:
- The total length of PVC duct is approximately 55 ft with three elbows. To account for static pressure due to the fittings, assume total length is 70 feet. Use Table 1 to calculate static pressure for 2, 3 and 4 inch ducts. The table values are for a 10 foot section of duct thus they need to be multiplied by 7 for the 70 foot duct.
For a 2 inch duct: 7 x 1.52 =10.64 inches of water
Fan power is 100 CFM x 10.64 / 3200 = 0.33 hp
For a 3 inch duct: 7 x 0.22 = 1.54 inches of water
Fan power is 100 CFM x 1.54 / 3200 = 0.05 hp
For a 4 inch duct: 7 x 0.05 = 0.35 inches of water
Fan power is 100 CFM x 0.35 / 3200 = 0.01 hp
- A centrifugal fan that can overcome the 10.64 inches of water static pressure from the 2-inch duct may require an expensive fan. For the 3-inch duct, fan power is low and the 1.54 inches of water static pressure matches well with small centrifugal fans such as the Cincinnati Fan PB-8 series housing. The 4-inch duct further reduces static pressure and power, but the extra cost of the larger duct will likely offset any savings from a lower cost fan. Thus, use the 3-inch PVC duct system and look for a fan that can deliver 100 CFM at a static pressure of 1.54 inches of water.
Sealing bins for leaks
Phosphine loss during fumigation in a grain bin is primarily due to pressure differences between the outside and the inside of the bin. If a bin has leaks in a place with a pressure difference, fumigant will either be pushed out or fresh air pulled into the bin. These pressure differences arise from a variety of sources:
- Blowing wind creates high and low pressure areas around the outside of a grain storage structure.
- Temperature differences and composition of the air change the gas density which can lead to pressure differentials in different regions of the bin. Warming and adding moisture to air both reduce the density of air and cause it to tend to rise in a bin. This can create higher pressures in the headspace and lower pressures in the bottom of grain bins. Cooling and/or drying the air in the bin has the opposite effect. Phosphine gas has a density very close to air so its effect on overall density is generally small.
- A CLF system, like the one shown in Figure 1, can increase leakage because it moves air through the structure by pressurizing the plenum at the base of the bin and creating a partial vacuum in the headspace. Air containing phosphine will be pushed out through any openings in the pressurized regions of the bin. Fresh air will be pulled into the grain bin in the areas of partial vacuum.
The rate of fumigant loss is dependent on the number and size of leaks, and on the locations of the leaks. A leak in an area with a high pressure differential is more serious than a leak in an area where the pressure difference is small.
Thorough sealing of a grain bin is important for all fumigations. All openings in a bin: access hatches, ventilation openings, filling spouts, and unloading augers should be sealed. In addition, cracks and gaps in the walls and roof, seams, and joints should also be sealed to prevent fumigant from escaping.
There are several ways to identify leaks in a grain bin. Smoke from a smoke generator inside the bin will escape through leaks in the bin. On a windless day, the escaping smoke can be used to identify leaks. Light entering the darkened interior of a bin through gaps and cracks is another way to identify leaks. A pressure test can be used to estimate the leakage rate of a bin, and in some cases, locate leaks. It is always better to discover and correct leaks before starting fumigation.
Sealing of grain storage facilities can be divided into permanent and temporary sealing. Permanent sealing can remain on the bin at all times. It includes sealing around the base of the bin, aeration fan motor connections and ducts, seams and holes due to missing hardware, and the unloading equipment auger, drag conveyors etc. Permanent sealing conserves fumigant and also excludes insects and water from entering the structure between fumigations. Materials for permanent sealing include caulking, expandable closed cell foam, and wood, plastic and metal barriers.
Figures 8 through Figure 14 demonstrate various permanent sealing techniques on grain storage structures.
Temporary sealing occurs at time of fumigation and is removed when the fumigation is complete to allow routine access to the bin and grain. It is typically done at the aeration fan intake, bin entry doors, manholes, top ventilation openings and the downspouts and auger entry points. Materials for temporary sealing include 6 mil polyethylene film, duct tape and spray adhesive. Figures 15 through Figure 19 illustrate application of these materials in preparation for a fumigation.

Figure 8a.
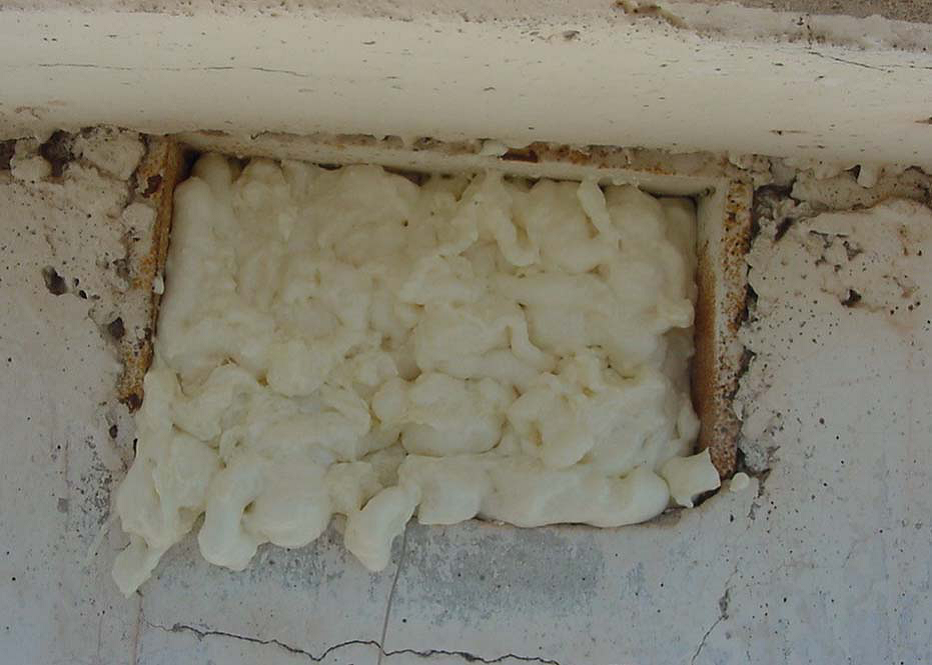
Figure 8b.
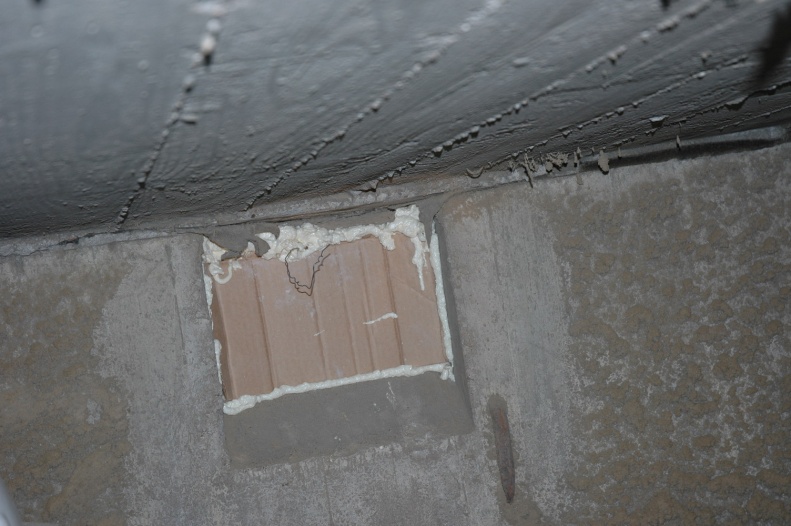
Figure 8c.
Figure 8a-c. Sealing concrete silo top vents with closed cell expandable foam. Interior cardboard support is temporarily held in place with wire while foam is applied from outside.
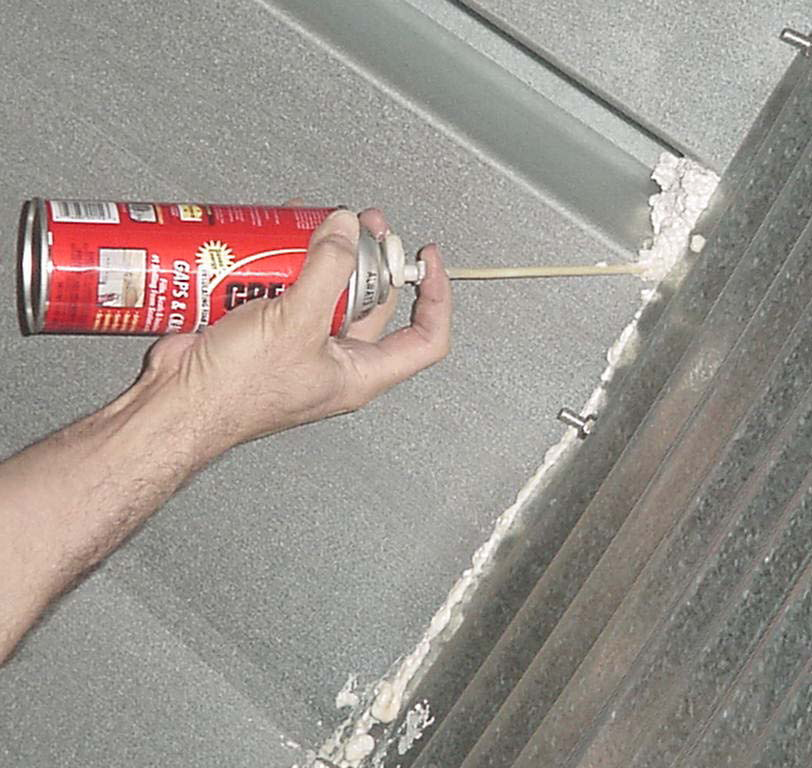
Figure 9. Bin roof and sidewall seam sealed with silicone caulk and closed cell foam.
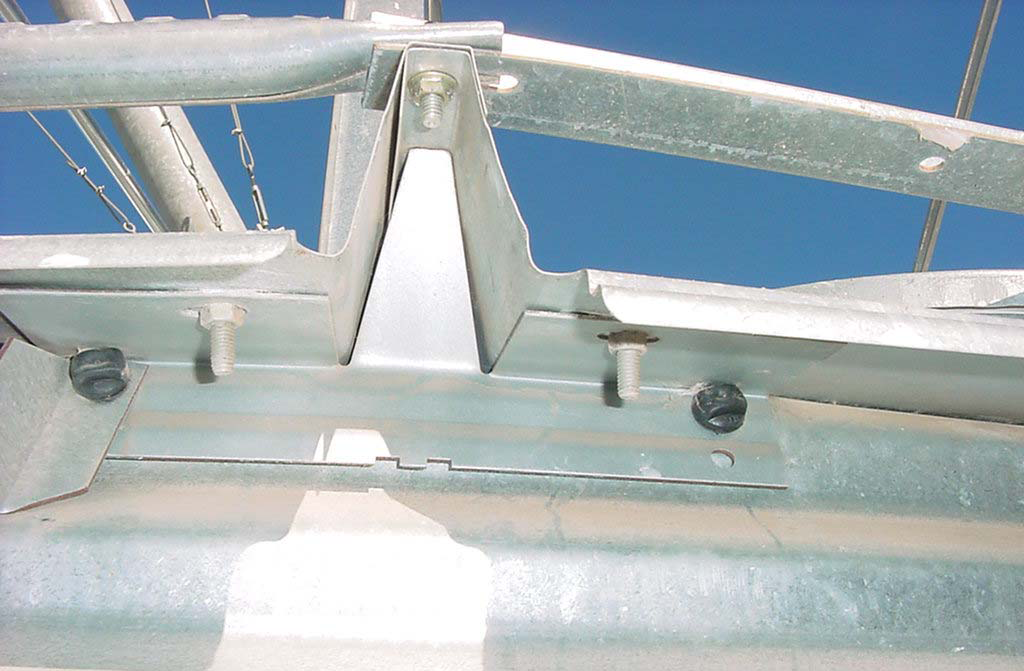
Figure 10. Roof panel stiffening rib fitted with a metal plate. Caulk cracks around the edges of the plate from inside or outside the bin.
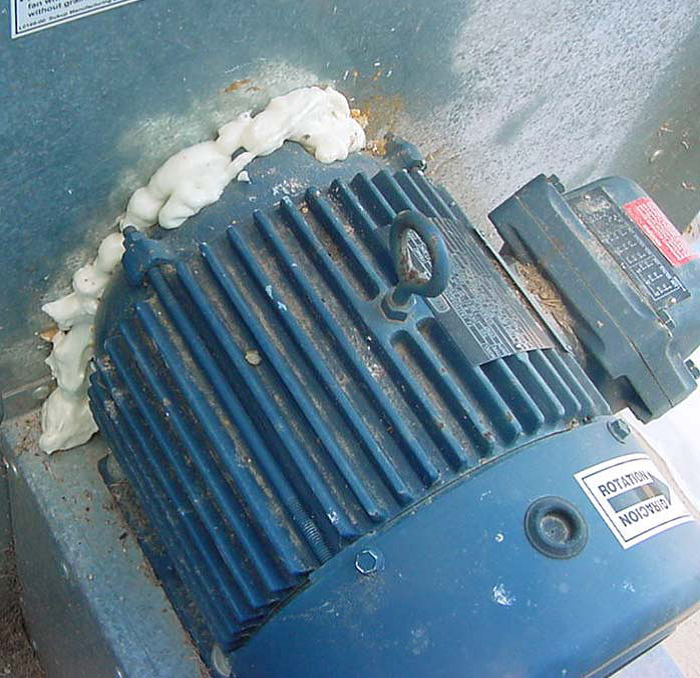
Figure 11. Aeration fan motor housing to fan enclosure sealed with expandable foam.
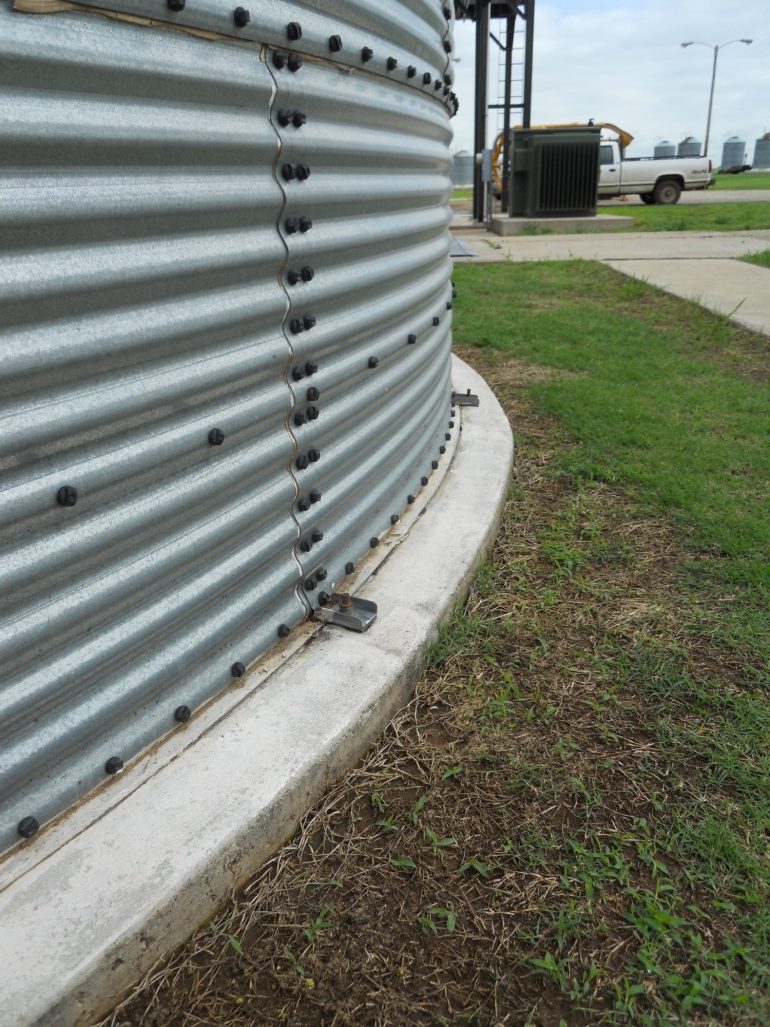
Figure 12. Base of bin sealed with elastomeric sealant.
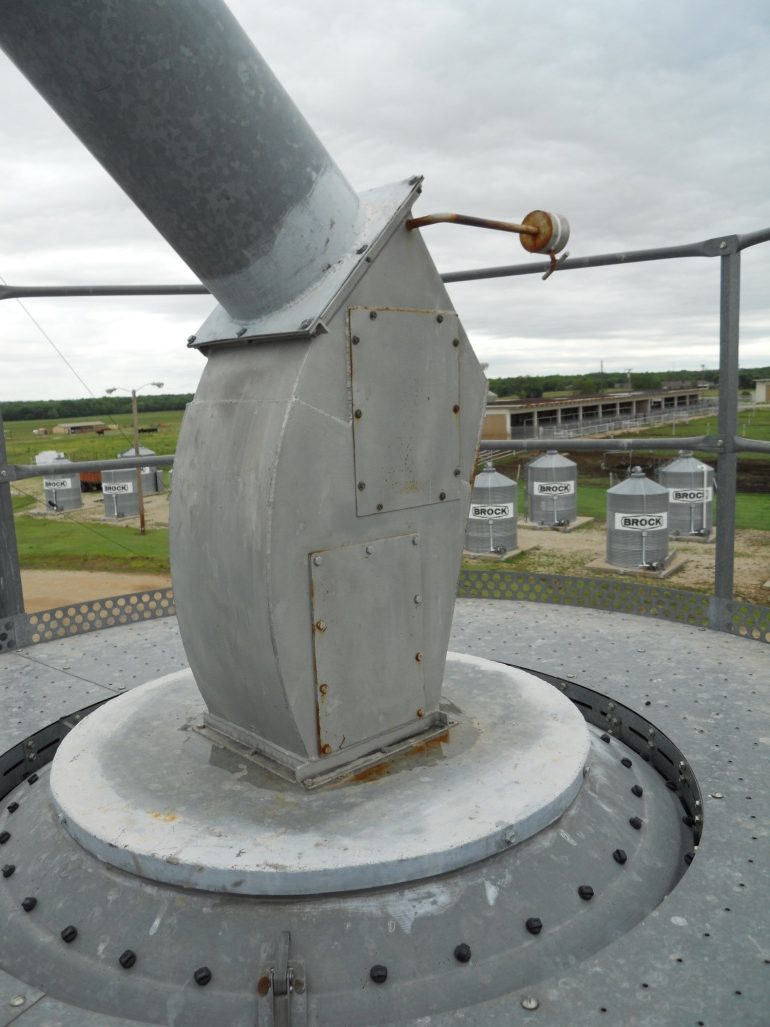
Figure 13. Fill spout equipped with a self-closing door to reduce leakage up the leg. Seam where fill spout attaches to top of the bin needs to be caulked also.
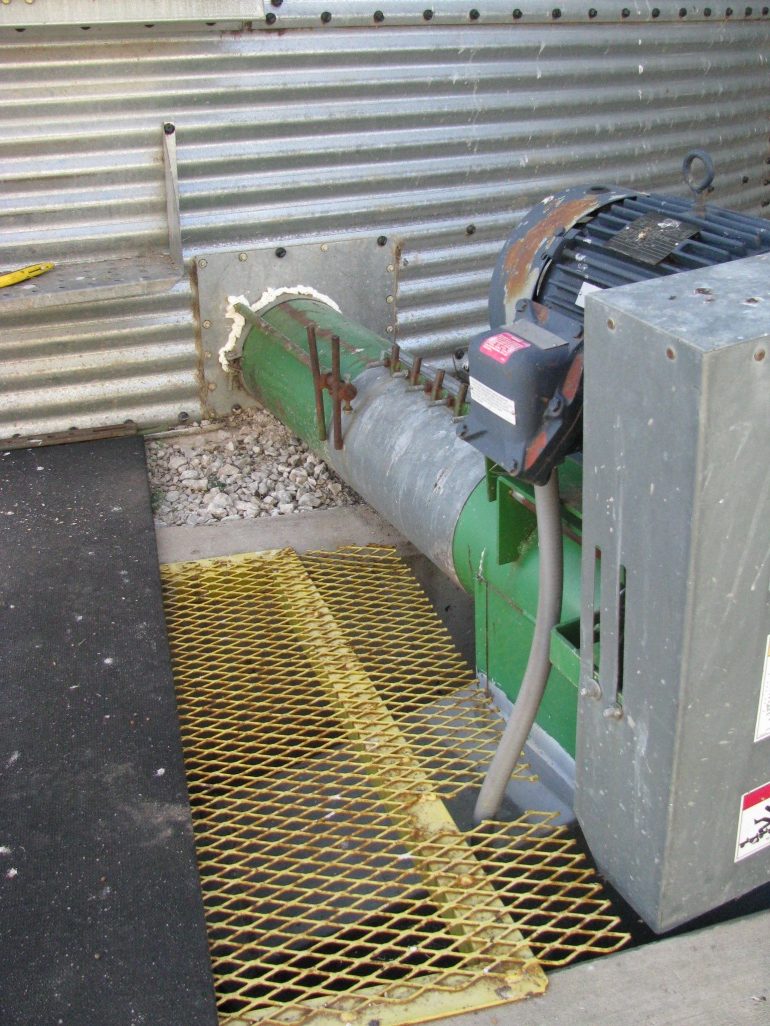
Figure 14. Unloading auger with permanent sealing on bin penetration and temporary sealing on slide gate push rod opening.
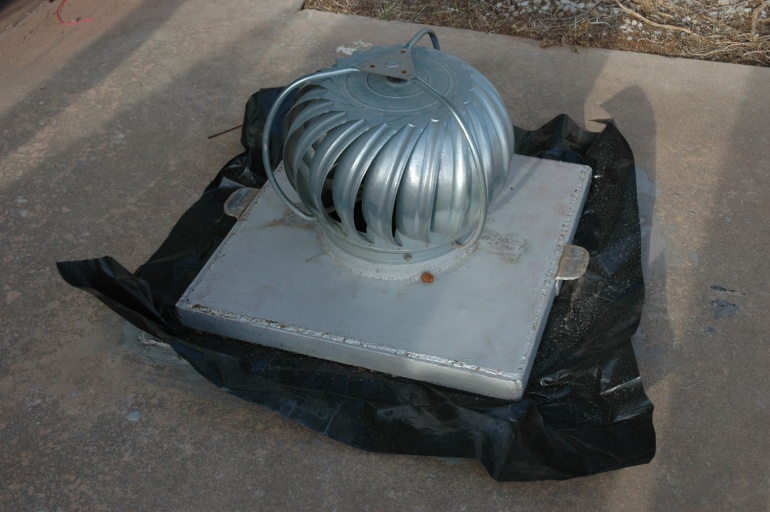
Figure 15. Temporary sealing of ventilation hatch using polyethylene film.
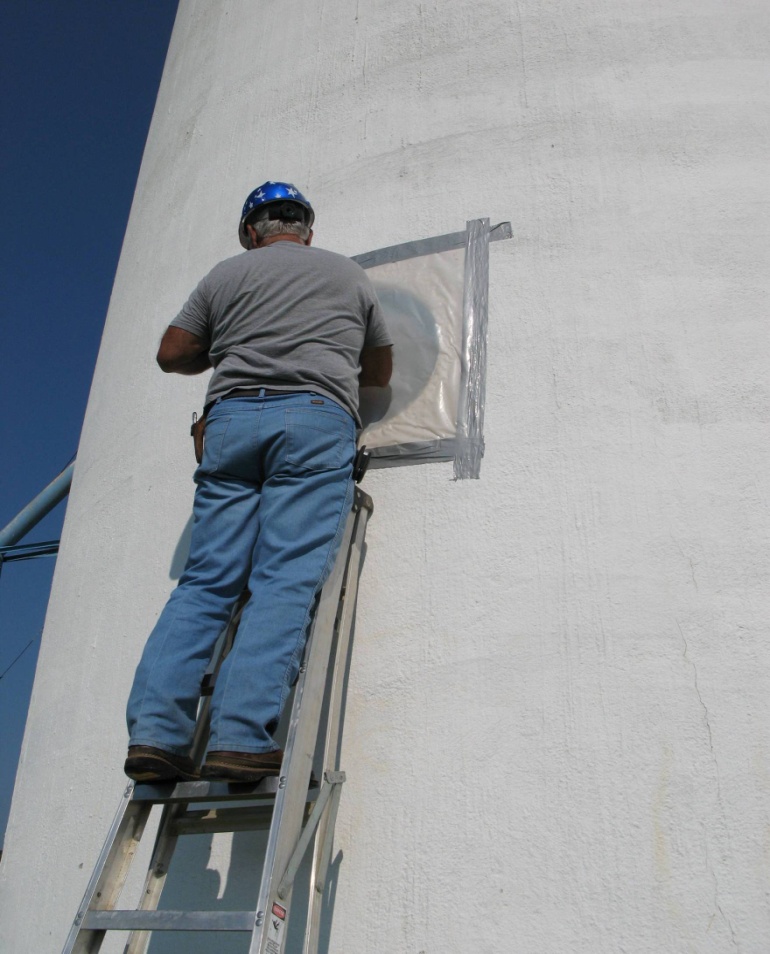
Figure 16. Temporary sealing of hatch on concrete silo prior to fumigation.
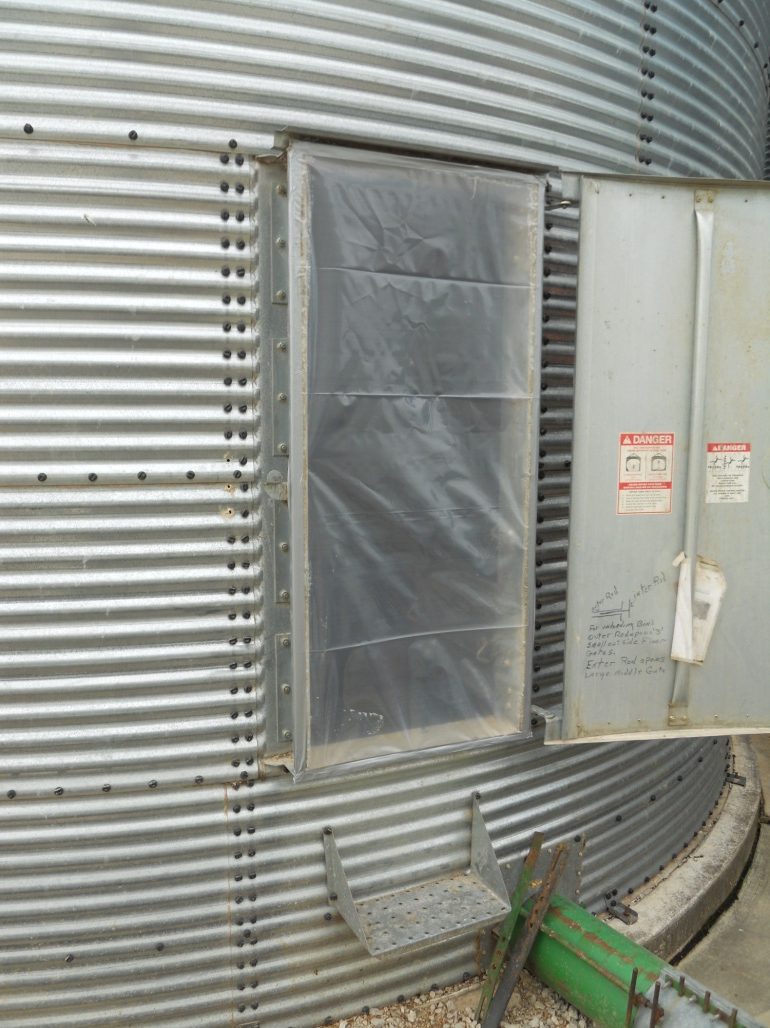
Figure 17. Access door sealed with polyethylene film and duct tape.
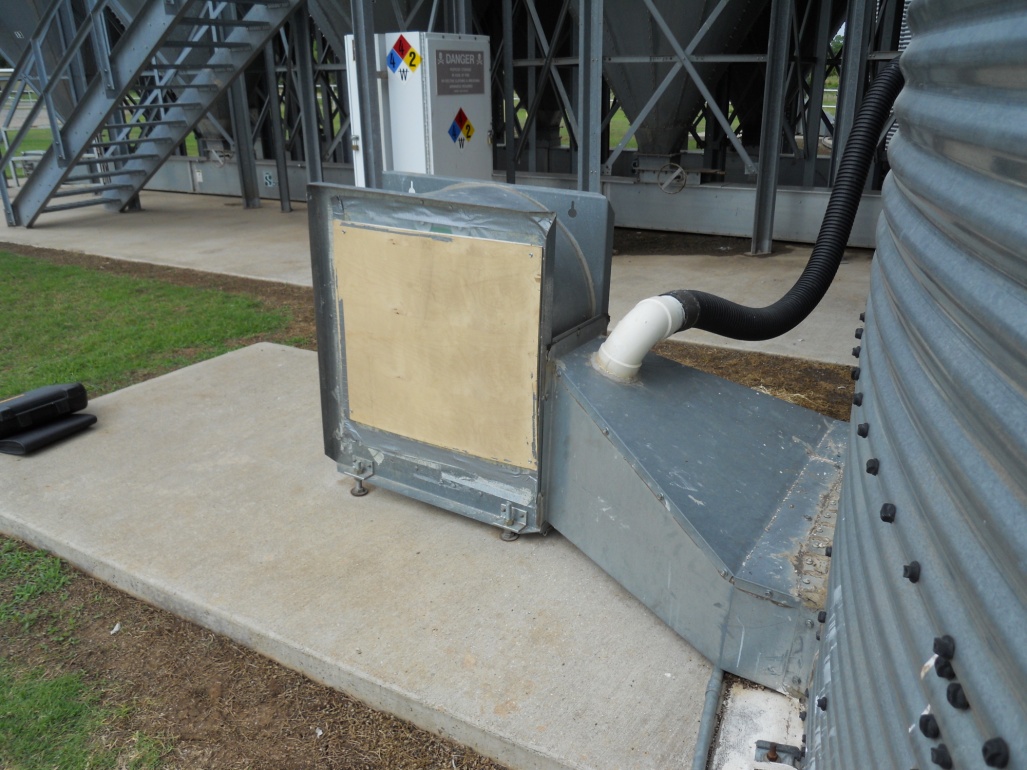
Figure 18. Aeration fan intake sealed with polyethylene film and duct tape. A plywood support panel is secured over the fan opening to protect the polyethylene film from wind damage.
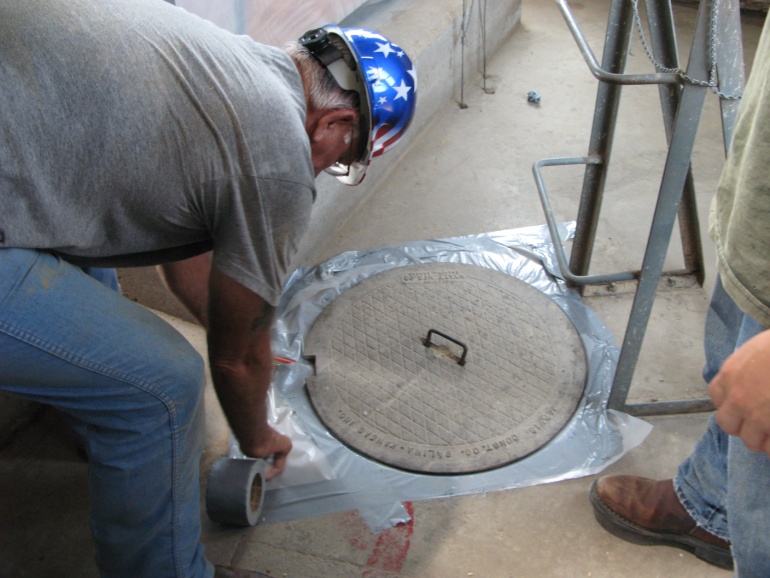
Figure 19. Sealing manhole cover with polyethylene film in a concrete elevator.
Additional information and examples for sealing grain storage structures can be found at OSU’s Stored Products Research and Education Center website:
Safety
Fumigation is only to be conducted by specially trained and licensed personnel. It is important to follow all label requirements for all fumigations. All fumigations must be carried out using industry standards and regulations. Extra cautions with CLF systems:
- Periodically inspect the CLF system for leaks. The ducts can be pressure tested if appropriate valves are included in the installation.
- Protect CLF equipment and ducts from damage by installing appropriate guards and by locating away from high traffic areas.
- Maintain access to CLF fan power and system controls.
- If the CLF system is located in an area with explosion potential from grain dust, explosion proof electrical components must be used.
References:
Noyes, R., Navarro, S. & Armitage, D. (2002). Supplemental Aeration Systems. In The Mechanics and Physics of Modern Grain Aeration Management, 413-488 (Eds S. Navarro and R. Noyes). Boca Raton, Fl: CRC Press.
Carol Jones
Assistant Professor, Stored Products Engineering
James Hardin
Research Engineer
Edmond Bonjour
Extension Entomologist, Stored Products

