Three Designed Birdhouse Plans for Eastern Bluebirds
Nest boxes are frequently used by Eastern Bluebirds (Fact sheet NREM-9005, Oklahoma Gardening Episode #4403). Listed in this fact sheet are three birdhouse designs for bluebirds.
Birdhouse Design Principles for Eastern Bluebirds
The birdhouses for Eastern Bluebirds can be designed in many styles. But general guidelines should always be followed to fit the needs of Eastern Bluebirds.
Dimensions and Entry Hole
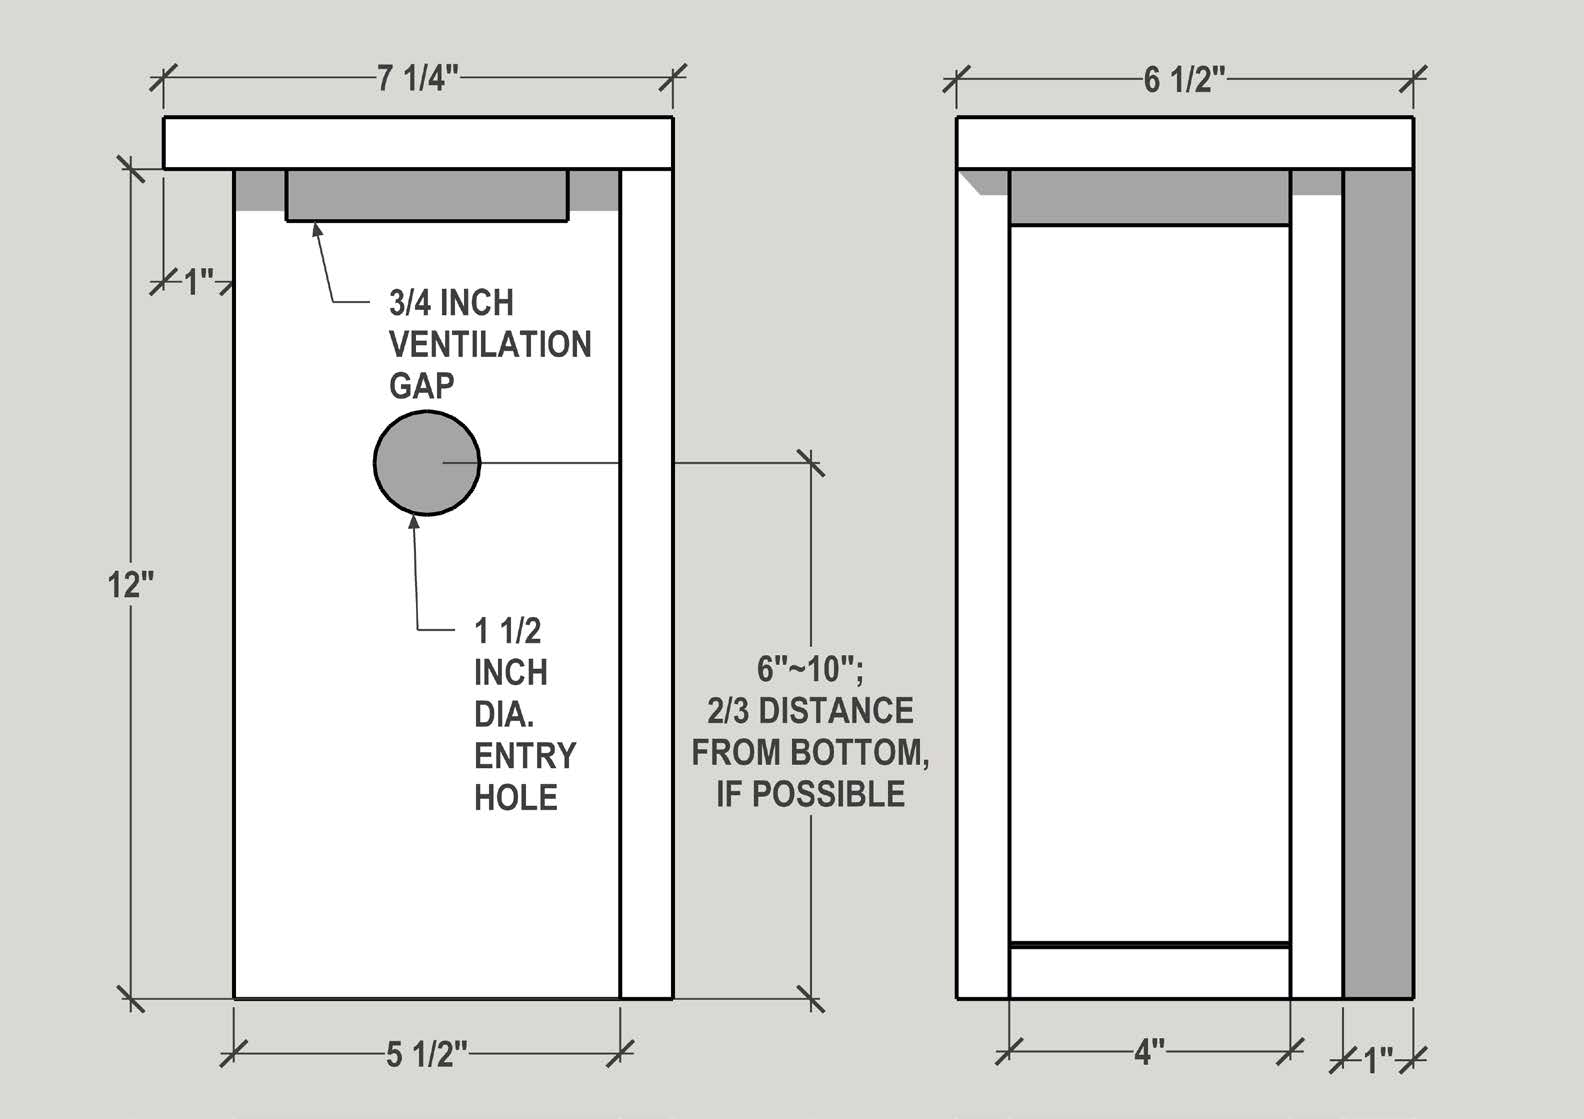
Eastern Bluebirds can use a relatively small birdhouse with an interior floor space of minimum 4 inches wide by 4 inches deep with a height of approximately 12 inches. This gives the birds plenty of room to nest in and raise their young, yet not too big to allow larger species to invade them.
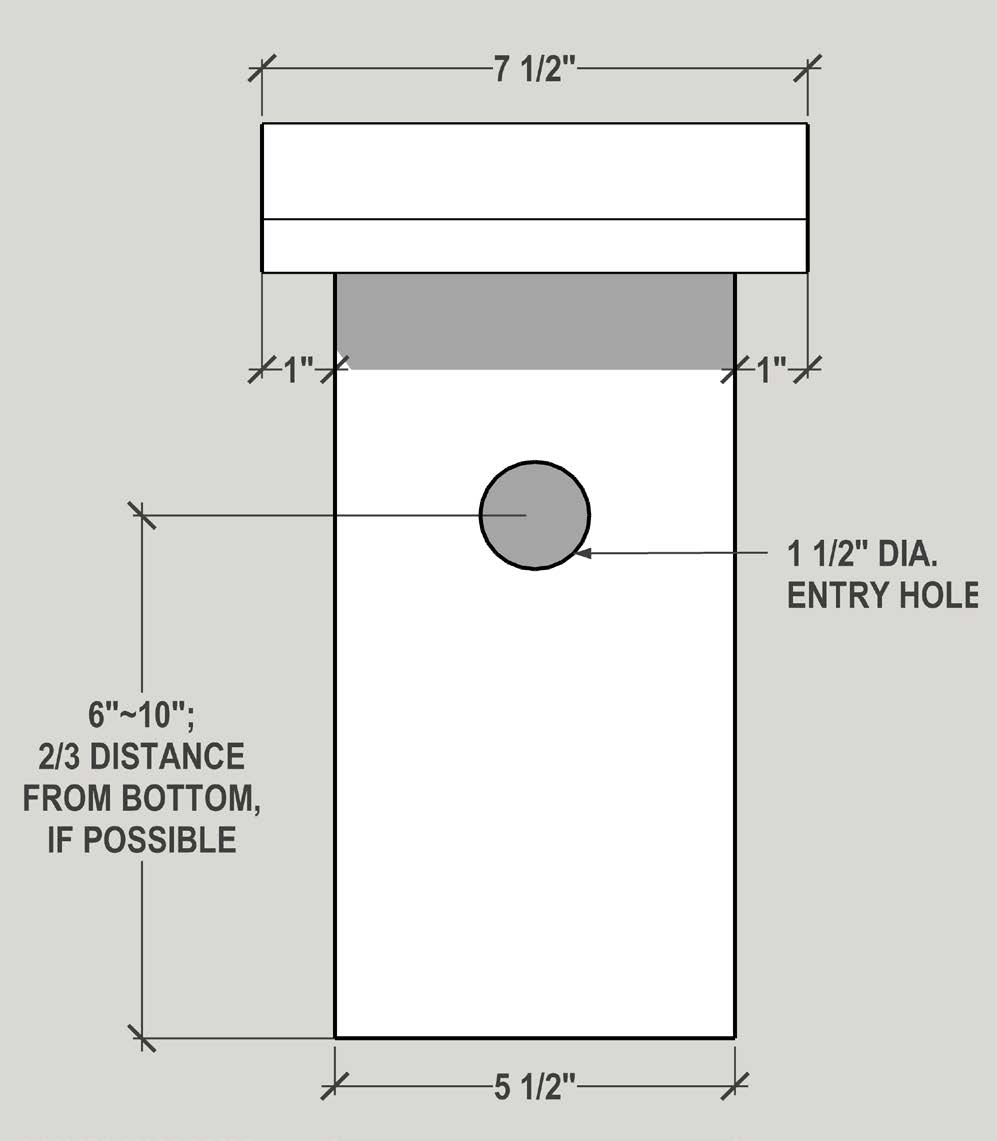
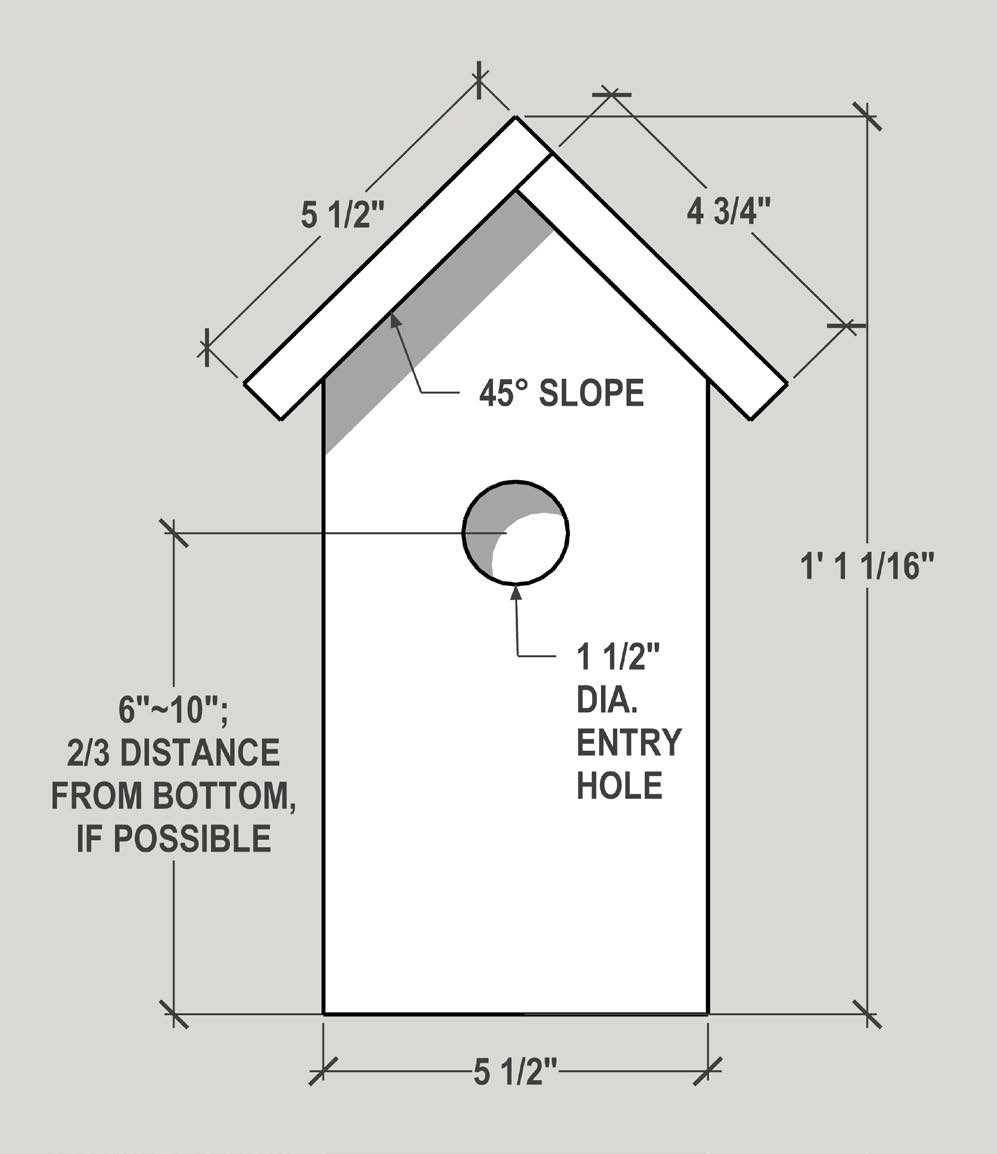
Since Eastern Bluebirds are cavity nesters, they like a hole to serve as access for the birdhouse. The hole should be 1½ inches in diameter and 6 to 10 inches from the bottom of the house. Placing the hole at about two-thirds distance from the bottom will achieve the ideal visual aesthetic based on the design theory of English painter John Thomas Smith's rule of thirds.
Roof and Bottom Drainage
- The box roof should provide adequate coverage and be well-sealed.
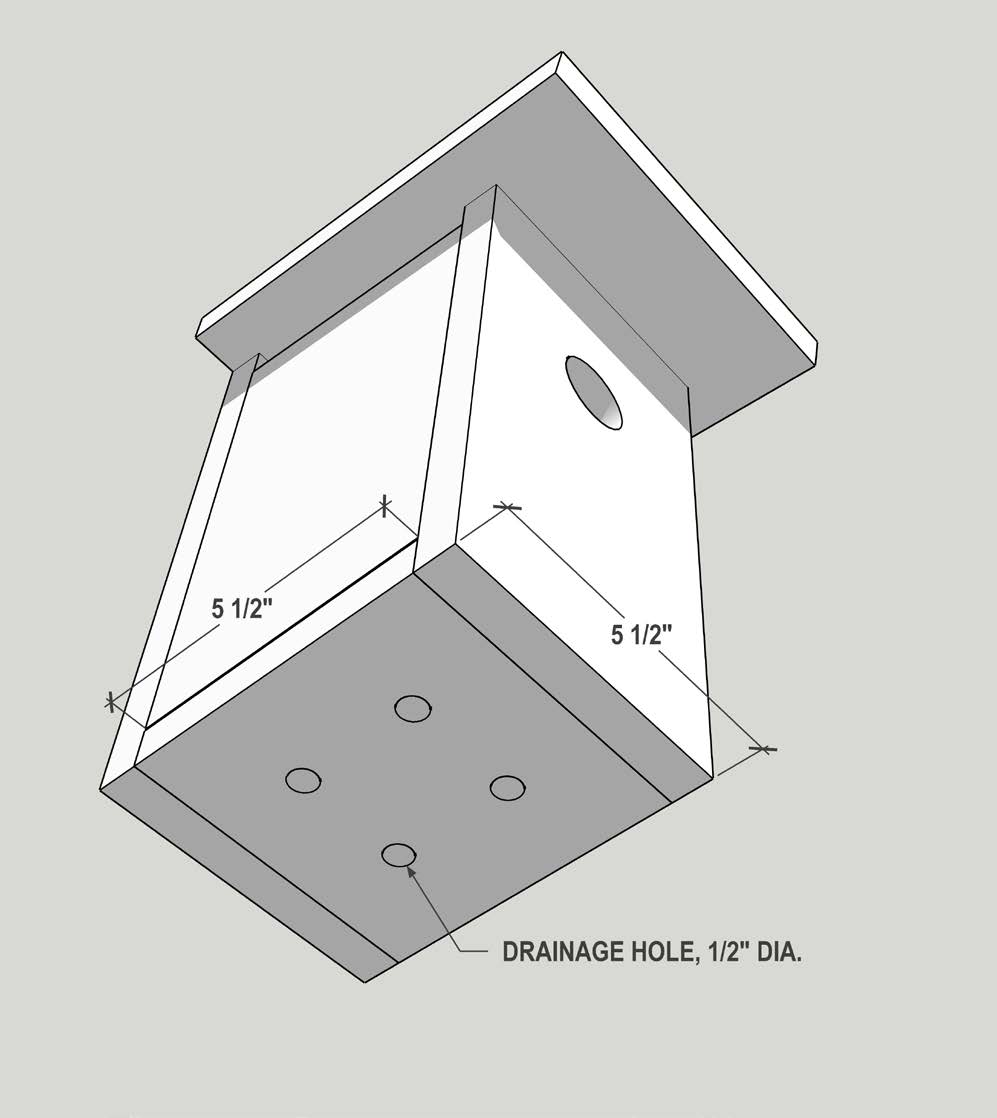
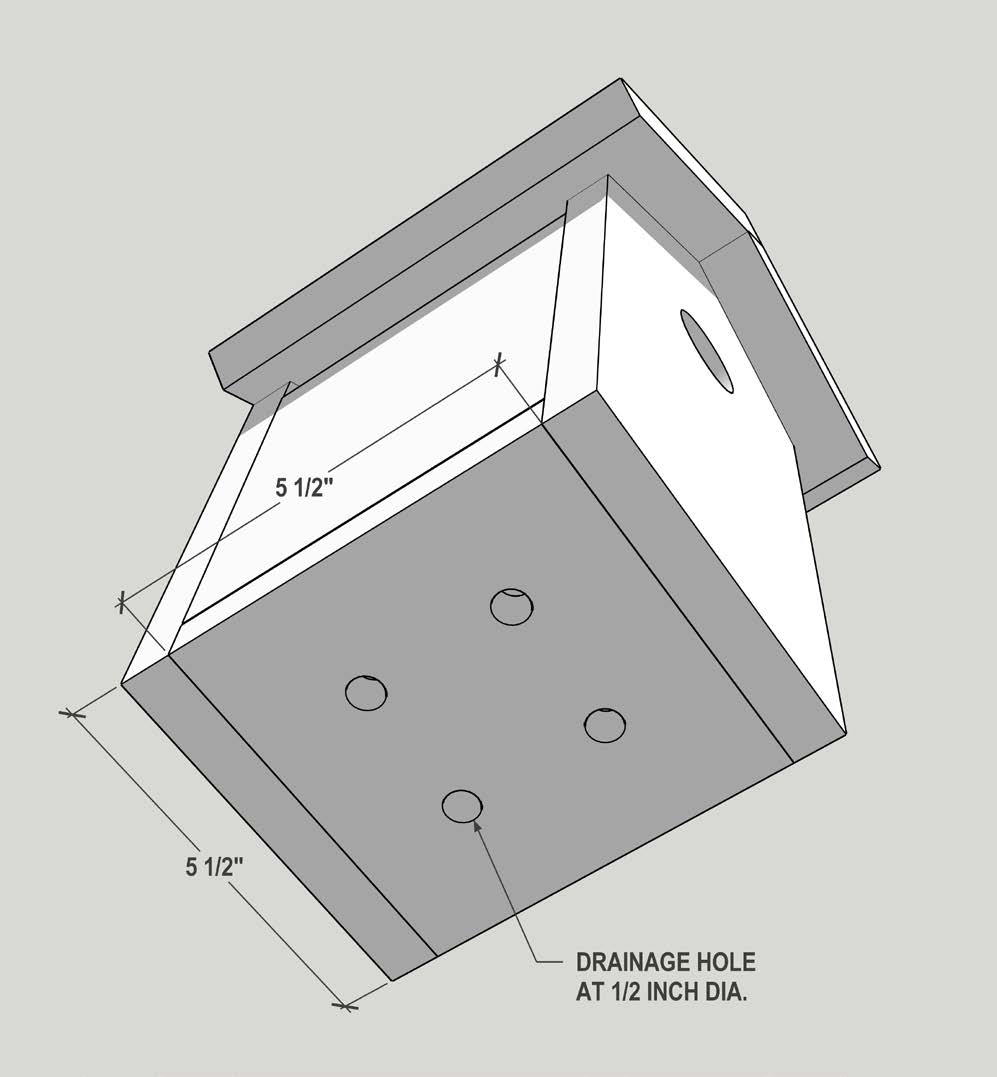
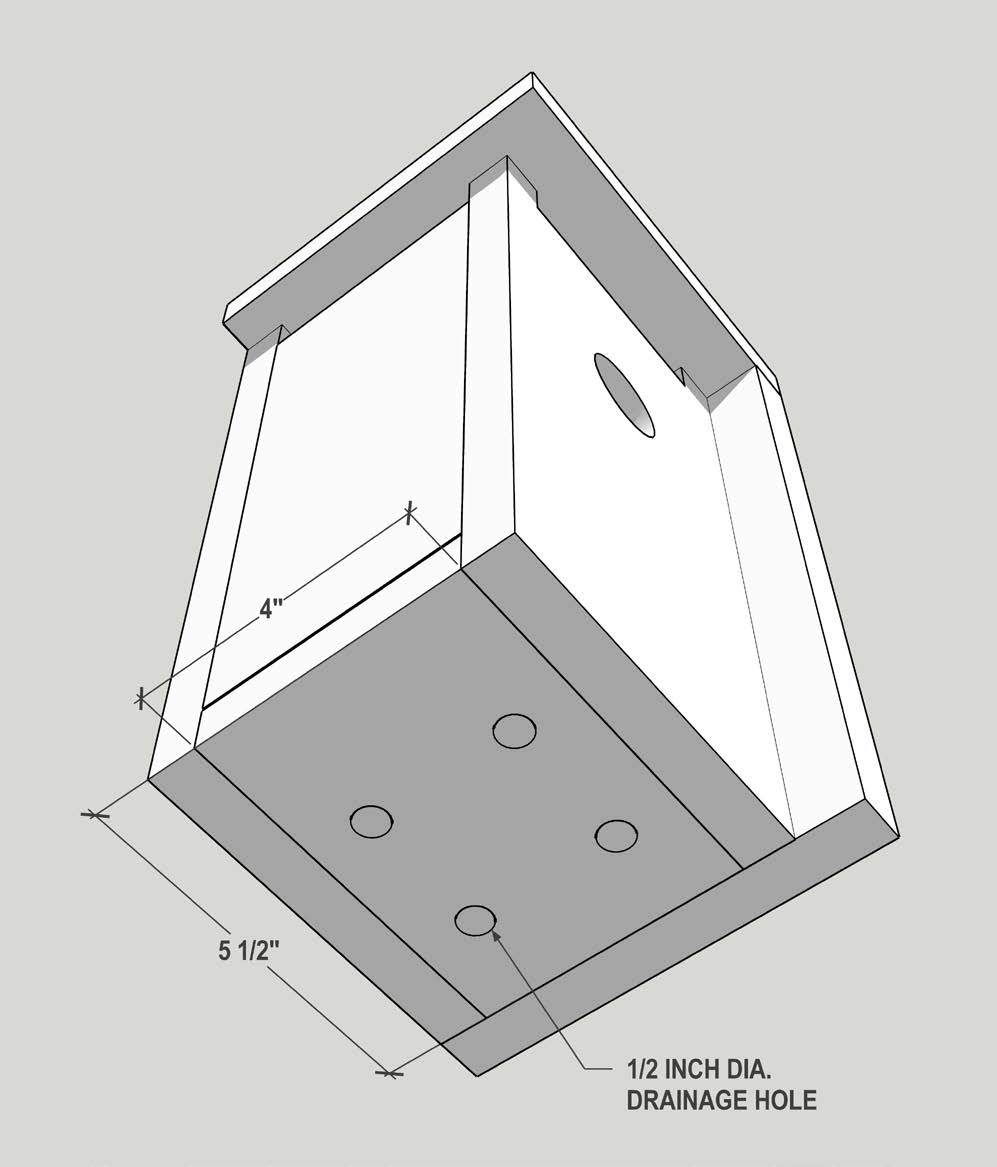
- 4 to 5 small drainage holes (³/8 to ½ inches in diameter) should be on the bottom floor in case water gets in the box.
Ventilation and Front Wall
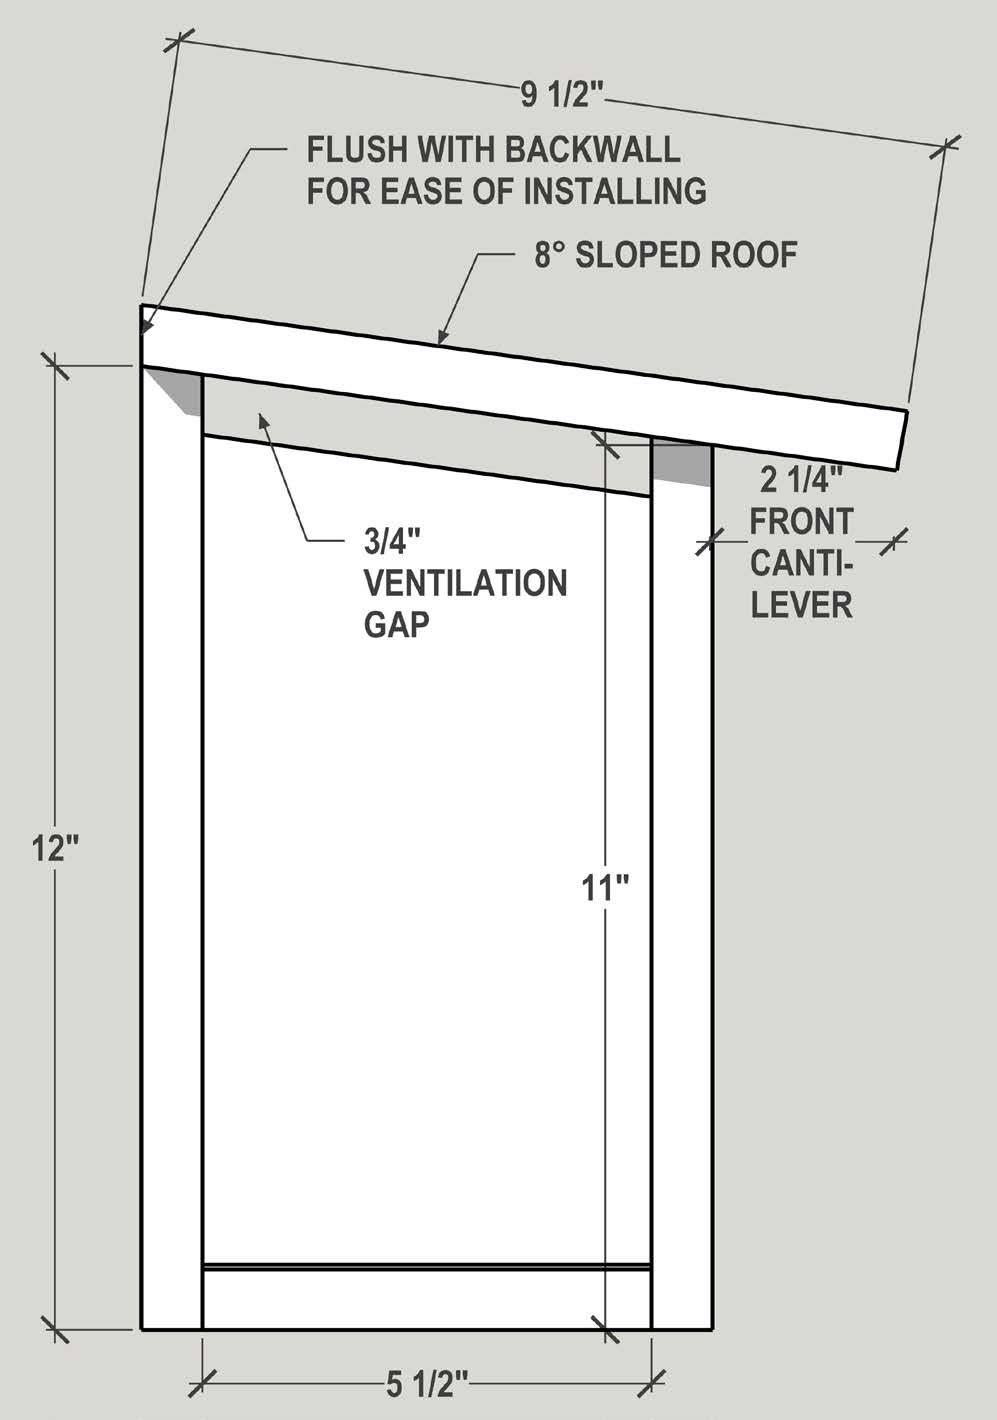
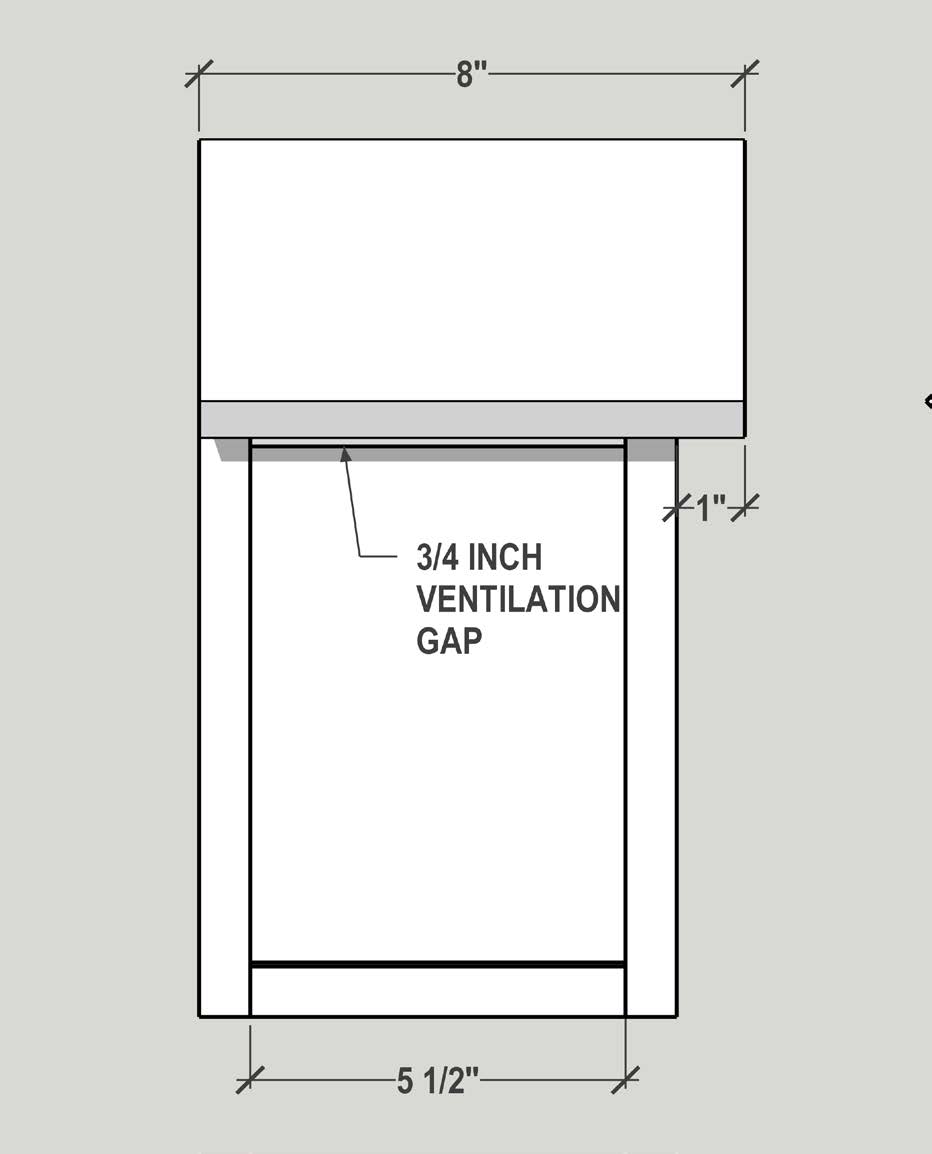
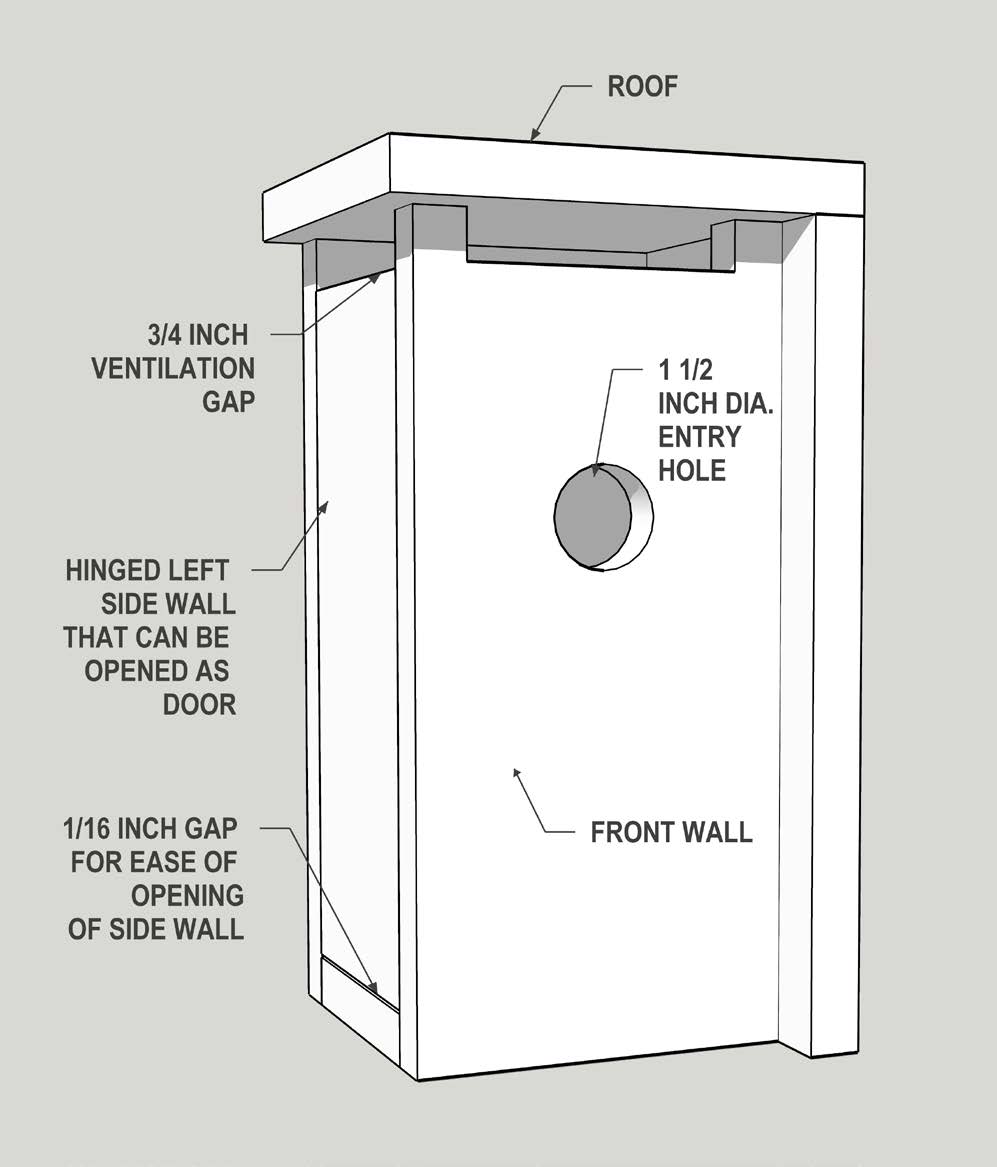
Additionally, it is vital to give the birdhouse proper ventilation to allow incubation to occur properly. Ventilation creates a livable environment with air circulation and can be ¾ inch to 1 inch diameter holes or a ¾ inch to 1 inch gap between the roof and the side walls.
As for the front wall, the inside wall facade should be rough in texture rather than sanded too smooth. This allows the fledglings to climb out once they are ready. There should never be a perch on the front wall as the birds do not need it, and it only helps predators climb inside the birdhouse.
Three Designed Birdhouse Plans
Three plans- Based on the previously stated principles, this fact sheet provides three customized birdhouse plans. Each supplies diagrams, details, and dimensions. Readers can pick a plan and follow the measurements to build a birdhouse. Kids can be involved in the building process alongside their parents.
Materials- A single 8 foot long wood board measuring 5 ½ inches in width and approximately ¾ inches in thickness can be used to build any one of the three plans. Unstained and untreated natural wood materials are preferred.
Functions first- As for the stylistic design, the birdhouse must serve the functions first, and then can be themed to fit a garden style as long as it does not interfere with the initial functionality.
Plan A. Simplicity
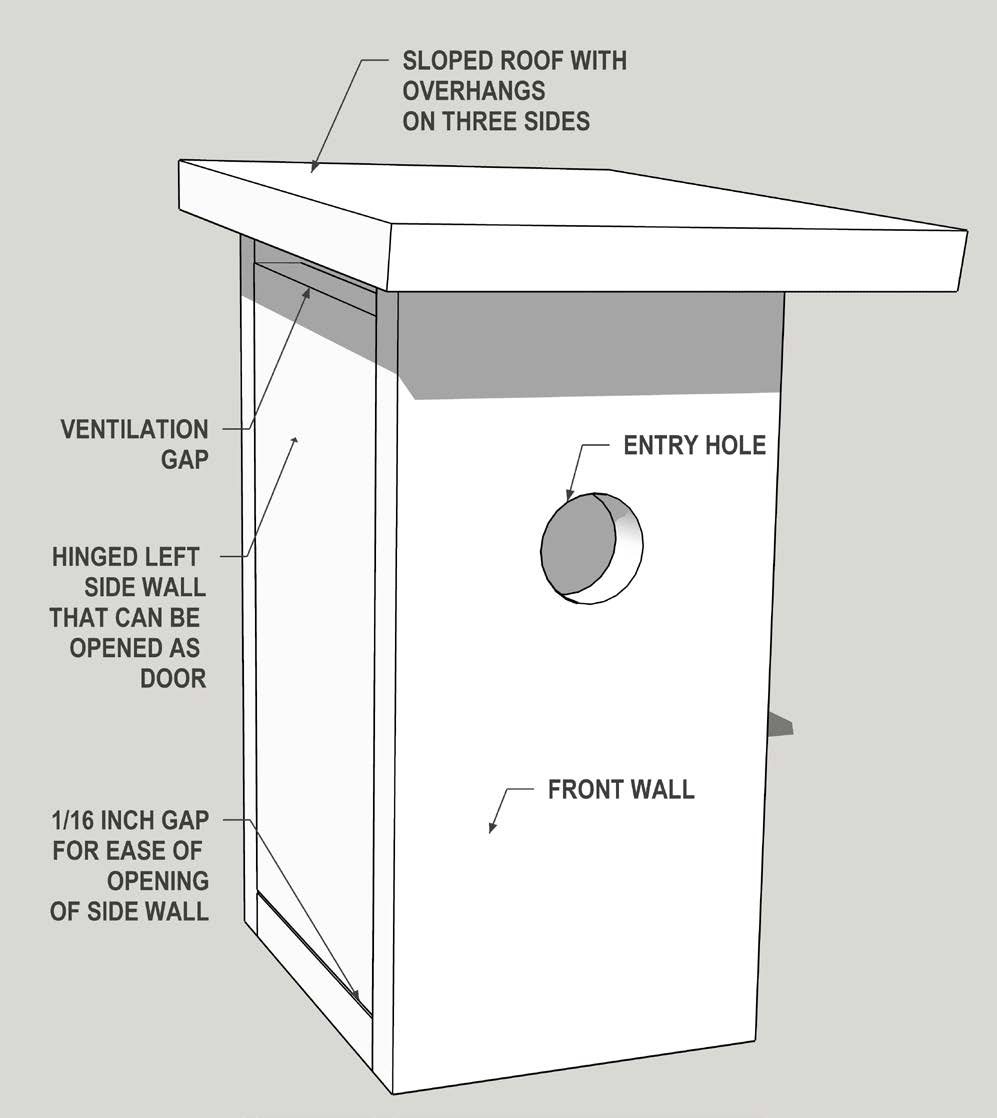
This design has a single-sloped roof. The roof overhangs beyond the walls on at least three sides to provide better coverage from rain and predators. There are ventilation gaps on top of each sidewall. The drainage holes are four circular holes drilled on the floorboard.
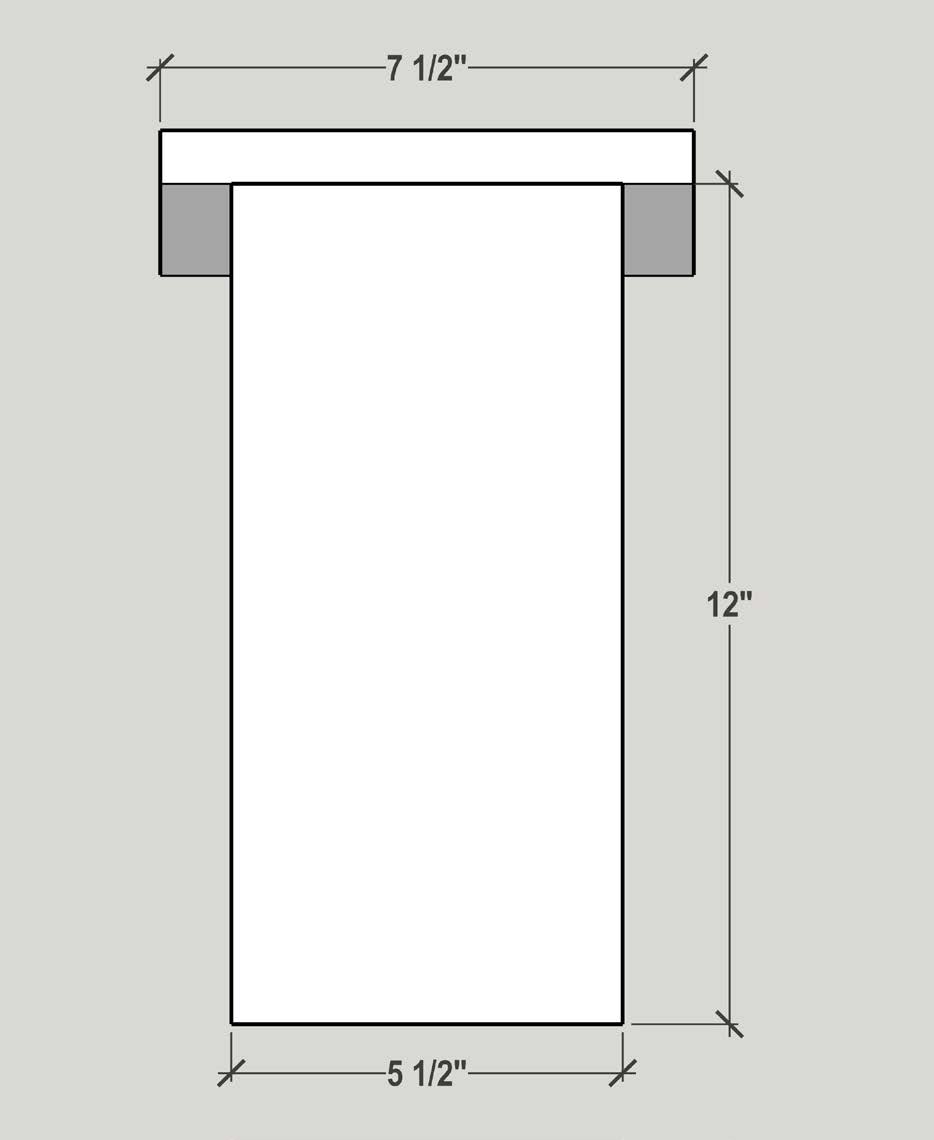
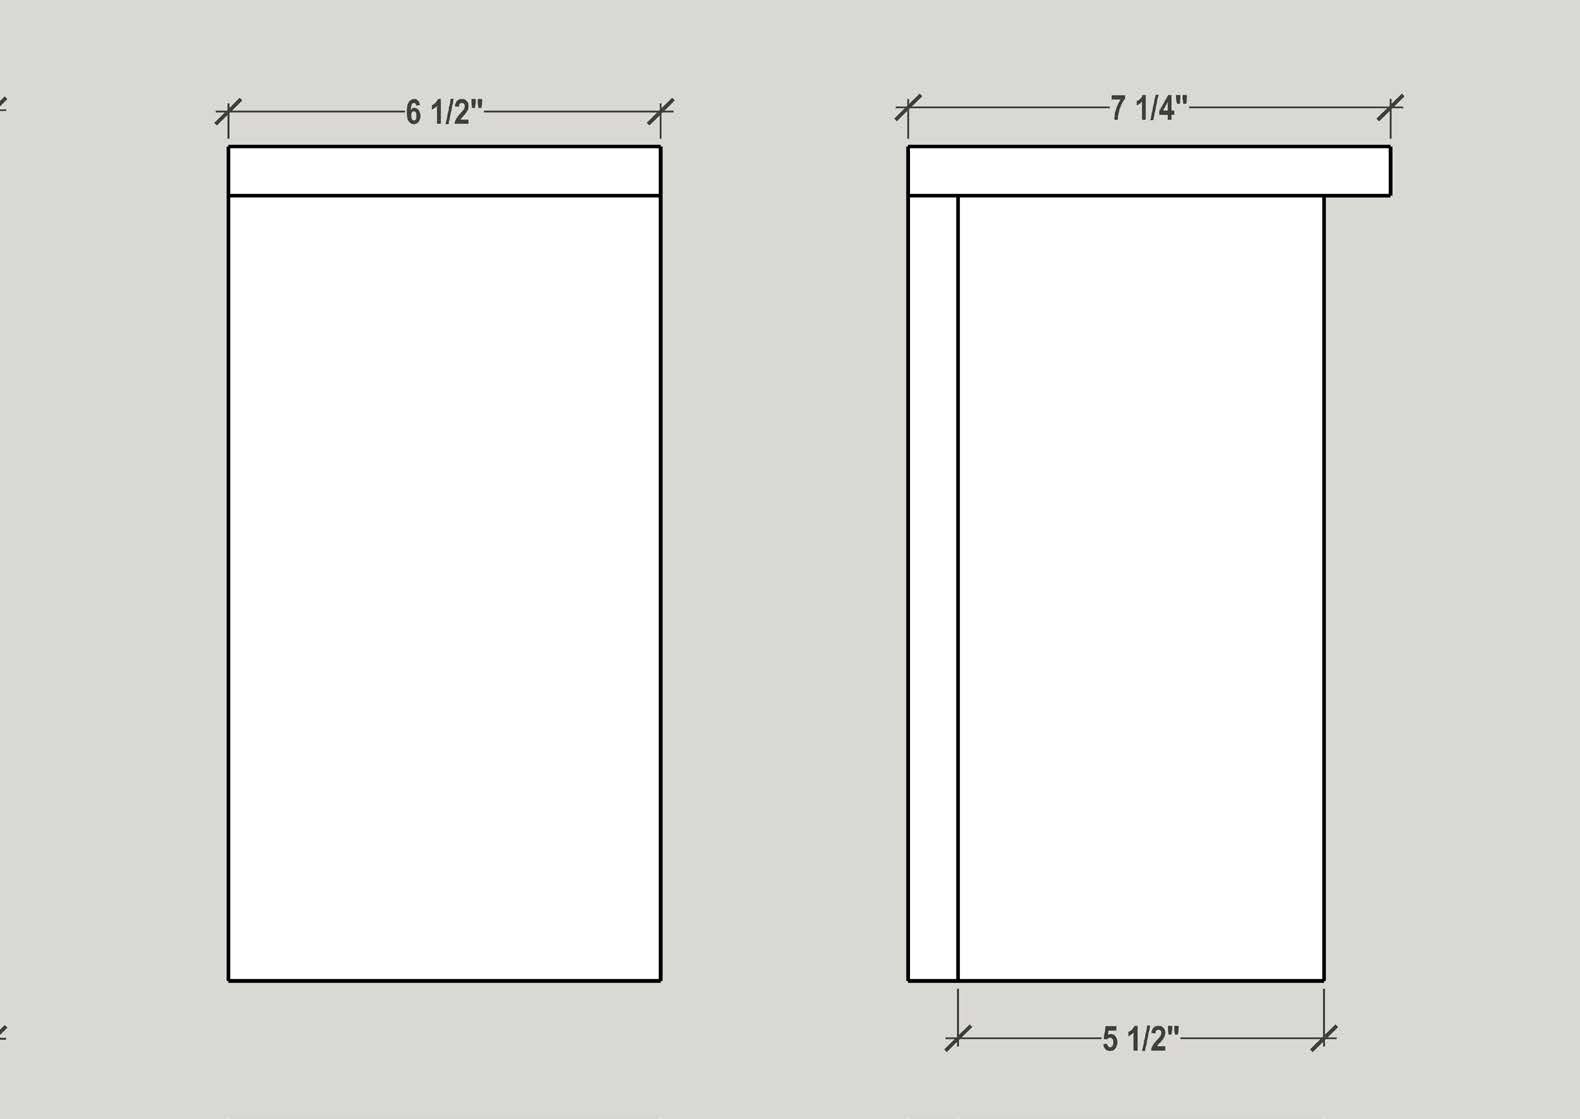
Dimensions- Diagrams A1-A5 (Pages 3-4) exhibit the overall view, bottom view, and side elevation views with detailed dimensions.
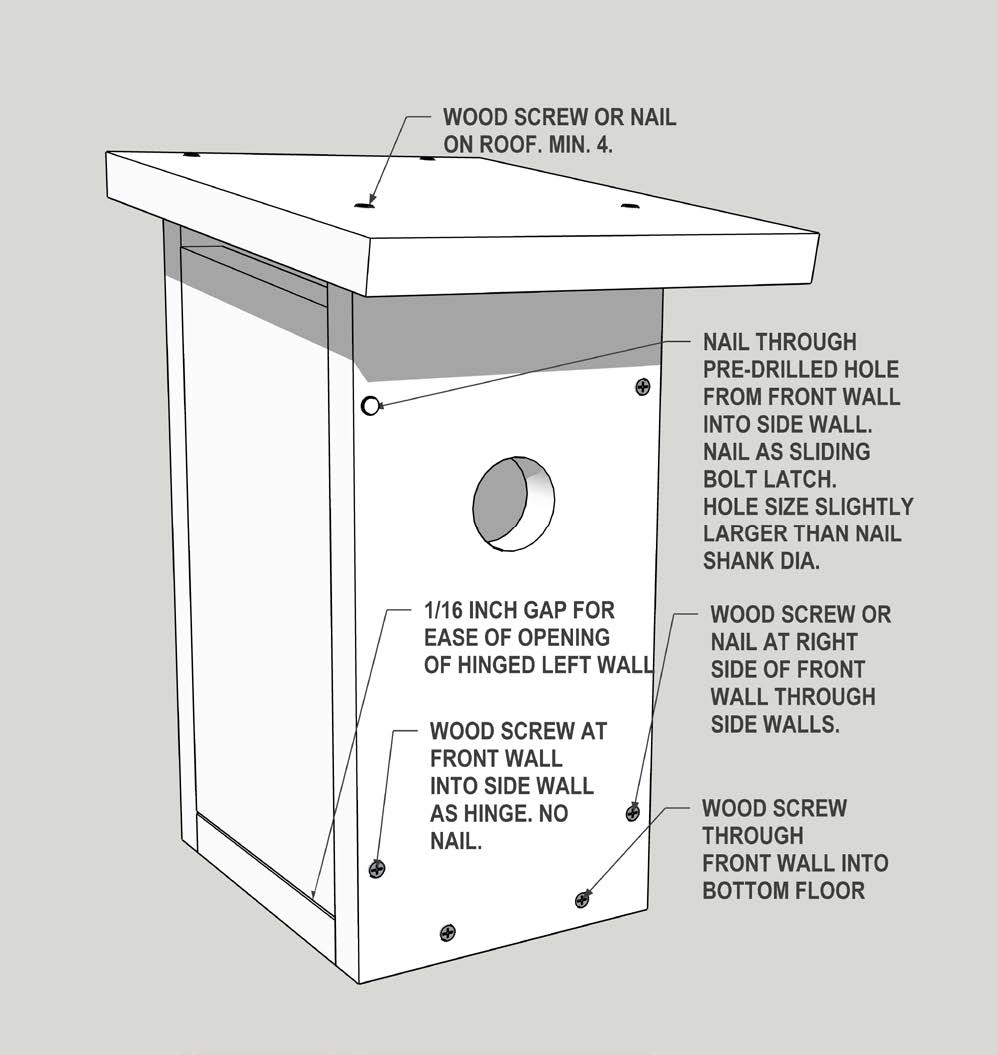
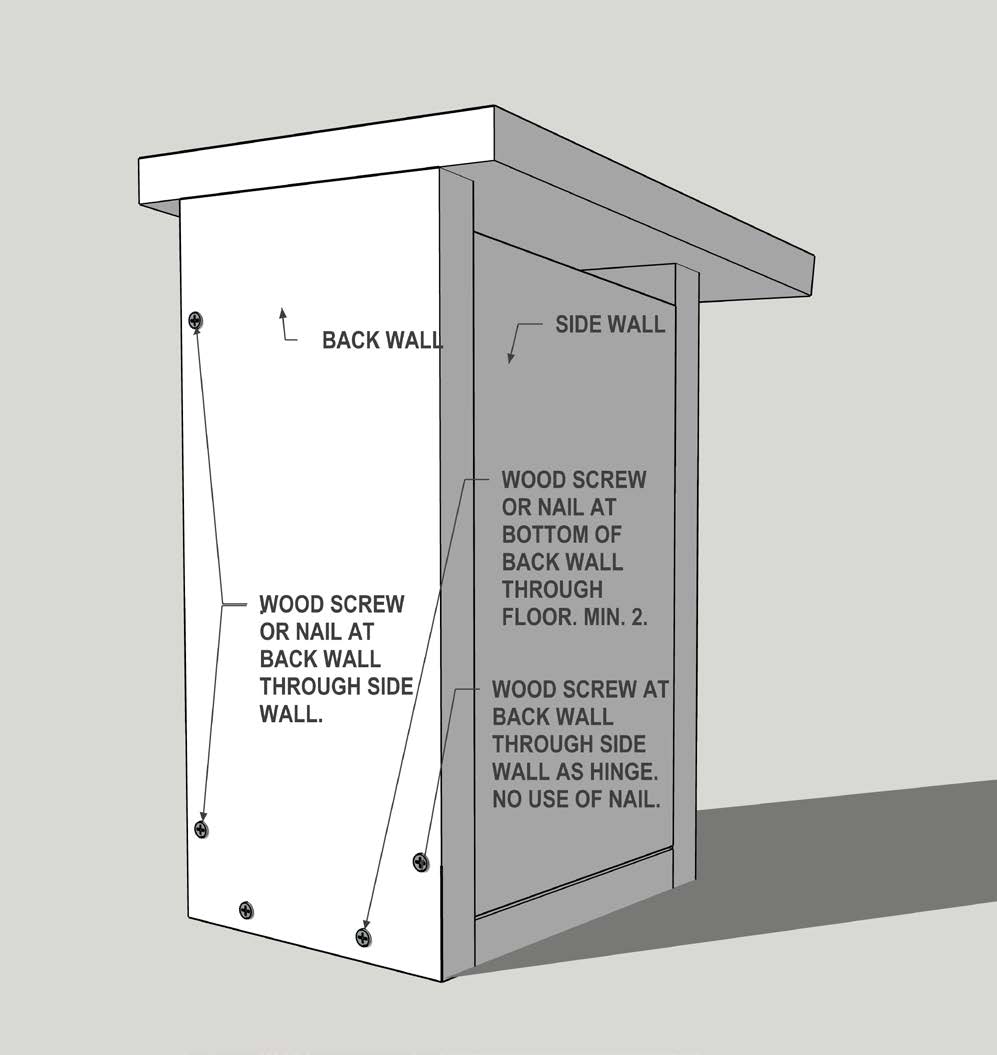
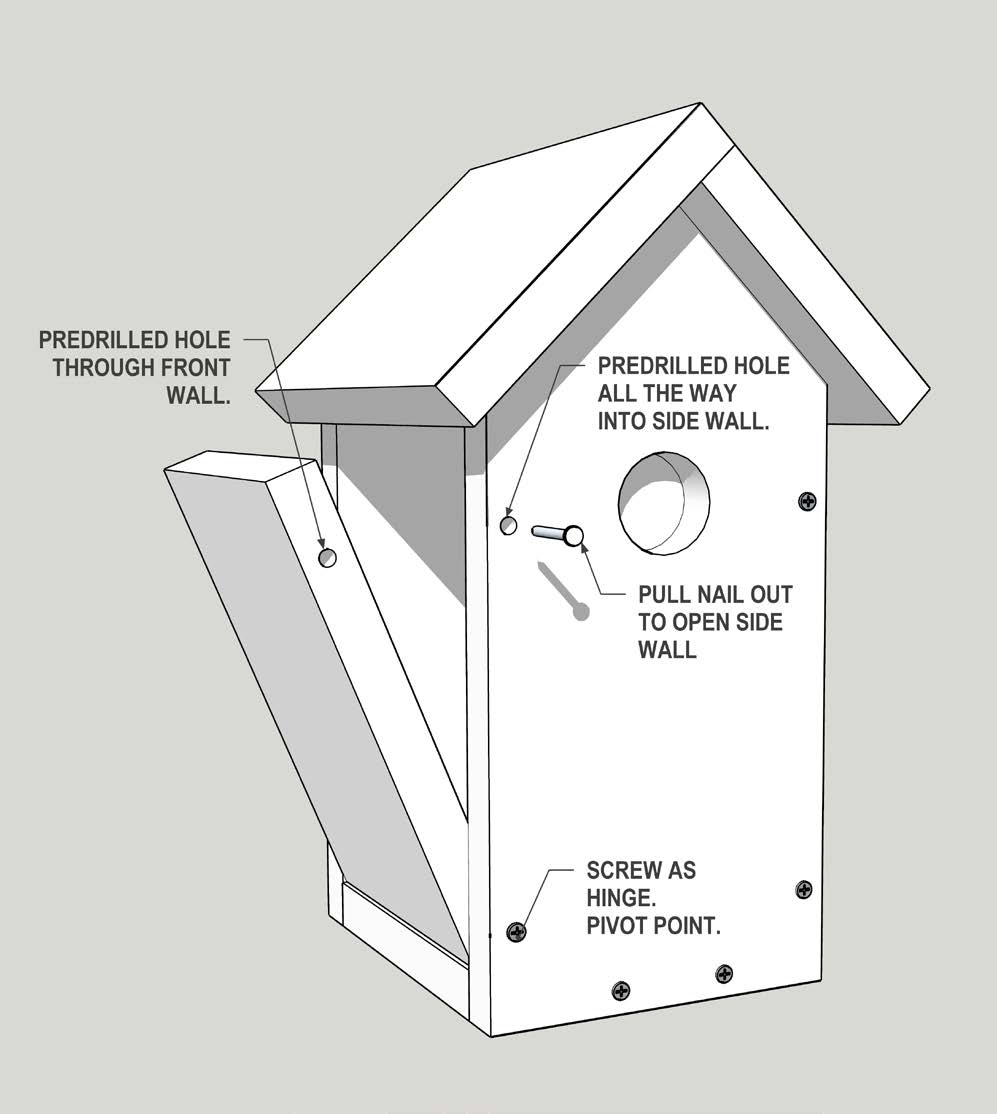
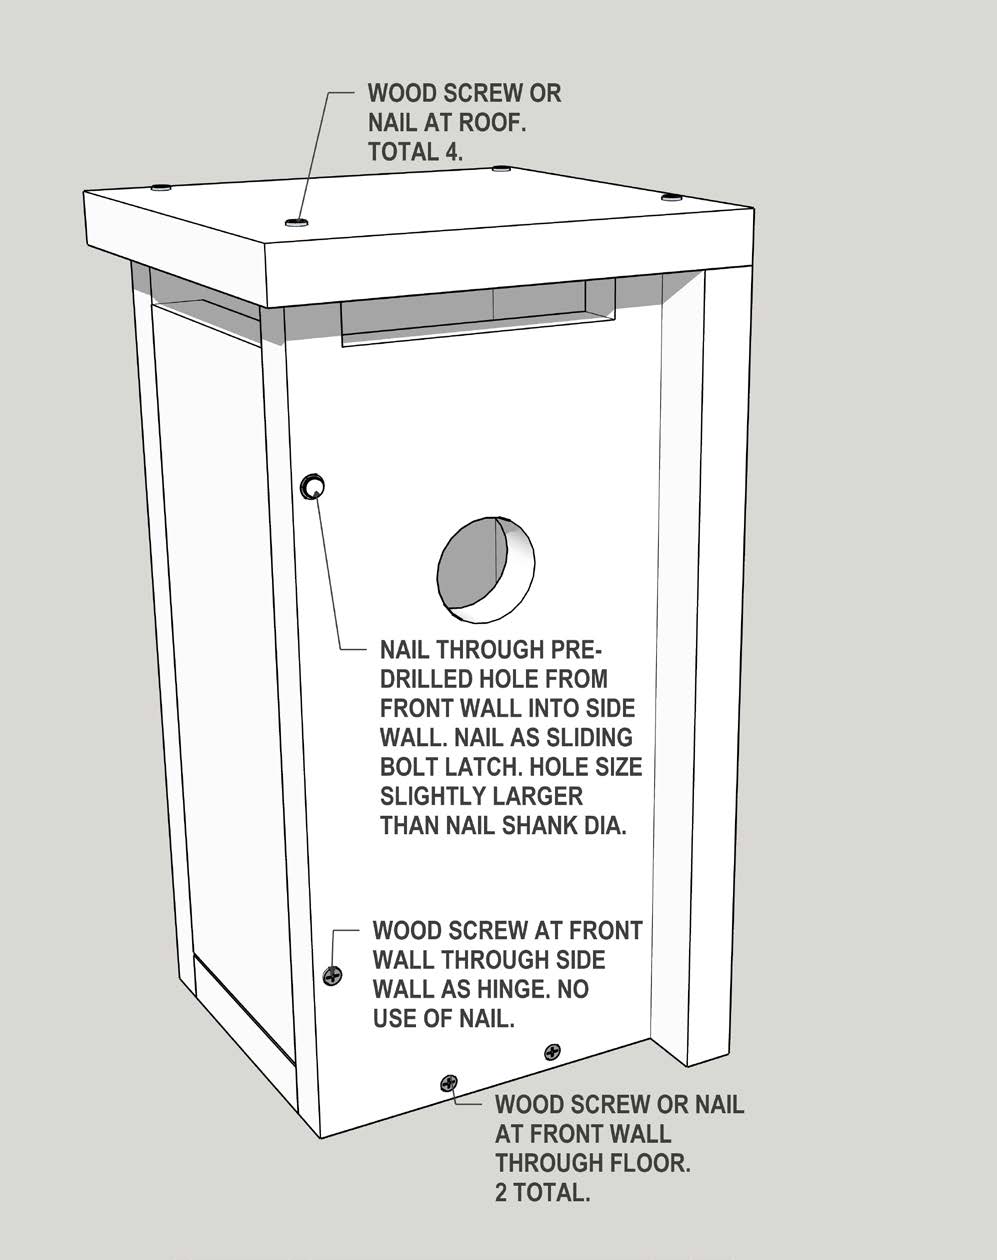
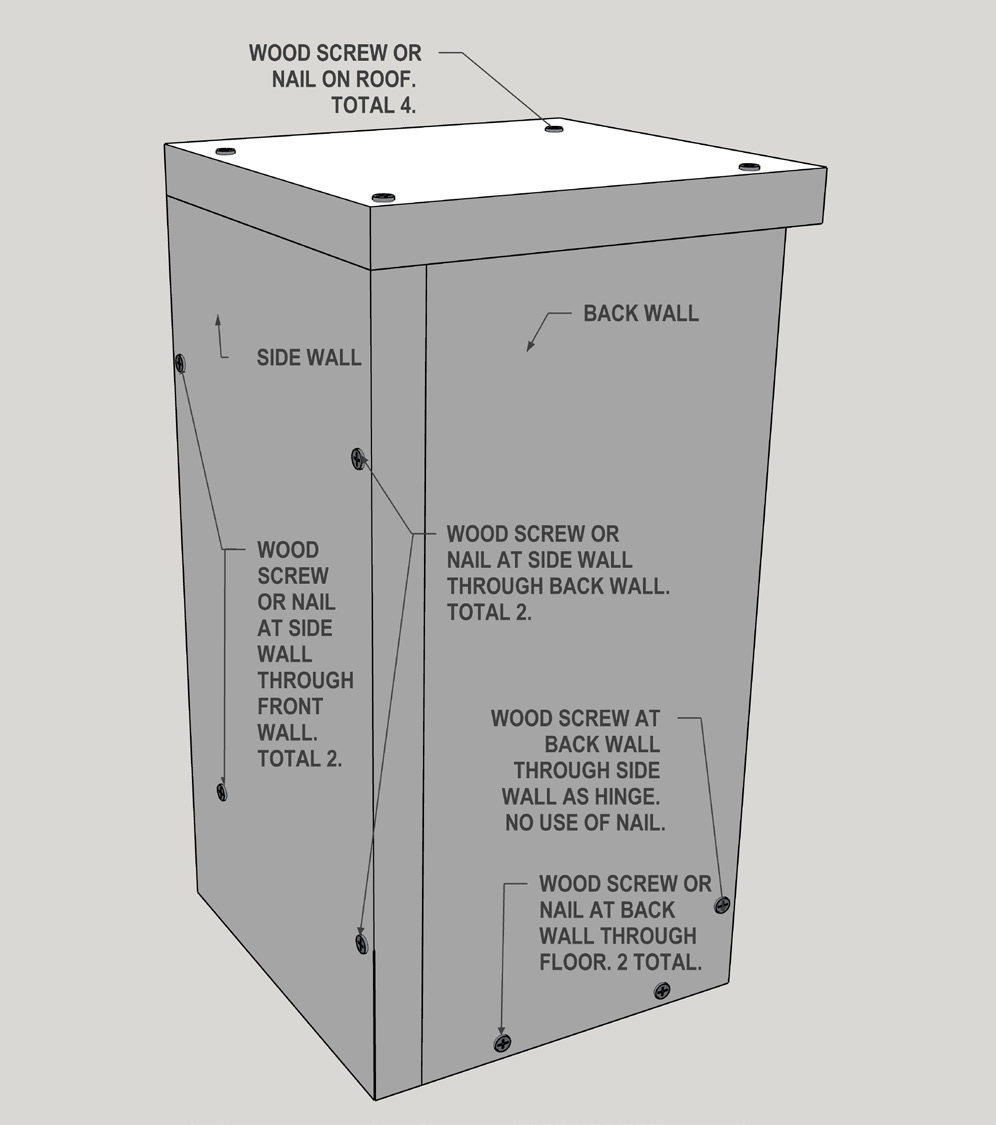
Fastener locations and pivoting side wall- Diagrams A6-A8 (Page 4)exhibit the locations of screws and nails that fasten all the boards together into a nest box.
Plan B. Elegance
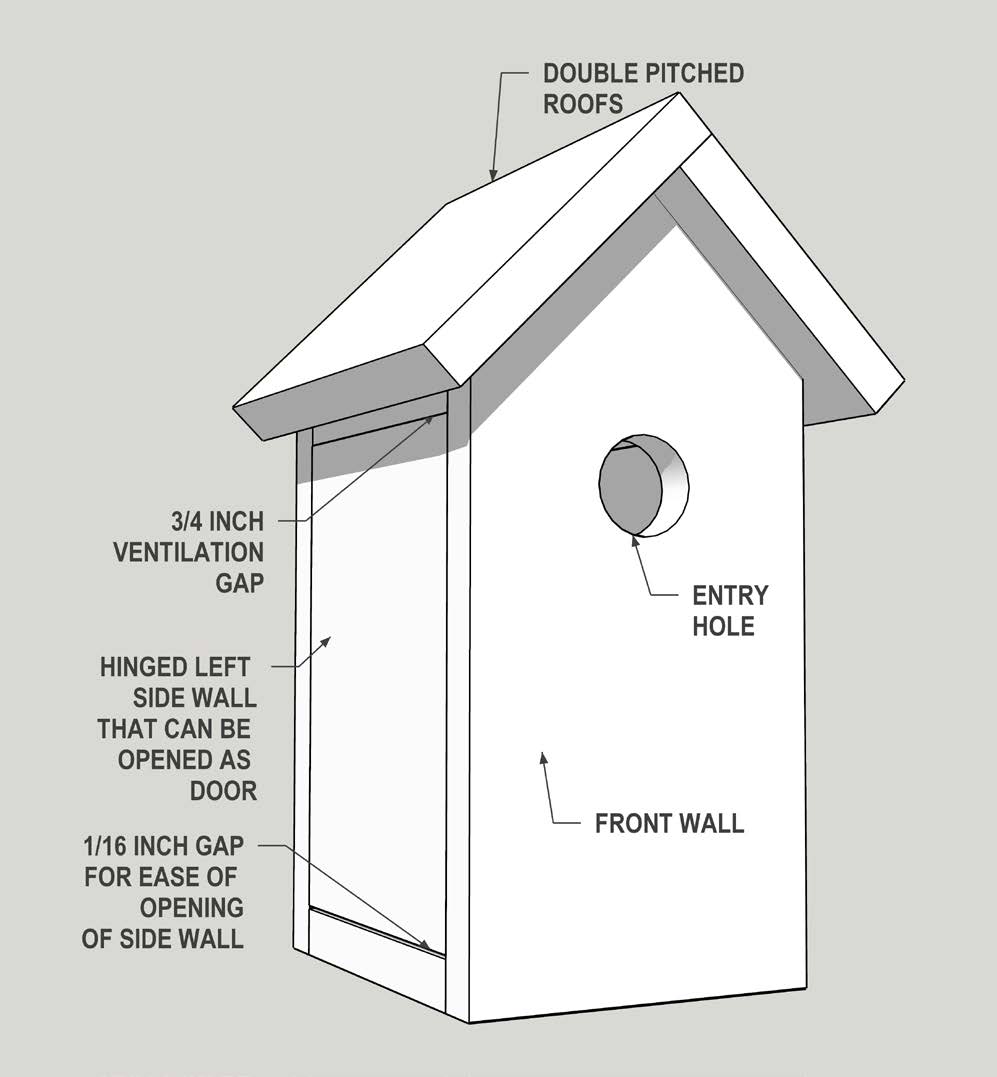
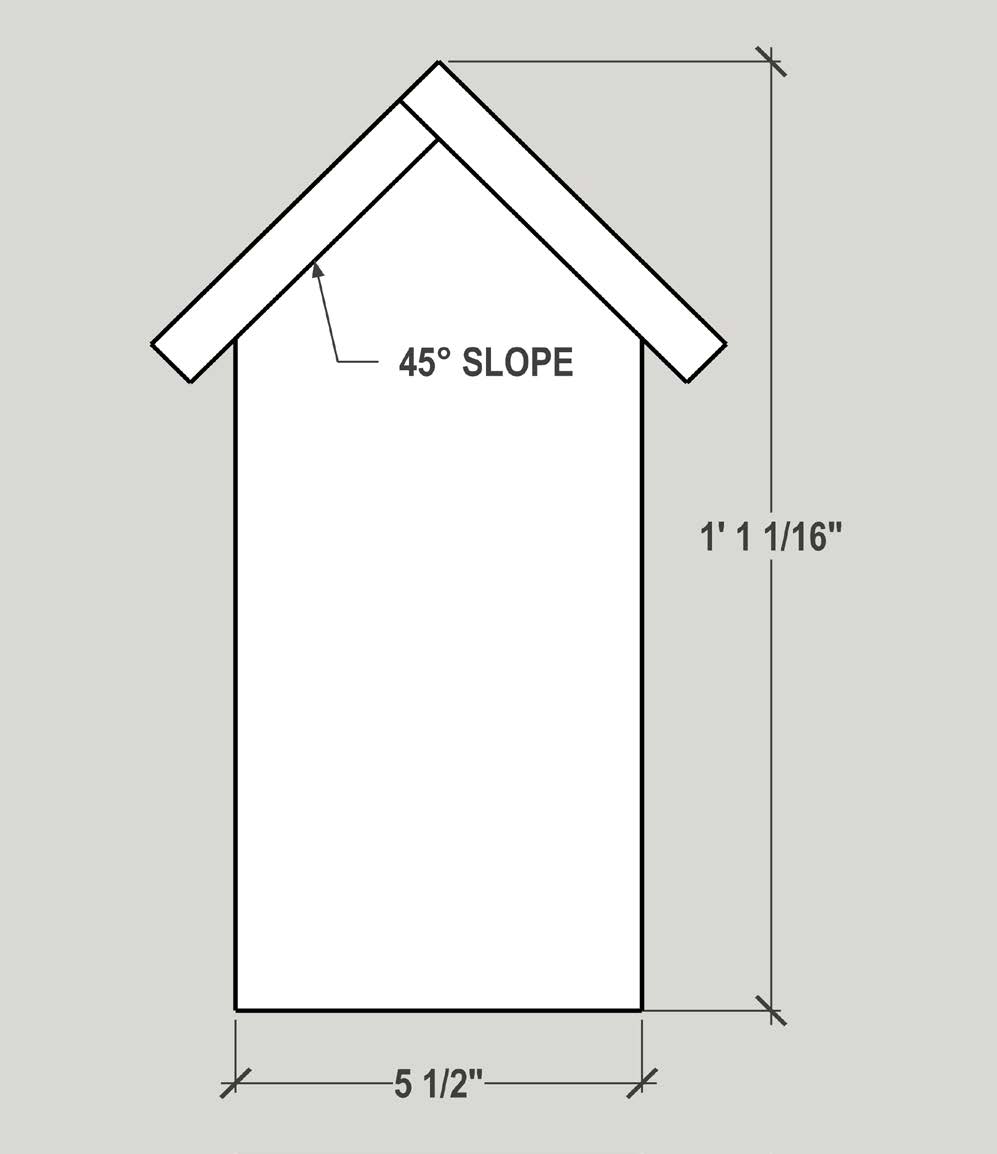
This design has two sloped roofs. The roof overhangs beyond at least three sidewalls to provide full coverage from rain and predators. The drainage holes are cut at the corners of the floorboard. Ventilation was made with a ¾ inch gap at the top of the side walls.
Dimensions- Diagrams B1-B5 (Pages 5-6) exhibit the top view, bottom view, and side elevation views with detailed cut dimensions.
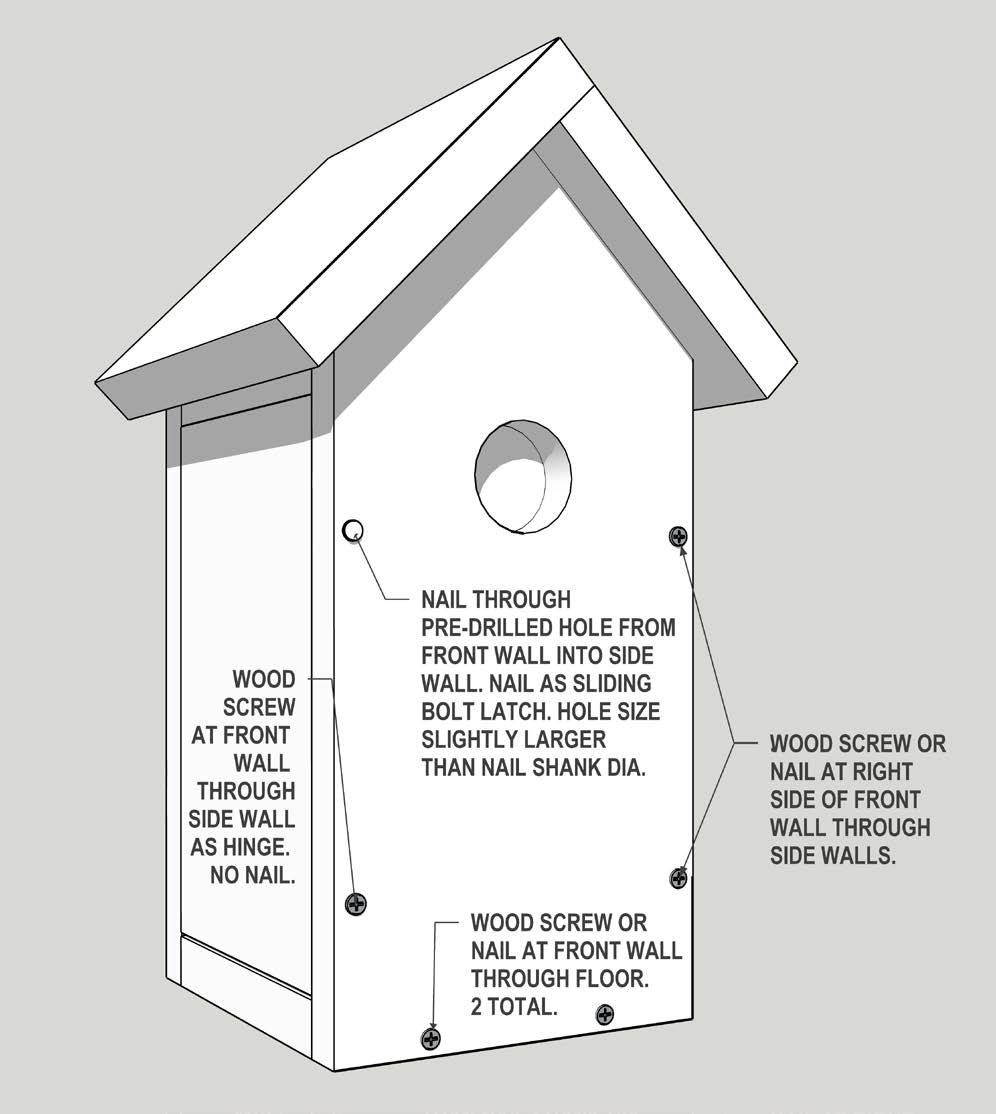
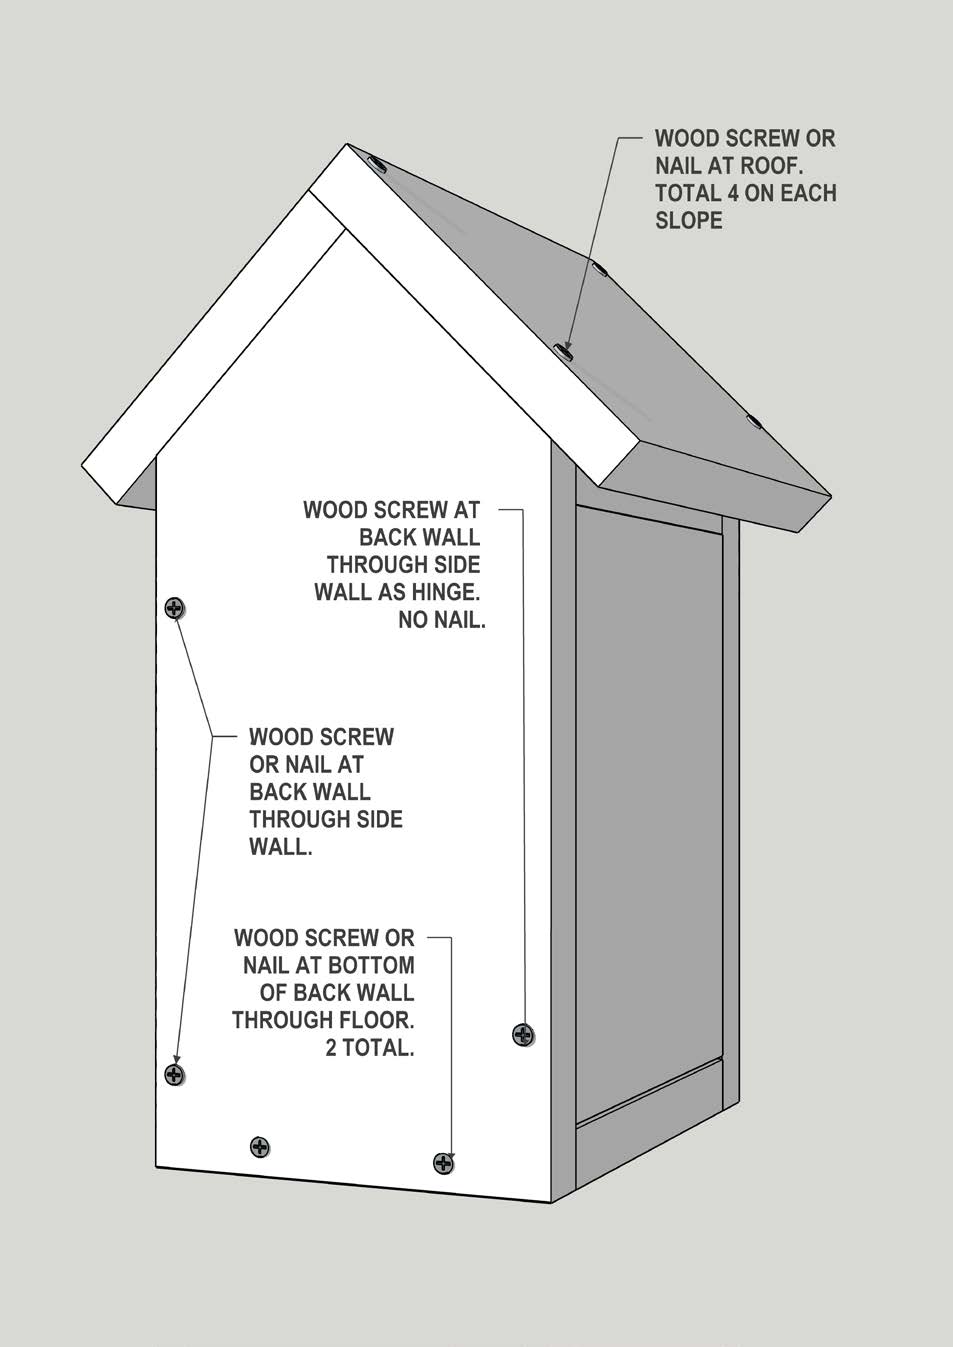
Fastener locations and pivoting side wall- Diagrams B6-B8 (Page 6) exhibit the locations of screws and nails that fasten all the boards together into a nest box.
Plan C. Modern
This is a modern asymmetrical design. It has a flat roof. The roof overhangs beyond the vertical walls to provide cov-erage from rain and predators. It also continues down on the right and becomes the right vertical wall. The roof is elevated by sidewalls to provide ventilation on three sides (Diagram C1-Page 7).
Dimensions- Diagrams C1-C6 (Page 7) exhibit the overall view, bottom view, and side elevation views with detailed dimensions.
Fastener locations and pivoting side wall- Diagrams C7-C9 (Page 8) exhibit the locations of screws and nails that fasten all the boards together into a nest box.
Special Notes
For all three designs, when a callout note states "wood screw or nail," a small nail or brad nail can be used in place of a screw to reduce the visual impacts of fastener heads exposed on the wall surfaces.
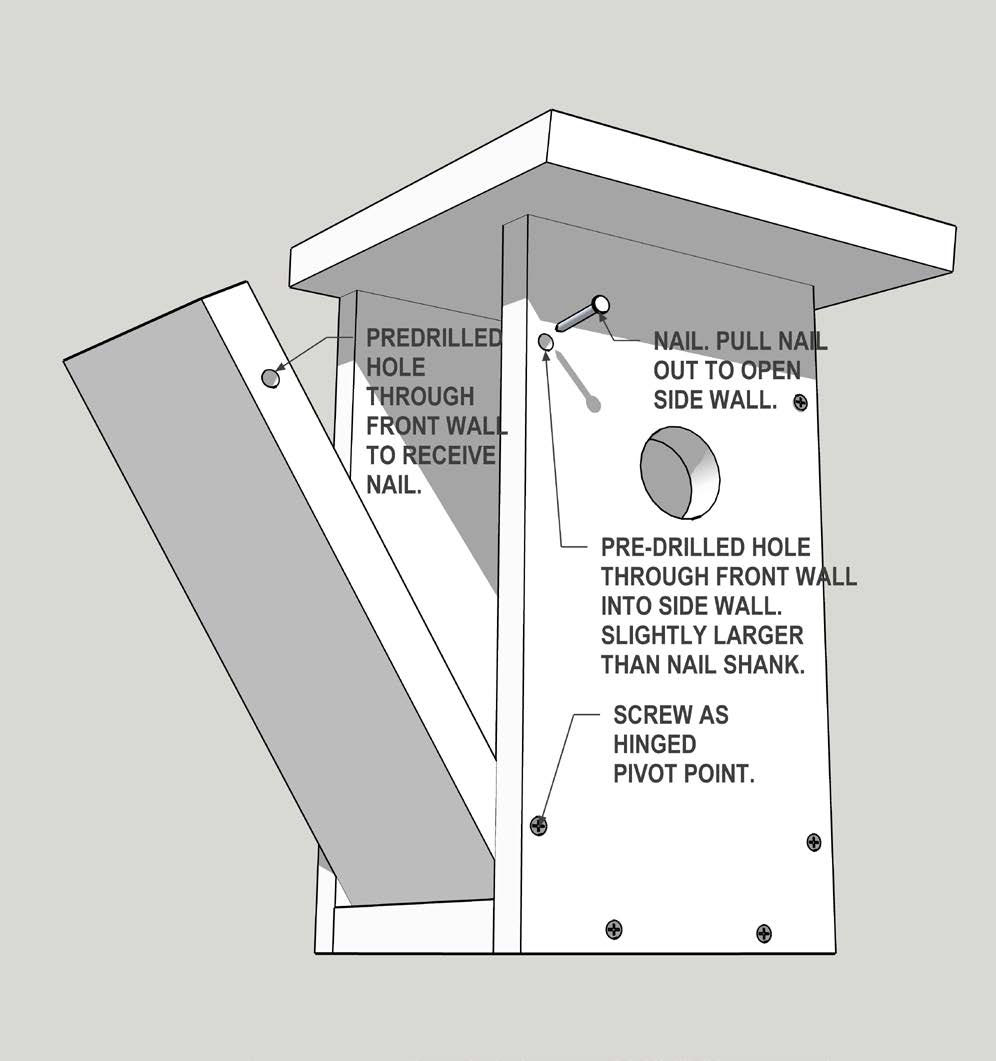
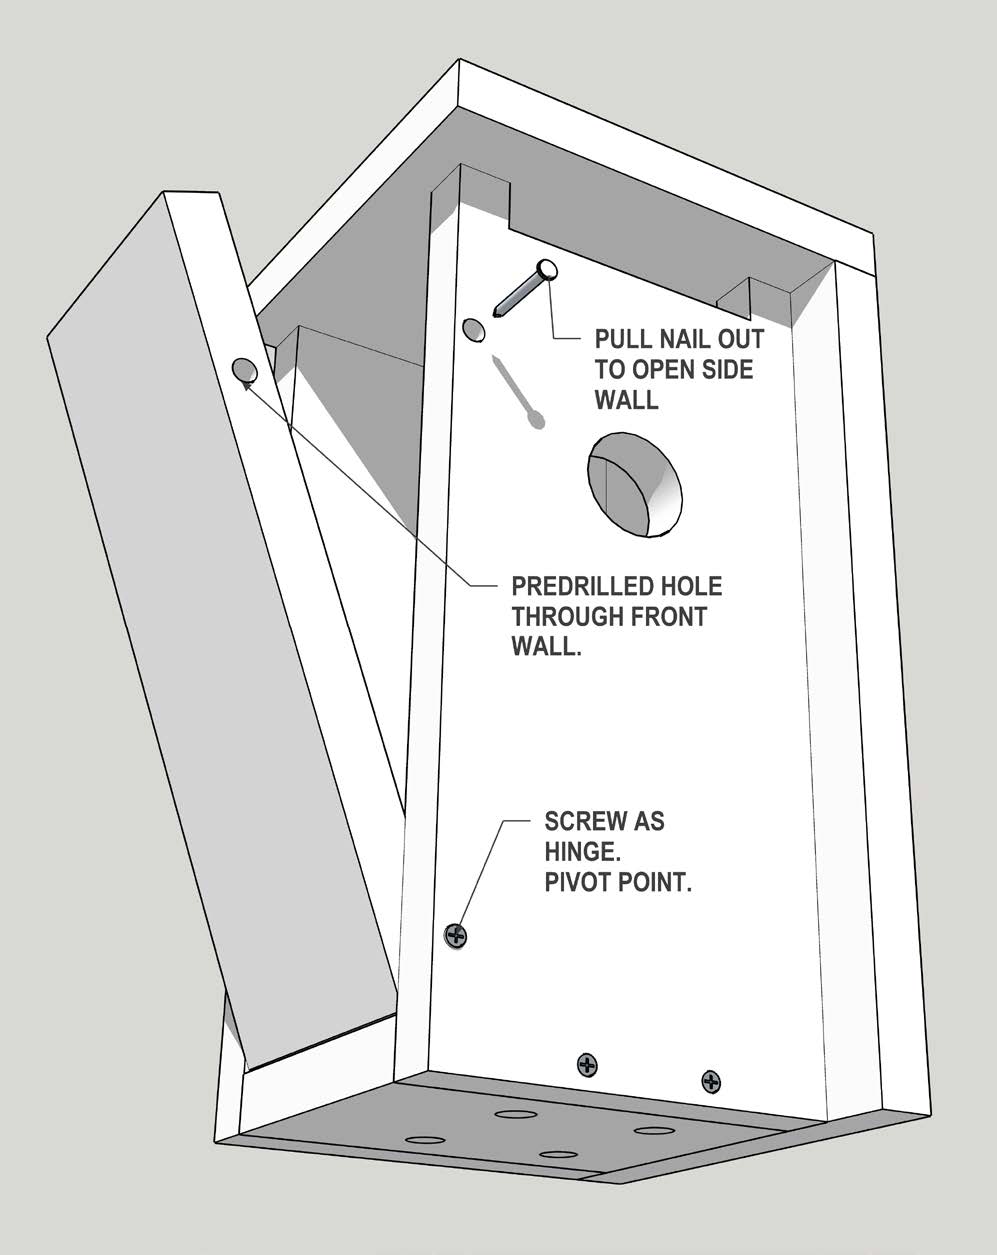
For each birdhouse, the left side wall is designed to be able to open on a pivot for cleaning purposes (Diagrams A8, B8, & C9 - Pages 4,6,8). At the lower side of that wall, a wood screw (not a nail) should be used as a "hinge" to allow it to swivel open.
Mounting and Placement Principles
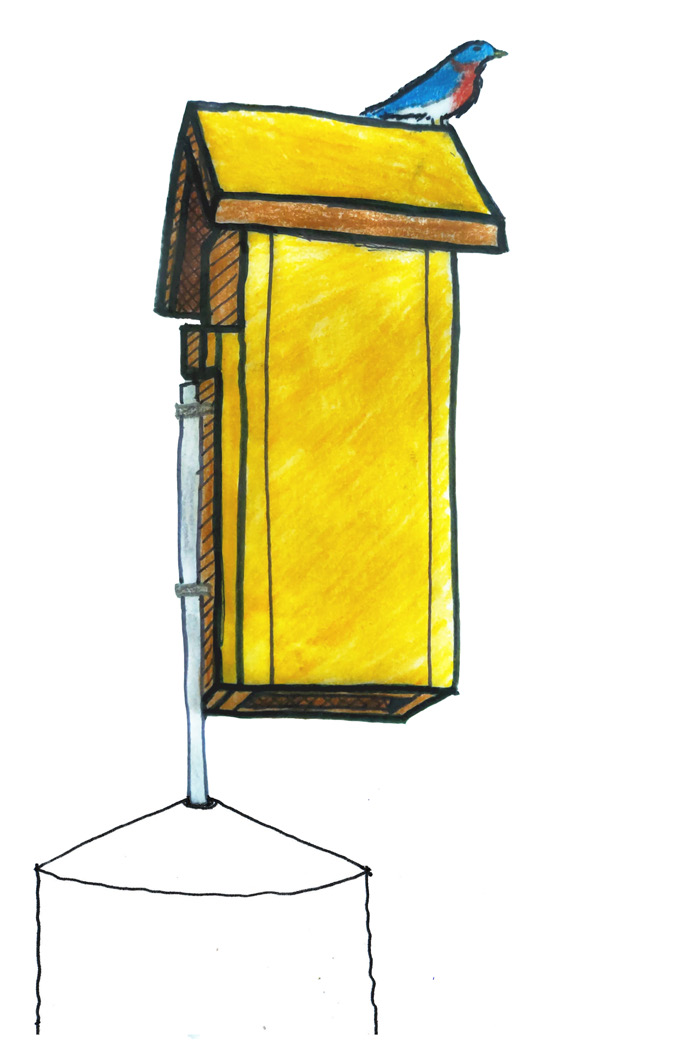
- It is recommended to mount the birdhouse on top of a pole (Figure 1- Page 9) at four to six feet off the ground instead of attaching it to a tree as the best practice. While there are multiple ways to mount the birdhouses, the following recommendation and guidelines use simple and affordable materials.
- The common and affordable pole material is 1-inch round smooth conduit pipe (electrical metal tube). There are other wood and metal materials for poles, but they are usually more costly and take more effort to install.
- Total conduit length should be the mounting height (4 to 6 feet) plus 3 feet of footing.
- Drive 3 feet into the ground as the footing for Oklahoma's common wind conditions.
- Back mount birdhouse onto the top of the pole with two galvanized 2-hole pipe straps.
- Ideally, install a baffle guard below the birdhouse to prevent climbing predators from climbing up. Figure 1 shows an example of a stovepipe guard that can be slid onto the pole during the birdhouse installation process. There are other types of baffles that can be obtained from hardware stores with their own installation manual.
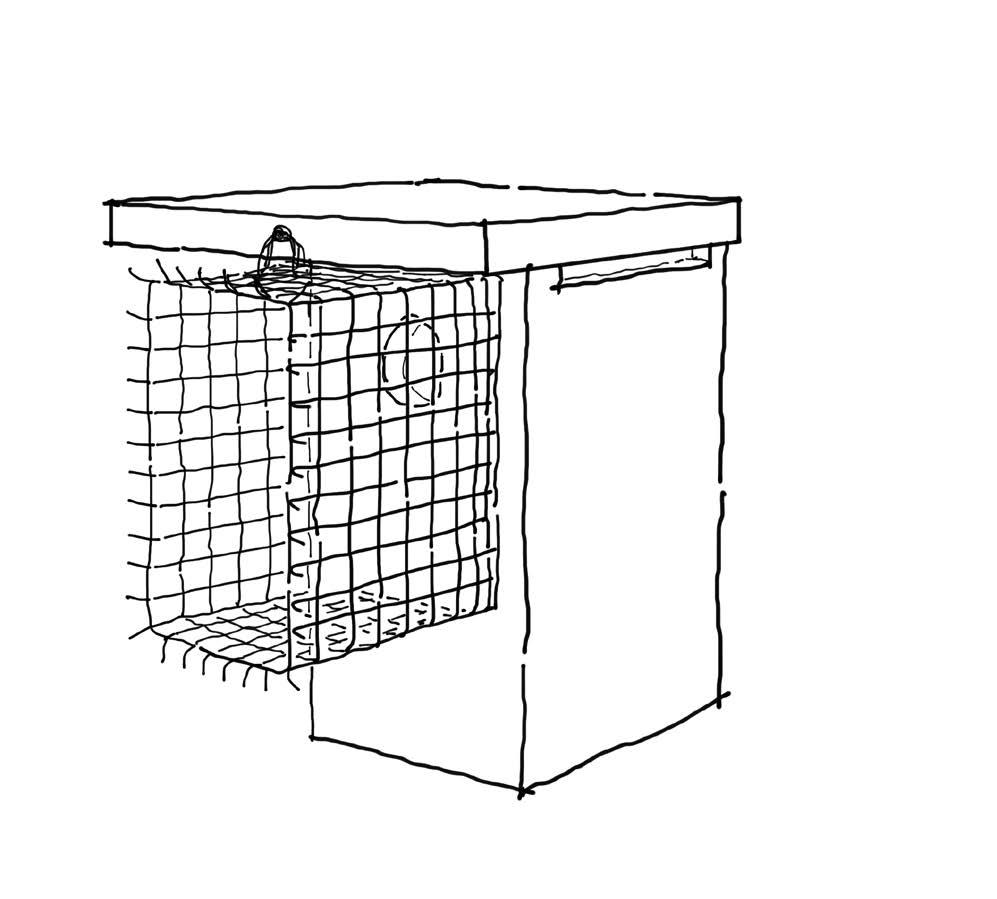
To further increase the success in fledging, a predator entrance guard can be added at the birdhouse entry hole. They can be made with a variety of materials. Figure 2 & 3 (Page 9) exhibit two common examples.
The location should be safe from predators but also easy to access for both people and birds. This will allow you to clean and maintain the house without difficulty and give the birds the best chance for reproduction as well as invite them to use the house. It should be at least 20 to 50 feet away from wooded and bushy areas, while scattered trees are fine. Ideally, the birdhouse should be facing east or north into an open area away from woods which allows the birds to fly into the house freely and gather nesting materials.
The preferable time to put up the nest box is by autumn in the year before the bluebirds come. The birdhouse should be ready in late January. In addition, it is best to put these houses in pairs to better increase the odds of attracting the Eastern Bluebirds. Both should be regularly checked to remove non-target or invasive species. There should be a minimum of 300 feet between pairs of birdhouses so that they are not overcrowded and competing with each other over the nesting boxes.
To make your property further attractive to birds, Fact sheet HLA-6435, Landscaping and Gardening for Birds (linked at the end of this article), has included landscaping suggestions, plant materials as bird food, feeder and water resources.
Summary
The Eastern Bluebird needs lower maintenance than many other species, provides a beautiful splash of color, and is an excellent bird to attract into your backyard. Following the plans in this fact sheet, you will be able to customize a birdhouse that will be enticing for this popular, native songbird. Furthermore, building a birdhouse together as a family can be a meaningful activity full of lessons about design, math and science while helping our environment and protecting birds.
Additional Resources
Oklahoma Gardening #4403 Youtube Video - Homes for Nesting Bluebirds
Fact Sheet - HLA-6435, Landscaping and Gardening for Birds
Fact Sheet - NREM-9005, Nest boxes for cavity nesting birds in Oklahoma
Diagrams A1-A8
Diagram A1. Perspective overview
Diagram A2. Bottom view
Diagram A3. Front view with board dimension
Diagram A4. Side view with board dimension
Diagram A5. Back elevation view with board dimensions
Diagram A6. Screw and nail positions at the front
Diagram A7. Screw and nail positions at the back
Diagram A8. Wall opening mechanism
Diagram B1-B8
Diagram B1. Perspective overview
Diagram B2. Bottom view
Diagram B3. Front view with board dimension
Diagram B4. Side view with board dimension
Diagram B5. Back elevation with board dimensions
Diagram B6. Screw and nail positions at the front
Diagram B7. Screw and nail positions at the back
Diagram B8. Wall opening mechanism
Diagram C1-C9
Diagram C1. Perspective overview
Diagram C2. Bottom view
Diagram C3 and C4. Front and left side
Diagram C5 and C6. Right side and back elevation view with board dimensions
Diagram C7. Screw and nail positions at the front for modern birdhouse
Diagram C8. Screw and nail positions at the back and side for modern birdhouse
Diagram C9. Left side wall opening mechanism for modern birdhouse
Figures 1-3
Figure 1. An Example of a birdhouse mounted on a post with a baffle
Figure 2. A wire guard that has prickly edges and adds additional front distance (Right)
