Smart Phone Photography
Introduction
Smartphones have become an essential tool for daily life. By 2013, phones were 10 times more likely to be purchased than digital cameras of any kind (Cardinal, 2021). Our phones have become handheld computers, capable of nearly anything we may need, including photography. Chase Jarvis, a famous photographer said, “the best camera is the one that’s with you.” In many cases, the camera with you is in your smartphone. More than 92% of all photos are captured via smartphones and the typical user takes about 22 photos with their phone each day (Jasenka, 2023).
However, without understanding how to use the increasingly powerful smartphone cameras, they can become a hindrance rather than a tool. In this fact sheet, we will help you learn how to use your phone camera to capture life’s moments clearly and effectively. You will learn about the basics of photography, basic camera settings and file types, smartphone camera settings and features, and helpful tips and tricks to allow you to maximize your phone camera.
Basic Camera Settings
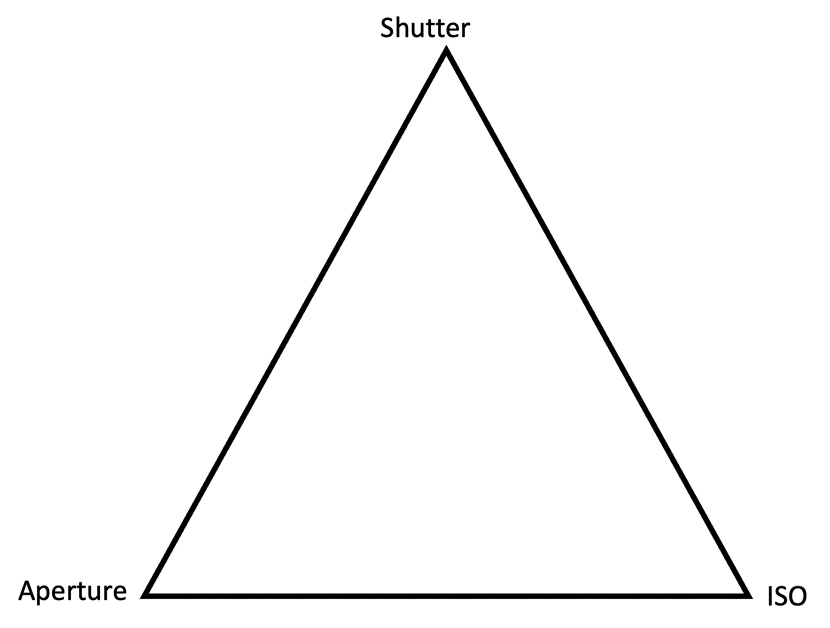
There are three basic settings photographers deal with: shutter speed, aperture and ISO. These may be new terms to you because many smartphone cameras do not show these settings when using the default “capture mode”. This trio of settings are all represented by numbers. You will learn how all these numbers work together to create the “triangle of exposure”. Rather than separate values, these numbers work together to expose and light the photo.
Shutter Speed
This is the time the camera sensor is exposed to light as the photo is taken. The longer the sensor is exposed to light, the brighter the photo will be. A photo taken with a longer shutter speed will be brighter and more blurred if there is motion occurring, whereas a shorter shutter speed will result in less exposer to light and motion will be clearly stopped, appearing sharp, in the photo.
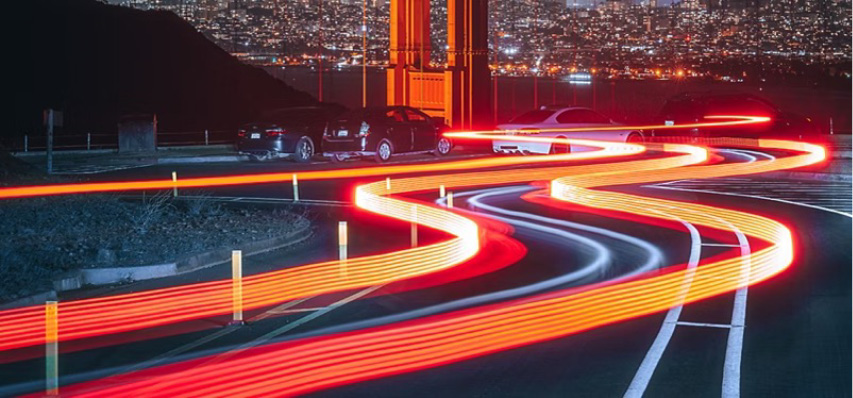
Figure 1. Image by Ryan Ditch.
Shutter speed is measured in time, starting at numbers as small as a thousandth of a second to minutes or hours. The numbers represent the amount of time the shutter of the camera is open to allow light in. Short shutter speeds freeze motion and are useful for things like sports or wildlife photography. Long shutter speeds blur motion and can be useful for capturing things like traffic at night or moving water to create effects with blur and motion. Below is an example of using a long shutter speed to produce an effect involving lights where motion forms what is called a light trail.
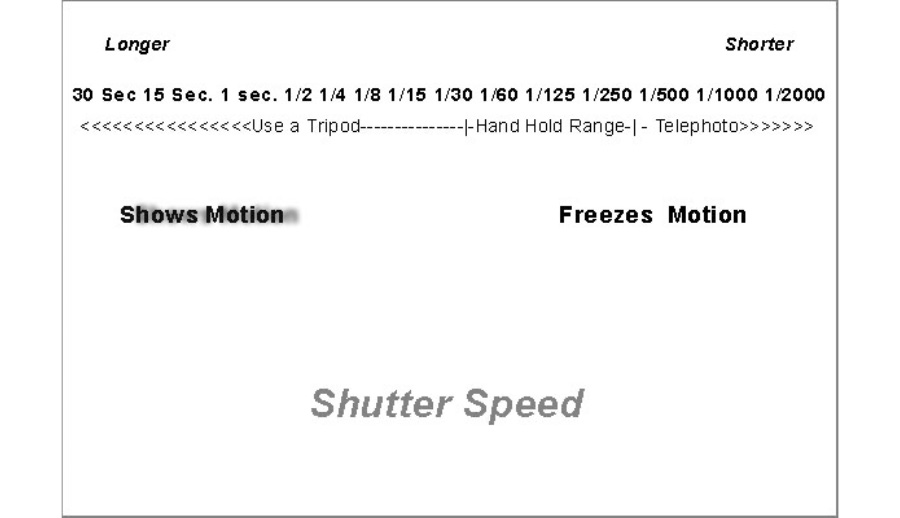
Figure 2. Shutter speed graphic.
If you have taken a photo on your phone in a dark space, you will notice a lag between when you press the button and when the photo is taken. This is your phone letting more light on the sensor to make the resulting photo brighter. Shutter speed also controls the amount of blur in a photo. The shorter the shutter speed, the clearer the photo, but it will also be darker, where a longer shutter speed will be brighter, but blurrier (Mansurov, 2022). The chart below shows some possible shutter speeds related to the amount of blur produced in the photo.
Aperture
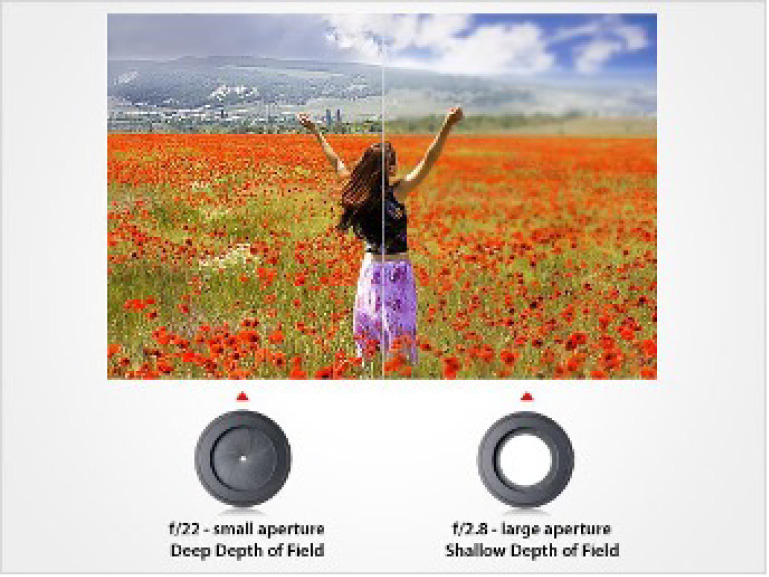
The aperture is a setting relating to the size of the opening allowing light to enter the camera sensor. Aperture determines the depth of field in a photo. Depth of field is the portion of a photo that is sharp and in focus. The number related to aperture is measured in “f stops” and can be tricky to understand because it seems counterintuitive. The smaller the f stop number, the bigger the opening, meaning more light is allowed into the sensor yet the depth of field is shallow. The bigger the f stop number, the smaller the opening, meaning less light is allowed into the sensor yet the depth of field is deeper.
For example, a photo taken in “portrait mode” on your smartphone could have a small aperture number, resulting in a photo with a shallow depth of field and is only focused on the subject. You can alter the f stop number of “portrait mode” on your smartphone to create photos of varying depths of field. Your smartphone defaults to keeping everything in the frame in focus, a large depth of field therefore, a big aperture number (Mansurov, 2022).
Figure 3. Aperture chart.
Figure 4. Graphic by Attila Kum.
ISO
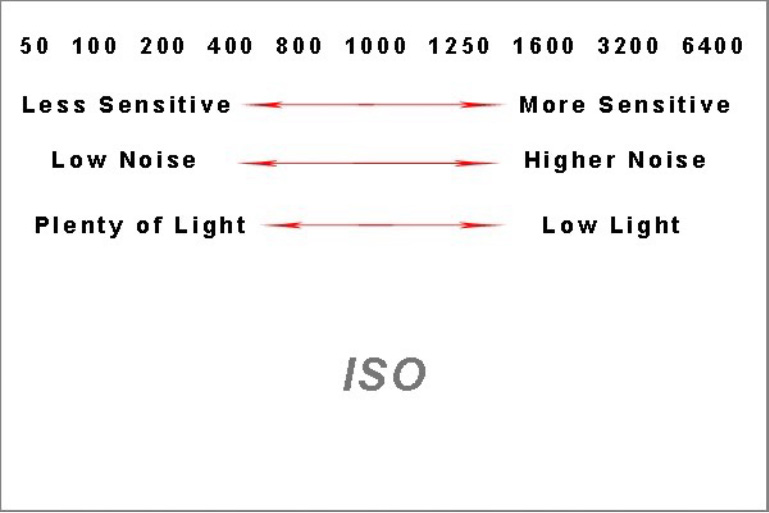
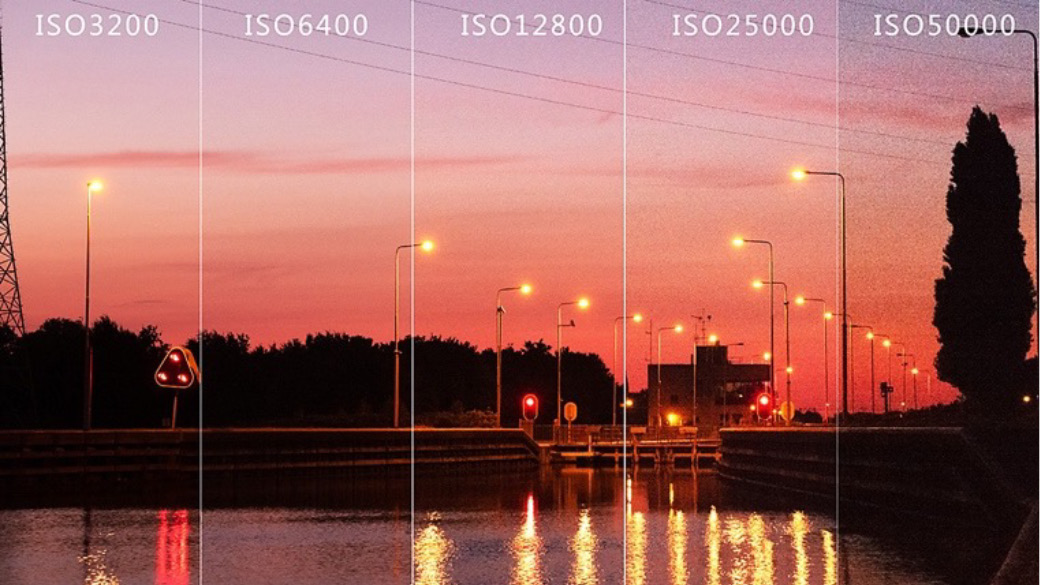
ISO works to balance the other two settings and controls the overall quality of your photos. It controls your camera’s light sensitivity and can brighten or darken photos. Think of the ISO number as worker bees, working together inside the camera to light photos. A lower ISO number like 100 or 200 works well when you take photos on a bright and sunny day, and you will not see any “worker bees,” because the natural light is already bright enough. A higher ISO number like 800 or 1600 works best indoors or on a cloudy day, and you will see more “worker bees,” or graininess, in the photo because the “bees” are working together to light the photo. This is why it is important to watch your ISO number is not too high because it can add noise, or a grainy look to your photos, aka, the “worker bees” (Mansurov, 2022).
Figure 5. ISO Sensitivity, noise and light chart.
Figure 6. Shooting in Darkness Without a Tripod: A Step-by-Step Guide to Prevent Noise When Using a High ISO
Exposure Triangle on Your Phone
If your phone automatically adjusts to its environment, why should you worry about these settings? Many smartphones allow you to change these settings to get the perfect photo. It’s important to understand how each one works to prevent your photos from being blurry, grainy, and too light, too dark, or properly exposed. Photos are meant to capture the moments of life, so we want to make sure your camera is operating on the best settings to produce photos you will look back on and cherish for years to come.
Phone Photography
In this section, we’ll talk about the basic “rules” of photography to produce high quality photos with your phone. The most important tip is to practice. Take as many photos as you can and study why you like your favorite photos so you can replicate them. You can also look back on your least favorite photos to understand why you do not like them and determine what you can do differently to create a great photo in the future.
Using Light and Exposure
Different lighting can change the entire emotion of a photo. Dark lighting can cause a photo to seem more serious or moody, where a bright photo can seem more upbeat. Use the lighting to create shadows or silhouettes or look for places where the light creates reflections you can use to your advantage.
This difference in effect can be noticed in the following photos. Though they were taken just seconds apart, the emotion of the photos is completely different due to the lighting.
Figure 7. Examples of different levels of exposure.
Exposure is another word for light in photography. It is the overall brightness or darkness of a photo and is determined by the amount of light that reaches the camera sensor when a photo is taken. The higher your exposure, the brighter a photo will be, but if your exposure is low, there will be less light, resulting in a darker photo.
As mentioned in the previous section of this fact sheet, the shutter speed, aperture and ISO work together to create the exposure and are known as the “exposure triangle.” When the shutter speed is increased to freeze motion in an image, we need to open the aperture more or increase ISO to allow more light to reach the sensor. If we want to close the aperture to create a wider depth of field, we need to slow down the shutter speed or increase ISO to allow more light in. Together, these three aspects move in relation to each other to maintain the correct exposure.
Figure 8. The exposure triangle.
Perspectives
Angles are very important in photography. Try raising your phone above your head or even lowering your phone to the ground to change the perspective. As American landscape photographer, Ansel Adams once said: “a good photograph is knowing where to stand”. Moving around to find the perfect spot to take a photo can be one of the most important aspects of photography. Be intentional about where you place yourself in relation to your subject. Choose angles that offer a unique perspective on your subject, and make sure you are close enough that the viewer immediately knows which aspect of the photo is the focal subject.
The following photos are of the same silo. Notice how the different angles make two totally different photos, even though the subject is the same.
Figure 9 and 10. Perspectives example.
Composition
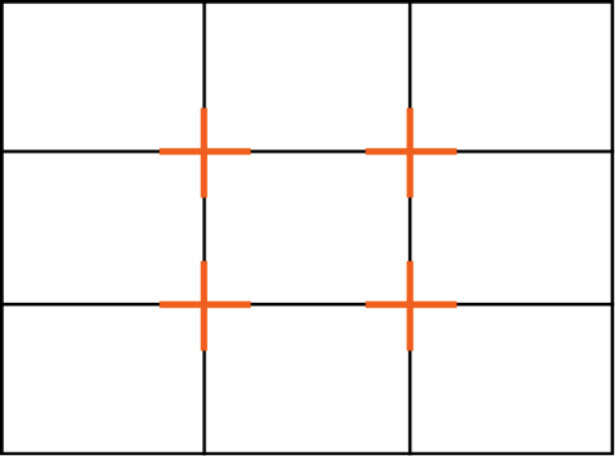
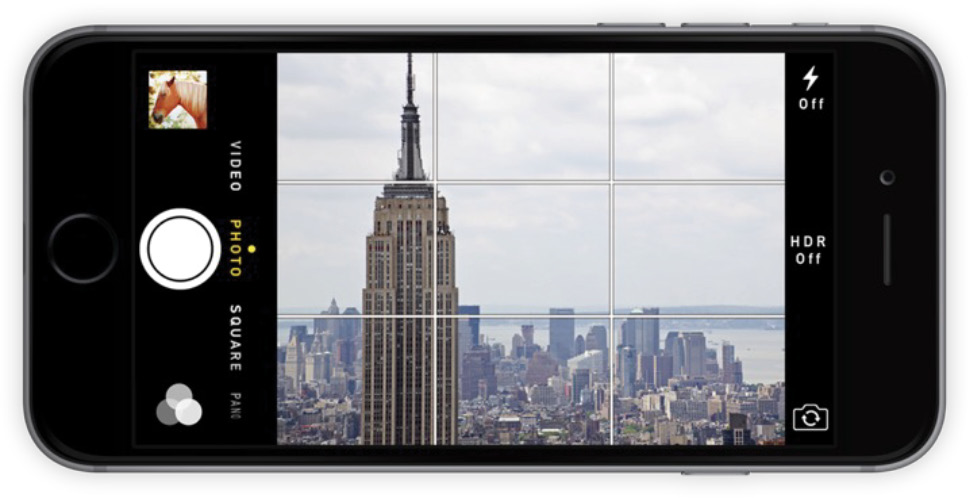
Composition is the way you arrange the subject(s) of your photo compared to the rest of the scene. You can turn on a feature in your phone camera settings called a grid to help you with this. The grid is based on the “rule of thirds,” which breaks photos into thirds horizontally and vertically.
Figure 11. Composition grid.
Figure 12. Composition grid on camera.
Lining up your subject or interest point with the gridlines, or the intersections, of the lines creates a more balanced and level photo. The rule of thirds also applies to the area moving away from the lens, which is where foreground, midground and background can be useful to keep in mind as well. Having different focus points in different areas of the photo can increase its appeal. You will learn how to turn on the grid feature on your phone next.
Grids for iPhone
Your phone camera can display a grid on the camera screen. The grid is nine equal boxes made by horizontal and vertical lines. Using the grid can be useful when you want the subject of the photo to be in a specific area, like the top, middle, bottom or side. To turn this on, go to the settings app > camera > and turn on the “Grid” switch.
Grids for Android
Your phone camera can display a grid on the camera screen. The grid is nine equal boxes made by horizontal and vertical lines. Using the grid can be useful when you want the subject of the photo to be in a specific area, like the top, middle, bottom or side. To turn this on, open the camera app > camera settings > Grids and guides > turn on the Grid switch. To convert a motion photo to a long exposure photo, tap the information icon (the “i” by the map and settings of the photo) and choose “long exposure” from the options.
Lines, Patterns and Symmetry
Lines can draw a viewer’s eye toward certain points of a photo. They are called leading lines. Things like staircases, train tracks, roads, or fences can create leading lines.
Repeating patterns can create bold images. Look for things like lines, shapes, forms and colors that repeat and create a pattern. Patterns can be something obvious, like a tiled floor, or something more subtle, like paint on a building or repeating greenery.
Symmetry is pleasing to the eye. Taking photos with two equal parts that mirror each other can create a sense of balance and beauty. Symmetry could be created with reflections, buildings, or even a perfectly centered photo and tends to create more stability in a photo. However, asymmetry can also be a useful aspect of photography, creating more energy in a photo and making it appear livelier.
Figure 13 and 14. Examples of leading lines, patterns and symmetry.
Focus and Zoom
Focus is what is clear and sharp in the photo. The viewers eye will be drawn to the sharpest, most detailed portion of the photograph. It is very important to make sure your focus is set on the correct object, or that element will be blurry. This is also why autofocus can sometimes be undesirable, as it may choose the wrong thing to focus on sometimes. Focus cannot be fixed after the photo is taken, so it must be right from the start. Luckily, it can easily be set on your phone. Simply tap your screen in the area you want to focus on, and the focus will be set.
It can be tempting to zoom in on a subject, but it can create a grainy, blurry or pixelated photo, so avoid it when using your phone for photography. It is better to just step closer to your subject or crop the photo later to make the subject appear closer (Rumberger, 2023). However, some newer smartphones boast multiple cameras, so tapping on the numbers at the bottom of the screen like 0.5x or 2.5x will zoom out or in without distorting the image.
Using Bursts
A “burst” is when a lot of photos are taken at once. This can be achieved on your phone by holding the shutter button and swiping to the left, using the volume button, or by setting a timer on your phone camera. Bursts can be helpful when trying to capture movement and can be useful when taking photos of motion like sports or animals.
Photo File Types
There are two prominent file types that iPhone, other Apple products and Android devices use to store photos: Joint Photographic Experts Group (.jpg) and High Efficiency Image Format (.heic). There are a few differences between the files to be considered before choosing the best fit for you like compression, storage quality, compatibility, transparency, and editing (Adobe, 2024).
Large .jpg files can be compressed into more manageable files and are a popular choice for many web designers. However, this can affect image quality, where .heic files can break into significantly smaller files without sacrificing quality. .heic files also take up significantly less space on your device, boast superior quality, retain quality after edits are made, and support image transparency. However, .jpg files are much more compatible among devices and programs (Adobe, 2024).
Phone Settings
Each type of smartphone has different settings, modes and tools. We will explain these on some of the most common phone types, like iPhone and Android.
iPhone
If you have an iPhone, you are probably familiar with the basic modes in your camera app, like photo, portrait, and pano. For these settings, we will keep the camera in the “photo” mode. Here are a few adjustments to make in your settings to improve your phone’s camera.
Live Photos
Live photos capture the moments before and after you take a photo and combine them into a 1.5-second-long video. These can be used to create long exposures, like the “light trail” we talked about earlier, or to capture and freeze motion. To turn on the live photo feature, tap the multi-circle icon that appears at the top right of the camera app. After the live photo is taken, you can alter it by viewing it in your gallery and tapping the drop-down arrow next to the “live photo” label.
Turn Off HDR Auto
HDR is a mode your iPhone defaults to and can often make photos look unnatural and pixelated. The reason behind this is that some photographs contain both very bright areas and very dark areas, like a sunny sky and deep shade beneath trees. It is difficult for most smartphone cameras to capture detail in both areas simultaneously. In HDR, or High Dynamic Range, mode, your camera will take several photos in rapid succession at different exposures. It then blends the photos to capture more detail and color in the varied areas. However, this effect is most useful in complex settings with a range of brightness. Turning it off will make your photos look more natural and cleaner. To turn it off, go to the settings app > camera > and turn off the “Smart HDR” or “Auto HDR” switch.
Adjust Exposure
Exposure is another tool to make a photo brighter or darker. The auto exposure feature doesn’t always capture a photo how you would like it to look, so you can adjust the exposure on your own. To do this, open the camera app and tap your screen to focus. Then you can slide your finger up or down on the sun icon to adjust exposure.
Underexposed
Correctly Exposed
Overexposed
Figure 15. Examples of different exposure.
Preserve Camera Settings
So, you changed these things to get the perfect photo, but your phone will return to its default settings unless you preserve them. You can do this by opening the settings app > camera > scroll to “Preserve Settings.” You can choose to keep your last mode, like Photo or Pano, the last filter you used, or the Live Photo setting. If you plan on switching between modes often, this can save time and keep you from missing a shot (Carrasco, 2024).
Android
Here are some settings to change on your Android smartphone to enhance your photo-taking abilities.
Motion Photos
Motion photos capture the moments before and after you take a photo and combine them into a 1.5-second-long video. These can be used to create long exposures, like the “light trail” we talked about earlier, or to capture and freeze motion. To turn on the motion photo feature, open the camera app > camera settings (upper left corner) > turn on the “Top Shot” option.
Pro Mode
Android devices have a mode that allows you to adjust things like shutter speed, ISO and more. To turn this on, open the camera app > change the camera mode to More > tap Pro. The new settings will appear at the top and bottom of the screen.
10-Bit Color
Enabling 10-Bit Color will give your photos more color detail, making them look truer to real-life. Photos shot with this setting will take up more space than the default, so be aware of the amount of storage space on your phone. To turn this on, open the camera app > tap settings > tap 10-Bit color.
Portrait Mode
If you want to take pictures of individual people, portrait mode can be useful. To turn this on, open the camera app > tap portrait. (Sansom, 2023)
Conclusion
Photography is an art form and similarly to other arts, can be open to interpretation. While the content of this fact sheet provides the basic framework for phone photography, there is much more to photography than knowing how to use camera settings. Practicing is the most full-proof way to become a better photographer. This fact sheet is designed to lay out the basics for you to build upon and determine which style of photography you enjoy most. Happy snapping!
References
- Adobe (2024). HEIC vs. JPEG: Which is better? | adobe. Adobe. https://www.adobe.com/creativecloud/file-types/image/ comparison/heic-vs-jpeg.html
- Cardinal, D. (2021, April 28). Smartphones vs cameras: Closing the gap on Image Quality. DXOMARK. https://www.dxomark.com/smartphones-vs-cameras-closing-the-gap-on-image-quality/
- Carrasco, N. (2024, January 22). Top 5 iphone camera settings for better looking photos. Moment. https://www. shopmoment.com/reviews/top-5-iphone-camera-settings-for-photography
- Jasenka, G. (2023, December 13). How many pictures? photo statistics that will blow you away. Light Stalking. https://www.lightstalking.com/photo-statistics/
- Kun, A. (2019, November 25). Focusing basics. ExposureGuide.com. https://www.exposureguide.com/focusing-basics/
- Mansurov, N. (2022, April 6). Understanding iso, shutter speed and aperture - a beginner’s guide. Photography Life. https://photographylife.com/iso-shutter-speed-and-aperture-for-beginners
- Rumberger, J. (2023, September 7). Phone Photography 101: How to take good pictures with your mobile device. HubSpot Blog. https://blog.hubspot.com/marketing/good-pictures-phone-tips
- Sansom, A. (2023, March 20). 9 Android camera features that will help you take way better photos. Tom’s Guide. https://www.tomsguide.com/how-to/android-camera-features-that-will-make-you-a-better-photographer

