Review and Operational Guidelines for Portable Ultrasonic Flowmeters
Introduction
Having an accurate estimate of any input used for agricultural production is the first step towards increasing the efficiency of utilizing that input and maximizing yield per unit input. This is especially true in case of irrigation water, as this precious resource is limited in availability and the competition over its use is growing rapidly from various sectors. Knowing the amount of water applied to agricultural fields is a prerequisite in evaluating how an irrigation system is performing and if any improvements are required. This information also allows for determination of pumping plant efficiency, which is required for improving energy conservation and reducing pumping costs.
Ultrasonic flowmeters provide the capability of measuring water flowrate accurately, by utilizing the dynamics of ultrasonic energy transmission. A compact marvel of modern engineering, the portable ultrasonic flowmeter enables one to determine water flowrate through a pipe without having to interrupt the flow (nonintrusive testing). These devices are becoming more common as improvements continue to be made to the technology. The popularity of portable ultrasonic flowmeters has been largely attributed to their convenient size, weight and ease of use. The weight of most commercially available units is less than 13.0 pounds (including all accessories), which is a major advantage for set up and transportation to remote areas. Portable ultrasonic flowmeters generally come with a built-in rechargeable battery, which can last up to 18 hours when fully charged. This attribute makes them the flowmeter of choice in cases where more time is spent in the field, for example when evaluating many irrigation systems in remote areas. The equipment can also be used while the battery is being charged, if a power source such as a generator is available.
Depending on the brand and model, portable ultrasonic flowmeters can operate on pipe diameters from 0.5 inch to 20 feet; flow velocities from 1.0 to more than 50 feet per second; and a wide range of fluid temperatures. They have excellent accuracy, ranging between 1 and 5 percent, when set up and operated properly within their range of flowrates. On the other hand, portable ultrasonic flowmeters are relatively expensive compared to other types of flowmeters. The price depends on the type and range of flows that can be measured. At the time of preparation of this fact sheet, the price for a single unit ranged between $2,000 and $13,000.
Ultrasonic flowmeters consist of clamp-on transducers that are attached on the outside wall of the pipe with flowing water (Figure 1). These transducers transmit and receive ultrasonic signals that result in the computation of corresponding flowrate, which is displayed by the meter. The digital display showing the water flowrate is the device to the left sitting on top of the pipe. Portable ultrasonic flowmeters are programmed to measure and display flow in most of the commonly used water flow units such as gallons per minute, liters per second and cubic meters per second.
Several types of ultrasonic flowmeters exist in the market. They vary in setup, signal type, application and price. This fact sheet describes the general characteristics and principles behind two main types of portable ultrasonic flowmeters currently available in the market and used for both laboratory and field applications: transit-time and doppler ultrasonic flowmeters.
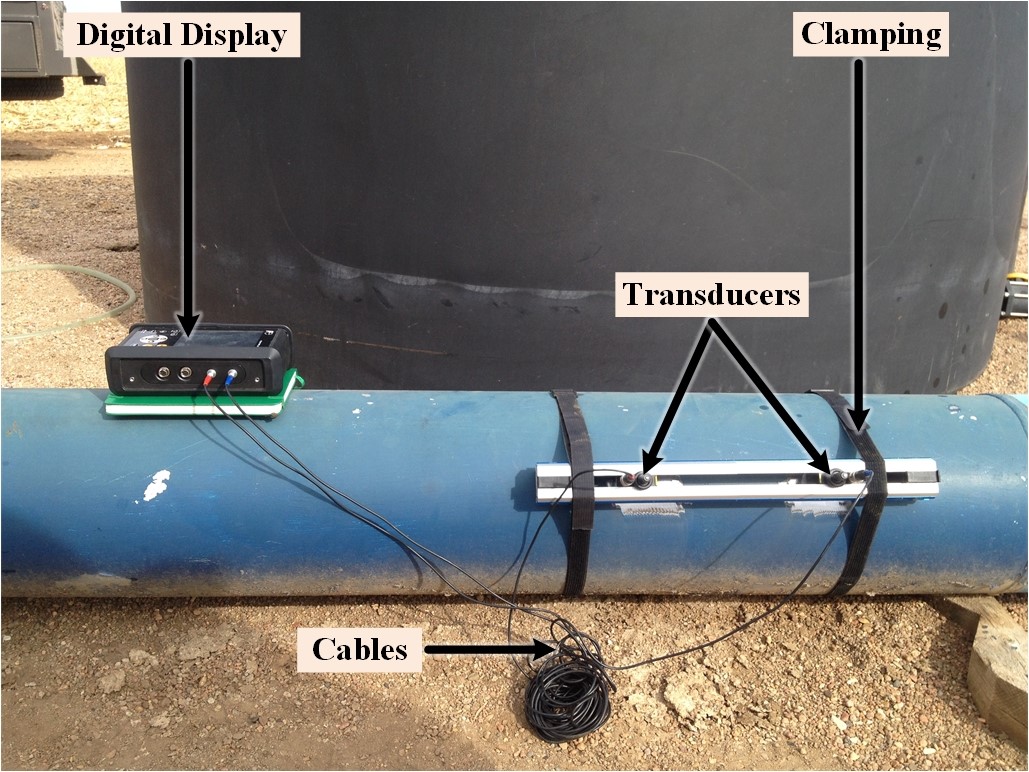
Figure 1. Ultrasonic flowmeter installed on a pump outlet pipe.
Transit-time Ultrasonic Flowmeters
The operation of transit-time ultrasonic flowmeters is based on the principle of phase shift flow measurement. According to this principle, ultrasonic signals (sound waves) moving in the direction of flow require less time to travel between the two transducers as compared to signals moving against the flow. The more common transit-time ultrasonic flowmeters consist of two transducers mounted on the outside wall of the pipe. These two transducers act alternatively as transmitter and receiver. The first transducer sends out an ultrasonic signal and the second transducer receives it. Immediately after, the second transducer sends a signal back to the first transducer. The transit times between the up-stream and down-stream signals are estimated and their difference is used to compute the velocity of the flowing water. Transit-time ultrasonic flowmeters are reported to work very well with relatively clean water that allows good signal transmission.
Doppler Ultrasonic Flowmeters
Doppler ultrasonic flowmeters measure the frequency change (Doppler effect) of a signal sent into the flowing liquid stream across the pipe. The injected signal bounces off of bubbles or particles in the stream and this echo is returned to the transducer (Figure 2). The frequency of the signal is shifted lower in case of flow moving away from the sensor. The device compares the frequency shift to the original signal and computes the flow velocity. For accurate flow measurement with the Doppler-type ultrasonic flowmeter, the fluid should contain sufficient concentration of particles and/or bubbles to reflect the signal adequately.
Doppler ultrasonic flowmeters work well with suspension flows where particle concentration is more than 100 parts per million and particle size is larger than 100 micrometers, but less than 15 percent in concentration. Thus, these flowmeters are not recommended for use in clean water. Doppler flowmeters typically have just one transducer, therefore setup for measuring may be easier than the transit-time flowmeters (this affects the cost too).
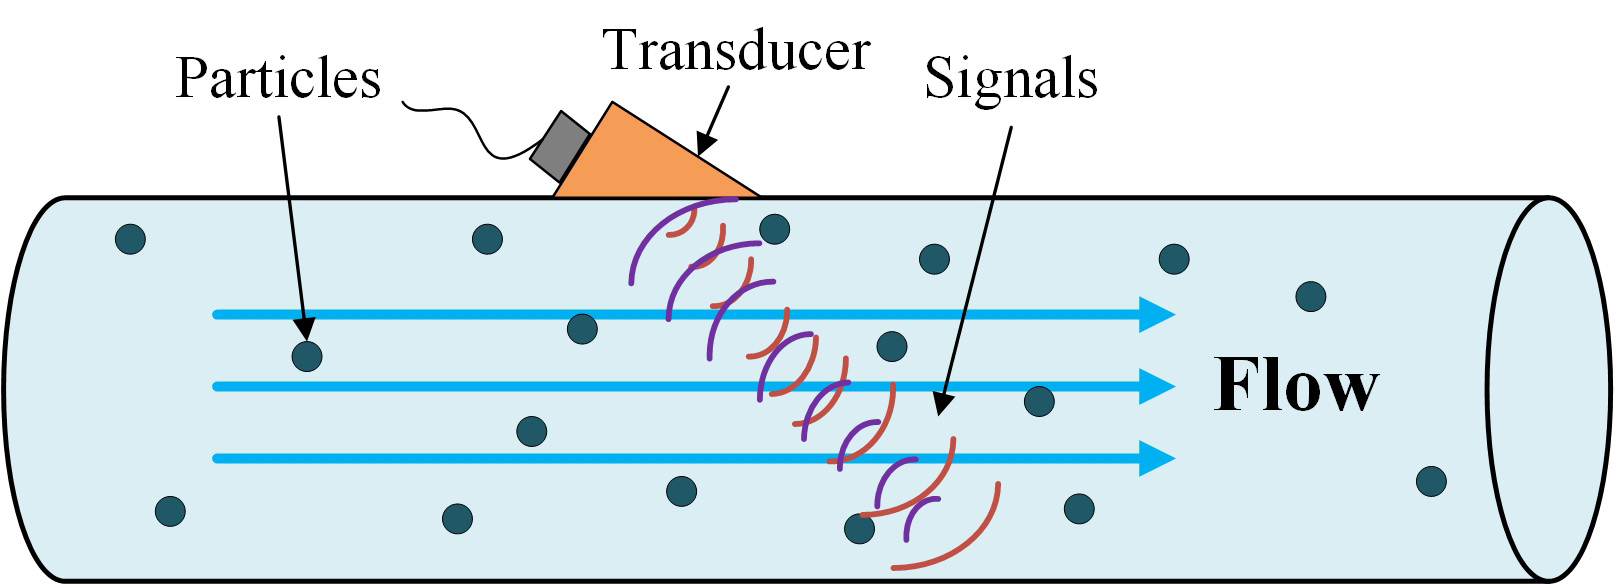
Figure 2. Doppler ultrasonic arrangement.
Selecting Portable Ultrasonic Flowmeters
There are a number of important factors to consider when choosing a good portable ultrasonic flowmeter. One factor is the sediment properties of the water in terms of quantity and size. Generally, when water to be measured has sediment particles more than 100 parts per million and larger than 100 micrometers (the numbers may be different for different manufacturers), the Doppler type should be considered. On the other hand, in the case of clear and clean water without sufficient sediments, the transit-type works better. The desired level of accuracy should be considered when selecting the best portable ultrasonic flowmeter for the job. Between the two types of ultrasonic flowmeters discussed in this fact sheet, the transit-time was reported to be more accurate as compared to the Doppler type. The pipe size and flow range for which the flowmeter is intended to be used should also give guidance on choosing the right flowmeter to purchase.
Maintenance of Portable Ultrasonic Flowmeters
As with any piece of equipment, portable ultrasonic flowmeters require routine inspection and maintenance to ensure efficiency and accuracy. Major maintenance recommendations are generally included in the respective manuals. In general, these devices require less maintenance compared to other flowmeters because they have no moving parts. After use, dust and transmission gel should be adequately wiped from the transducers and other electronics before housing in the carrying case. When not in use, meter components should be kept in the carrying case and stored where it will not be exposed to excessive dust and other contaminants. The equipment should be stored away from high temperature and humidity and not exposed to direct sunlight and rain. Replacement of components like the built-in battery and electronics should be done based on the manufacturer’s recommendation. The lifetime of components is generally stated in the equipment manuals and guidelines.
Sources of Error and How to Avoid Them
Deviations from full pipe flow cross section
Ultrasonic flowmeters are designed to measure flowrate in pipes completely full of water. This is one of the primary reasons for inputting the pipe dimensions into the flowmeter — the unit calculates volumetric flowrate through multiplying water velocity by the pipe’s cross sectional area. However, air at the top of the pipe or sediments resting at the bottom can cause deviations in the assumed cross sectional area. Additionally, air in the water can disrupt the transducer signal and give inaccurate readings. If possible, use air bleed valves to purge trapped air or other means available to ensure the pipeline is flowing full. One easy test is to feel the top and the bottom of the pipe. If the pipe is full the top should feel as cold as the bottom.
One method for improving the measurement under these conditions is to take the measurements in perpendicular (cross) planes at an angle of about 30 degrees above and/or below the horizontal as shown in Figure 3, and take the average of the two measurements. Precautions should also be taken to keep the flowrate constant or have a separate flowmeter to account for changes in flowrate between the two measurements as shown in the picture in Figure 3.
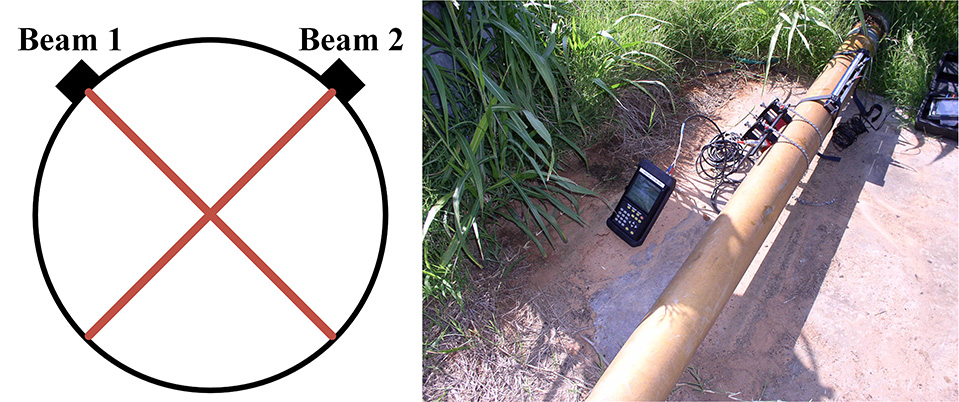
Figure 3. Example of cross beam measurement (left) and use of two flowmeters to verify measurements (right).
Pipe fittings and configurations
Ultrasonic flowmeters are heavily influenced by changes in flow profile caused by flow disturbances, and they need fairly laminar water flow to be able to report accurate measurements. Pipe disturbances such as elbows, fittings and valves can cause downstream turbulence in a pipe. This could cause measurement errors as accurate flow measurement of water that is agitated and swirling is very difficult. Figure 4 shows flow characteristics in and after a 90-degree bend, which has been reported to cause excessive turbulence in pipe flow. As shown in this figure, the bend results in non-uniform flow streamlines with different velocities and this causes excessive turbulence immediately downstream of the bend, which ultimately affects flow measurement.
Valves can also cause significant errors if partly closed or located near other pipe fixtures. If possible, the best method of dealing with valves is to work upstream and have the valves completely open. It is not recommended to use straightening vanes on any elbow configurations, since the profile is dramatically changed and ultrasonic flowmeters tend to produce measurement error.
Figure 4. Turbulence in 90-degree pipe bend.
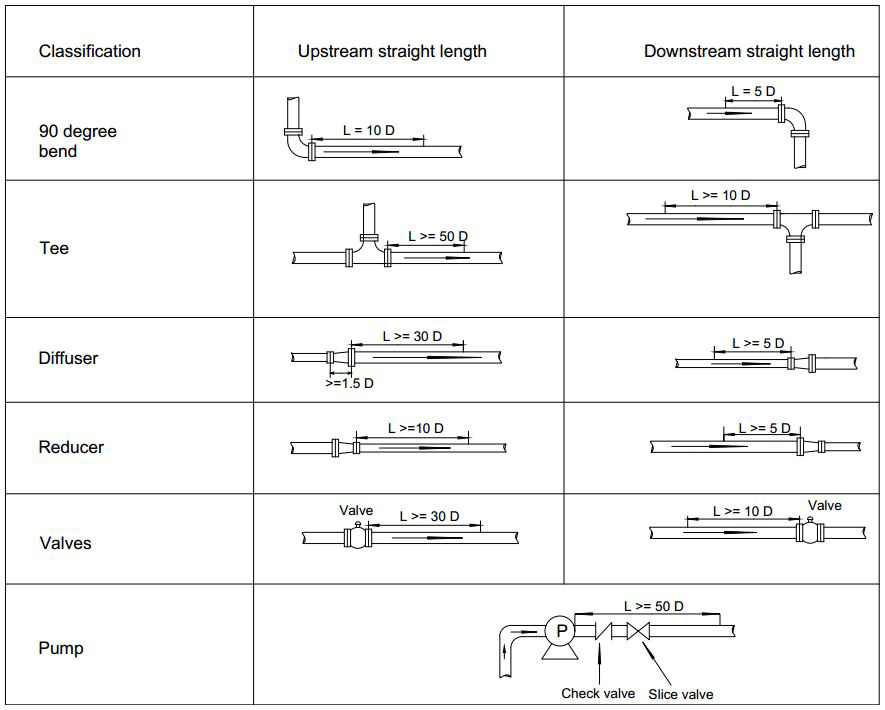
To ensure well-conditioned water flowing past the measuring location, a sufficient length of straight, unobstructed pipe is required from the meter location. Manufacturers suggest placing flowmeters at a distance of at least 10 times the diameters of straight pipe downstream of pipe fixtures. Studies indicate that certain types of disturbances require more than 10 diameters for the measurement to be within 5 percent accuracy as presented in Figure 5. However, each meter manufacturer has its own guidelines on what distances from a disturbance to place a meter to achieve a good measurement. This information can be found in their manuals and technical specifications.
Figure 5 shows the straight pipe length requirements for some of the pipe fittings and configurations to ensure accurate flow measurement. The lengths (L) are in pipe diameter (D) multiples. For example, a 6-inch pipe with “10 D” recommendation is saying the meter should be at least 60 inches (5 feet) from the disturbance. Note, the lengths are from the fixture to the center of the ultrasonic meter.
Figure 5. Required straight runs for mounting the flowmeter.
In a practical field setting, one often must use much shorter straight runs in which case correction factors may need to be employed. Correction factors for an ultrasonic meter can be derived from laboratory calibrations. In the study by Eisenhauer (2008), a 90-degree elbow, a check valve and a butterfly valve were tested and some correction factors were estimated for corresponding downstream straight lengths (Table 1). Even after applying the correction factor some error is expected, especially for shorter distance. For example, at 2 D distance the reading error is expected to be ±20 percent after adjustment.
Table 1 can be used by applying the following relationship:
- Adjusted flowrate = Correction factor × Displayed flowrate on the flowmeter at that length
Table 1. Correction factors and accuracy values at selected pipe diameters (D).
| Downstream length (multiples of diameters, D) |
Correction factor (dimensionless) | Accuracy after adjustment (±%) |
|
|---|---|---|---|
| 2 | 1.15 | 20 | |
| 3 | 1.1 | 9 | |
| 4 | 1.07 | 5 | |
| 5 | 1.06 | 4 | |
| 6 | 1.05 | 3 | |
| 7 | 1.04 | 3 | |
| 8 | 1.03 | 3 | |
| 9 | 1.03 | 3 | |
| 10 | 1.02 | 3 | |
| 15 | 1.01 | 3 | |
| 20 | 1.01 | 3 | |
| >30 | 1 | 3 |
As an example, if water flow was measured 5 D downstream of a 90-degree elbow and the displayed flowrate on the meter was 600 gallons per minute, the adjusted flowrate would be equal to 600 × 1.06 or 636 gallons per minute with ± 4 percent accuracy, meaning that the actual flowrate could be from 611 to 661 gallons per minute.
Measuring pipe wall thickness
This operation must be carried out during the initial flow measurement setup procedure. Typically, this is accomplished with a separate small transducer that measures only the wall thickness after input of the pipe material into the device. The pipe wall thickness is a critical input parameter. In larger steel pipes, this thickness can be greater than 0.3 of an inch. Difficulty in getting a consistent thickness reading may point to corrosion problems. That is, the pipe may be heavily pitted and corroded on the interior. Researchers have seen thicknesses vary from about 0.20 to 0.33 of an inch on the same pipe and suspect this was in part due to pitting, rust and scale. Inputting an incorrect wall thickness can throw off the flow readings by a significant margin. Measurement accuracy of wall thickness is improved by applying gel between the transducer and pipeline and also making sure that the transducer is perpendicular to the pipeline surface.
In rare cases, the pipe material itself has imperfections that can scatter the ultrasonic signals. This would be from the manufacturing phase when the pipe material was not solid, thus hardened in a non-uniform way. This would be difficult to detect ahead of time as one approached a section of pipe in the field. If this is suspected to be an issue, the sensor should be moved and flow should be measured at a different location on the pipe.
Transit-time transducer pair placement spacing
The installation locations of transit-time flowmeter transducer pairs directly impact the accuracy of the measurement. There are a number of mounting arrangements that can be followed to mount the two transducers on a pipe. The three main configurations are the direct transmission (Z-method), the single reflection (V-method), and the multiple reflection (W-method) as shown in Figure 6. The first two configurations are most common. The direct method where transducers are mounted on the opposite sides are more commonly used in larger diameter pipes whereas the reflection methods, where the transducers are mounted on the same side, are normally applied for small diameter pipes.
As depicted in Figure 6, the signal is reflected off the inside walls of the pipe. The receiving transducer needs to be exactly where the reflected signal (or direct signal in case of Z configuration) appears. The flowmeter software calculates this transducer pair spacing distance precisely when first setting up the equipment (assuming the parameters such as pipe material and wall thickness are entered correctly). Mistakes caused by placing the transducers at an incorrect spacing can result in erroneous readings. Laboratory tests showed that a shift along the pipe of 1 millimeter could produce a 1 percent variation in measured flow. As with other flowmeter measurement errors, the operator may not be able to tell from the instrument output readings that a serious mistake has occurred and the reported flow readings are far from actual. Attention to details must be exercised at the set-up stage.
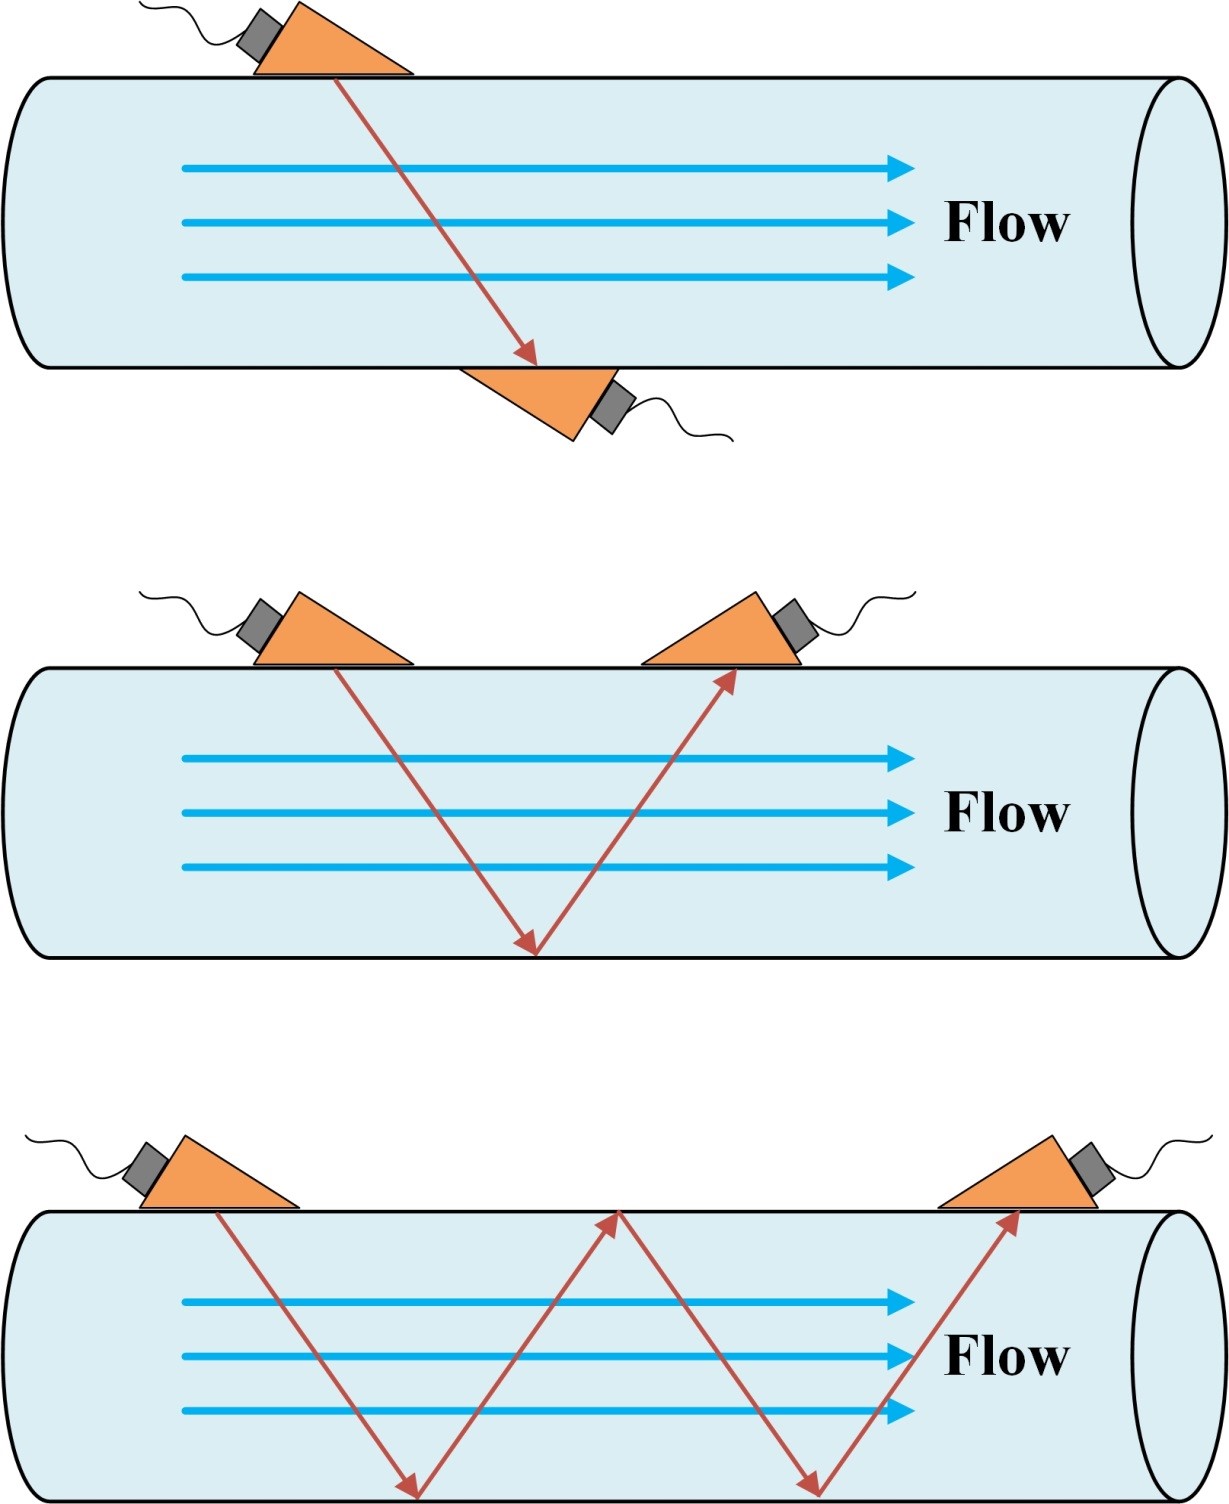
Figure 6. Common mounting configurations: Z method (top), V method (middle) and W method (bottom).
Condition of the pipe interior
Wall roughness of the inside of the pipe increases the flow turbulence and if not accounted for in the meter’s correction factor, may cause an error of up to 4 percent in very rough pipes. Many older pipes have considerable corrosion and scale buildup. Older pipes may be very difficult to read with ultrasonic flowmeters. Not only does the heavy corrosion cause turbulance, the thick corrosion layer is another boundary the ultrasonic signal must reflect off of or penetrate. Severe corrosion can cause over-estimation of the pipe interior diameter which is input into the flowmeter software at procedure start-up. If using multiple reflection patterns (“V” or “W”), the signal may be absorbed and too weak to be measured. Thus, the Z-method (single top to bottom) configuration may be the best option in these cases. The ultrasonic signal frequency of the flowmeter also should be considered. Generally, the rougher the interior of the pipe, the lower the frequency of the flowmeter should be used. This is accomplished by selecting a lower frequency transducer (if one is available) and adjusting the start-up settings on the device.
Ultimately, it may be difficult to ascertain the interior condition of the pipe being tested. The main point of using ultrasonics is that the pipe and process are undisturbed. If a valve or port can be opened to visually inspect the pipe, this might be advantageous. Otherwise, caution should be exercised for flow readings varying greatly (± 25 percent) or difficulty finding the pipe wall-thickness.
Misalignment of transducers
Depending on the type (transit-time or Doppler), portable ultrasonic meters utilize one or two clamped-on transducers to measure water flow velocity. Misalignment of the transducers causes errors in the flow velocity readings. The transducers must be exactly parallel to the liquid flow in the pipe (Figure 7). Misalignment reduces the signal strength received by the transducers, therefore result an error in flow readings, depending on the magnitude of deviation from the parallel axis. Some flowmeters come with an alignment rail, which is very useful in avoiding the misalignment error. Figure 7 shows a properly aligned portable ultrasonic flowmeter parallel to the pipe. The two dashed lines demonstrate proper alignment and an example of misalignment that can occur.
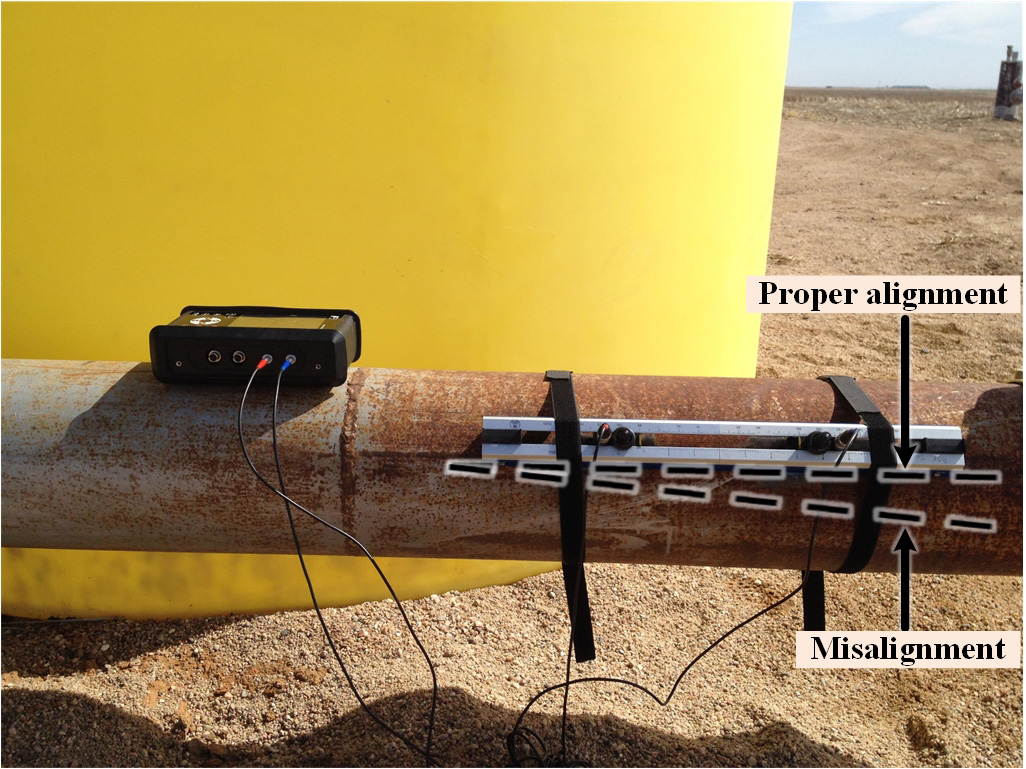
Figure 7. Alignment of transducers.
Transducer contact with pipe
For the ultrasonic flowmeter to measure flow, the transducer(s) must generate and receive sound signals that pass through various types of material simultaneously. The signal must get through the transducer and pipe material at both sending and receiving locations and pass through the flowing water. This interface between vastly different materials (transducer and pipe) is another potential source of error. A bad contact between the transducers and the pipe can lead to a variety of errors such as echoes, signal damping and variation in flow readings. Tests performed by OSU and NRCS found this area to be the most sensitive, single parameter to producing errors in measurement in an otherwise correctly setup flow test. Some of the errors were obvious (300 percent + flow measurements), but other measurements were not so far off to indicate clear mistakes.
In a perfect situation, the transducer would be welded or somehow very rigidly fastened to the pipe. This would allow the signals to go directly from the pipe to the transducer and vice versa. This is not practical in the field with a portable device. The solution is to use an acoustic gel between the transducer and the pipe. Like gels used for medical sonograms, this material makes a continuous path for the sound signal to pass through. Without the gel, many flowmeters would simply not work. Misapplication of the gel, such as not applying enough to cover transducer contact area, not thick enough or an uneven application can cause reading errors. Applying the gel requires caution to ensure it does not dry out or air bubbles are not introduced from excessive spreading. Bubbles in the gel can cause signal echoes. The gel should be applied in a bead that will spread evenly along the transducer base and allow for full contact with the pipe wall when the transducer is pressed onto the pipe (Figure 8).

Figure 8. Correct application of gel for good transducer-pipe contact.
The importance of properly applying the gel should not be underestimated. While silicon grease is preferred, a suitable substitute can be axle grease or other similar gels. Different manufacturers have different gel recommendations and might use different techniques to apply them. Thus, the manufacturer’s manual should always be consulted to make sure the correct procedure is followed. The OSU/NRCS tests showed over-torquing the transducers onto the pipe can sometimes warp the transducer contact area by a tiny amount, causing the transducer to partially peel back from the pipe and lose contact. This in turn, resulted in erratic flow readings. Most manufacturers suggest exercising caution when torquing the transducers to the pipe. Rearrangement or moving the transducers is sometimes needed. It is recommended that the used gel be wiped off and a fresh amount used every time the transducer is placed on the pipe.
All flowmeter manufacturers recommend transducers to be mounted on a smooth section of pipe free of defects. In the field, the pipe exterior is often corroded and/or painted multiple layers. Some flowmeters can adjust for the thickness of the paint by adding it to the lining thickness. If the coating on the pipe is fibrous or a metal mesh, it must be removed. Aggressive sanding and cleaning the surface are often required to properly prepare the pipe surface. Tests showed that some ultrasonic flowmeters are more sensitive to pipe surface conditions. Nevertheless, surface sanding has become the standard practice for OSU tests and almost every pipe to be measured is ground with a grinding wheel to get a clean, bare metal surface on which to place the transducers and gel (Figure 9). This practice greatly reduced variation and errors in the flow readings. If concerned about corrosion, the small area can be cleaned and painted after the test.
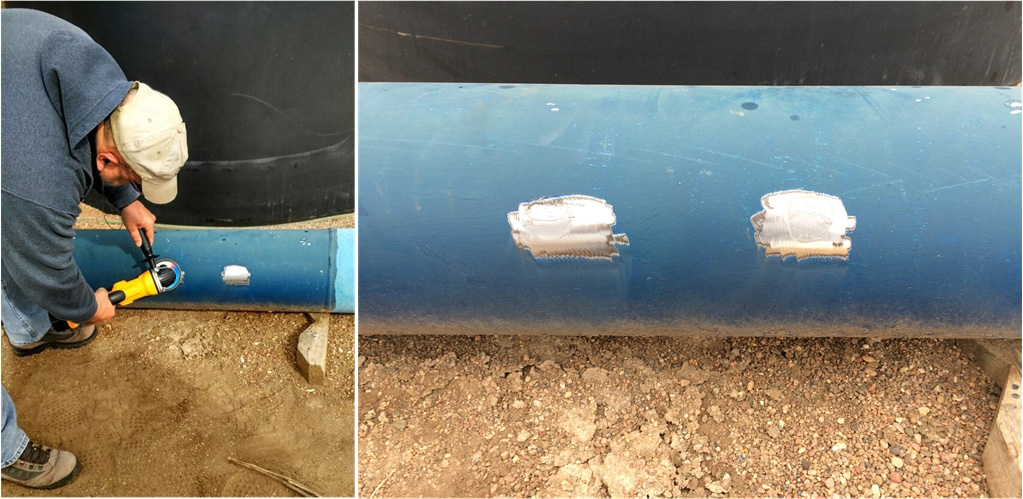
Figure 9. Pipe surface preparation for flow measurement in the field.
Deviations in calibration
Like most measuring equipment, flowmeters are factory calibrated. However, the calibration could drift over time. The equipment should be checked on a regular basis to ensure it is within its reported accuracy range. One can also perform their own calibration if circumstances allow. As long as the water flows are not too high, the volume of water passing through the pipe could be collected and measured over a specific period (recorded by stopwatch) and used to compute the actual flowrate. Comparing the actual flowrate with the flowmeter reading will provide useful information on possible drifts in calibration. Some flowmeters can also measure the speed of sound in the water. This can be checked against known values at specific temperatures (typically in the owner’s manual). A speed of sound reading that is far off could indicate a problem with the meter or pipeline in question. Meters should periodically be calibrated based on manufacturer recommendations.
Accuracy Tests Conducted by OSU
Nine portable ultrasonic flowmeters were tested in January 2016 to determine their accuracy. Testing was performed in a straight section of 12-inch steel pipeline supplying flow to a hydraulic model testing facility at the USDA-ARS Hydraulic Engineering Research Unit as shown in Figure 10. Flowmeter readings were compared against estimates based on a laboratory calibrated orifice meter connected to an air-water differential manometer.
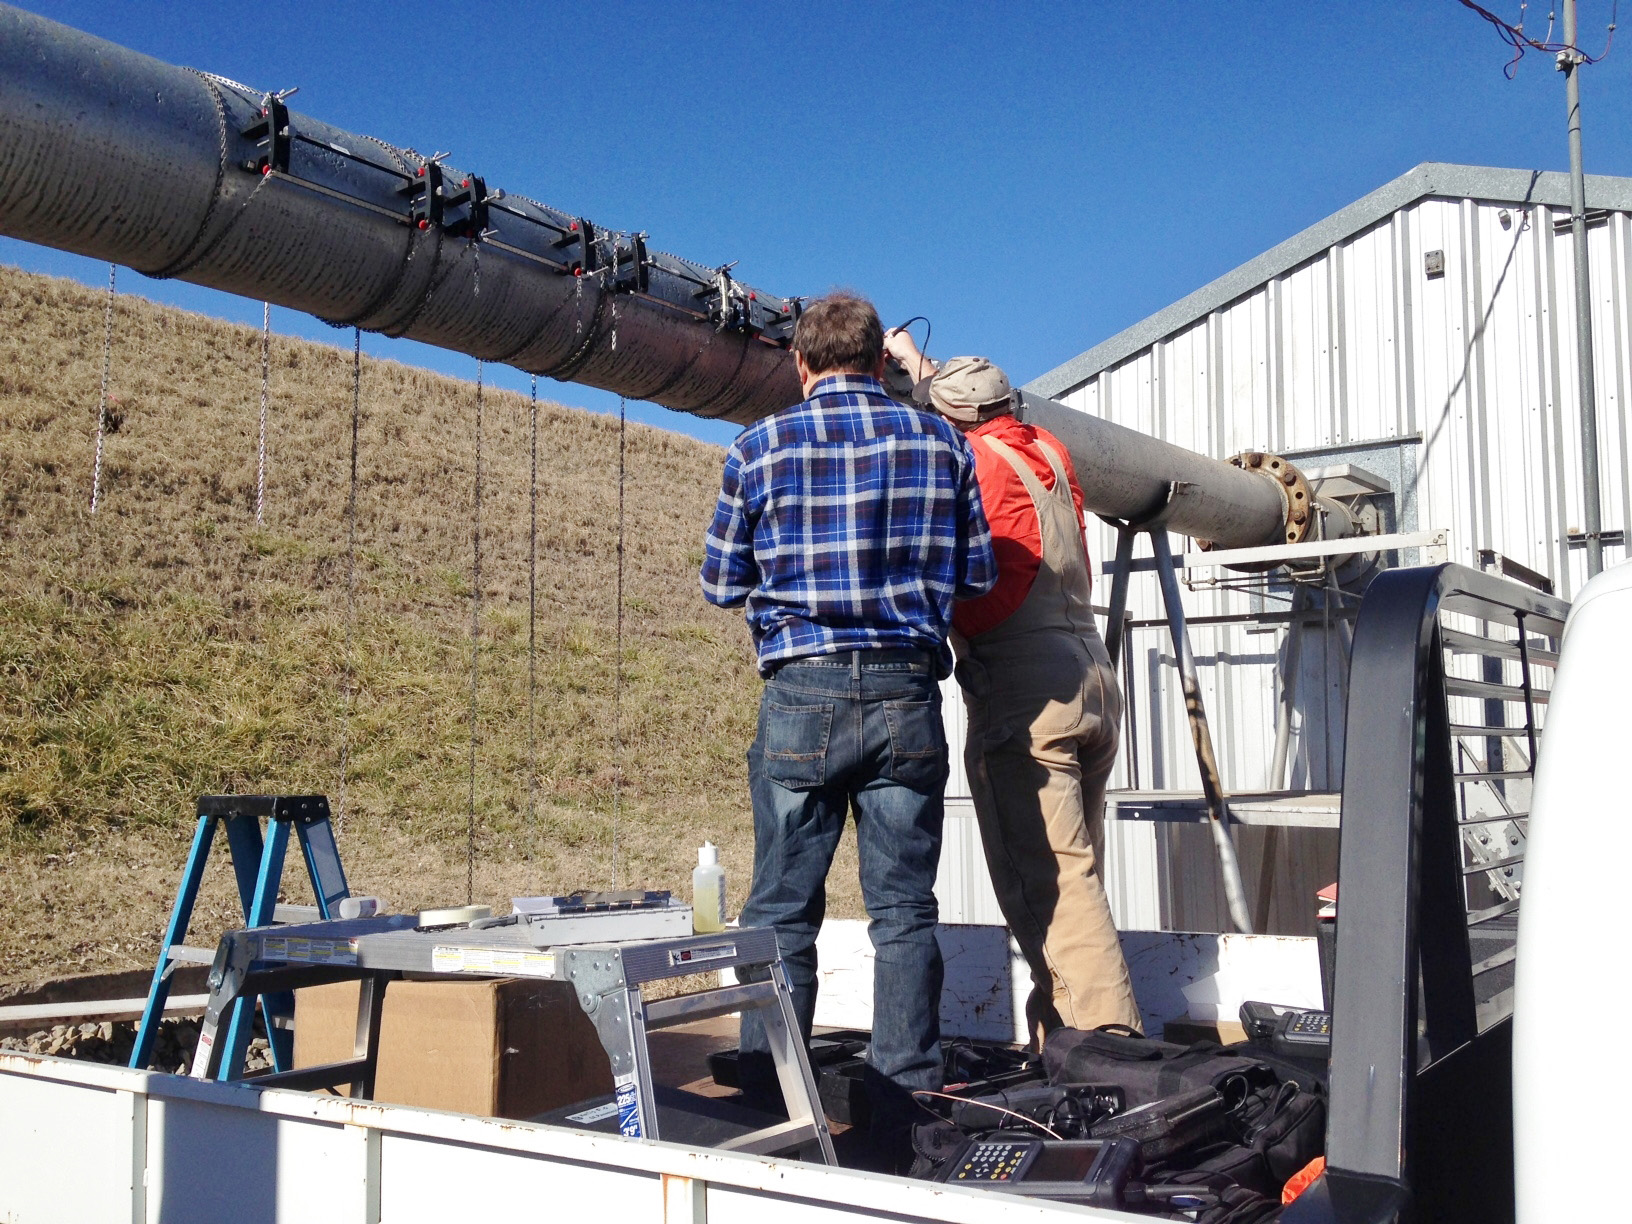
Figure 10. Test setup.
Testing was done at different flowrates ranging from 550 to 1625 gallons per minute. When averaged over all flowrates, the error in ultrasonic flowmeters was from -12.8 to +1.2 percent, with eight out of nine flowmeters underestimating the flowrate. The average error for all units was -6.0 percent (underestimation). Figure 11 demonstrates the comparison between actual flowrates based on the orifice meter measurements and the ultrasonic flowmeter readings.
Figure 11. Actual flowrates based on orifice meter versus ultrasonic flowrates.
Most of the literature on ultrasonic flowmeters have reported the accuracy of the equipment to be in the range between 2 to 5 percent. The results of this test showed that five out of the nine tested flowmeters had accuracy less than the reported values, thus highlighted the importance of regular quality checks. Similar tests can help to establish correction factors for improving the accuracy of flowmeter readings.
Acknowledgment
This material is based upon work supported by the Natural Resources Conservation Service (NRCS), U.S. Department of Agriculture (USDA), under number 69-3A75-16-013. Funding was also provided by the Agricultural Research Service, USDA, under number 3070-13000-011-47S. The authors are grateful to Mr. Don Sternitzke and Mr. Dustin Livingston with USDA-NRCS and Mr. Kem Kadavy with USDA-ARS for their valuable contribution to this project.
References
Baum, M. C., Dukes, M. D., & Haman, D. Z. (2009). Selection and use of water meters for irrigation water measurement.
Boman, B., & Shukla, S. (2009). Water Measurement for Agricultural Irrigation and Drainage Systems1. Agricultural and Biological Engineering Department, Florida Cooperative Extension Service, University of Florida.
Eisenhauer, D. E. (2008). Using ultrasonic flow meters in irrigation applications. NebGuide G1426, University of Nebraska–Lincoln Extension Publication.
Fuji Electric Co., Ltd. (2013). Portable Type Ultrasonic Flowmeter (PORTAFLOW C). Instruction Manual.
Hill, R. (1999). How Good Is Your Water Measurement?
Johnson, A. L., Benham, B. L., Eisenhauer, D. E., & Hotchkiss, R. H. (2001). Ultrasonic water measurement in irrigation pipelines with disturbed flow. Transactions of the ASAE, 44(4), 899.
Lynnworth, L. C., & Liu, Y. (2006). Ultrasonic flowmeters: Half-century progress report, 1955–2005. Ultrasonics, 44, e1371-e1378.
Mahadeva, D. V., Baker, R. C., & Woodhouse, J. (2009). Further studies of the accuracy of clamp-on transit-time ultrasonic flowmeters for liquids. IEEE Transactions on Instrumentation and Measurement, 58(5), 1602-1609.
Winkler, R. Sounding out flow. How ultrasonic flowmeters work, Omega Engineering, Inc., 2010.
Blessing Masasi
Research Assistant
R. Scott Frazier
Associate Professor and Extension Specialist,
Energy Management
Saleh Taghvaeian
Assistant Professor and Extension Specialist, Water Resources


