Building a Vertical Hydroponic Tower
Vertical Hydroponics
Hydroponics is a method of growing plants without soil in a horizontal or vertical fashion, where mineral nutrients are provided through the water. Hydroponic systems that allow growing of plants in a vertical fashion are known as vertical hydroponics. Vertical hydroponics works by using conventional hydroponic techniques in a vertical, gravity fed system. The nutrient-rich water is fed from the top and collected at the bottom. Vertical hydroponics has various advantages over traditional crop production methods including:
- Allows for high density yield per unit area.
- Good for small sunny places like balconies, patios and rooftops.
- It allows year around production inside.
- It often can provide more than 90 percent efficiency in water use.
- No soil-borne diseases.
Tower Garden
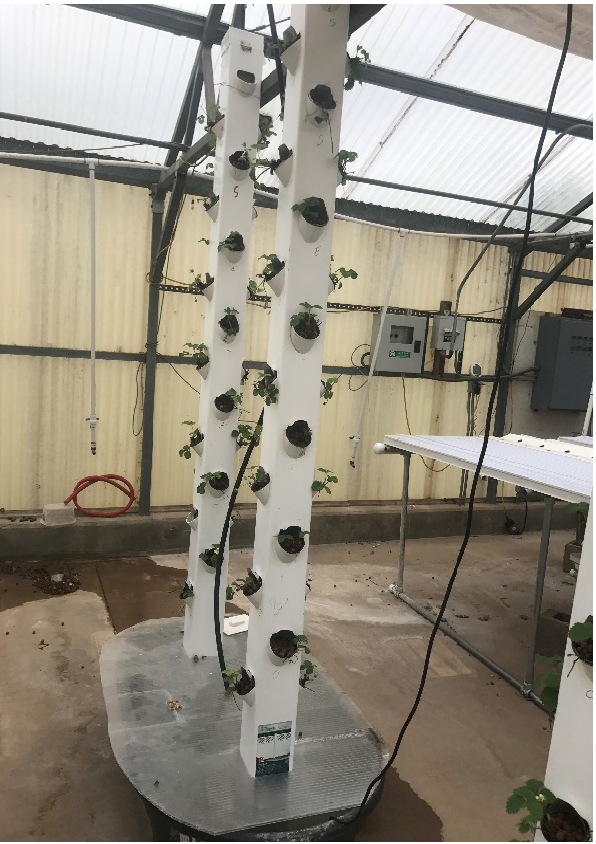
A tower garden, also called a window farm is a system of vertical hydroponics, which includes an A-Frame hydroponic system, hydroponic wall and cascades of bottles. It can be used for growing various crops like strawberry, lettuce, Swiss chard, herbs, spinach, kale, broccoli and flowering petunia. There are various online sources to get these systems, which can cost around $500 or more, but you can build your own tower garden for much less. It can also be used for growing plants indoors if lights are provided above the tower, which is popular in urban areas with only a small space for gardening. The tower garden design described here can hold 28 plants per tower and two towers can be placed in a 5-foot x 5-foot space, producing 56 plants at one time (Figure 1). The design can be modified according to preference. For example, tow-ers can be hung from the top and can drain to a single tank to collect the nutrient solution. Materials listed below can be found at a hardware store, except the net pots which can be purchased from hydroponic dealers or online. If tower material is modified, make sure to use food grade material.
Figure 1. Vertical towers holding 56 plants.
Material required
- One white vinyl fence post 5 inches x 5 inches x 8 feet
- Two white vinyl pyramid post tops
- One 45-gallon tank
- A plastic sheet for preparing a lid for the tank, which provides support to the tower and should be opaque to avoid growth of algae.
- 3-inch PVC pipe (10 feet)
- Submersible pump (400 gallons per hour) with attachments
- Light timer
- 5/8-inch x 5/8-inch x 8-foot white vinyl blind stop molding – cut into 12 4-inch pieces.
- Spray adhesive
- PVC epoxy
- 28 3-inch net pots
- One silver 1-inch narrow utility hinge
- Two brass 1 ½-inch narrow utility hinges
- Eight #6 32-inch x 3/8-inch machine screws with nuts
- Clear silicone for aquariums
- ½-inch nylon hose barb tee
- 10-foot length vinyl hose inner diameter ½ inch – outer diameter – 3/4 inch
- 4-inch x 24-inch aluminum pipe for dryer vents
- Medium grit sandpaper
Tools needed
- Miter saw
- Tape measure
- Ruler
- Drill
- Various drill bits:
- 1/2-inch for cut out pilot hole and also for tee barb
- 5/32-inch hole for hinges
- 1/8-inch holes for water tray
- Jig saw with fine blade
- Soldering iron
- Two U clamps (1/4-inch x 3/4-inch x 2-1/2-inches)
Steps for building tower
- Take a white vinyl fence post 5-inch x 5-inch x 8-foot and cut according to the height wanted for the tower. The recommended height for a vertical towers is 5 to 6 feet, which is easily accessible by most people.
- Drill a hole in the plastic sheet used to prepare the lid to allow the fence post (tower) through it using the square template listed under template links on the last page.
- Place the net pot hole template on the tower at the spacing according to the crop to be grown in the tower. Stagger the holes on each side so the pots do not touch each other inside the tower.
- Paste the pot hole template on the fence post using adhesive.
- Drill a hole at one end of the template so the jig saw can work.
- Using the jig saw, cut a pot hole of the same size as the template.
- Take a 3-inch PVC pipe and cut at a 45-degree angle with a height of 2.25-inches.
This will prepare the net pot support (Figure 2). This is suitable for 3-inch net
pots, but if net pot size is changed in the tower, then the pot hole size and net
pot support will need to be modified.
Figure 2. Net pot support. - Make a rectangular cut at the bottom of the tower using a template for the holes at the bottom of the tower. This will allow the water supplied from the top to exit.
- Place the net pot holder on the bottom of the net pot hole on the tower. Rub the area with sand paper where the net pot holder needs to be glued. Use the PVC epoxy on the edge of the net pot holder and place it on the bottom of net pot hole with some weight on it and let it set for two to three hours. Fix all the net pot holders throughout the length of the tower.
- Prepare the top of the tower by using two white vinyl pyramid post tops. Drill a ½-inch hole through the center of the top and pass a ½-inch tee barb to supply nutrient solution to the tower.
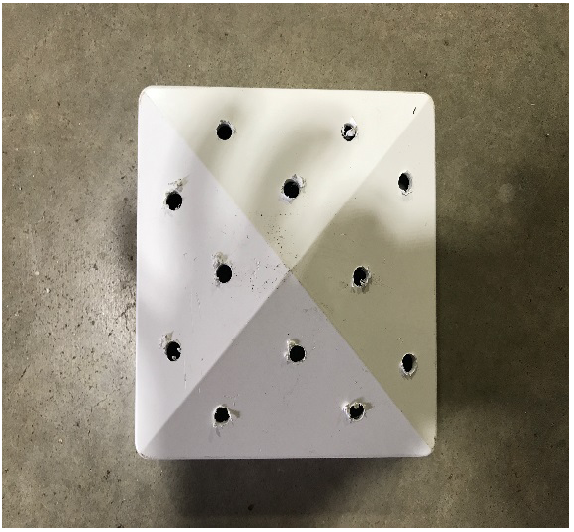
- Use the other white vinyl pyramid post top to drill the holes on all sides to distribute
nutrient solution throughout the tower. Approximately 10 random holes should be drilled
(Figure 3).
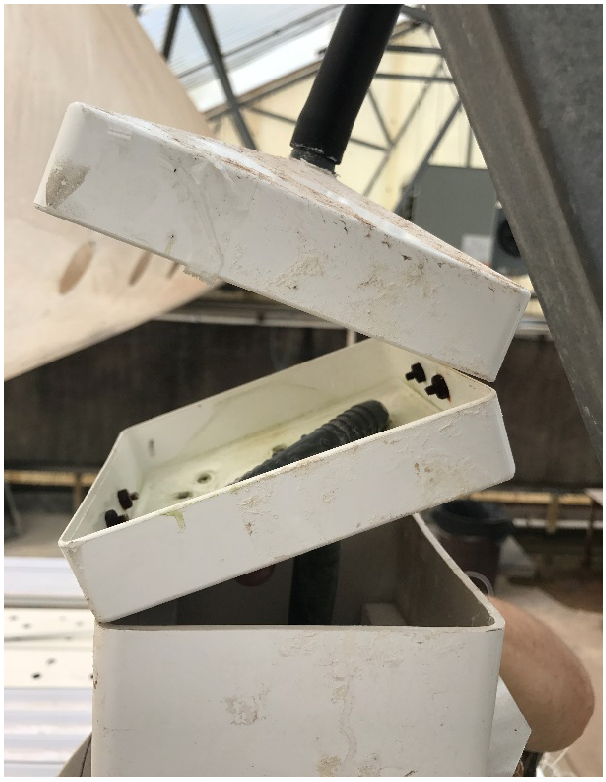
Figure 3. Vinyl pyramid post top with holes. - Attach both white vinyl pyramid post tops by using the hinge. On the opposite side,
attach the top with holes to the tower using the other hinge and cover the screws
with clear silicone for aquariums to avoid corrosion (Figure 4).
Figure 4. Both white vinyl pyramid post tops attached to tower.
- Take a 5/8-inch x 5/8-inch x 8-foot white vinyl blind stop molding and cut into 12 4-inch pieces. Rub the side of this piece with sand paper, which needs to be attach inside of the tower. Also, rub the inside of tower above each net pot hole. Apply PVC epoxy on the rubbed edge and place it inside the tower. This will help in proper distribution of the nutrient solution through the tower.
- Place the net pot in a net pot hole and mark the edges, which touch the top of the net pot hole. Melt this area with a soldering iron. This will prevent flow of water along the edge of pot outside of the tower and also facilitate easy placement of the pot into the hole.
- On the covering of the reservoir, cut out a piece to make a small lid that is attached by a hinge. Apply clear silicone for aquariums to avoid the corrosion of the screws. This will facilitate adding of nutrient solution to the reservoir and pH/EC monitoring.
- Drill another hole in the covering of reservoir to pass a nutrient supply hose in the center of both towers.
- Place a submersible pump in the center of the reservoir and attach the nutrient supply hose to the outlet of the pump.
- Place a T barb on the nutrient supply hose at the same height as the tower to supply nutrient solution to both towers.
- Place a timer to turn the pump on and off. The intervals for watering may depend on type of crop grown in the tower. For example, watering for lettuce can be continuous for 24 hours, while for strawberries, the recommended watering is seven to 10 times per day for one hour.
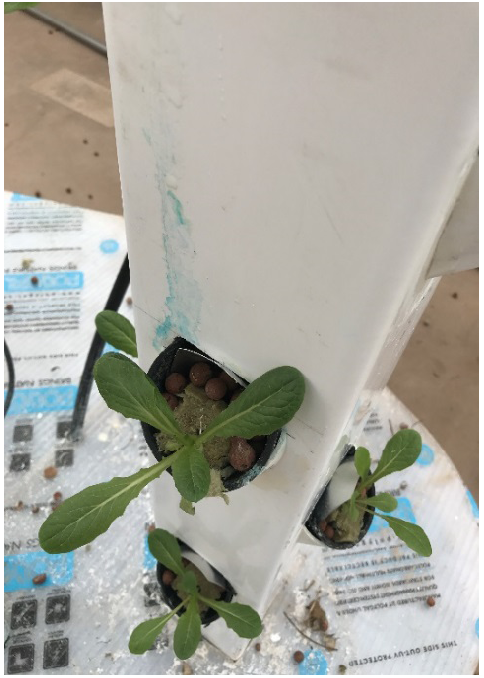
- Place the net pot into a net pot hole, place some expanded clay balls or other media
into it, and place the plant over these balls. Also, fill clay balls around the plant
(Figure 5).
Figure 5. Lettuce plants placed in vertical tower. - Start the pump. If you see the water splashing out of the pot, it may wet the leaves
of plants. This can lead to fungal diseases and may cause death of the plant. To avoid
this, take an aluminum sheet and cut a shield of the same size as the template for
the water splash shield given at the end using the link listed under the template
on the last page. Stick this shield near the pot hole opening above the clay balls
(Figure 6). This keeps the plant from being splashed
from the nutrient solution.
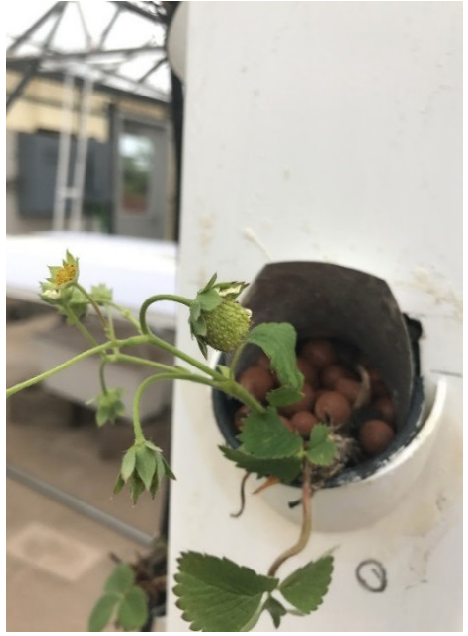
Figure 6. Strawberry plant with water splash shield on it. - Provide a support to the tower from the top using some wire or a bar.
Post preparation care
- Avoid water leakage.
- Clean tower with bleach after each round of crop.
- Monitoring of pH and EC for solution according to crop grown. Water level in tank should be maintained.
- See fact sheet HLA-6722, “Electrical Conductivity and pH Guide for Hydroponics.”
Hardeep Singh
Graduate Assistant, Vegetables
Bruce Dunn
Associate Professor, Floriculture

