October 2025 Hort Tips
Wednesday, October 1, 2025
Leave Hollow Stems for Native Bees
Courtney Dekalb-Myers, Assistant Extension Specialist, Consumer Horticulture
Honeybees receive a tremendous amount of credit for their pollination efforts and are often touted as the leading representation for pollinators. While important, this credit tends to overshadow our native bee populations. There are around 4,000 species of native bees in the United States and they’re actually more effective pollinators than the honeybees.
The colony lifestyle of beehives is unique in the bee world. Almost all native bees are solitary or only semi-social. These critters prefer to nest in the ground, shelter in leaf litter, or nest in cavities, including the hollowed-out stems of our garden plants. One of the ways we can encourage native bees in the garden is by leaving these hollow stems, allowing them a space to nest and overwinter so that they emerge next to their food source the following spring.
Adult female bees begin looking for a hibernation location, or hibernaculum, in the fall. If the gardener is planning to deadhead any spent flowers from the summer, aim to prune stems at varying heights (8” to 24”) as a nesting site for these bees. Many perennial flowers and shrubs have pithy stems that will serve as a good location. A few common Oklahoma garden plants that are good candidates include roses, purple coneflower, salvia, bee balm, and sunflowers.
This practice can be completed anytime from late summer through early winter, giving bees ample time to find their hibernaculum. If unused in the winter, native bees can use the stems to lay eggs and care for their young in the spring. Leave these stems undisturbed after pruning; they will begin to fade the following growing season. At this time, gardeners can start the process over again.
It’s always a good practice, if the gardener can stand it, to leave the landscape a little bit messy going into the winter. Dead plant material provides nesting supplies for birds and insects, as well as the dried canopy can serve as a wildlife shelter. Spent flowers left can also serve as a food source for many birds during winter. If cleaning out the garden in early fall, it might be worthwhile to consider little bit of both strategies – prune out some flowers for bees’ hibernaculum and leave some for the winter birds. We garden in an active ecosystem and the creatures around us can always benefit from a little bit of our help.
| Image | Caption |
|---|---|
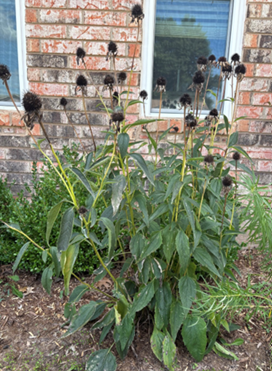 |
A purple coneflower with many spent blooms from the summer. |
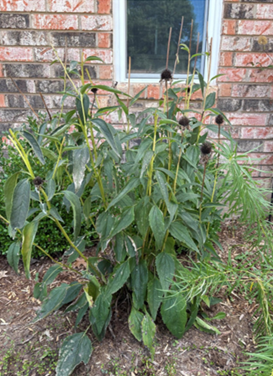 |
After pruning, leaving stems at various heights for stem nesting native bees to overwinter and a few spent blooms for winter birds. |
Preserving Herbs for Winter Flavor
Courtney Dekalb-Myers, Assistant Extension Specialist, Consumer Horticulture
Fall can be an excellent time to harvest herbs and preserve them for use in the winter. Homegrown, preserved herbs may have a slightly different flavor than their fresh counterparts, but can still bring a savory experience to cool season cooking. With a little preparation now, flavors can be enjoyed for many more months.
Drying
One of the easiest ways to preserve herbs is by drying. Harvest herbs early in the morning after dew has dried. Select stems with healthy foliage and remove any flowers before beginning the drying process. There are a few different strategies to drying herbs, including hanging, drying a on a tray, or speeding things up with a dehydrator.
When hanging herbs for preservation, gather four to five stems and bundle with twine. These can be placed on a laundry rack, clothesline, or wire hanger in a warm, dry space. Use a paper bag to cover hanging herbs and keep them free of dust and insects. Cut small holes into the sack to allow for airflow. Most hang dried herbs should fully dry in about two weeks.
Herbs can also be dried by placing them on a drying rack or screen. This can be extra helpful if drying something with a fine texture, like thyme or chamomile flowers. To protect from debris, prop a cheesecloth over the tray using jars or glasses. If the house is too humid, use a dehydrator or dry at a low temperature in the oven for best results.
Freezing
Some herbs, like cilantro and mint, may lose their flavor when drying. In these cases, freezing is a better alternative for preservation. Wash and trim herbs prior to freezing. To make the process even easier, pack herbs into an ice cube tray and cover with boiling water. The boiling water allows for quick blanching before placing the cubes into the freezer. After freezing, place herb ice cubes into an airtight bag to allow for easy and quick use. Herbs can also be frozen in oil for a savory addition to soups and sauces. The same strategy can also be used to preserve pesto.
Infusing
Infusing herbs in oils can be an option for preservation. However, it is critical to approach this strategy with safety in mind. Oils lack oxygen, allow for bacterial toxins to grow. Soak any vegetables, like chili peppers or garlic, in vinegar prior to using as ingredients in oil infusions. Infused oils should be stored in the refrigerator and used within three weeks to be safe.
For more information on growing and preserving herbs, see HLA-6037 Culinary Herbs for Oklahoma Gardens: Culture, Use and Preservation

Basil hangs drying on a wire hanger, ready to be placed in a paper sack.
Cool-season Lawn Planting and Renovation
David Hillock and Dennis Martin
The period mid-September through early October in Oklahoma typically has near-ideal day/night temperature combinations for germination of cool-season grasses. So, let the tall fescue, perennial ryegrass and Kentucky bluegrass seeding begin (if you have access to water)! Sodding of these grasses is also appropriate now. The best temperatures for germination are when we experience a mid-80s day and upper 50s/low 60s night. You might be asking, is it possible that we will get fooled and the temperatures will shoot back up. Sure, anything is possible in Oklahoma, but what is key to remember is that the nighttime lows are what’s important. When you see evening temperatures from the upper 50s to mid-70s, it’s time to seed cool-season lawns. So even if a few day-time highs slip back in the mid to upper 90s, (and it will happen) our day-time lows are looking great!
- Fact sheet HLA-6418 covers turfgrass selection
- HLA-6419 covers the establishment (planting method)
- HLA-6420 covers the mainstream long-term maintenance practices (mowing, fertilization, irrigation, etc.)
- A newer fact sheet, HLA-6608, addresses managing turfgrass in the shade.
- Find these on the web at the turf collection fact sheets.
There are many satisfactory performing tall fescues. These include, but are not limited to Crossfire II, Houndog V, Millenium, Rembrandt, and Plantation to name just a few. There are dozens of good performers. A blend is a combination of two or more varieties within the same species. A mix is two or more species combined. Blends and mixes are beneficial in cool-season lawns as they broaden the genetic diversity present. In theory, this decreases the likelihood that your lawn will be completely wiped out by a single disease or single insect infestation.
Most importantly, if turf-type quality is expected, choose a turf-type rather than a forage type tall fescue. Forage type fescues include Fawn and Alta. General purpose soil stabilizer types include the old K-31, Kentucky 31, KY 31, they get used as a forage and as a lawn, but these variations on Kentucky 31 are not true turf-type tall fescue despite what the marketing message on the seed bag might say. Turf-types are selected for improved color, texture, density, slower vertical leaf expansion rate and other important characteristics for lawn use.
Tall fescues are best in medium to light shade. There are no hard and fast rules for “hours of sunlight” required. There are no perfect solutions to dense shade where grasses fail repeatedly, year-in and year-out. It is best to take a hint if grass is failing in a shaded site for many years, it’s time to move on to mulches, shade tolerant perennial ground covers, hardscape elements, etc.; a list of alternate shade tolerant plants can also be found in fact sheet HLA-6608. Sometimes grass does not die exclusively from shade, but rather the combination of shade and tree root competition for nutrients and water in combination with added disease pressure due to less air movement and more grass canopy moisture caused by less air movement in a “tight and mature” landscape.
In lightly shaded areas, mixtures of tall fescue and Kentucky bluegrass can sometimes work best. While Kentucky bluegrass is generally not as shade tolerant as tall fescue, it still has some shade tolerance, and it has improved brown patch disease and Rhizoctonia blight resistance over that of tall fescue. Brown patch is usually the most serious disease of tall fescue. These mixtures will often have Kentucky bluegrass present at 5 to 10% by weight and tall fescue at 90 to 95%. There are 10 times as many bluegrass seeds in a pound of bluegrass as there is tall fescue seeds present in a pound of fescue, so we use about 10 times less bluegrass seed to get to a 50/50 species count. Never, use a 100% stand of Kentucky bluegrass in most areas of Oklahoma because pure stands of Kentucky bluegrass in most of Oklahoma can get summer patch disease. Also, older Kentucky bluegrasses such as Park, Newport, South Dakota Common (SD Common), Kenblue and variety not stated (VNS =when there is no variety name stated) really don’t bring any value to the cool-season mix. So, if these are the only ones available locally, you might as well use 100% tall fescue. Most other varieties of Kentucky bluegrass that you might encounter (there are hundreds nationally, and yet few repeatedly available in OK from year to year) are improvements and will benefit the mix!
There is seldom any benefit and there is often detriment created by mixes of cool-season perennial grasses with annual or Italian ryegrass. Yet, if you scout the store shelves, you will find these mixes. Annual ryegrass simply competes with the cool-season perennial grasses in the mix in the cool portion of the year when good growth can take place and then annual ryegrass, having taken its fair share of the lawn, dies out in the heat. This leaves uninformed consumers in a panic at worst and with unsightly dead areas in their remaining cool-season perennial lawn at best. Avoid mixes of annual ryegrass with the desirable cool-season perennials like tall fescue, perennial ryegrass, and Kentucky bluegrass.
To Compost or Not – Garden Clean-Up Edition
Shelby Mendoza, Extension Assistant
As we approach the first frost date, many of us start thinking about cleaning out the garden for the year… or maybe, like me, you let plants start to fade back in July when the heat got the best of you and your garden.
Whether you’re clearing out a vegetable garden or flower beds, some materials are perfect for the compost pile, while others are best avoided. Let’s dig in!
Things You Can Compost
- Fallen leaves
- Old potting mix from planters
- Plant clippings or trimmings
- Entire plants – such as frost-killed annuals or vegetable plants that have finished producing
Things to Avoid (or Compost with Caution)
- Bermudagrass clippings – Use caution! Lawn clippings often contain rhizomes. A hot, well-maintained compost pile can kill them, but if your pile doesn’t heat up enough, those rhizomes may survive and spread.
- Weeds with seeds – Many seeds can survive the composting process. If they do, you’ll be pulling those weeds again once you spread your compost.
- Diseased plants – Avoid composting plants with fungal diseases such as rust, powdery mildew, or fusarium wilt.
- Plants with insect infestations – Some pests (like beetles, mites, and squash bugs) can survive in compost piles and may even thrive in the warm, protected environment.
A Quick Reminder
Successful composting is about balance. Aim for a good mix of green materials (like fresh plant debris and kitchen scraps) and brown materials (like dried leaves and mulch). This balance supports the microbes that break everything down into compost.
That said, most home compost piles aren’t closely monitored with thermometers, moisture checks, and frequent turning. Unlike commercial composting systems, backyard piles often don’t heat up enough to reliably kill all plant pathogens, weed seeds, or pests. That’s why it’s smart to be cautious about what you add.
Because let’s be honest—gardening in Oklahoma summers is already challenging enough without reintroducing last year’s problems into next year’s garden!
Fall is a Good Time to Plant
David Hillock, Senior Extension Specialist, Consumer Horticulture
Now is an excellent time to plant most trees and shrubs as well as other landscape plants such as perennials and cool season annuals. Cooler temperatures reduce stress to allow ideal root growth and establishment before cold weather. In fact, roots continue to grow if soil temperatures are above 40 degrees F. Plants installed during the growing season are susceptible to high transpiration rates leading to drying of plant tissues.
Research suggests that early fall planting is best for container-grown and B&B shade and ornamental trees and pines, but spring is best for planting bare-root plants and broadleaf evergreens, such as holly and Southern magnolia. However, many containerized plants can be planted at any time if handled properly. Be sure to water regularly to keep roots and soil moist.
Proper planting techniques are also critical for trees. Do not plant too deep. The base of the tree where the roots begin to branch out (the flare) should be visible. Be sure to remove all packaging and support material used in the growing process. A light mulch would also be in order around plants. Mulch, about 2 to 3 inches thick, provides benefits such as moisture retention, weed control, and temperature control. Do not pile mulch up against the base of a plant; keep the mulch a few inches away from the base of trees.
Planting pansies along with spring flowering bulbs will not only add to the spring display, but can provide a needed color during those cool, sometimes dreary fall and winter months. Pansies are extremely cold hardy and will tolerate snow and ice.
After properly preparing the bed area, pansy transplants can be set out at the recommended spacing with spring flowering bulbs scattered throughout. It won’t matter too much if they are spaced close together because the spring bulbs will poke right up through the pansy foliage. This arrangement creates another dimension to the garden; the pansies form an “understory” of color, while the spring bulbs form an “upperstory” of color. Often the colors of pansy and spring flowering bulbs provide striking complementary color combinations making the spring bed come alive.
Success for a cool-season annual planting is dependent, however, on bed preparation and location. A sunny to partly shady location with excellent drainage is ideal and will encourage the most blooming. A heavily shaded spot will result in smaller, fewer flowers and may never dry out, which could result in root rots. On the other hand, do not let the plants become too dry. Cold, dry winter winds with little moisture in the form of rain or snow will result in winter scorch. Be sure to water the landscape enough to wet the soil to a depth of about 6 - 8 inches.
Additional cool-weather-loving annuals that can be planted this time of year are ornamental cabbage and kale, snapdragons, and others.
Young trees with green or tender bark should be wrapped by late October. Remember to start wrapping from the ground up to the first major limb.
Advantages of tree wraps for young plants:
- Deter animals from browsing on bark.
- Reflects sun that either scalds the trunks or makes them susceptible to southwest injury during the winter months (bark is warmed followed by a sudden plunge in temperature which kills that portion of the bark).
Do not apply any more fertilizer to trees or shrubs. By refraining from fertilizer applications, woody plants can harden off their latest growth to avoid freeze injury. Likewise, pruning should be discontinued at least until dormancy occurs. Otherwise, new succulent growth could be damaged as temperatures drop below freezing.
September Pecan Management
Becky Carroll, Senior Extension Specialist
This time of year, pecans are continuing to fill. Keeping leaves on the tree as long as possible—through adequate irrigation and insect and disease management—is critical for both the current crop and next season’s production.
Pecan Drop
“Why are my pecans dropping now?” is a common question in late summer. Nut drop can result from several stress factors, including excessive crop load, drought, or even prolonged wet conditions. Other causes include pecan scab, insect feeding during the water stage, and self-pollination. Water split is another issue in some thin-shelled cultivars, where shell hardening and the start of dough development create internal pressure, causing the shell and shuck to split and the kernel to abort.
Tree Spacing
Before harvest, take time to evaluate tree spacing and consider marking trees for removal. Marking trunks of nonproductive trees with spray paint can help identify candidates for later removal. Overcrowded orchards or groves reduce tree health and yield. Spacing can be assessed in several ways:
- Maintain at least 10–15 feet between tree canopies.
- Ensure no more than 50% ground shade at high noon during the growing season.
- Allow about 30 square feet of cross-sectional trunk area per acre.
Fact Sheet HLA-6208: Improving Native Pecan Groves provides details on tree removal decisions, considering factors such as irregular bearing, small or poor-quality pecans, insect and disease susceptibility, late ripening, or harvest difficulty.
Insect Monitoring & Control
- Pecan Weevil: Continue monitoring traps for adult emergence. See EPP–7190: Monitoring Adult Weevil Populations in Pecan and Fruit Trees in Oklahomafor trapping details. After heavy rainfall, expect emergence to increase and be ready to spray as conditions allow. Monitor nut development to determine egg-laying timing by cultivar.
- Stink Bugs & Leaf-Footed Bugs: These insects can cause bitter kernel spots in the dough stage. They often move into orchards from nearby crops or weedy areas once those habitats are disturbed.
- Aphids: Check regularly for aphid infestations. Thresholds are 20–25 yellow pecan aphids per compound leaf, but only 2 black pecan aphids per leaf. If treatment is needed, consider combining aphid sprays with weevil sprays to prevent flare-ups.
Disease Control
Continue fungicide sprays if scab models indicate risk. After shell hardening, scab usually affects appearance more than kernel quality unless it is severe.
Harvest Preparation
Prepare the orchard floor by mowing vegetation, smoothing hog damage or cattle tracks, and removing fallen branches. Condition soil if planning to establish cover crops.
Irrigation
Adequate water is essential during kernel filling to produce high-quality pecans. Without irrigation, kernels may be light and wafery. Aim for about two inches of water per week, supplementing rainfall as needed.
Cover Crops
September is an ideal month for planting legumes in orchards or groves. See HLA-6250: Use of Legumes in Pecan Orchards for details. A healthy legume stand can supply most if not all of the orchard’s nitrogen needs while also attracting beneficial insects. Cool-season legumes are especially advantageous since they compete less with trees for moisture.
Soil Testing
Soil testing is recommended every 3–5 years in mature orchards or groves. Monitoring soil pH, phosphorus, and potassium helps guide nutrient management. For sampling instructions, see PSS-2207: How to Get a Good Soil Sample. Collect 15–20 cores at 0–6 inches deep from representative areas, mix them thoroughly, and submit as a composite sample for the best results.
For additional information, videos, and webinar recordings on pecan management topics, visit Oklahoma Pecan Management.