August 2021 Horticulture Tips
Sunday, August 1, 2021
Oklahoma Pecan Update, August 6
Becky Carroll, Associate Extension Specialist, Fruits and Pecans
This month’s timely pecan topics on August 6 at 1 pm includes crop load management, irrigation scheduling and pecan development. Pecan Topics for August is open to anyone with an interest in pecans - homeowners, hobbyists, and commercial growers. In-service credit is available to extension personnel.
Special guest speaker, Jake Montz from Montz Pecan Co. in Charlie, Texas will be describing his experience with how crop load management or removing portions of the crop can benefit pecan growers. Saleh Taghvaeian will talk about how to schedule irrigation events to boost size and quality of pecan nuts and Becky Carroll will tell why it’s important to know what development stage your pecans are at to determine management needs. Updates on other items being seen around the state, increased pecan scab pressure and an info on upcoming pecan field day will be presented.
After registering, you will receive a confirmation email containing information about joining the meeting. Information and recordings of previous sessions are available on the Oklahoma Pecan Management webpage or the Oklahoma Pecan Management Facebook page - @okpecans.
Questions can be emailed to becky.carroll@okstate.edu.
Garden Weed Management
Lynn Brandenberger, Extension Specialist
Managing weeds in vegetable gardens can be a major undertaking. In a general sense a weed is a plant species that is growing in the wrong place at the wrong time, and it competes with our garden crops for light, water, and fertility. How serious is weed control? It is a major limiting factor that will decide how successfully you can produce food in your garden. Learning to manage your garden to reduce weed competition includes several things that should be considered before starting a crop.
First, learn about the crop that you are growing. What is its growth habit, preferred temperature and the best time of year to grow it and also consider its fertility and water needs. Sounds a bit ominous, but with that understanding a gardener can help the crop to grow as well as possible and hopefully out compete many of the weeds that are in the garden. Next, gain an understanding of your enemy meaning the weeds that are in the garden. Do the weeds in your garden grow best during cool weather, hot weather? Will the weed population germinate, grow, and complete its life cycle in one season (annuals), or are they perennials that grow and survive from year to year? Do they grow tall or close to the soil surface, do they come from a reservoir of weed seeds, stolons or other means of spreading themselves throughout the garden? Identify and keep a list of troublesome weeds that you are having problems with and note which areas of the garden where they are particularly thick. Select crops that can compete well with the weeds that you have issues with. Do not grow a crop that is a poor competitor in a particularly weedy area of the garden.
Last, familiarize yourself with possible ways to control the weeds that are in the field or garden. Do they respond to cultivation (hoeing, pulling, tilling, etc.), or can they be shaded out by a fast growing crop or some type of mulch. Consider growing your vegetables in a smaller space to allow you to manage the weeds more intensely, you could end up with more produce to harvest from that smaller area than a larger one because of improved weed control. Consider using a fast-growing cover crop such as mustard to “biofumigate” the soil to kill weed seeds during the off season. Would a “living-mulch” shade the soil well enough to control most of the weeds? Consider trying drip irrigation which applies water in the crop row only, meaning that other areas that do not receive water will grow fewer weeds that will need controlling.
You can learn more through this YouTube video.
In conclusion there is a lot to consider when planning for control of weeds. Become familiar with the crops that you hope to grow, become familiar with the weeds that you are planning on managing, and last consider all the options when it comes to methods for controlling or managing weed pests.
Protect your home from wildfire with Firewise plantings
David Hillock, Consumer Horticulturist
Wildfires have been raging in the western state but luckily, we have been blessed with good rainfall to keep things relatively green; however, weather can always change and become hot and dry, and we are no strangers to wildfires. Even winters can be very dry increasing the potential for wildfires. Lives, homes, livestock, pastureland, crops, and thousands of miles of fencing can be lost to the flames.
Although a wildfire does not discriminate among its victims, there are some steps homeowners can take to help protect their property from fire, whether it be a wildfire or an accidental fire at home caused by a charcoal grill during a cookout.
The key to keeping a fire at bay is to not provide fuel for the fire. There are plants and shrubs available that are more fire-resistant than others. Fire-resistant plants are those that don’t readily ignite from a flame or other ignition sources. Although the plants themselves can be damaged or killed by a fire, their foliage and stems don’t significantly contribute to the fuel and, therefore, the fire’s intensity.
Seeing a need for information for homeowners, several agencies, including Oklahoma State University Cooperative Extension, joined forces in the early 1990s and coined the term Firewise. This became a catalyst for educational resources and programs to help homeowners, communities, and firefighters to make sensible choices in the wild land/urban interface, which would in turn help control wildfires and protect property.
When selecting plants to include in a Firewise landscape, homeowners need to identify plants with a low flammability rating for areas nearing the home. By selecting plants with certain characteristics, you can reduce the flammability potential of your landscape and provide habitat for wildlife. There are several factors that influence the fire characteristics of plants, including plant moisture content, age, total volume, dead material, and chemical content.
Plants with low flammability don’t accumulate large amounts of combustible dead branches, needles or leaves as they grow. They also have little dead wood and tend not to accumulate dry, dead material within the plant. They have open, loose branches with a low volume of total branches. Many of our deciduous trees and shrubs are fire resistant.
Leaf characteristics is something else to consider. Leaves that are moist and supple, such as the sedum leaf, are more resistant to fire.
Many herbaceous perennials make excellent Firewise plantings. Some remain green in the winter, which in turn reduces their flammability.
Oils and resins found in the sap of some trees and plants such as pine, juniper, cedar, and Yaupon holly, makes them extremely flammable. Homeowners who want to use these plants and trees in the landscape should avoid placing them adjacent to their homes and other structures on the property.
In addition, plants that accumulate dry or dead material such as twigs, needles and leaves should not be planted against the house. This includes many vines like trumpet creeper and ornamental grasses. In winter, these plants have large amounts of dry material and are extremely flammable, allowing a wildfire to spread rapidly.
As you plan out a new landscape or add to an existing one, be sure to consider fire potential in your plant selections. For more information please visit the website Firewise.
Top 5 Herbs
Casey Hentges, Oklahoma Gardening Host and Laura Payne, Assistant Producer, Oklahoma Gardening
- Basil is one of the easiest herbs to grow from plant or seed. It is perfect for patio gardens and small container gardens. Comes in many varieties from large leaves to mini, from tall plants to short, and from small white flowers to large reddish maroon flowers. With so many basil varieties on the market, it is hard to choose. Basil is an annual in Oklahoma, but seeds are easy to save from year to year. However, basil varieties can cross pollinate if planted within a couple of hundred feet of one another. Consider planting basil in your garden as it is an excellent culinary herb used in Italian cuisine for making pesto or a caprese salad.
- Rosemary is a Mediterranean type of herb. Mediterranean herbs need a sandy, well-drained soil. If the Oklahoma clay is an issue in your garden, growing rosemary in a container or raised bed will give the best results. Rosemary can overwinter in Oklahoma if the temperatures aren’t too cold for a long period of time and the cultivar ‘Arp’ is known to be one of the most cold-tolerant cultivars in the market.
- Thyme is another Mediterranean herb that needs good drainage. Although thyme is mostly grown for its culinary use, varieties of this plant make beautiful ground covers adding a touch of softness to the landscape. Trimming thyme will help the plant produce tender new growth, however trimming should stop as fall approaches so the plant tissue can harden off. Most thymes are hardy to zone 5.
- Cilantro is an early season annual herb used mostly as a garnish. Warmer temperatures will cause cilantro to bolt and set seed producing yet another herb, coriander. The coriander seed can be harvested and used in culinary dishes or saved to plant in fall for another crop of cilantro.
- Mint is a very happy herb and there are literally hundreds of varieties. It makes a nice compliment to many summertime drinks. Mint needs little care to grow, in fact it can take over if not harvested regularly or planted in a container. Mint can cross pollinate so give some distance if planting different varieties.
For more information on Top 5 Herbs watch this Youtube video.
Ideal Conditions for Pecan Scab
Becky Carroll, Associate Extension Specialist, Fruits and Pecans
Pecan scab is the most significant disease that Oklahoma pecan growers face. What conditions favor scab development? Temperatures greater than 70 degrees and relative humidity greater than 90 percent are key to favorable scab conditions. This season has seen ideal weather for accumulating scab hours.
Scab can overwinter on twigs, shucks, and branches. An early season fungicide application can help lessen the overwintering inoculum. Protection is key, once the infection occurs, you can’t cure it. Using a varied arsenal or rotation of fungicides from different FRAC numbers will help prevent resistance.
The Pecan Scab Model accessible online
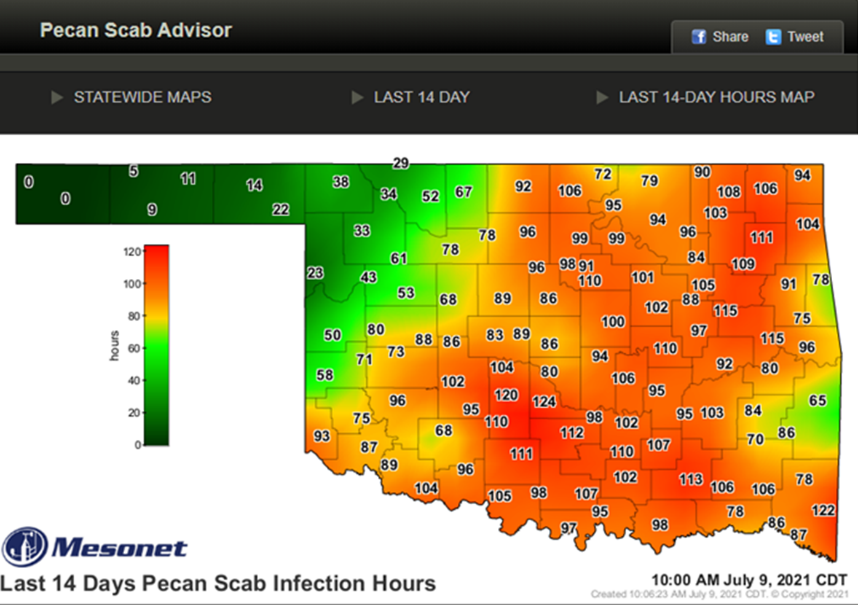
The Pecan Scab Advisor gives growers guidance on the number of scab hours accumulated and includes a spray decision advisor. This support tool helps growers decide if they should be making fungicide applications to protect their crop. The thresholds for highly susceptible cultivars like Western, Wichita and Squirrel’s Delight is only 10 scab hours. So that means 10 hours of temperatures above 70 degrees with relative humidity greater than 90%. For moderately susceptible cultivars like Maramec, Pawnee, and Caddo, they require just 20 scab hours to develop lesions. Low susceptibility (resistant) cultivars like Kanza, Lakota, Choctaw, and native trees (may vary), sprays are based on 30 scab hours. Growers can choose their location and cultivar susceptibility, enter their last fungicide application and the model will give a ‘spray’ or ‘no spray’ recommendation. Remember this is a tool that does not replace the grower’s knowledge of their orchard/grove’s scab history. The model can also give a forecast of scab hours and show the previous 3 years scab hour history. Normally, the Southeastern corner of the state has large numbers of scab hours with the western half of the state accumulating very few hours. On July 9, three-quarters of the state was close to accumulating 100 hours in a 2-week timeframe. Many growers have experienced higher than normal scab hours, and scab may be an issue this season. It is assumed that a fungicide application will provide protection for a two-week period. For excellent protection, fungicides should be applied properly, giving full coverage.
Immature growth is susceptible to scab. If infection periods occur while leaves are developing, the leaves will be susceptible. If the shucks are expanding, they will be susceptible. Once the infection has occurred, the leaves or shucks can’t be cured. Scab lesions on leaves can spread inoculum to developing shucks.
When shells begin hardening, scab protection is not as critical. With early infections, nuts may drop. Scab also can limit pecan sizing, reduce kernel percentage, and cause problems with ripening or shuck opening.
Using resistant cultivars in new plantings, improving water and air drainage in the orchard/grove, pruning up low limbs, proper tree density, mowing the orchard floor and good sanitation will help lessen disease pressure. A timely fungicide program will help protect the crop from pecan scab and other minor diseases. If scab has been an issue in native groves, those with a history of severe scab could be marked for removal during thinning. Homeowners should use resistant cultivars and the cultural practices listed since spraying is not an easy task.
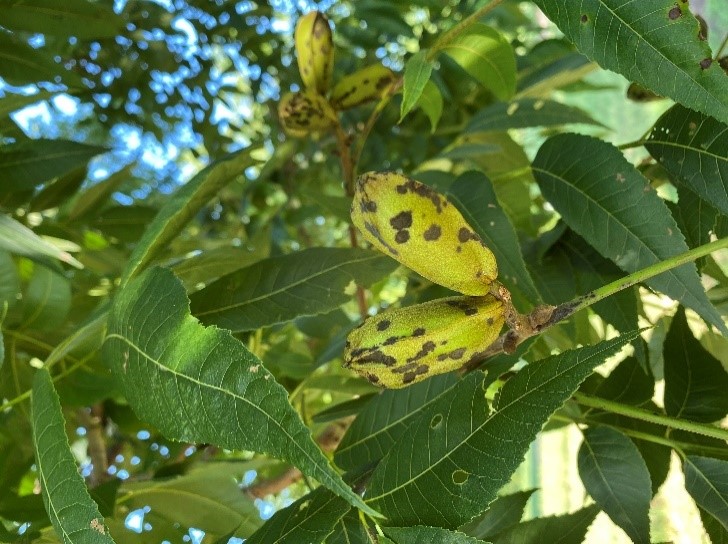
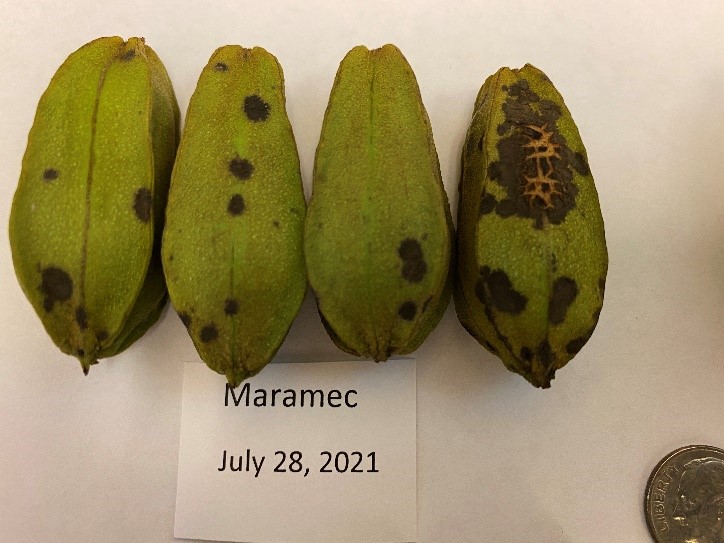
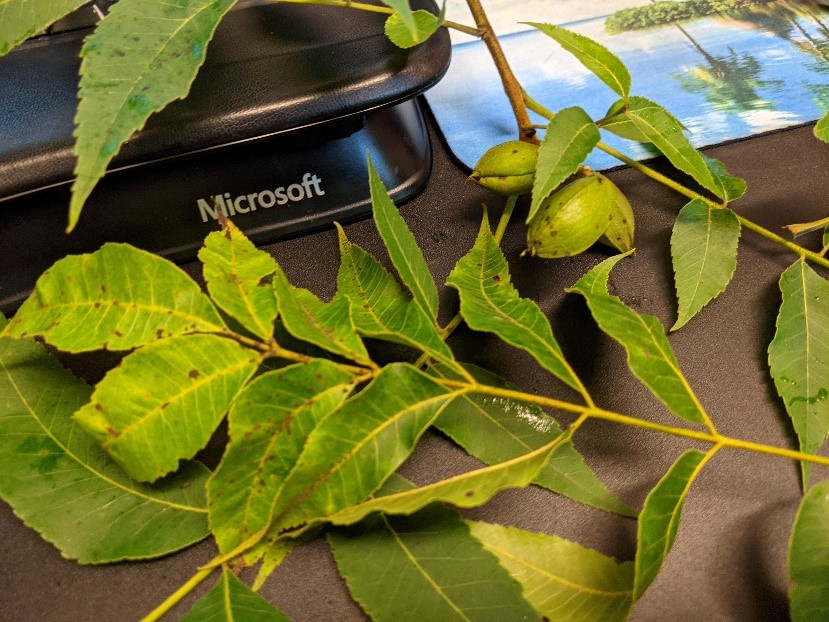
Maramec pecans at the Cimarron Valley Research Station have pecan scab lesions on the leaves and shucks this season. These are included in a fungicide trial testing out different combinations of fungicides.
The PDID Lab on campus has seen an increased number of pecan scab samples this season and have identified resistant cultivars with scab this year due to the ideal scab conditions.
Shrubs can Help Create Privacy in the Landscape
David Hillock, Consumer Horticulturist
Almost everyone enjoys spending time in the great outdoors. Blue skies and wide-open spaces are appealing. Some people, however, may love the outdoors, but prefer a bit of privacy. Using shrubs to create walls or screens in your landscape is one way enjoy the outdoors but still maintain some privacy.
In addition to creating privacy, shrubs also can help hide things in the landscape such as water spigots or electrical/meter boxes. The nice thing about shrubs is they have longevity in the landscape.
As a bonus, the shrubs can provide additional benefits, such as reducing noise, blocking wind or dust, conserving energy, and improving water and air quality. They also can define a space, create habitat for beneficial wildlife and beautify the landscape by adding texture and visual interest.
When selecting a species for your screen or hedge, be sure to consider the adaptability to your region of the state, mature size (both height and width), the space available in the landscape, maintenance level and your overall aesthetics and function desired.
For homeowners who have a desire for year-round screening to provide privacy or block an intrusive view, select broadleaf evergreens or conifers. However, if your goal is season performance, such as acting as a privacy screen or reducing summer heat, a deciduous species may be more effective.
There are so many plant species and many varieties within a species, so your options from which to choose are broad. For those wanting a more formal, clipped hedge look, a few examples to consider include boxwood, firethorn, holly, abelia, arborvitae or yew. A great thing about some of these options is they also are great choices for natural hedges for those who don’t care for the formal, clipped hedge.
If you’re looking for something to serve as more of a background or screen, consider evergreens such as arborvitae, cherrylaurel, devilwood, fringeflower, mugo pine, Japanese plum yew or waxmyrtle.
No matter what look you’re going for, shrubs are a great addition and provide multiple functions in your landscape. For a list of shrubs suitable for Oklahoma see our OSU Extension fact sheet HLA-6439 Selecting Shrubs for the Landscape.
Fertility Management in the Garden
Lynn Brandenberger, Extension Specialist
Soil fertility is a key part of growing any plant, but particularly for crops like vegetables, fruits, and nuts. Just like us, plants require specific nutrients to be able to maintain their health and their rate of growth. These nutrients are called “essential nutrients”. Those used most by plants are call the major or macro-nutrients and include nitrogen, phosphorus, and potassium which we may need to supply and carbon, hydrogen, and oxygen which are abundant and free in nature. The secondary nutrients include calcium, magnesium, and sulfur. Both the major and secondary nutrients are building blocks that plants use for growth and development. The last category of plant nutrients includes micro or minor nutrients. These include iron, zinc, copper, molybdenum, boron, manganese, and chlorine. Although needed in very small amounts these serve as precursors or catalysts to start all sorts of reactions etc. within the plant.
Where to begin? It is best to begin with a soil test of your garden before applying fertilizer. A routine soil test is adequate in most instances and will provide you with the soil pH and available nitrogen, phosphorus, and potassium. There are other types of soil tests, take a look at what soil tests are available check out OSU’s Soil, Water, and Forage Analytical Laboratory.
The first step in having a soil test is to collect a good composite soil sample from the garden which will require between 15-20 sub-samples which are mixed-together to form the composite sample. Fact sheet PSS-2207 provides detailed instruction on how to collect a good soil sample.
Next on our to-do list is interpretation of the soil test results. Lucky for us the SWFAL website can give soil test interpretations individually for most vegetable crops or we could use fact sheet HLA 6036 Soil Test Interpretations for Vegetable Crops.
If you ask for the garden soil test interpretations you will receive recommendations that are an average of all vegetable crop needs, it would be better to list specific vegetables when turning in your soil sample.
Next, apply all phosphorus and potassium that are suggested by the soil test interpretation during soil preparation prior to planting and part “up to 1/3” of the suggested nitrogen. This provides all the phosphorus and potassium for crop needs and the nitrogen applied should get the crop off to a good start.
Never apply all the nitrogen at once since it is not stable in the soil and can be washed away by a good rain or deep irrigation. Divide up the remaining nitrogen into 2-3 supplemental fertilizations or divide up the remaining nitrogen in small amounts and apply weekly through a fertilizer injector that is part of the drip irrigation system.
For organic farms nitrogen can be expensive, but compost, manure, or cover crops can be used to supply a good share of the nitrogen. In general compost or manure has between 1-2% nitrogen and legume cover crops that are tilled into the soil may provide 50 to 100 lbs./acre of nitrogen.
For more information on using cover crops visit this YouTube link.
Pruning Shrubs as Hedges
David Hillock, Consumer Horticulturist
Hedges are a row of plants that merge into a solid linear mass. They have served gardeners for centuries as screens, fences, walls, and edging. A well-shaped hedge is no accident. It must be trained from the beginning.
Establishing a deciduous hedge begins with selection of nursery stock. Choose young trees or shrubs one to two feet high, preferably multiple-stemmed. When planting, cut the plants back to six or eight inches; this induces low branching. Prune off half of the new growth late in the first season or before bud-break in the next season.
The following year, again trim off half. In the third year, start shaping. Trim to the desired shape before the hedge grows to its desired size. Never allow plants to grow untrimmed to the final height before shearing. By that time, it is too late to get maximum branching at the base. Do not allow lower branches to be shaded out. After the hedge has reached the desired dimensions, trim closely to keep the hedge within chosen bounds.
Evergreen nursery stock for hedging need not be as small as deciduous material and should not be cut back when planted. Trim lightly after a year or two. Start shaping as the individual plants merge into a continuous hedge. Do not trim too closely because many needle-bearing evergreens do not easily generate new growth from old wood.
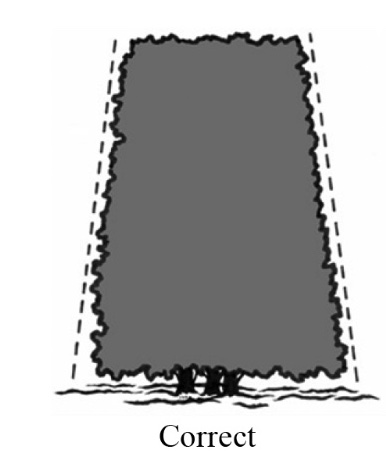
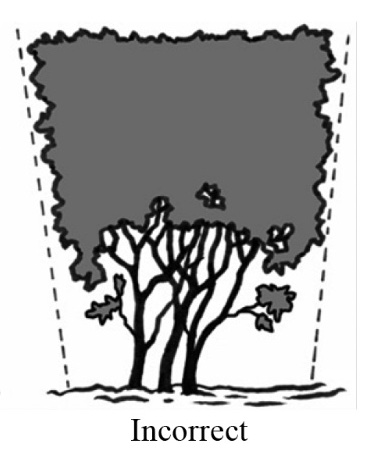
Hedges are often shaped with flat tops and vertical sides; however, this unnatural shape is seldom successful. As far as the plant is concerned, the best shape is a natural form, with a rounded or slightly pointed top and with sides slanting to a wide base (Figure 1).
| Hedge Shapes | Hedge Shape Descriptions |
|---|---|
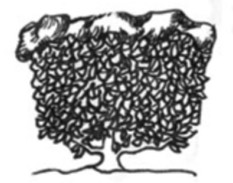 |
Snow accumulating on a broad flat tops. |
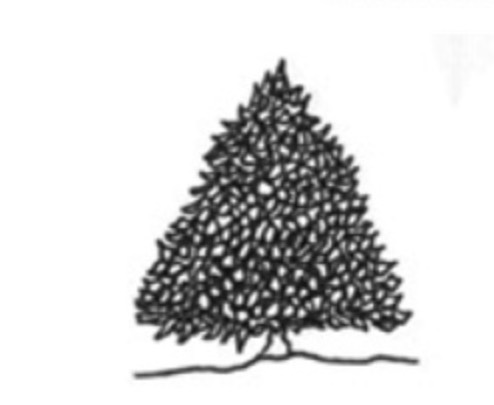 |
A pointed hedge shape where straight lines require more frequent trimming. |
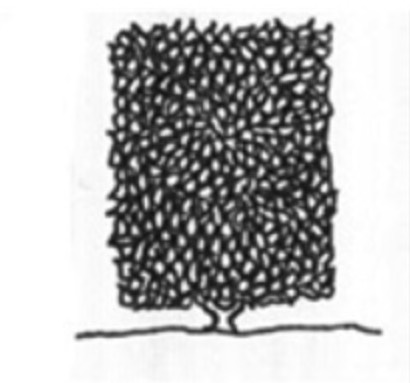 |
A rectangle hedge shape where straight lines require more frequent trimming. |
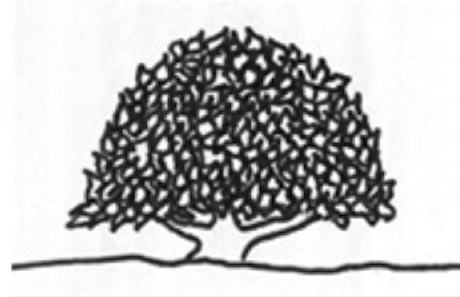 |
Peak and rounded tops hinder snow accumulation. Rounded forms, which follow nature tendency, requires less trimming. |
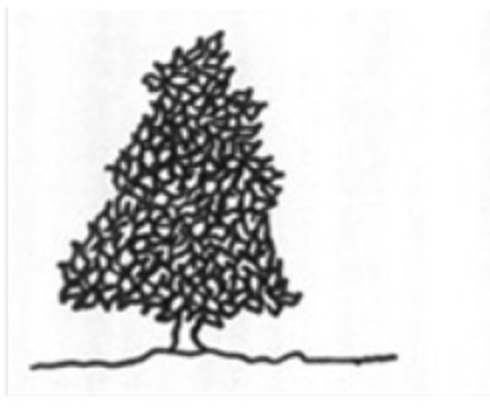 |
A rounded hedge shape to showcase the difference in hedge shapes during snow fall. |
After plants have been initially pruned to induce low branching, maintain by trimming the top narrower than the bottom so that sunlight can reach the base of the plant (Figure 2).
Figure 2. Proper hedge pruning.
This question often arises: How often and when should a hedge be trimmed? Answers depend to some extent on how formal an appearance is desired. In general, trim before the growth exceeds one foot. Hedges of slow growing plants, such as boxwood, need to be trimmed sooner. Excessive, untrimmed growth will kill lower leaves and will also pull the hedge out of shape. Trimming frequency depends on the kind of shrub, the season, and desired neatness.
Rejuvenating evergreen hedges is more difficult. As a rule, evergreens cannot stand the severe pruning described above and may have to be replaced.
Tools
The traditional pair of scissor-action hedge shears is still the best all-round tool for trimming hedges. It cuts much better and closer than electric trimmers that often break and tear twigs. Hand shears can be used on any type of hedge, while electric trimmers do poorly on large-leaved and wiry-twigged varieties, and sometimes jam on thick twigs. Hand shears are also quieter, safer, and less likely to gouge the hedge or harm the operator.
Hand pruners are useful in removing a few stray branches and are essential if an informal look is desired. Large, individual branches can be removed with loppers or a pruning saw. Chain saws are not recommended for use on hedges.
Successful Fall Gardening Starts with Good Plant Establishment
David Hillock, Consumer Horticulturist
Gardening is a year-round activity. Those who garden develop an appreciation and a desire for fresh, nutritious vegetables and fruits. In many situations, the best way to obtain fresh vegetables is to grow them at home.
Some of the best quality garden vegetables in Oklahoma are produced and harvested during the fall season when warm, sunny days are followed by cool, humid nights. Under these climatic conditions, plant soil metabolism is low; therefore, more of the food manufactured by the plant becomes a high-quality vegetable product.
Successful establishment of a fall garden starts with the planting of seeds and obtaining transplants made available in the garden centers.
Climatic conditions of July and August involve high soil temperature, high light intensity, and rapid drying of the soil, resulting in an increase in problems of obtaining a uniform stand of plants. Achieving a full stand of plants in the heat of summer may require special treatments. This might include shade over rows when seeded and supplemental watering to reduce soil temperature and aid in seed germination.
Viable seed, to germinate or sprout, must have the proper temperature, adequate moisture, and sufficient oxygen. The surface of the soil, when exposed to the summer sun, may become very hot (140°F). Vegetable seeds should be planted no deeper than three times the diameter of the seed. With small seed such as carrot, this would be no more than 1/4 inch deep. At this depth and exposed in the hot soil, death of the seed due to high temperature would probably occur. It is also likely that such a soil, even when watered, might dry out quickly because of the high temperature. Unless the soil remains moist at the depth where the seeds have been planted, germination will not take place.
To achieve proper temperature and adequate moisture, apply mulch over the row following planting and watering or use materials such as screen wire strips, shade cloth, or boards to cover the row. This will moderate both soil temperature and soil moisture. Remove covers after seedling emerges.
Another desirable practice is to open the soil for the row somewhat deeper than in spring planting. The seeds are planted in this furrow, covered, and watered. In this manner, only the narrow trench would be watered, thus conserving a limited water supply. Later, one may cultivate along the sides of the row and fill soil to the same level of the remainder of the garden. In so doing, one may cover small grass and broadleaf weed plants that might be growing in the row.
Some vegetables are most easily grown by planting seeds in a small seed flat, setting them in individual containers to grow for approximately one month, and then transplanting them to the garden. Those that respond most favorably to this method of handling include broccoli, cauliflower, Chinese cabbage, leaf lettuce, Brussels sprouts, and cabbage.
Prior to setting them in the garden, transplants may be conditioned or toughened by a reduction in the amount of water supplied and by exposure to full sunlight. This might require three to five days. Plant them in the garden in late afternoon to early evening to reduce transplanting shock. Water the plants as they are set. A water-soluble fertilizer may be used at this time, if necessary—following label directions.
To achieve maximum germination of lettuce seed, the planted and watered seed flat should be kept cool. This can be accomplished by placing the seed flat in a cool (60° to 70°F) location for four or five days, at which time seed may begin germinating. The seedlings should be transplanted to individual containers within a few days.
When purchasing transplants in the fall from the garden center be sure to inspect them carefully for unwanted pests. Transplants coming from the greenhouse may also need to be conditioned before setting them directly into the garden. For additional tips on establishing a fall garden see OSU Fact Sheet HLA-6009 Fall Gardening.
Root Rot Disease in the Landscape
David Hillock, Consumer Horticulturist
Many plant pathogens inhabit the soil, and they are often favored by wet soil conditions. One group of root rot pathogens are known as the water molds because they are most severe in wet and poorly drained soils. Two of the groups of pathogens in this group are species of Phytophthora and Pythium. There are other types of root rot pathogens, but we will focus on these today.
Diagnosing root rot can be difficult because we do not examine the root system of plants daily. The aboveground symptoms that are observed may include wilting, dieback, poor vigor, yellowing, leaf drop, stunting, and/or a general unthriftiness of the plant. If any of these symptoms are observed, address any possible issues such as insect problems, poor fertility, or inadequate irrigation. Once these factors have been ruled out, it’s time to dig a little deeper. Literally.
Carefully dig the soil out around the plant roots to examine them. Note if the soil seems especially wet or dry. Sometimes growers will find that there is a foul odor that can be associated with anaerobic soil conditions and/or decay.
Healthy roots should be abundant and young roots are light colored. The roots of shrubs and trees will become woody and darker over time as a normal process. Touch the roots to confirm that they are firm, and they are not breaking apart. If the root system appears sparse, discolored or if the roots are softened, it is likely that a root rot problem has developed.
To have the plant tested to determine the exact pathogen responsible, remove an entire plant that is in decline, but not dead. Some of the soil associated with the roots should be included and the entire root system should be placed in a plastic bag. Seal the bag with tape or a rubber band at the soil-line to prevent soil from contaminating the foliage. The entire plant can be loosely wrapped in a larger plastic bag such as a trash bag and taken to the OSU County Extension Office so it can be sent in for diagnostic testing.
With problems due to Phytophthora and Pythium, it is critical to remove and discard plants and associated soil in the trash as soon as possible. It is best to leave the area fallow (no plants) and to occasionally turn the soil. It is helpful to use soil solarization to reduce the number of propagules in the soil. The addition of organic matter may be helpful and in studies, has shown to reduce the level of propagules of Pythium and Phytophthora in the soil. In planting beds, it is critical to have soil that is well drained and to avoid overwatering. Planting beds may need to be amended to improve drainage. Planting on slightly raised hills or digging a trench can help redirect water away from plants. In many cases, downspouts can be redirected to reduce water flowing into planting beds.
If you immediately replant into contaminated beds, it is best to select plant material that is resistant or tolerant to Phytophthora. Pythium is less aggressive, and, in most cases, the cultural methods listed above will adequately manage the problem. In general, we do not recommend fungicides for treating root rot problems in the landscape.
Prepare Young Grapevines for Winter by Removing Grow Tubes in Summer
Andrej Svyantek, Assistant Extension Specialist, Viticulture and Enology
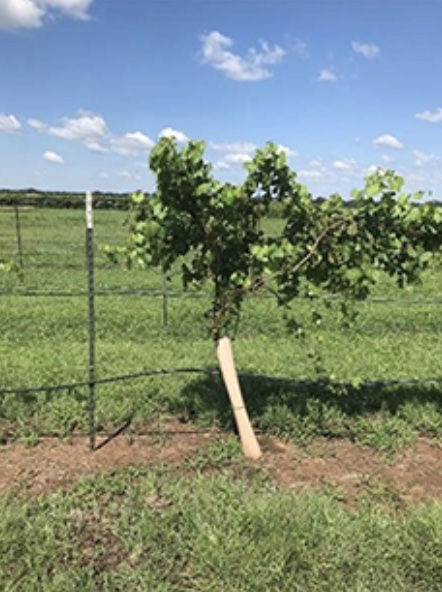
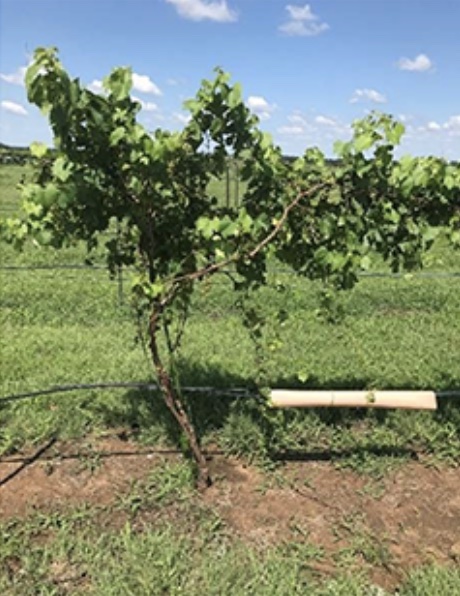
Grapevine grow tubes are an excellent tool for protecting young grapevines from herbicide or weed-whip damage during vineyard establishment. However, they need to be removed in summer to help new trunks acclimate in preparation for cooler fall and winter temperatures. August is a great time to remove these grow tubes because their job in the vineyard (protecting sensitive tissue from weed control measures) is mostly done for the season.
The tubes offer no winter protection for the trunk, and they will increase cold damage. Grow tubes create a hot environment during warm winter days, yet they offer no heat retention through cold events. Cracking and damage to trunks may occur when grow tubes are not removed in a timely manner; this can lead to grapevine death or decline from crown gall infections within exposed tissue.
Always wear gloves and investigate the openings of your grow tubes before detaching them from vines. There are many interesting things you may find while removing grow tubes, such as spiders, snakes, Japanese beetles, multi-colored Asian lady beetles, and your old pair of pruners.
For younger (<3 yr old) grapevine trunks, you may still want to use the grow tube to protect the vines’ tissue during herbicide applications the following year. You can attach them for the winter on adjacent irrigation lines or trellis t-posts to reduce transportation and storage, but make sure they will not bump the trunk throughout winter. Any mechanical damage to your trunk may lead to openings for future crown gall infections.
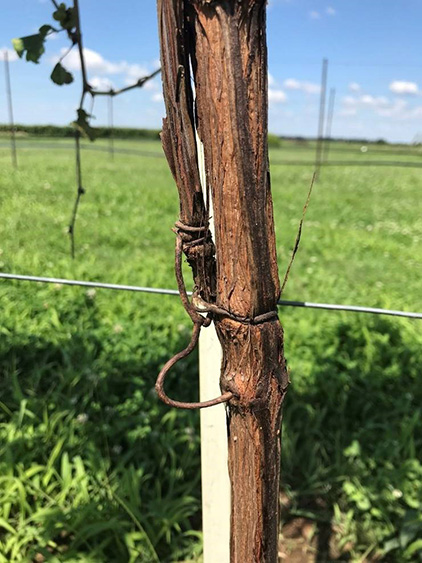
After removing grow tubes, now is also a good opportunity to look for any tendrils that might begin to girdle your grapevine. Removing tightly bound, woody tendrils from permanent trunks can alleviate stress on your grapevine and improve its overall health and productively for years to come.
It's a Bird . . . It's a Pain . . .
Andrej Svyantek, Assistant Extension Specialist, Viticulture and Enology
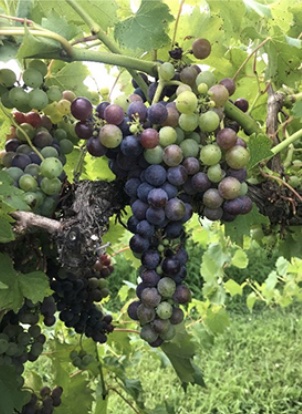
Throughout most of Oklahoma, grape berries are proceeding through veraison (the changing of grape berries from hard and green to soft and colored). The berries are increasing in sugar, phenolic, and pigment content. Important flavor compounds are also developing. Veraison is the stage when grape growers and winemakers begin to taste berries and test fruit composition in preparation for harvest and fermentation, but they will not be the only ones sampling fruit.
‘Chambourcin’ grapes during veraison
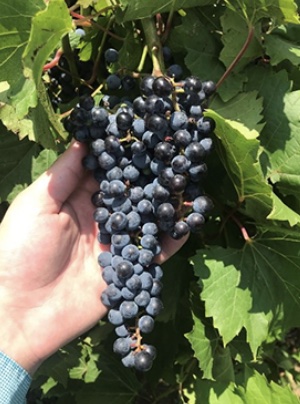
‘Frontenac’ grapes approaching harvest, hidden beneath multiple leaf layers
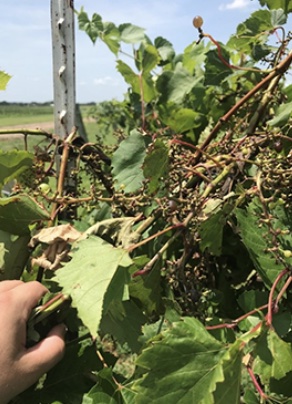
Exposed ‘Frontenac gris’ grape clusters after berry removal by birds
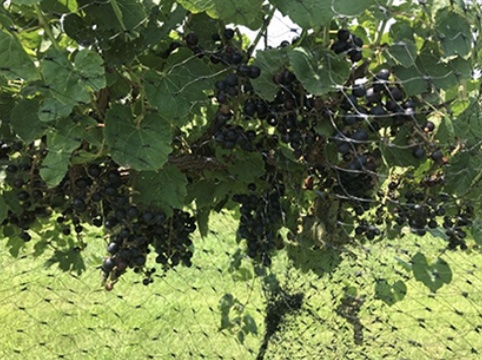
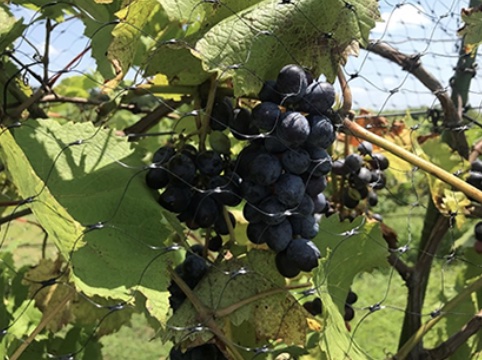
As berries go through veraison, they become appealing to many birds and mammals from neighboring woodlands. Clusters bare of berries are not a kind reward for hard work training, pruning, and protecting vines from fungal and insect pests. When berries start ripening, it is time to implement vertebrate pest protection practices appropriate to your farming situation. These include use of bird netting (top choice to reduce losses), distressed bird call recordings, vineyard scare tools, bird cannons, and other devices to reduce berry predation.
‘Arandell’ wine grape berries protected by bird netting
‘Faith’ seedless table grape berries protected by bird netting

