Use of Plastic Mulch and Row Covers in Vegetable Production
Growing vegetables commercially requires intensive management and involves risk whether in a market garden, a truck farm or a larger commercial farm. Regardless of production scale, the procedures needed for success are similar and require the grower to have an ample supply of high-quality product available to sell, preferably when the price is highest. Price is generally highest when the supply is the lowest, thus the importance of “off-peak” production, i.e. production earlier or later in the season than competitors.
Various soil and plant cover materials are available to help growers achieve their production goals whether that is earliness, improved quality or increased yields. The decision to use these intensive cultural practices may be influenced by factors such as farm size, labor availability, intended market and specific crops being grown. Mulches and row covers are management tools growers can use to help meet their production goals.
Mulches
Mulching is a technique that has been used by vegetable growers for many years and may refer to use of either organic or inorganic materials. Organic mulches are those derived from plant and animal materials. Those most frequently used include plant residues such as straw, hay, peanut hulls, leaf mold and compost; wood products such as sawdust, wood chips and shavings; and composted animal manures. Organic mulch properly utilized can provide all the benefits of any mulch with the possible exception of early season soil warming. However, such mulch materials are often not available in adequate quantities for commercial operations or must be transported to the place of use. Application of natural materials can be labor intensive although special equipment such as hay mulchers and hay bale un-rollers may be useful for some situations. Plastic mulch accounts for the greatest volume of inorganic mulch use in commercial vegetable production although materials such as landscape fabrics and woven polypropylene may also.
Benefits of Plastic and Other Sheet Mulches
Earliness. Plastic mulch can be used effectively to modify soil temperature. Black or clear mulches intercept sunlight, which warms the soil. White or aluminum mulch reflects the sun’s heat and keeps the soil cooler. Black mulch applied to the planting bed will warm the soil and promote faster growth in early season, which generally leads to earlier harvest. First harvest acceleration of 7 days to 14 days is not uncommon, depending on weather conditions. Clear mulch provides greatest soil warming and is useful in certain situations.
Soil moisture regulation. Mulches help prevent soil water loss due to evaporation from the soil surface. Drip irrigation is often placed underneath mulches to provide a means for precise management of soil moisture. This can reduce irrigation frequency and amount, and may help reduce the incidence of moisture-related physiological disorders such as blossom end rot and fruit cracking on tomato.
Mulches also protect crop roots by shedding excessive water away from the crop root zone during periods of excessive rain fall. This is especially true when used with a raised bed.
Weed control. Mulch helps prevent the establishment of weeds in many vegetable crops. Black sheet mulches prevent most weeds by excluding light. Intact plastic and other materials control essentially all annual weeds except at planting holes and mulch edges, where additional control measures are needed. Most perennial weeds such as Johnsongrass are also suppressed although vigorous plants or heavy infestations may lift plastic. Perennial sedges, and to a lesser extent, grasses can puncture sheet mulches as the weeds emerge from the soil, resulting in inadequate control. Weeds grow under clear plastic, thereby requiring mulch removal or covering with an opaque material or soil once adequate soil warming is achieved.
Enhanced nutrient management. Along with enhanced moisture regulation, mulch allows for greater control of nutrients and fertilizer loss since leaching is reduced. This is particularly true in sandy soils. This allows the grower to place more preplant fertilizer in the row prior to planting the crop and facilitates side-dress fertilizer applications through drip systems.
Improved quality. Plastic mulch helps keep fruits such as melon and tomato from direct contact with the soil surface. This reduces soil rot and helps keep the product clean. Fruits and greens crops tend to have fewer scars and blemishes. Properly installed plastic helps keep soil from splashing onto the plants during rainfall, which can reduce disease incidence and produce washing requirements.
Reduced soil compaction. Soil under the mulch remains loose and friable. Aeration, soil microbial activity and the overall rooting environment are enhanced.
Reduced root pruning. The mulch strip reduces injury to crop roots, especially when used in combination with a raised bed to provide plant roots a large volume of soil with favorable growing conditions. Cultivation and/or chemical weed control can still be used in the row middles with little hazard of crop injury.
Improved plant growth. A combination of the above, and perhaps other factors, results in vigorous, healthier plants that are less susceptible to negative effects of weeds, insects and diseases.
Disadvantages
Cost. Depending on row spacing and bed width, plastic mulch costs approximately $350 to $700 per acre, including installation and removal. Most of this is an up-front cost, which must be borne for the duration of the crop. Some additional equipment is also required. As a minimum, a mulch-laying machine must be purchased or constructed in the farm shop. Equipment must also be available to prepare and shape the planting bed for mulch application. Also, depending on the extent of the operation, specialized transplanting or seeding equipment may be needed.
Removal and disposal. Non-degradable plastic mulch must be removed from the field. Truly degradable plastics are not yet available and partially degradable products are difficult to remove, as they readily break into small pieces. This can be a frustrating experience, although several useful techniques and devices are available to facilitate this procedure. Machines are available to lift the plastic and hand labor and rolling devices are needed to remove plastic from the field. Approximately eight hours of labor are required to remove plastic from one acre.
Types of Plastic and Other Mulch Materials Available
Many different kinds of mulch material are available. Common widths are 36 inches to 60 inches, with wider products available. Thickness varies from 0.6 mil to 2 mil or greater. The surface texture of the material may be slick or embossed. Embossed plastic has visible patterns on the surface, which give the plastic a wrinkled appearance. This mulch is generally more resistant to damage due to punctures, wind fatigue and cracking than non-embossed mulches. Another type of mulch, linear low density, has a slick surface appearance, but may have what appear to be parallel lines across the surface, which intersects to form diamond-shaped patterns. These lines serve to reinforce the mulch and help prevent tears from crossing from one diamond to another. Be sure to use an adequate strength material. A 1 mil to 1.25 mil embossed plastic is adequate for most applications in Oklahoma. Mulch that becomes brittle and breaks up too early is usually worse than no mulch at all, not to mention the money wasted.
Most common agricultural mulches include black, white and white on black, which may be used with either side facing upward, depending on the specific need. Clear mulch is used when most rapid soil warming is needed, but weeds will grow below it, thereby limiting its usefulness. White or aluminum reflective mulch reflects solar radiation and is used where soil cooling is desired, such as establishing fall crops during the heat of summer. Research has shown that white or aluminum reflective mulch also repels aphids, which spread some virus diseases in vine crops such as squash. Various other colors of mulch may affect plant growth in a positive way.
Currently, much research is being conducted into plastic mulch materials which degrade either by sunlight (photodegradable) or biological organisms in the soil (biodegradable). Completely degradable plastic mulch is not yet available. Existing degradable products may leave visible residues in the field as well as microscopic particles that may have environmental drawbacks.
Other commercial mulch materials include papers and woven products. Materials such as woven polypropylene can be a good choice for market gardens, as the material may be used several years. It is less susceptible to tearing and damage from gardening activities. It may be installed and used for several years, or installed and removed annually. Installation with standard mulch laying equipment is possible. Paper materials are for use in smaller areas and are generally effective for a short period compared to other mulch materials.
Soil Preparation and Fertilization
Plastic mulch is not a substitute for thorough soil preparation. A seed/transplanting bed prepared for mulch application should be the same quality as in non-mulched fields. The soil should be free of rocks, sticks, hard clods and other material that could puncture the plastic.
Rows should be laid off on widths compatible with available equipment. The ability to work row middles is restricted with use of plastic mulch due to mulch width. Rows on 6-foot centers covered with 5-foot wide mulch will have only three to four feet of free middle space, depending on the height of the bed and the amount of the mulch used for anchorage. Provisions must be made for weed control in the row middles, either with chemicals or mechanical cultivation.
Preplant fertilizer should be applied prior to mulch application. This generally means most of the potassium and phosphorus needs of the crop and part of the nitrogen. Fertilizer can be applied in a furrow prior to bedding or incorporated in the bed during the bedding process. The practice varies, depending on the crop to be grown.
Machinery of various designs and sizes is available to accomplish all operations associated with use of plastic mulch. As a minimum, a furrow must be opened with a lister for fertilizer application, and a ridge must be raised with a bedder or disc hillers and shaped to accept the mulch. Equipment is available to accomplish this in one operation. When finished, the bed should be four to six inches high, about 30 inches to 34 inches wide (depending on mulch width) with about 1 1/2 inches to two inches slope from center to edge (Figure 1).
The mulch should never be applied to excessively dry or wet soil. Dry soil settles and allows mulch to loosen after wetting, while wet soil does not seal the mulch well, making it subject to blowing off the bed.
An acceptable procedure is to apply fertilizer and raise ridges with disc 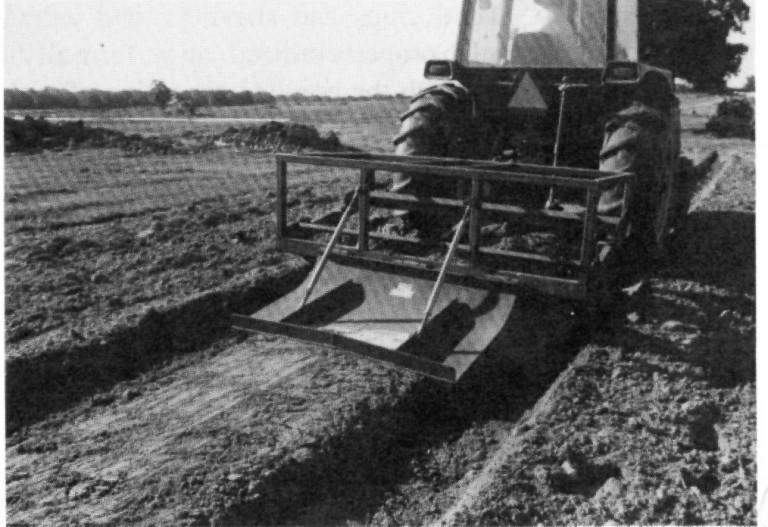 hillers for settling prior to mulch application. The top of the ridges can be knocked
off with a commercially available bed shaper or with a shaper constructed in the farm
shop. If the bed has thoroughly settled, some growers have done a suitable job of
shaping the bed utilizing a pre-shaped device mounted on a tool bar ahead of the mulch
layer. If the bed is prepared, and mulch/drip tube laid in one operation, a bed press
is needed to prevent the bed from settling after installation.
Mulch Application
Plastic mulch is most efficient when used in conjunction with drip irrigation. A drip tube can be applied on the soil surface under the mulch or buried two inches to three inches beneath the soil surface. Burial reduces the chance for movement of the tube and for damage that causes leaks. Either way, the tube must be installed prior to the mulch. If buried, the drip tube should be installed with the emitter holes oriented upward and without excessive stretching. For spring planting, the mulch should be applied at least seven days ahead of planting to allow time for soil warming. Soil fumigation can also be accomplished during mulch application. Fumigation is a specialized operation. Make plans well ahead of time to allow for equipment readiness as well as necessary waiting periods between treatment and planting. Confer with your local county Extension educator for fumigation recommendations.
Apply the mulch properly to realize all of the potential benefits for your money.
The plastic should be in continuous contact with the soil, i.e. the bed should be
uniform with no dish shapes to hold the mulch off the soil. Space between the soil
and the mulch interferes with heat transfer and prevents the soil from warming as
quickly and thoroughly. It also allows the plastic to “whip” in the wind, which can
start tears. Spaces also allow movement of the mulch against the stems of transplants,
which can cause abrasion of stems and death of the plant.
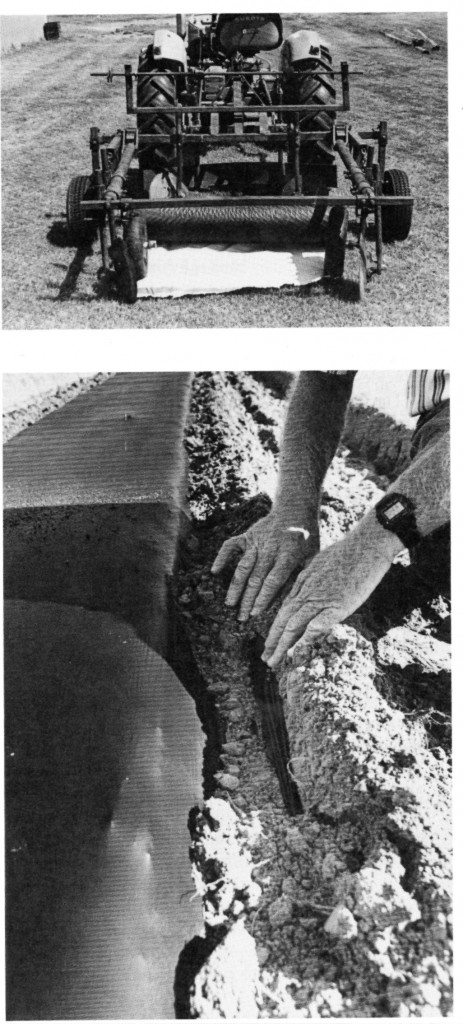
The mulch should be applied with a properly adjusted machine containing at least the components shown in Figure 2. The edges of the mulch should be secured with a generous amount of soil. However, do not apply more soil than is needed, as this makes the mulch more difficult to remove. Stretch wheels should be adjusted to stretch the mulch edge securely into the anchoring furrow for covering.
Figures 2 and 3.
The soil should “roll” smoothly from the covering discs onto the edge of the plastic. Ideally the furrow openers will prepare a rounded opening, the stretch wheels will securely hold the plastic in the furrow, and the covering discs will return to the furrow all soil removed by the openers. This should result in a “lip” of plastic filled with soil (Figure 3). Mulch applied properly will not blow off the row, but should require minimum effort to remove.
Plastic mulch is usually packaged in 2,400-foot rolls. Drip tube is sold in rolls
containing about 7,500 feet, depending on the type of tube and brand. Rows on 6-foot
centers require 7,260 feet of row to cover an acre of land. Therefore, about three
rolls of mulch and one roll of drip tube are needed per acre on 6-foot centers.
For crops grown in single rows, the drip tube should be installed approximately three
inches off center of the row. If crops are to be planted in two rows per bed, install
the drip tube in the center of the bed. This keeps the tube from being damaged during
the transplanting or seeding operation.
If equipment prevents working the middles after installing the mulch, apply herbicide to the middles prior to laying the mulch. It is generally best to leave adequate space between rows to allow middles to be worked with a rototiller or small tractor.
Planting
Planting through plastic mulch can be accomplished either manually or mechanically, depending on the size of the operation. Transplanters can be constructed in the farm shop or purchased at prices ranging from $1,200 to $1,500. Depending on the type and capabilities of the machine, planting space can vary from 18 inches to 60 inches in each row. The simplest planter is a “water wheel” planter which punches a hole through the mulch and fills it with water/starter solution. Two workers ride the machine and set a plant into each hole of water. The water settles the soil around the plant’s roots as it percolates down into the ground (Figure 4). Other types receive the plant into a pocket then punch a hole in the plastic, set the plant in the hole, press the soil around the plant and deliver water/starter solution onto each plant (Figure 5).
Figures 4 and 5.
Modifications are available to allow use of some transplanting equipment for delivering a “plug mix” into the planting hole. A “plug mix” consists of a potting soil:seed mix in a ratio, which provides an average of three to five seeds in each one-fourth cup of mix. The practice is effective on many crops including vine crops, late tomatoes, peppers, etc.
With some organization, hand transplanting and seeding can be accomplished quite efficiently. A crew of at least four is generally needed. Devices can be built for hand use or tractor mounted to mark and punch holes for hand planting (Figure 6).
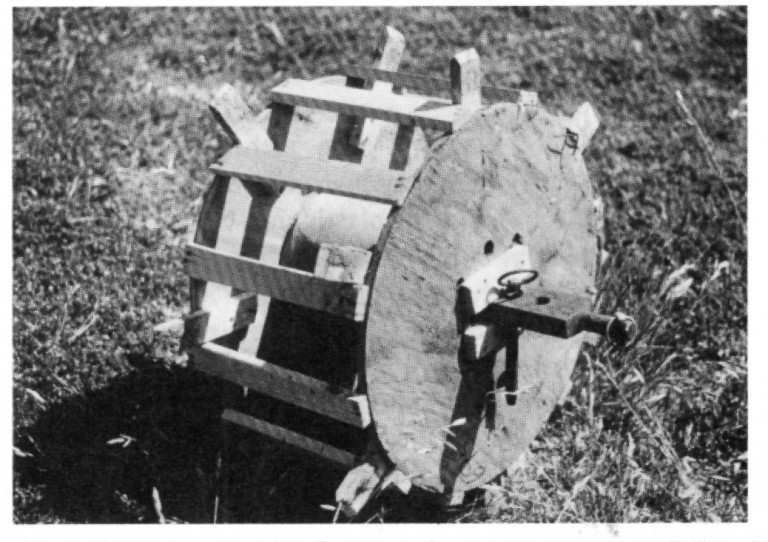
Figure 6.
Culture and Management
Plastic mulch does not eliminate the need for good cultural practices. On the contrary, more intensive management is needed to ensure utilization of the mulch to its greatest advantage. Crops should be observed regularly for insect build up under the plastic around plant openings. If the mulch loosens after installation and flaps in the wind, apply a shovel of soil in the middle of the plastic at regular intervals down the row to stabilize the mulch. This can prevent the mulch from blowing off the row or damaging transplants. Establish and follow a good integrated pest control management program for the particular crop.
Follow good irrigation practices. Drip irrigation is the method of choice. Furrow
irrigation along the edge of the plastic can be used, but is less successful. Soil
conditions must be suitable to furrow irrigation. While sprinkler irrigation may
be better than no irrigation at all, it is generally of only marginal value. Use
tensiometers to determine proper watering frequencies and application amounts for
the drip system. Side dress fertilization can be accomplished by injecting water-soluble
fertilizer through the drip system. In some cases, placement of nitrogen fertilizer
in a shallow furrow beside the edge of the plastic can be beneficial to such crops
as tomato. Use good judgment to assess the nutrition status of the plants and act
accordingly.
Removal
After the plastic has served its purpose, i.e. produced at least one and preferably two or more crops, it must be removed from the field. The plastic should be removed as soon as possible after use ceases. Do not allow the plastic to become overgrown with weeds prior to removal. Do not attempt to plow or disc under non-degradable plastic mulch. You will deal with the residue problem for years to come. Growers seem to develop their own techniques that work best in each unique situation. A machine is available to lift the plastic and shake off some adhering soil, leaving the mulch lying on the top of the row.
A suitable mulch lifter can be constructed by mounting a coulter on a tool bar centered
on the row. The coulter cuts the mulch into two strips while 10-inch to 12-inch sweeps
cut under the “lip” of the plastic to loosen the soil seal (Figure 7). The plastic
is then picked up by hand and removed from the field. Small quantities of plastic
can be burned if local regulations permit. Larger amounts should be delivered to
landfills. Disposal of spent plastic mulch is a significant problem for the industry.
Recycling is available in large use areas such as Florida and pelletizing plastic
for use as a fuel has been considered in some locations.
Woven polypropylene mulches can be removed and stored for future use.
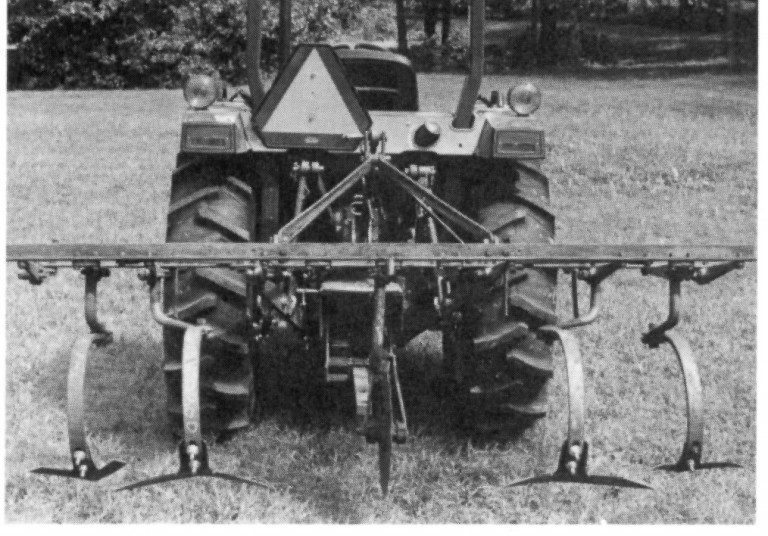
Figure 7.
Row Covers
The major benefits of row covers are earliness and wind protection. Spunbound row covers discussed below can also protect crops from certain insect pests including those that are vectors to diseases. The earliness benefit is generally attributed to warming beneath the cover. Wind protection reduces stress on plants, particularly during early growth stages. Location and market intent are key factors contributing to the value of earliness to a specific operation. Earlier production to a wholesale grower/shipper may mean direct competition with other growers in earlier production areas to the south. To a grower specializing in local retail sales or nearby wholesaling, production 10 days to 14 days earlier can mean several cents more per pound or dollars per box. The decision to use row covers is specific to each situation. Their use is generally limited to the highest value multiple harvest, warm season crops, e.g. tomato, pepper, squash.
The most flexible, yet most expensive, method of row cover employment is using two sheets of plastic 24 inches to 30 inches wide, anchored on each edge with soil and fastened together at the top with clothespins. The plastic is supported by wire hoops (9 -gauge galvanized, 60 inches long) on about 5-foot spacing down the row. Some growers also run a 16-gauge wire the length of the row at the peak of the hoop, with wood stakes every 20 feet to 30 feet for added support. The clothespins allow the cover to be vented on warm days (Figure 8). A less expensive alternative is a single sheet of plastic about 60 inches wide, stretched over the wire hoops after the crop is transplanted, and anchored with soil on each side. Porous, slitted or perforated plastic may be used, and additional manual venting (e.g. slit with razor blade) may also be required if excessively warm days occur in early season. Supported row covers are best used with plastic mulch, due to weed control problems.
The time of removal of the row cover is a key management decision. Removal too early reduces the temperature modification benefit. Removal too late can interfere with pollination, particularly with vine crops.
Machinery is available to install wire supported row cover systems, including setting the hoops and installing the plastic over the row (Figure 9). In some cases, conventional mulch-laying machines can be modified or adapted to install the plastic.
Figures 8 and 9.
Currently, the greatest emphasis on row covers is in floating covers, i.e. those which require no wire or other structural support. They are lightweight (0.5 oz/sq yd) spunbonded materials which lay directly on top of the plants. The major disadvantage of these materials is abrasive action of the material on plants caused by wind. This is at least partially counteracted by using wide row materials. The most common width is 21 feet. These materials tend to “float” more in the wind and are less abrasive to crop plants. Wide row covers can be laid by hand or by machine and, with some care, can be retrieved for use a second year. This technique is probably best utilized in market gardens or other direct-to-consumer sales operations. Problems in addition to cost are the logistics of handling and weed control beneath the covers. Herbicides can be utilized to minimize weed problems.
The third method of employment of row covers is over the midbed trench. This method
utilizes a 5-foot wide transparent cover material stretched tightly across a bed,
shaped to leave a mound of soil on either side of the row. This shaped bed supports
the cover material off the crop plants. Application is limited to relatively low-growing
crops such as melons and squash (Figure 10). The top of the planting bed must be above
the adjacent furrow to allow adequate drainage. The crop is seeded, plug seeded or
seedlings are transplanted down the center of the herbicide-treated bed. The row cover
material is then stretched tightly over the bed using a conventional mulch laying
machine. This method is less expensive and troublesome than using wire support. Use
of a porous cover allows water to be applied by sprinkle irrigation. A drip tube can
also be laid beneath the cover. The major problem with this technique is weed control.
Preemergence or preplant herbicides help reduce weeds under the cover. A postemergence
grass herbicide is generally needed when the covers are removed.
Plastic mulches and row covers used alone or in combination offer the grower a management tool which can increase earliness, yield, quality and return per acre in exchange for an additional input. Wire supported row covers may be best adapted to market or truck gardens for direct sales. Plastic mulches are more widely applicable and offer good potential to vegetable producers. For greatest efficiency and economy, mulches and/or row covers must be employed as part of a total production system.
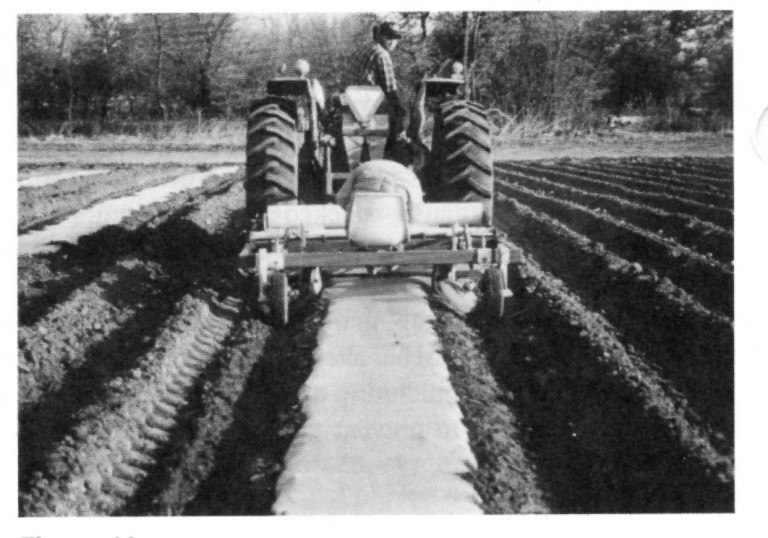
Figure 10.
Jim Shrefler
Area Extension Horticulturist
Lynn Brandenberger
Extension Vegetable Specialist

