

Turfgrass - A Middle School Curriculum
Introduction
The grass family is one of the largest plant families. There are more than 11,000 species of grass. Grasses include cereal grains (oats, wheat, rice, etc.), grasses growing in native pastures and grasslands (bluestem, switchgrass, gammagrass, etc.), turfgrass and even bamboo. Small grasses may grow only a few inches tall, while large grasses can grow over 12 feet high!
For early humans, short grasses were valuable for safety. Shorter grasses made it easier to stalk prey, while allowing humans to see dangerous predators. In medieval days, short grasses made it easier to see potential invaders coming to attack a castle. Since the 1100s, low-growing grasses have been used for sports and recreation around the world. Cricket, soccer and golf are some examples of sports played on short grass. Grasses referred to as turfgrasses are green plants with a low-growth habit that stay relatively short and can withstand mowing and traffic. Fewer than 50 species of grass can be considered turfgrass.
Types of Turfgrasses
Across the United States, different species of turfgrasses are used for lawns, as well as sports fields and parks. Not all turfgrasses will grow in any given place or in every season. Turfgrasses are divided into cool-season grasses and warm-season grasses.
| Characteristic | Cool-Season Grasses | Warm-Season Grasses |
|---|---|---|
Characteristic Climate adaption | Cool-Season Grasses Cooler climates | Warm-Season Grasses Warmer climates |
Characteristic Seasons adapted for | Cool-Season Grasses Spring and fall (65 - 75 F) | Warm-Season Grasses Summer (80 - 95 F) |
Characteristic Length of roots | Cool-Season Grasses Shorter | Warm-Season Grasses Longer |
Characteristic Adapted to drought conditions | Cool-Season Grasses No | Warm-Season Grasses Yes |
Characteristic Examples | Cool-Season Grasses Fescue, ryegrass, Kentucky bluegrass | Warm-Season Grasses Bermudagrass, St. Augustine grass, Zoysiagrass |
Oklahoma is in a unique part of the United States that makes growing turfgrasses more complicated than in many other states. This state is in the transition zone, where warm and cool conditions, as well as humid and arid conditions exist. It is often too cool for warm-season grasses to flourish year-round, but too warm for cool-season grasses to flourish in the summer. Because of this, many different turfgrasses are grown in the transition zone, depending on specific local climate. Sometimes two different grasses are grown together. For instance, to maintain a green look on sports fields throughout the year, cool-season grasses (such as ryegrass or bluegrass) are often overseeded onto dormant (brown) bermudagrass.
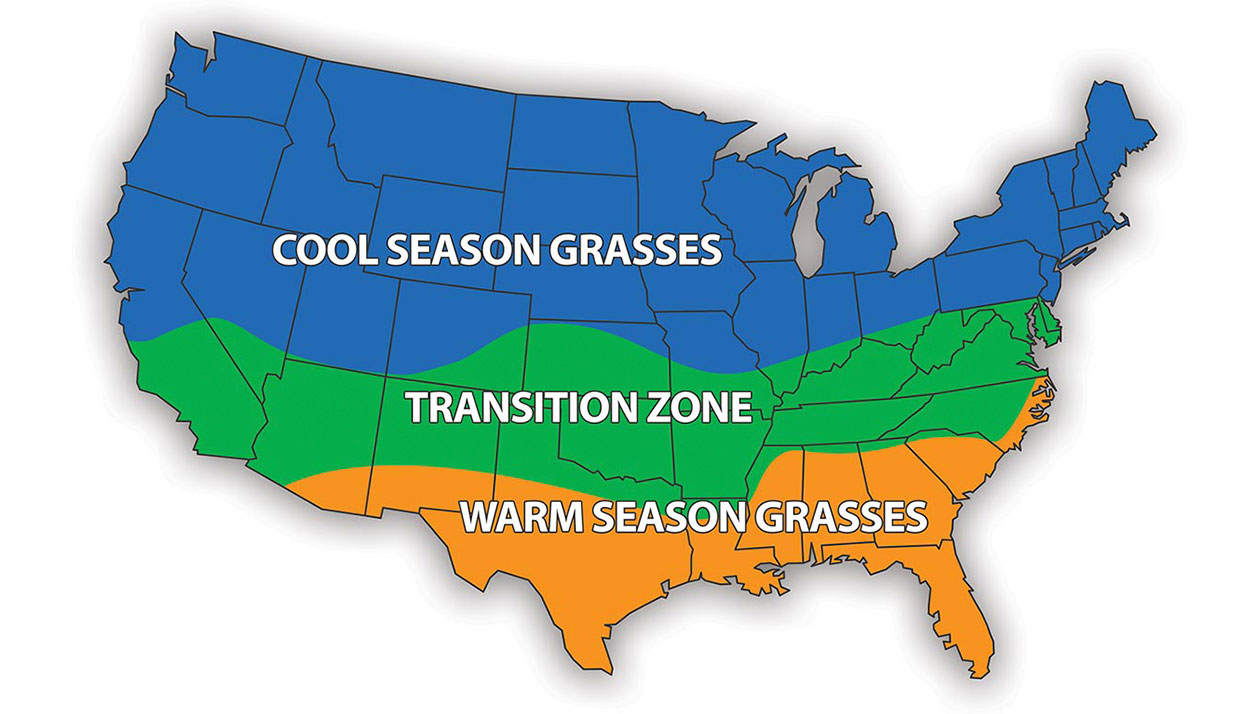 Figure 1: Map of the zones of the United States.
Turfgrass Anatomy and Growth Habit
To help identify different turfgrasses used in lawns and parks, which is important in knowing how to care for them, it is important to know the anatomy of grass. The same parts of a grass may look different, or even be absent, when compared to other species. These differences are important for identification, as well as knowing where to inspect for different diseases or pests.
The aboveground part of a plant is called the shoot. One part of the shoot is the leaves. Leaves have two parts. The lower part is called the sheath, which wraps around the stem. The top of the leaf is called the blade.
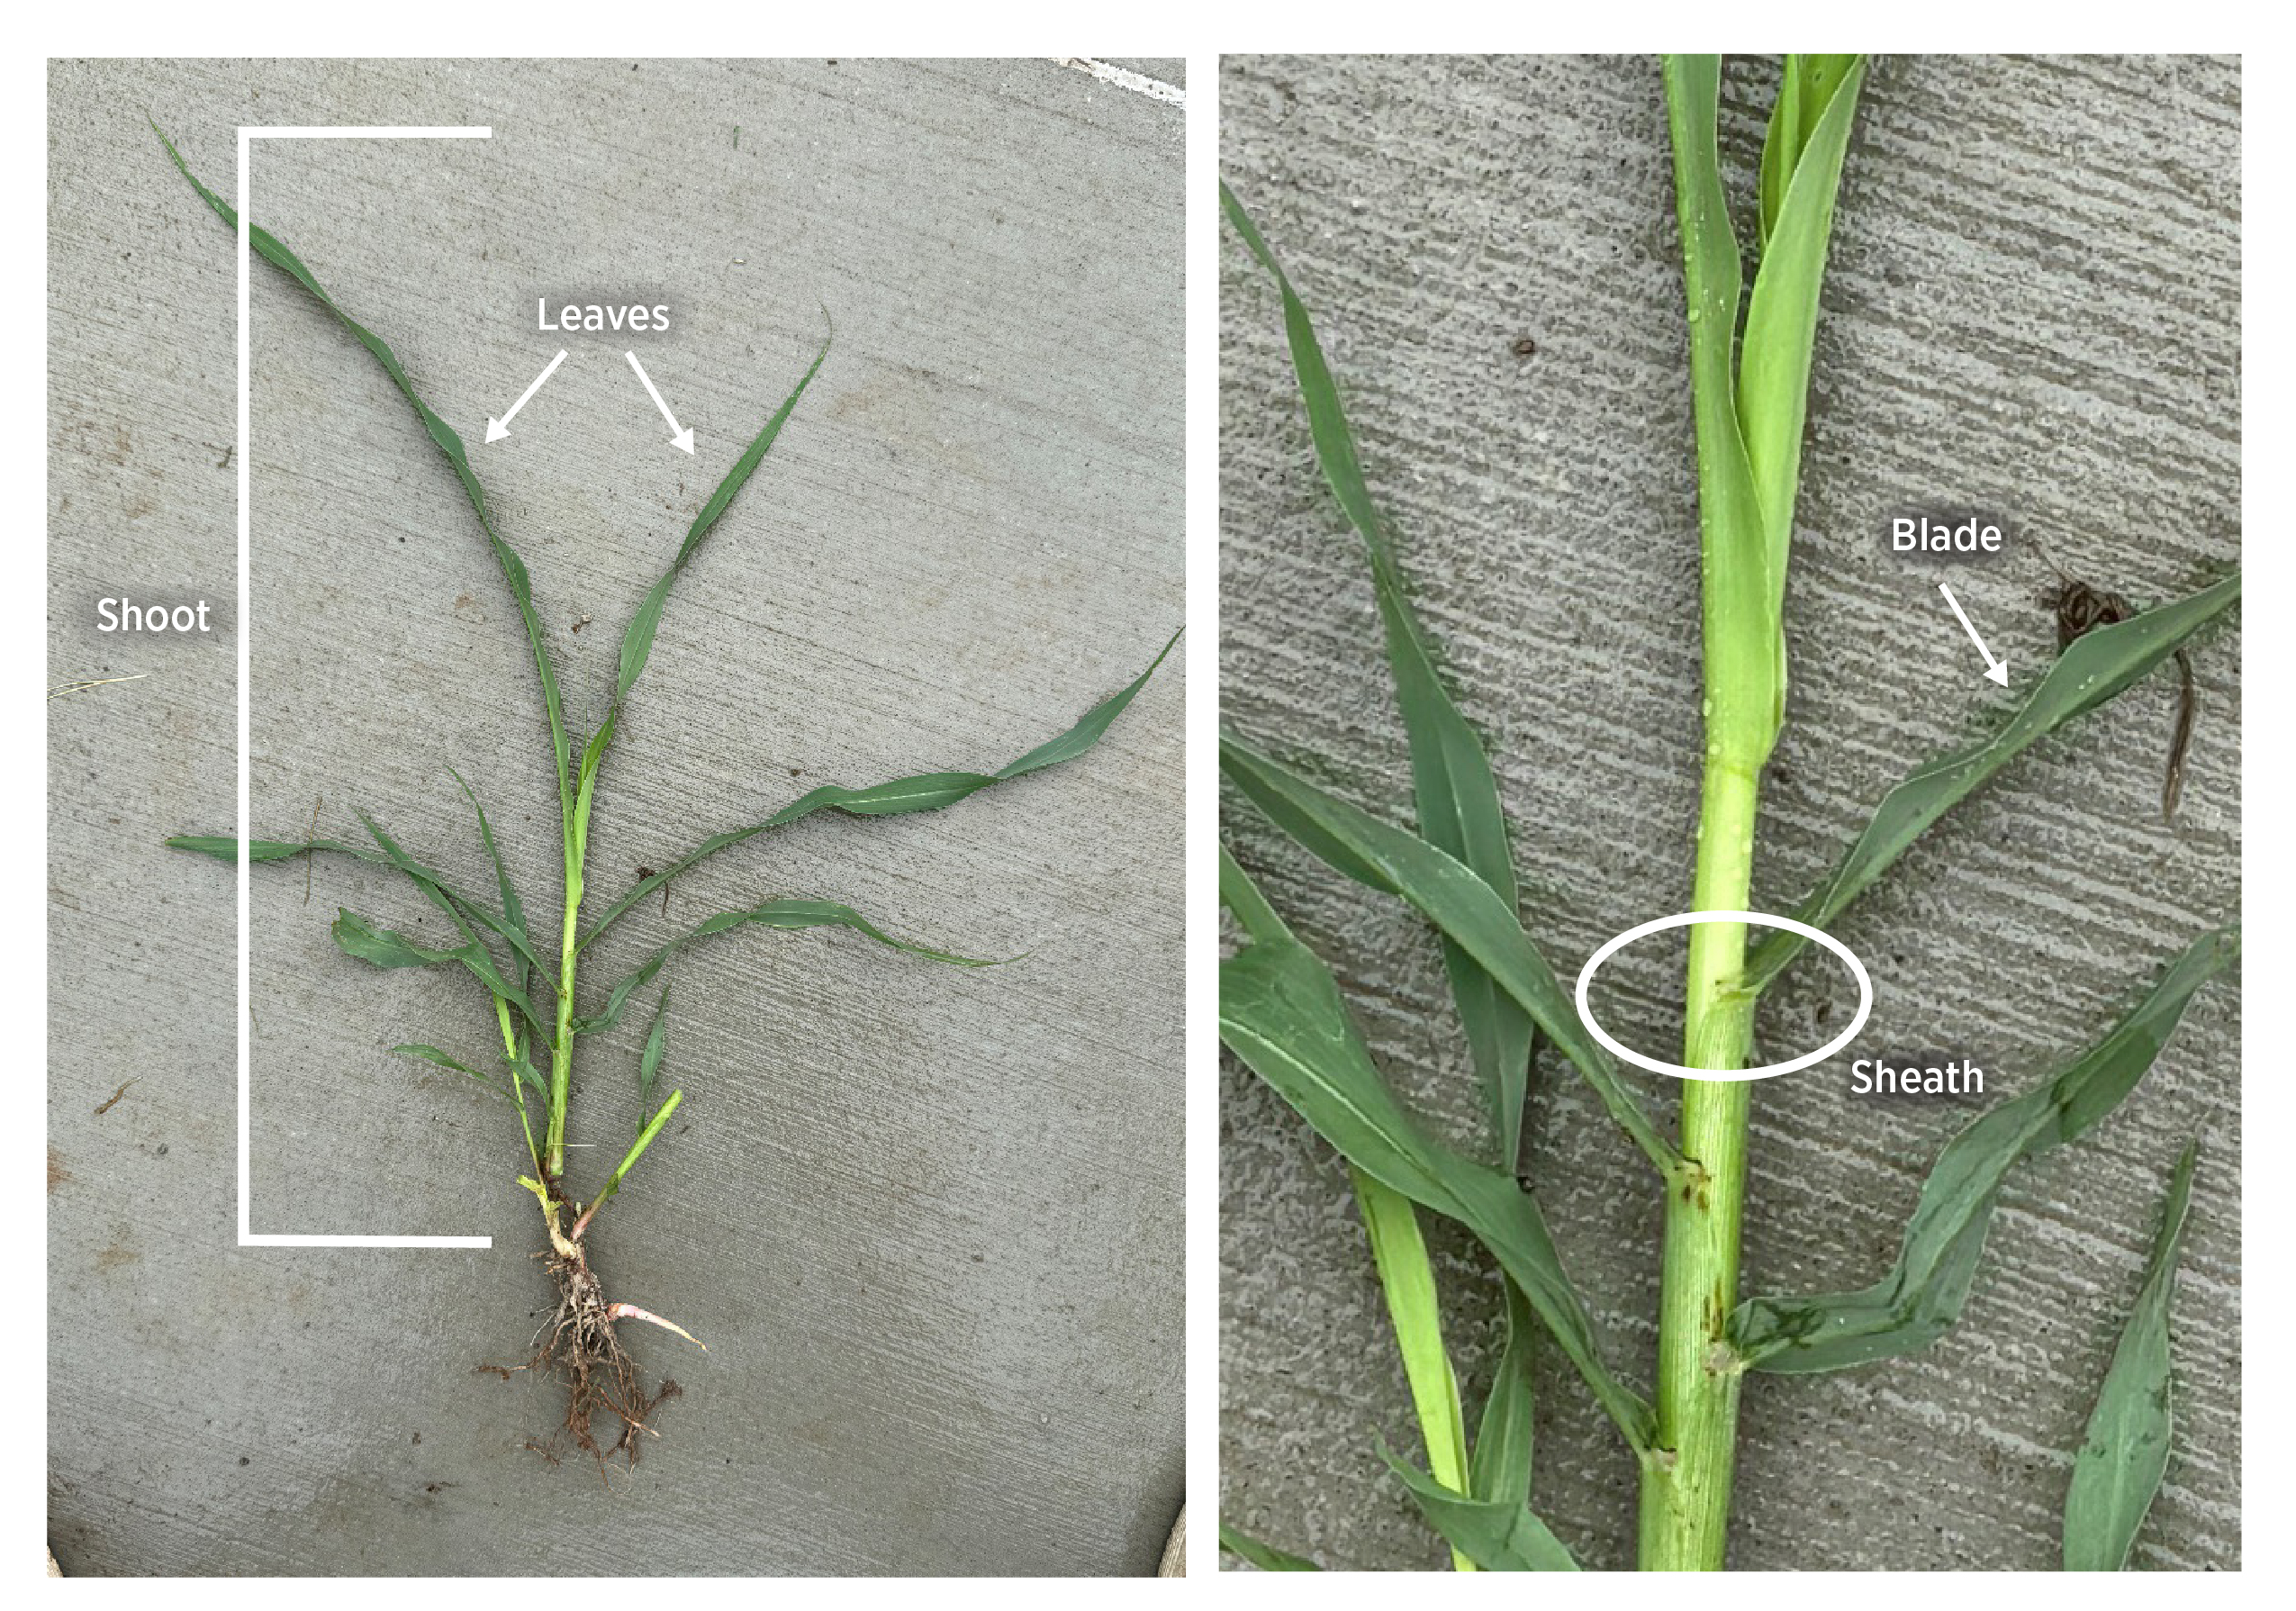 Figure 2: Isolated grass plant and enlarged view of leaves.
Where the leaf attaches to the stem is called a node. You can feel them along the stem. Wherever you feel a bump on the stem is a node. Nodes are also where buds are attached, and places that new plants grow from. If you’ve ever pulled bermudagrass out of a lawn, you will notice that there is a long string of nodes, each with their own roots and leaves.
Where the shoot meets the roots is a tight collection of nodes, called a crown. The crown is the growing point of the grass. When animals graze or when grass gets mowed, if the crown is not damaged, grass will grow back from the crown. Even if a lot of the roots are removed, if the crown survives, the plant can recover.
There are two directions in which the buds in the crown can grow: up or out. Buds that go up through the sheath of the mother plant are called tillers. Grasses that reproduce via tillers have a bunch type growth habit. They don’t spread away from the mother plant. Since they don’t spread away from the plant, you can easily pull them out of the ground, one bunch at a time. Since the bunches are not interconnected, bunching grasses do not make good sod.
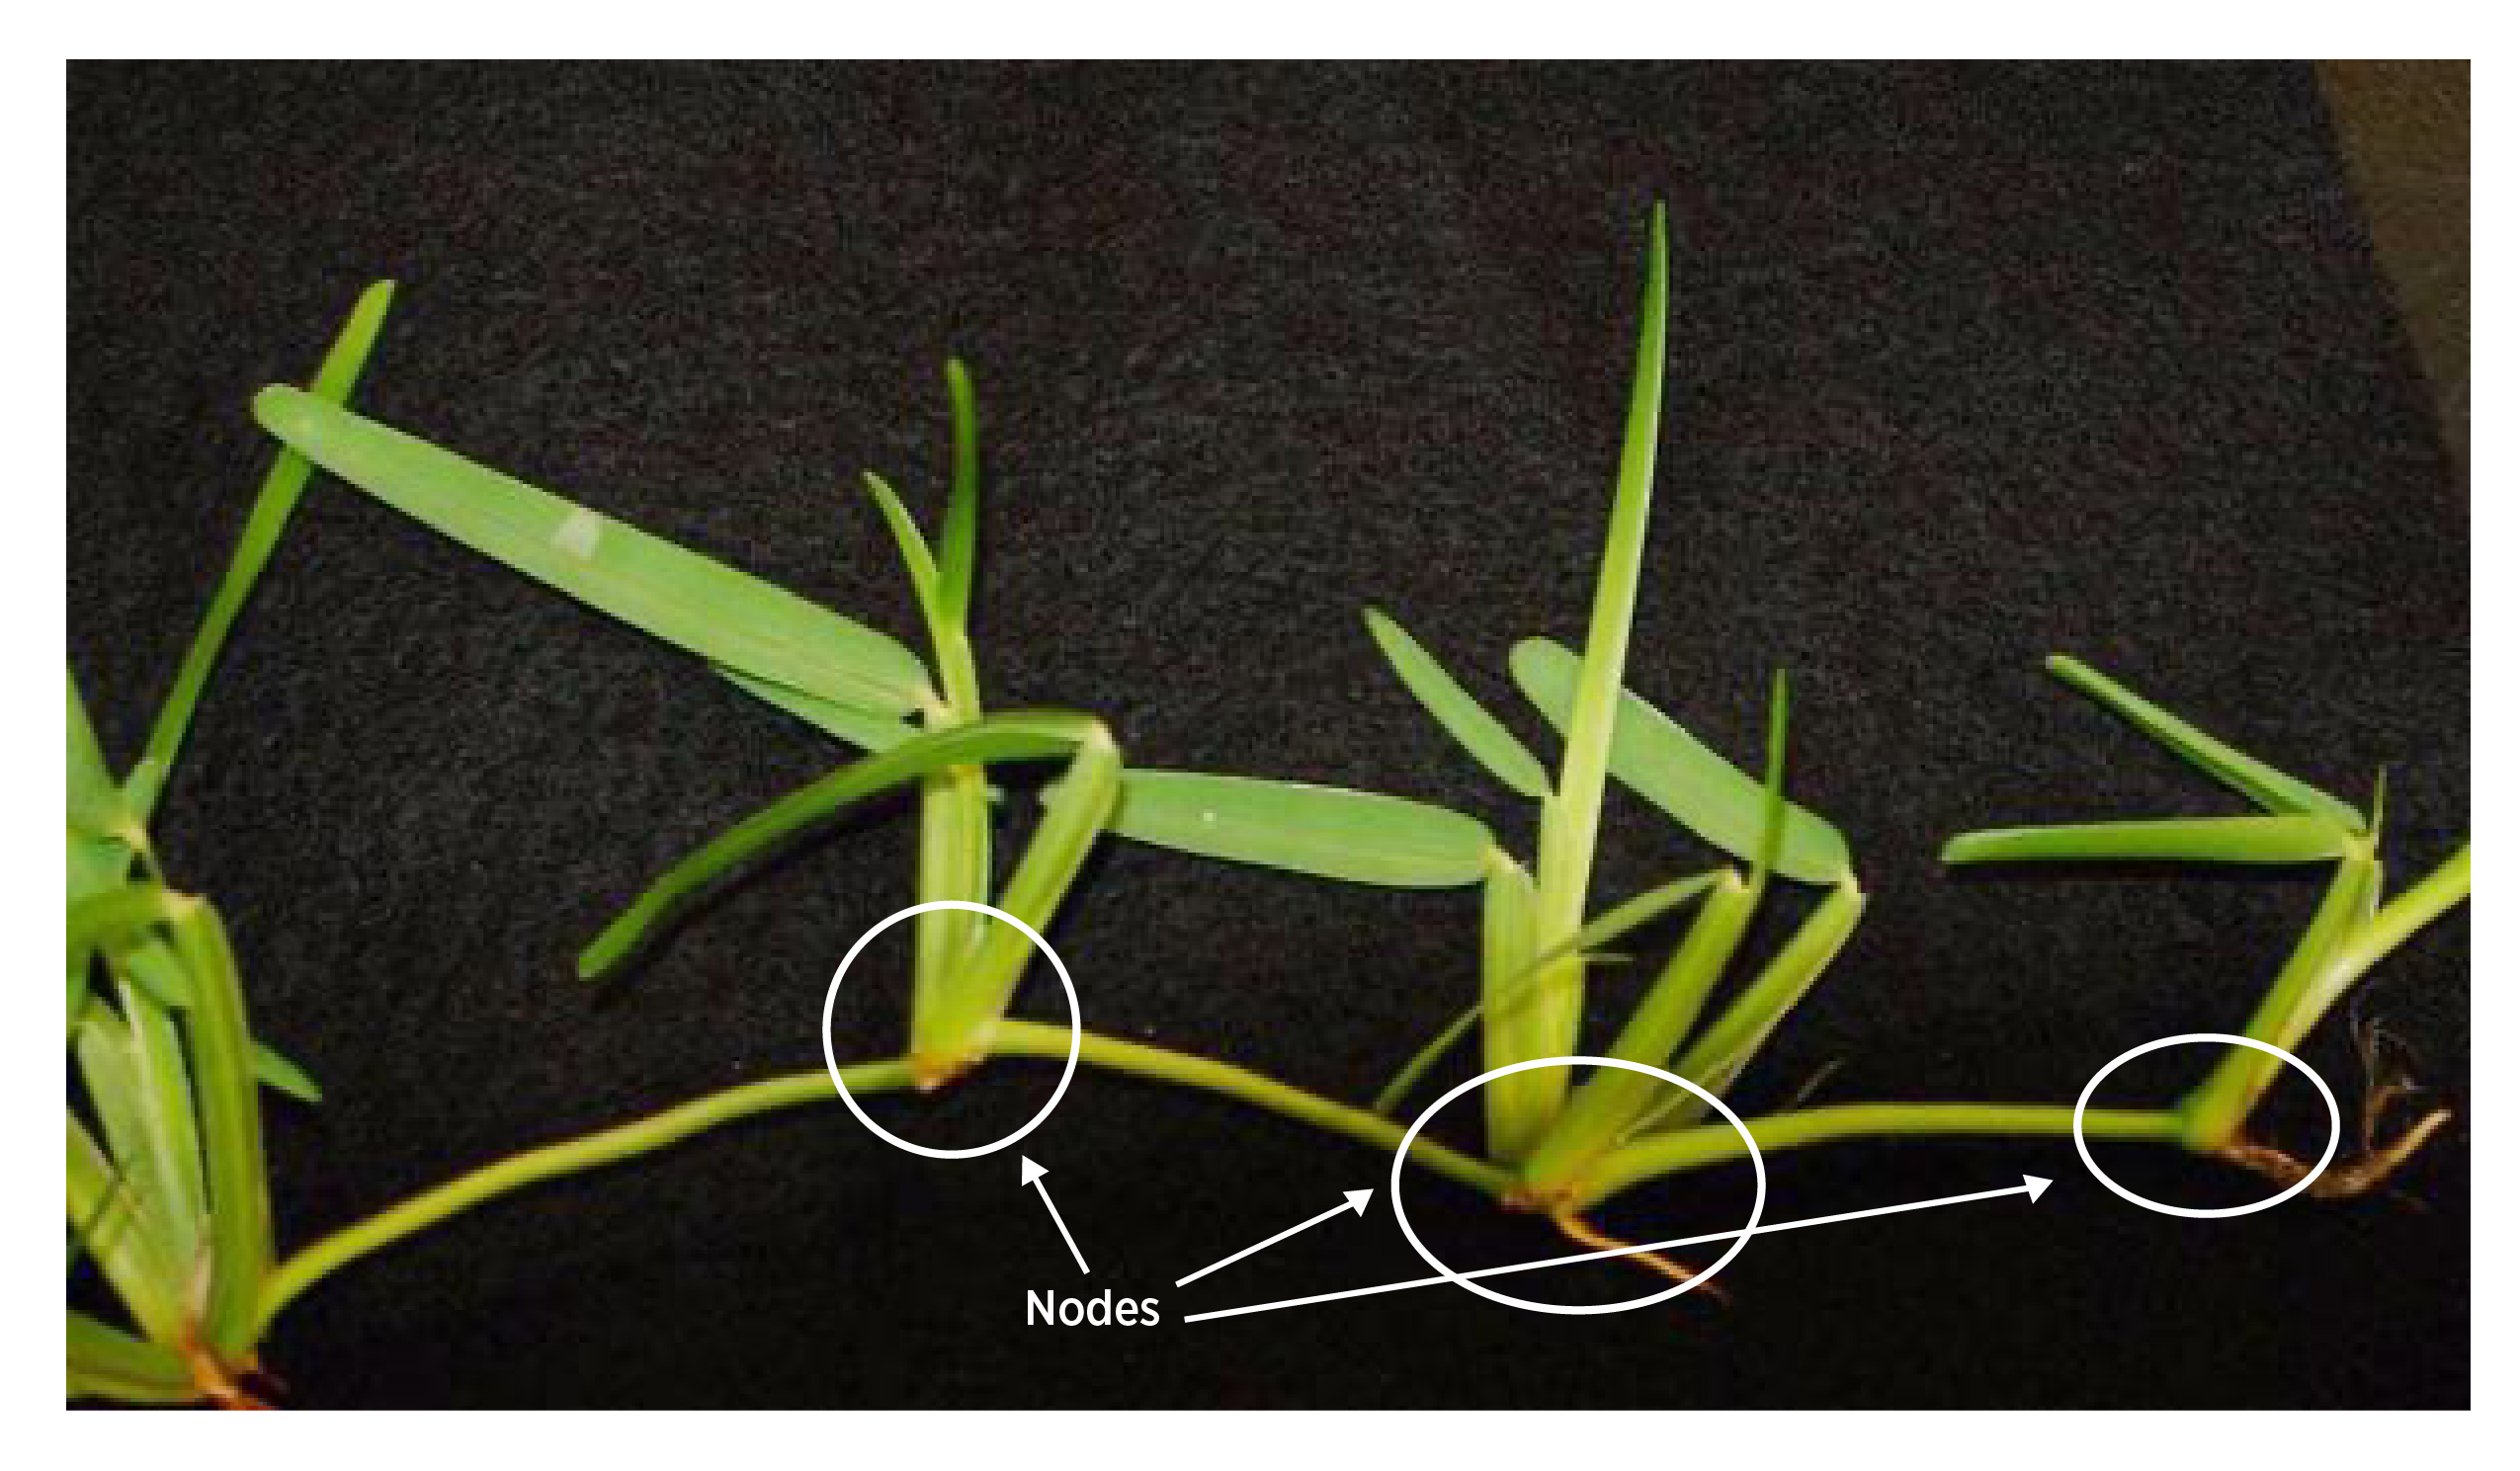 Figure 3: St. Augustine grass (North Carolina State University).
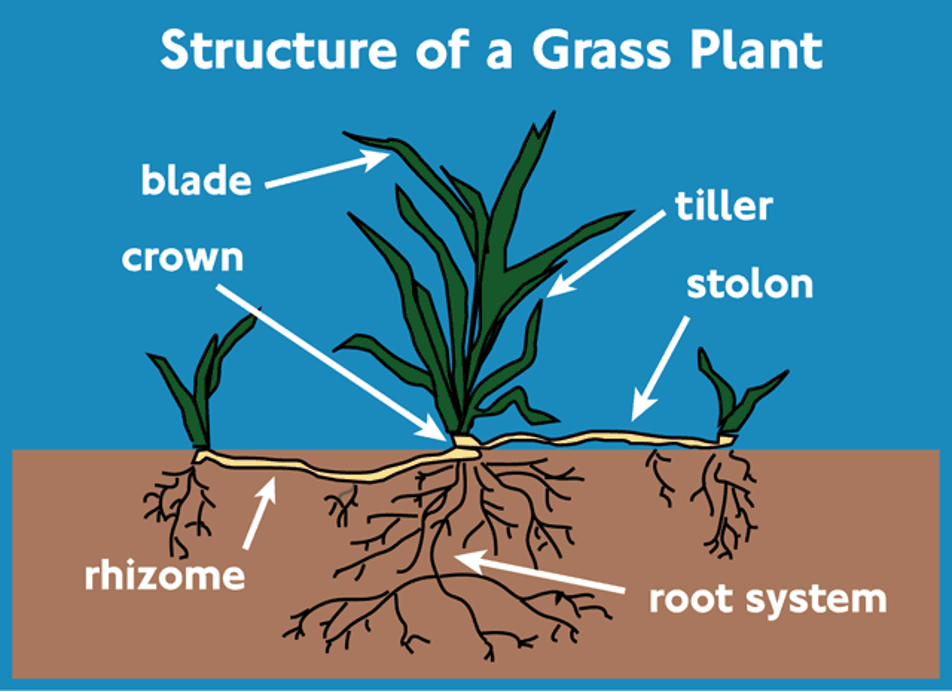 Figure 4: Structure of a grass plant.
Grasses that spread away from the mother plant come from buds that emerge laterally (sideways through the soil) from the mother sheath via rhizomes (below ground) or stolons (above ground). Rhizomes and stolons have nodes along their lengths, and those nodes can develop new roots and new shoots. Grasses with spreading growth habits fill in bare areas rather quickly, unlike bunching grasses. Because rhizomes and stolons spread out away from the mother plant, and are interconnected, they stay together well and make good sods.
Roots are structures below ground that anchor the grasses to the soil as well as take in water and nutrients for the plant. Roots cannot make their own food through photosynthesis, so the leaves of the grasses must provide enough food for the roots.
Turfgrass roots are more fibrous (hair-like) and branched than the roots of trees and flowers, etc., so they are really good at holding soil and creating sod (turfgrass harvested in strips to use as a lawn elsewhere). Have you ever tried to pull some grass up out of the ground? It is not easy. It is much easier to pull a carrot out of the ground, because carrots have one main root with just a few roots branching of it. That main root is called a tap root and is found also on dandelions and other flowering plants. Plants with tap roots are not as good at holding soil.
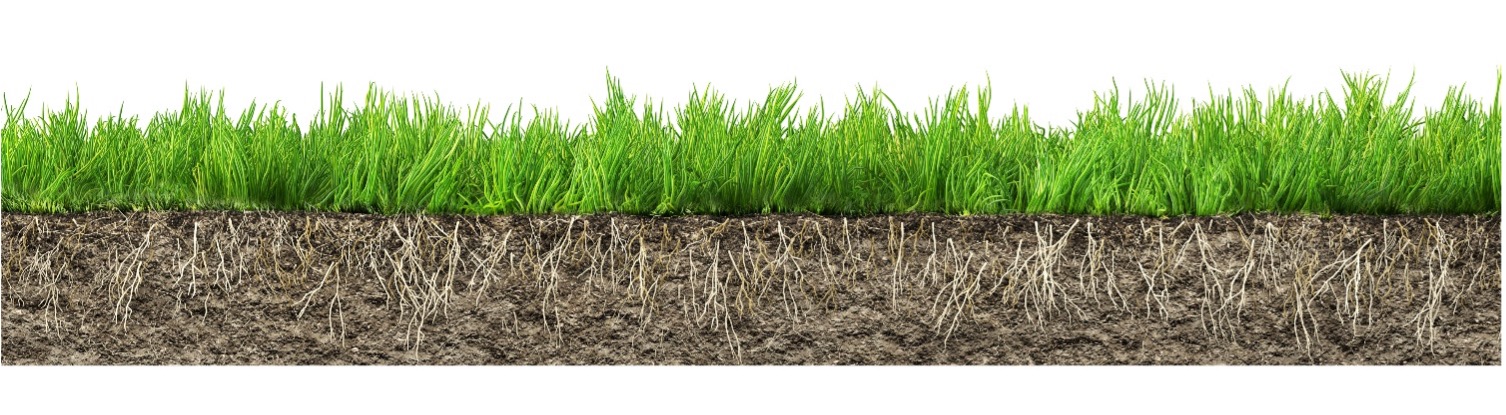 Figure 5: Turfgrass roots.
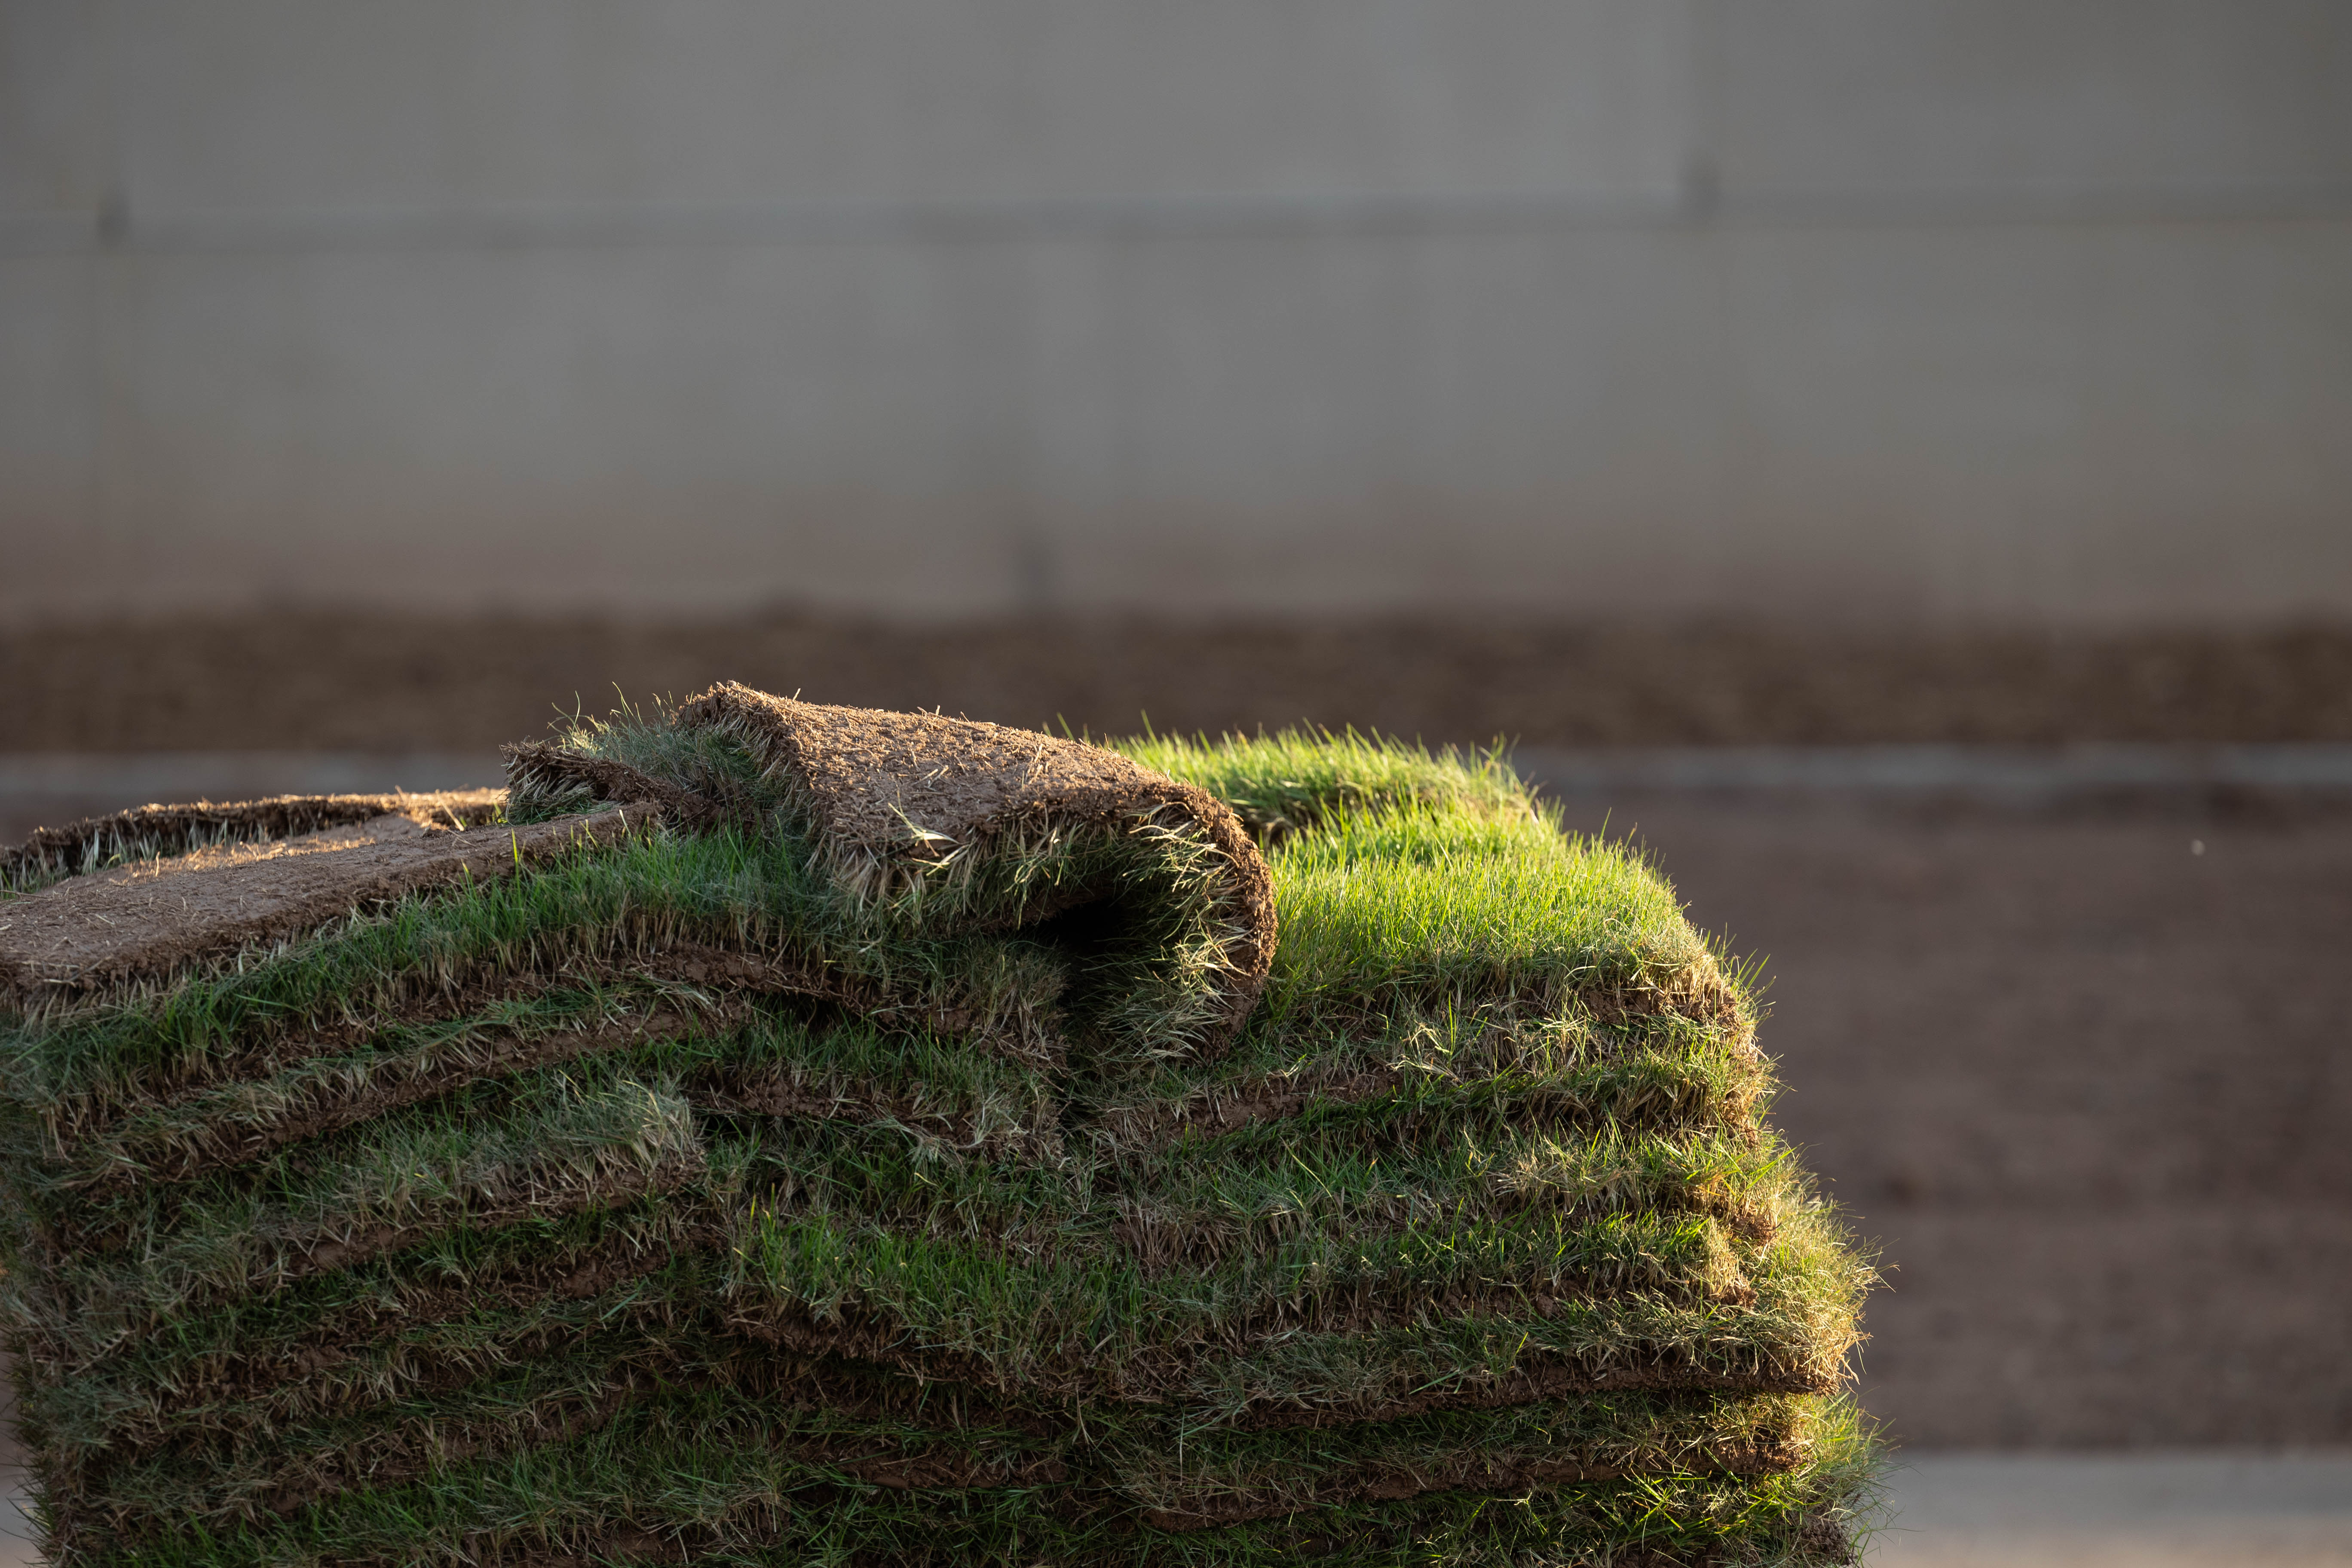 Figure 6: Rolls of sod (Oklahoma State University Extension).
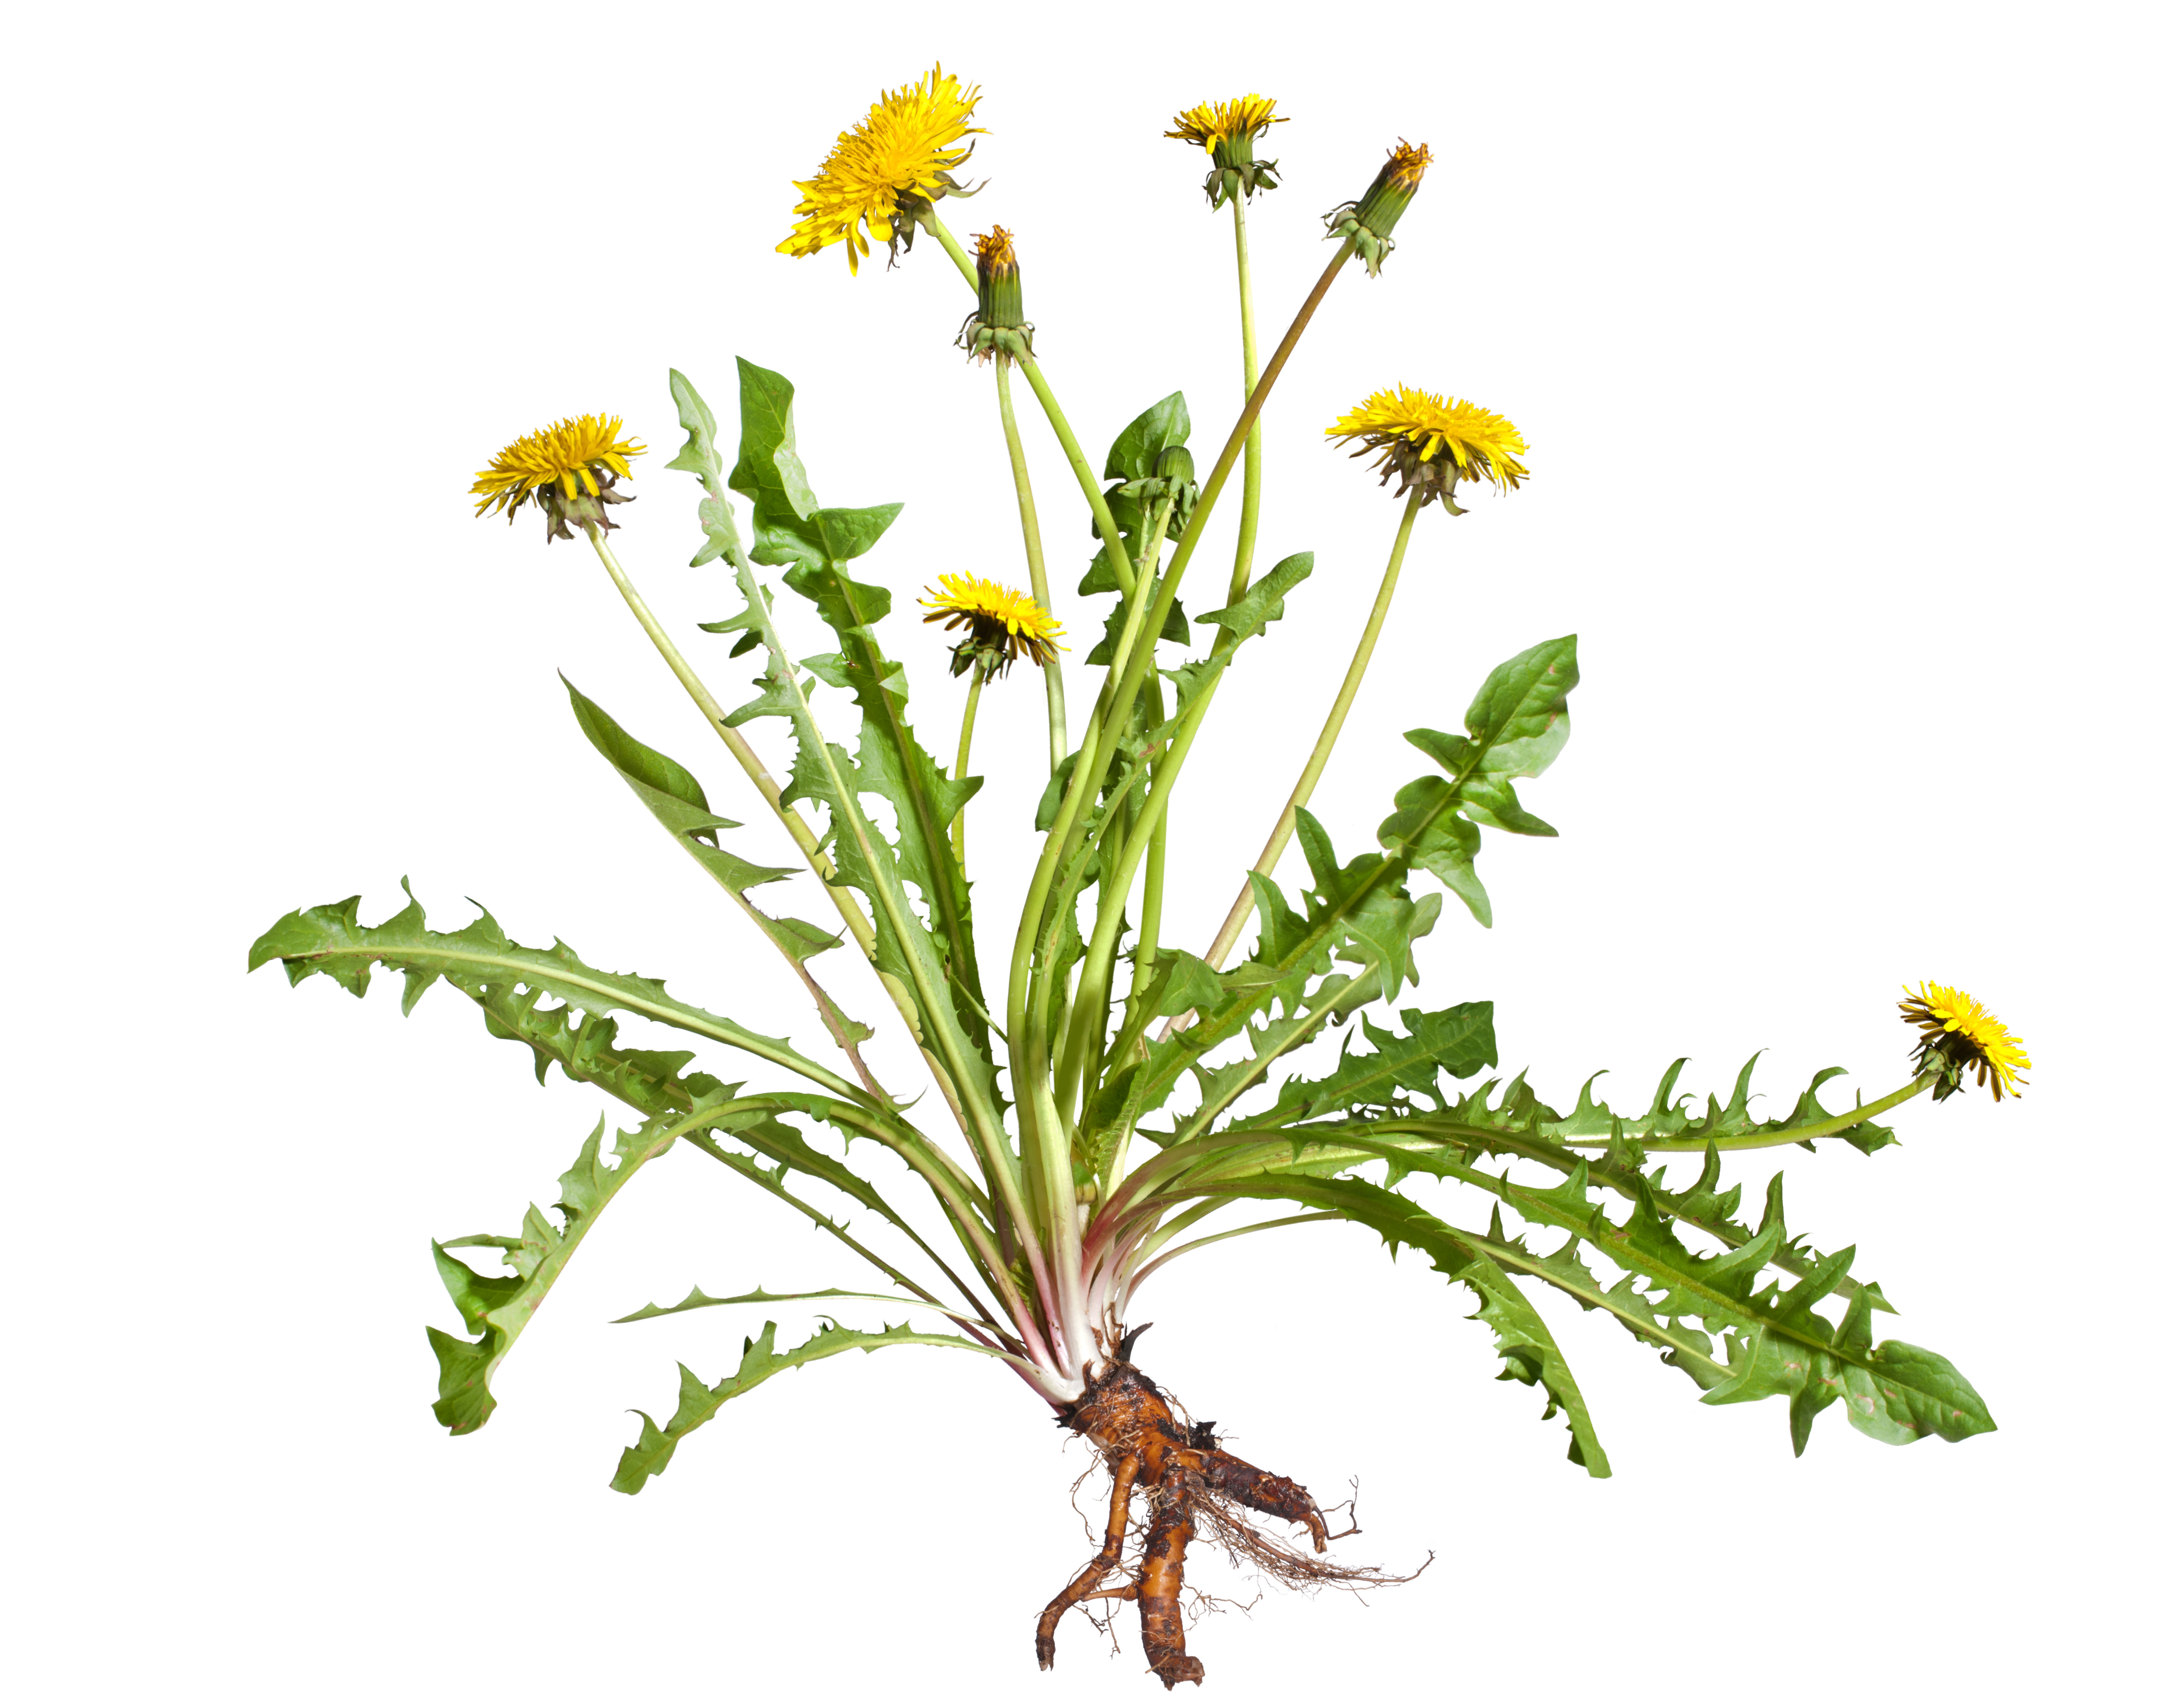 Figure 7: Dandelions are easy to pull out of the ground because they have tap roots that don't hold onto soil very well.
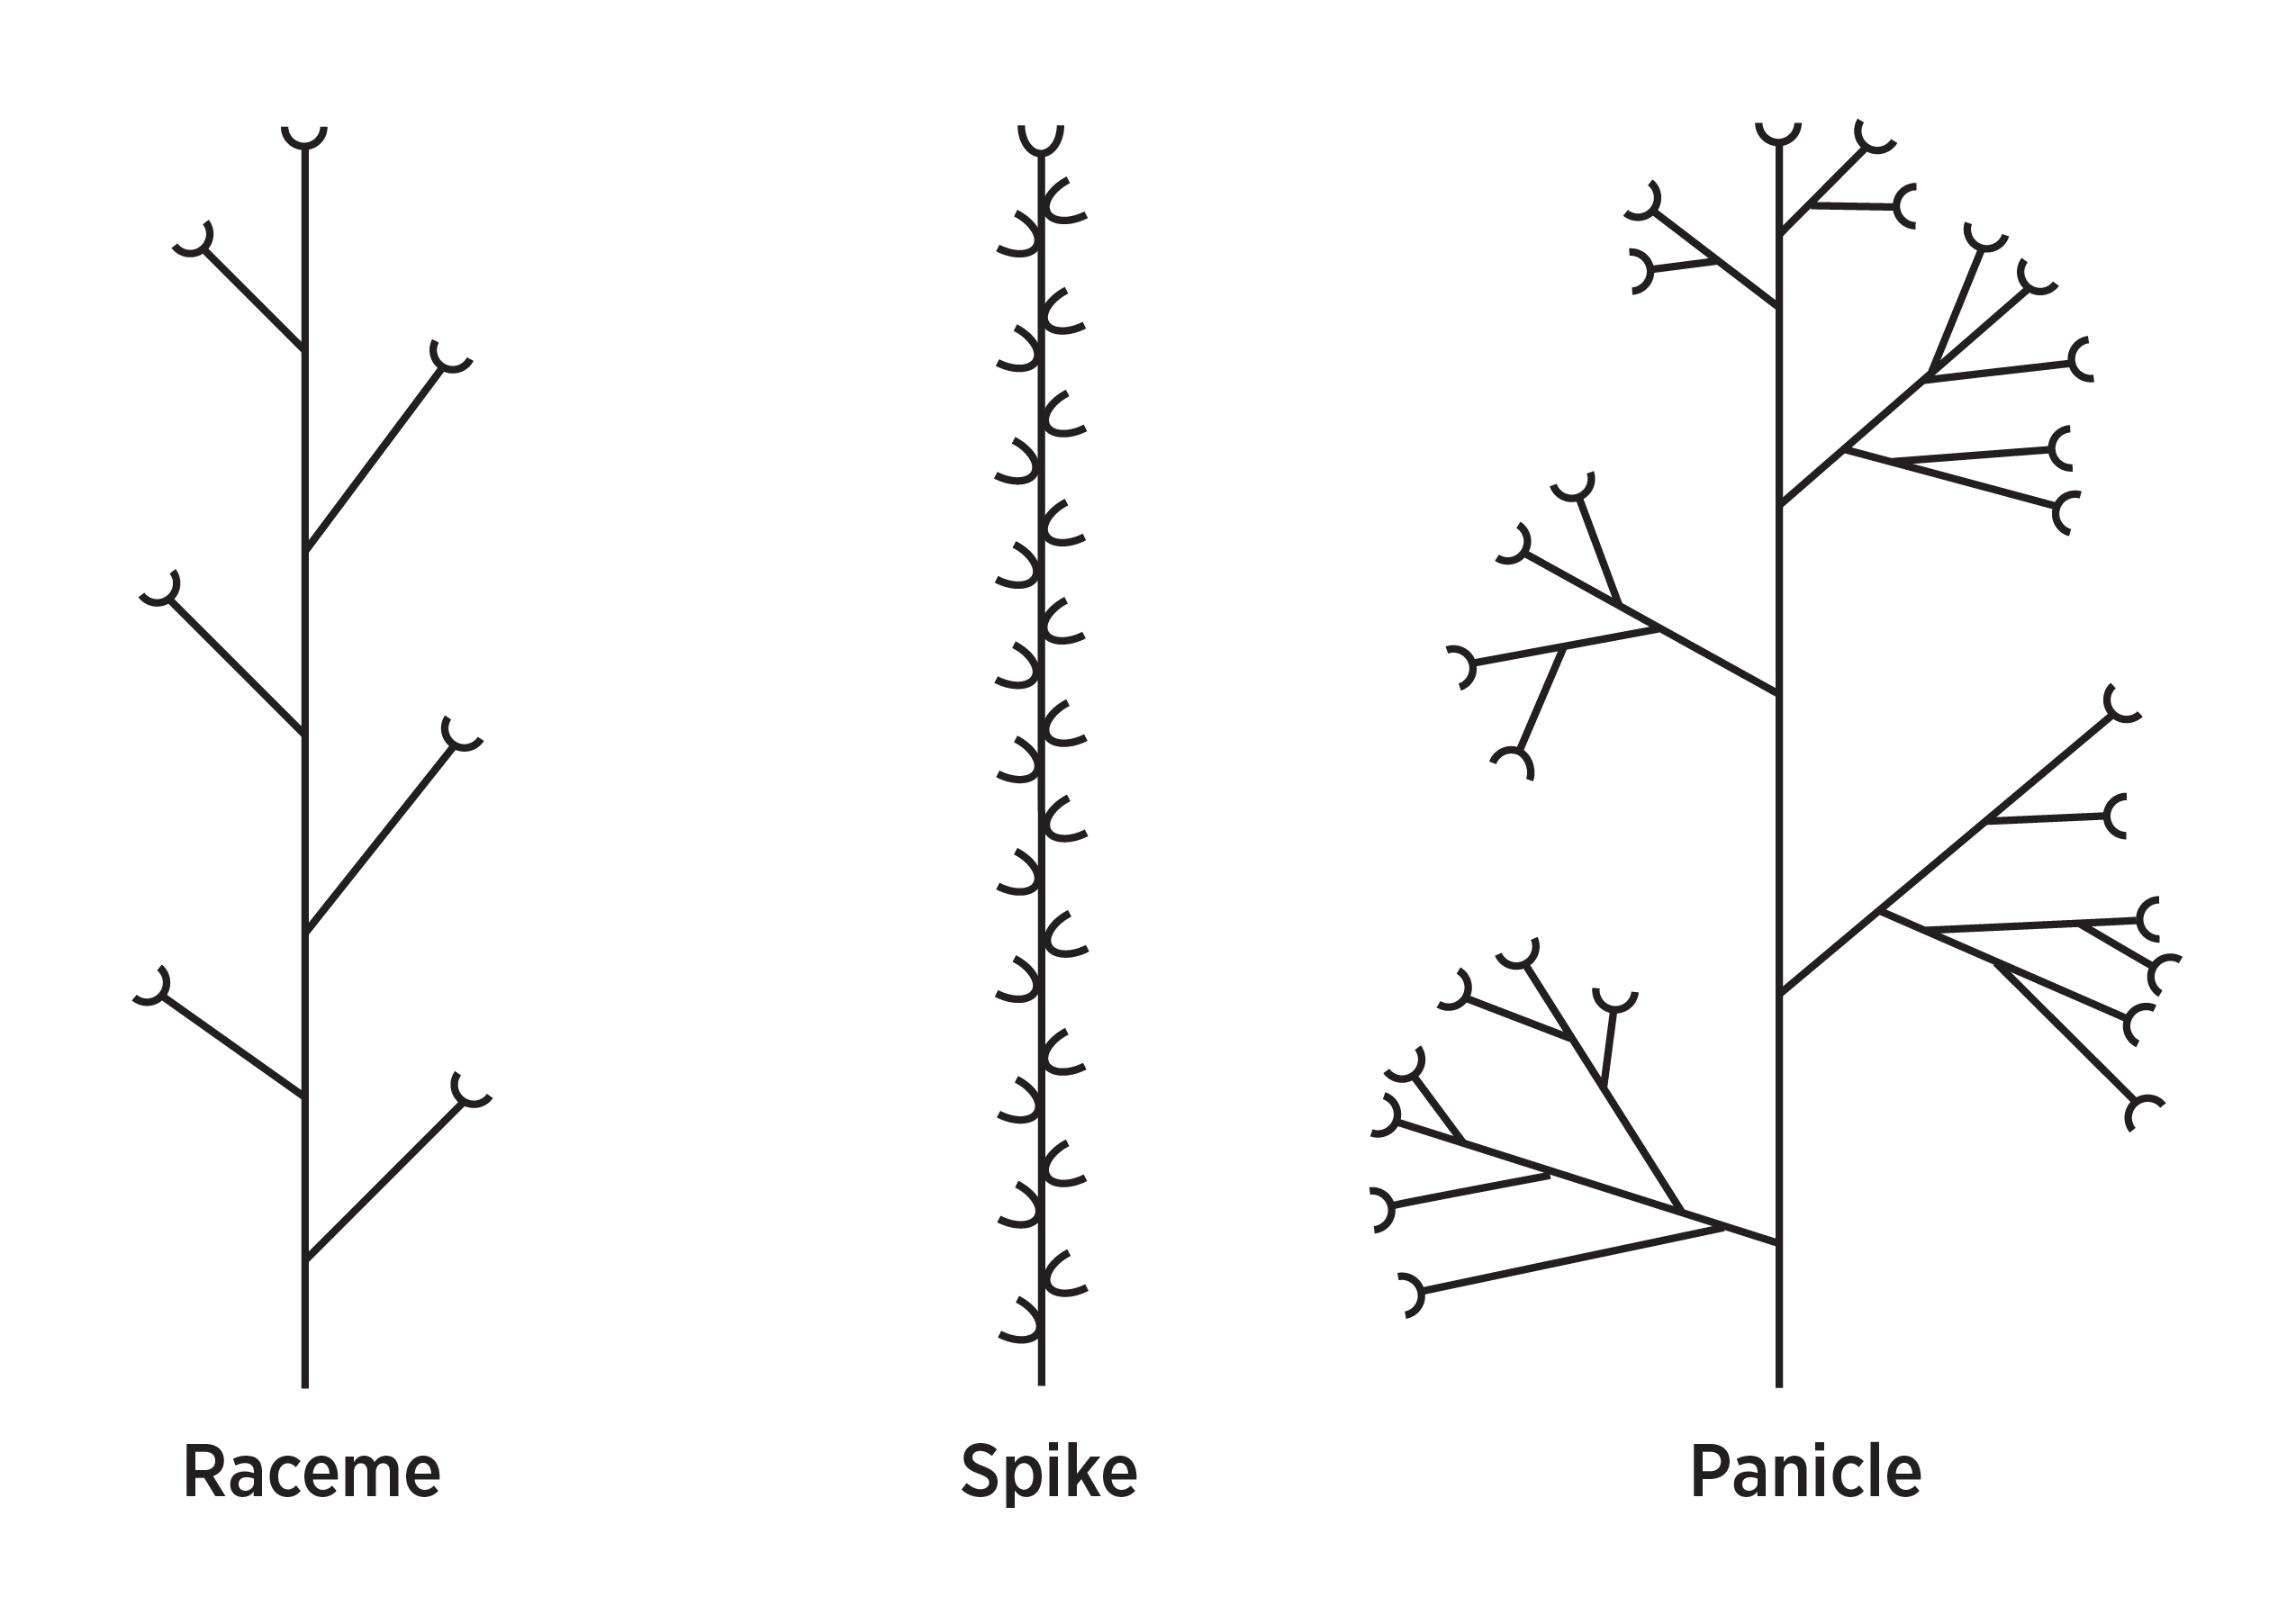 Figure 8: Notice that grasses used for sod are connected to each other with rhizomes or stolons, whereas bunch grasses are not connected to other grass plants and wouldn't be able to be harvested in strips for sod (Diagram from Penn State Extension).
Why Root Systems are Important to the Land
In the late 1800s, the federal government offered settlers 160-acre plots on lands in the west that were unoccupied (due to removal of the native tribes). These were claimed in land runs in which tens of thousands of people lined up to stake a claim. Some of these land runs occurred in present-day Oklahoma (such as the land run on April 22, 1889, which had millions of available acres). The settlers weren’t always experienced farmers or ranchers, and they overgrazed their cattle (who ate even the crowns of the grass plants) and also plowed deeply. The deep plowing tore apart the deep roots of prairie grasses that were holding the soil together.
During the 1930s, several back-to-back dry years dried out the exposed topsoil. Dust storms, many severe, occurred when dry, bare topsoil was swept by the wind into huge clouds, traveling across the Great Plains and leaving drifts several feet high in places. Some of the worst storm damage was in the Oklahoma Panhandle as well as parts of Colorado, Kansas, New Mexico and Texas. Fences and houses were partially or fully buried, livestock starved to death and many families had to move (many to California) to keep from starving to death themselves.
Grass Houses - Home Sweet Home on the Plains
When settlers first arrived in what is now Oklahoma, there were few trees to build homes with. Even if there had been, it takes a long time to cut trees and make a house out of them. Settlers needed a quick way to make shelter, so they had to use what was around them. Though western Oklahoma has sparse trees, it does have a lot of short and tall prairie grasses. Believe it or not, you can build a house out of grass!
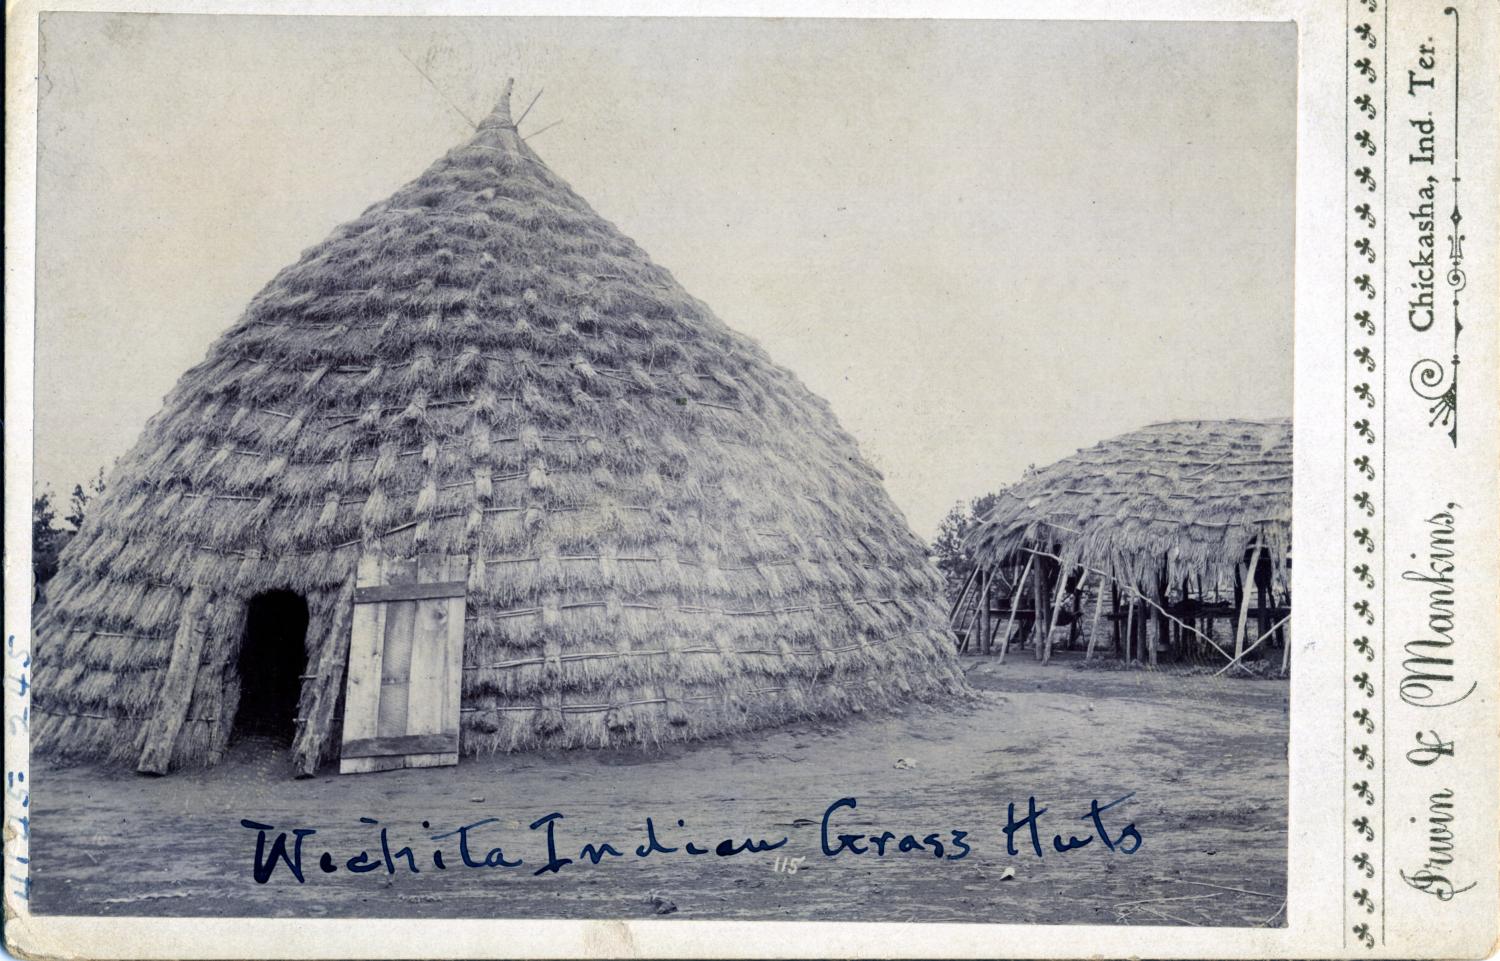 Figure 9: Photograph of a Wichita Wickiup dwelling. Irwin & Mankins. Wichita Grass Huts, photograph, Date Unknown, The Gateway to Oklahoma History; crediting Oklahoma Historical Society.
Some Native Americans used grasses to build homes on the Great Plains hundreds of years ago. The Caddo and Wichita tribes made large homes shaped like beehives. They were up to 50-feet tall and several families could live inside one home. Using a gridwork of poles, men and women would weave bundles of tall grasses together on the lattice of branches. With tight weaving, the home would be waterproof, windproof and insulated.
Settlers also made homes out of grass using a different technique. They used plows to cut sod strips from prairie grasses. The strips were about 12–18 inches wide and 3–4 inches thick. A shovel was used to cut the strips into pieces about 2–3 feet long. They only cut the amount of sod they could use at one time, since dry sod wouldn’t hold together during building. The walls of the sod house (often called soddys) were 2–3 feet thick to add strength (and provide more insulation). They left open areas for doors and windows to be added, and when they got to the top (about 7.5-feet tall) they laid poles on top of each end and then laid a pole between them to support the roof. The roof’s bottom layer was made of branches or brush and then more sod blocks were laid on the top with the grass side up.
Since sod prevents soil from washing away, the sod on top of the house was grass side up to keep the roof in good shape. Sheets suspended from the ceiling kept soil from falling on people and objects inside the home.
There is one original sod house built by a homesteader that is still standing. In later years, a building was built around it to protect it from the weather and is located in Aline, Oklahoma. Marshal McCully built it in 1893 after taking part in a land run. You can see it if you go to the Sod House Museum.
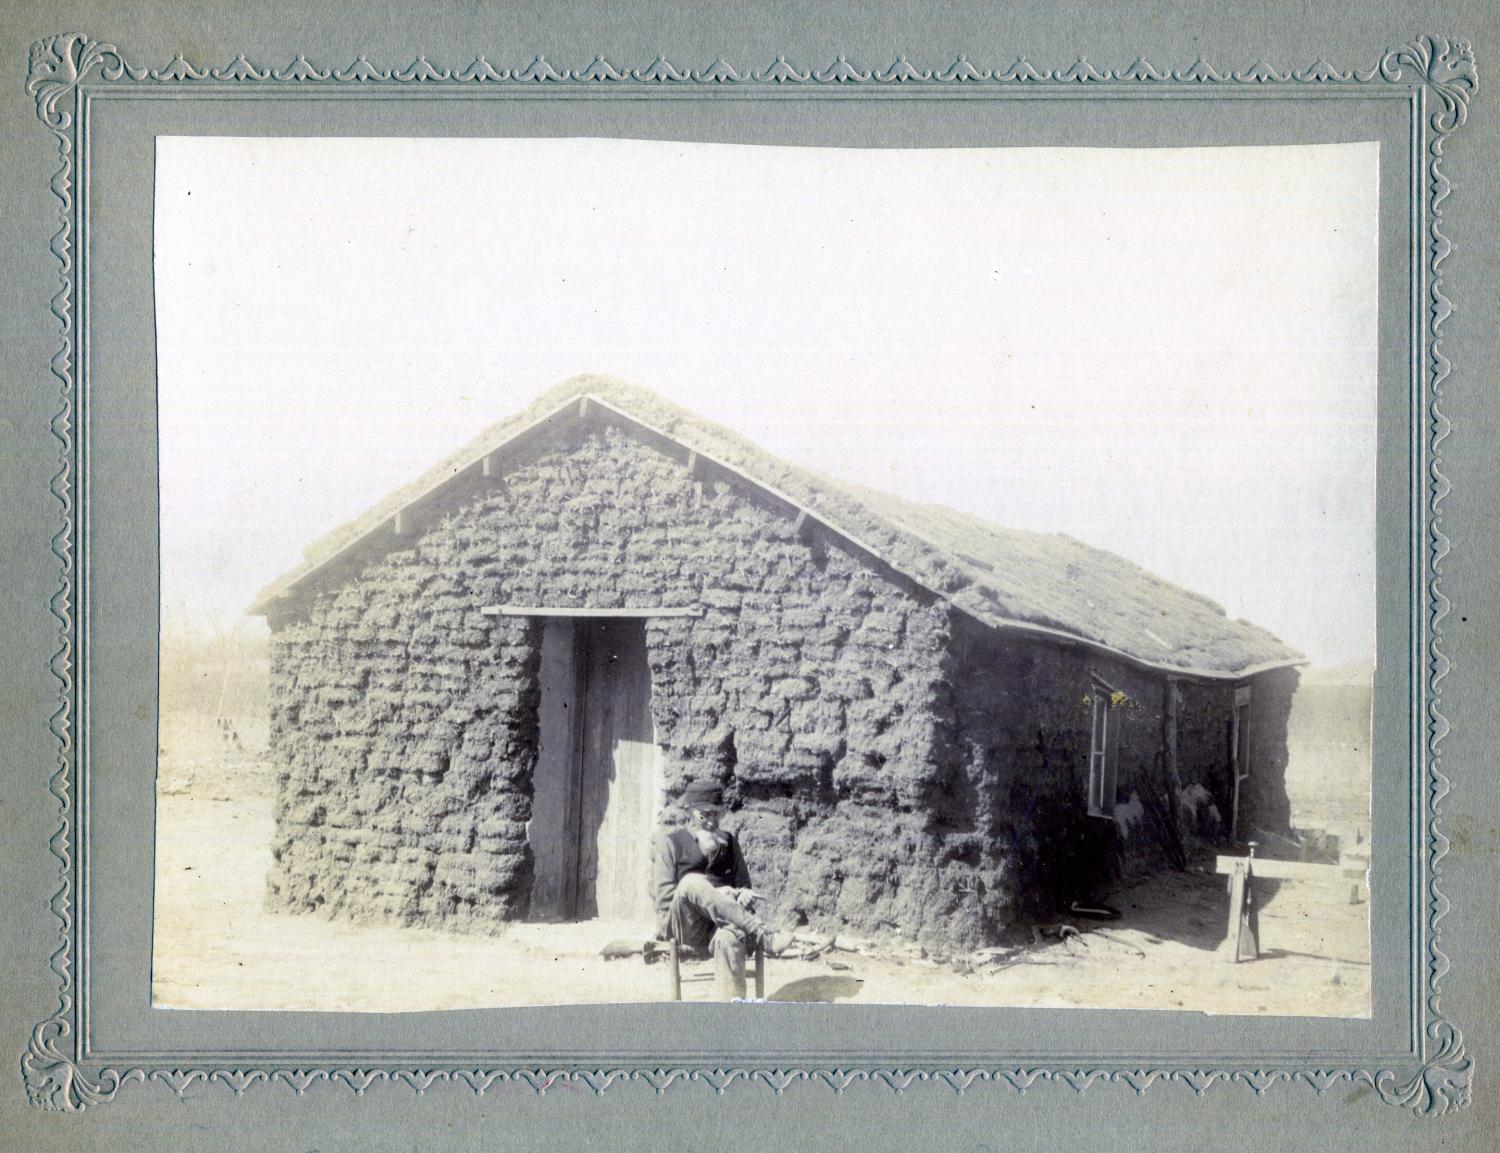 Figure 10: Photograph of a Sod House in Washita County, northwest of Corn, OK, c. 1890. Sod House, photograph, 1890, The Gateway to Oklahoma History, crediting Oklahoma Historical Society.
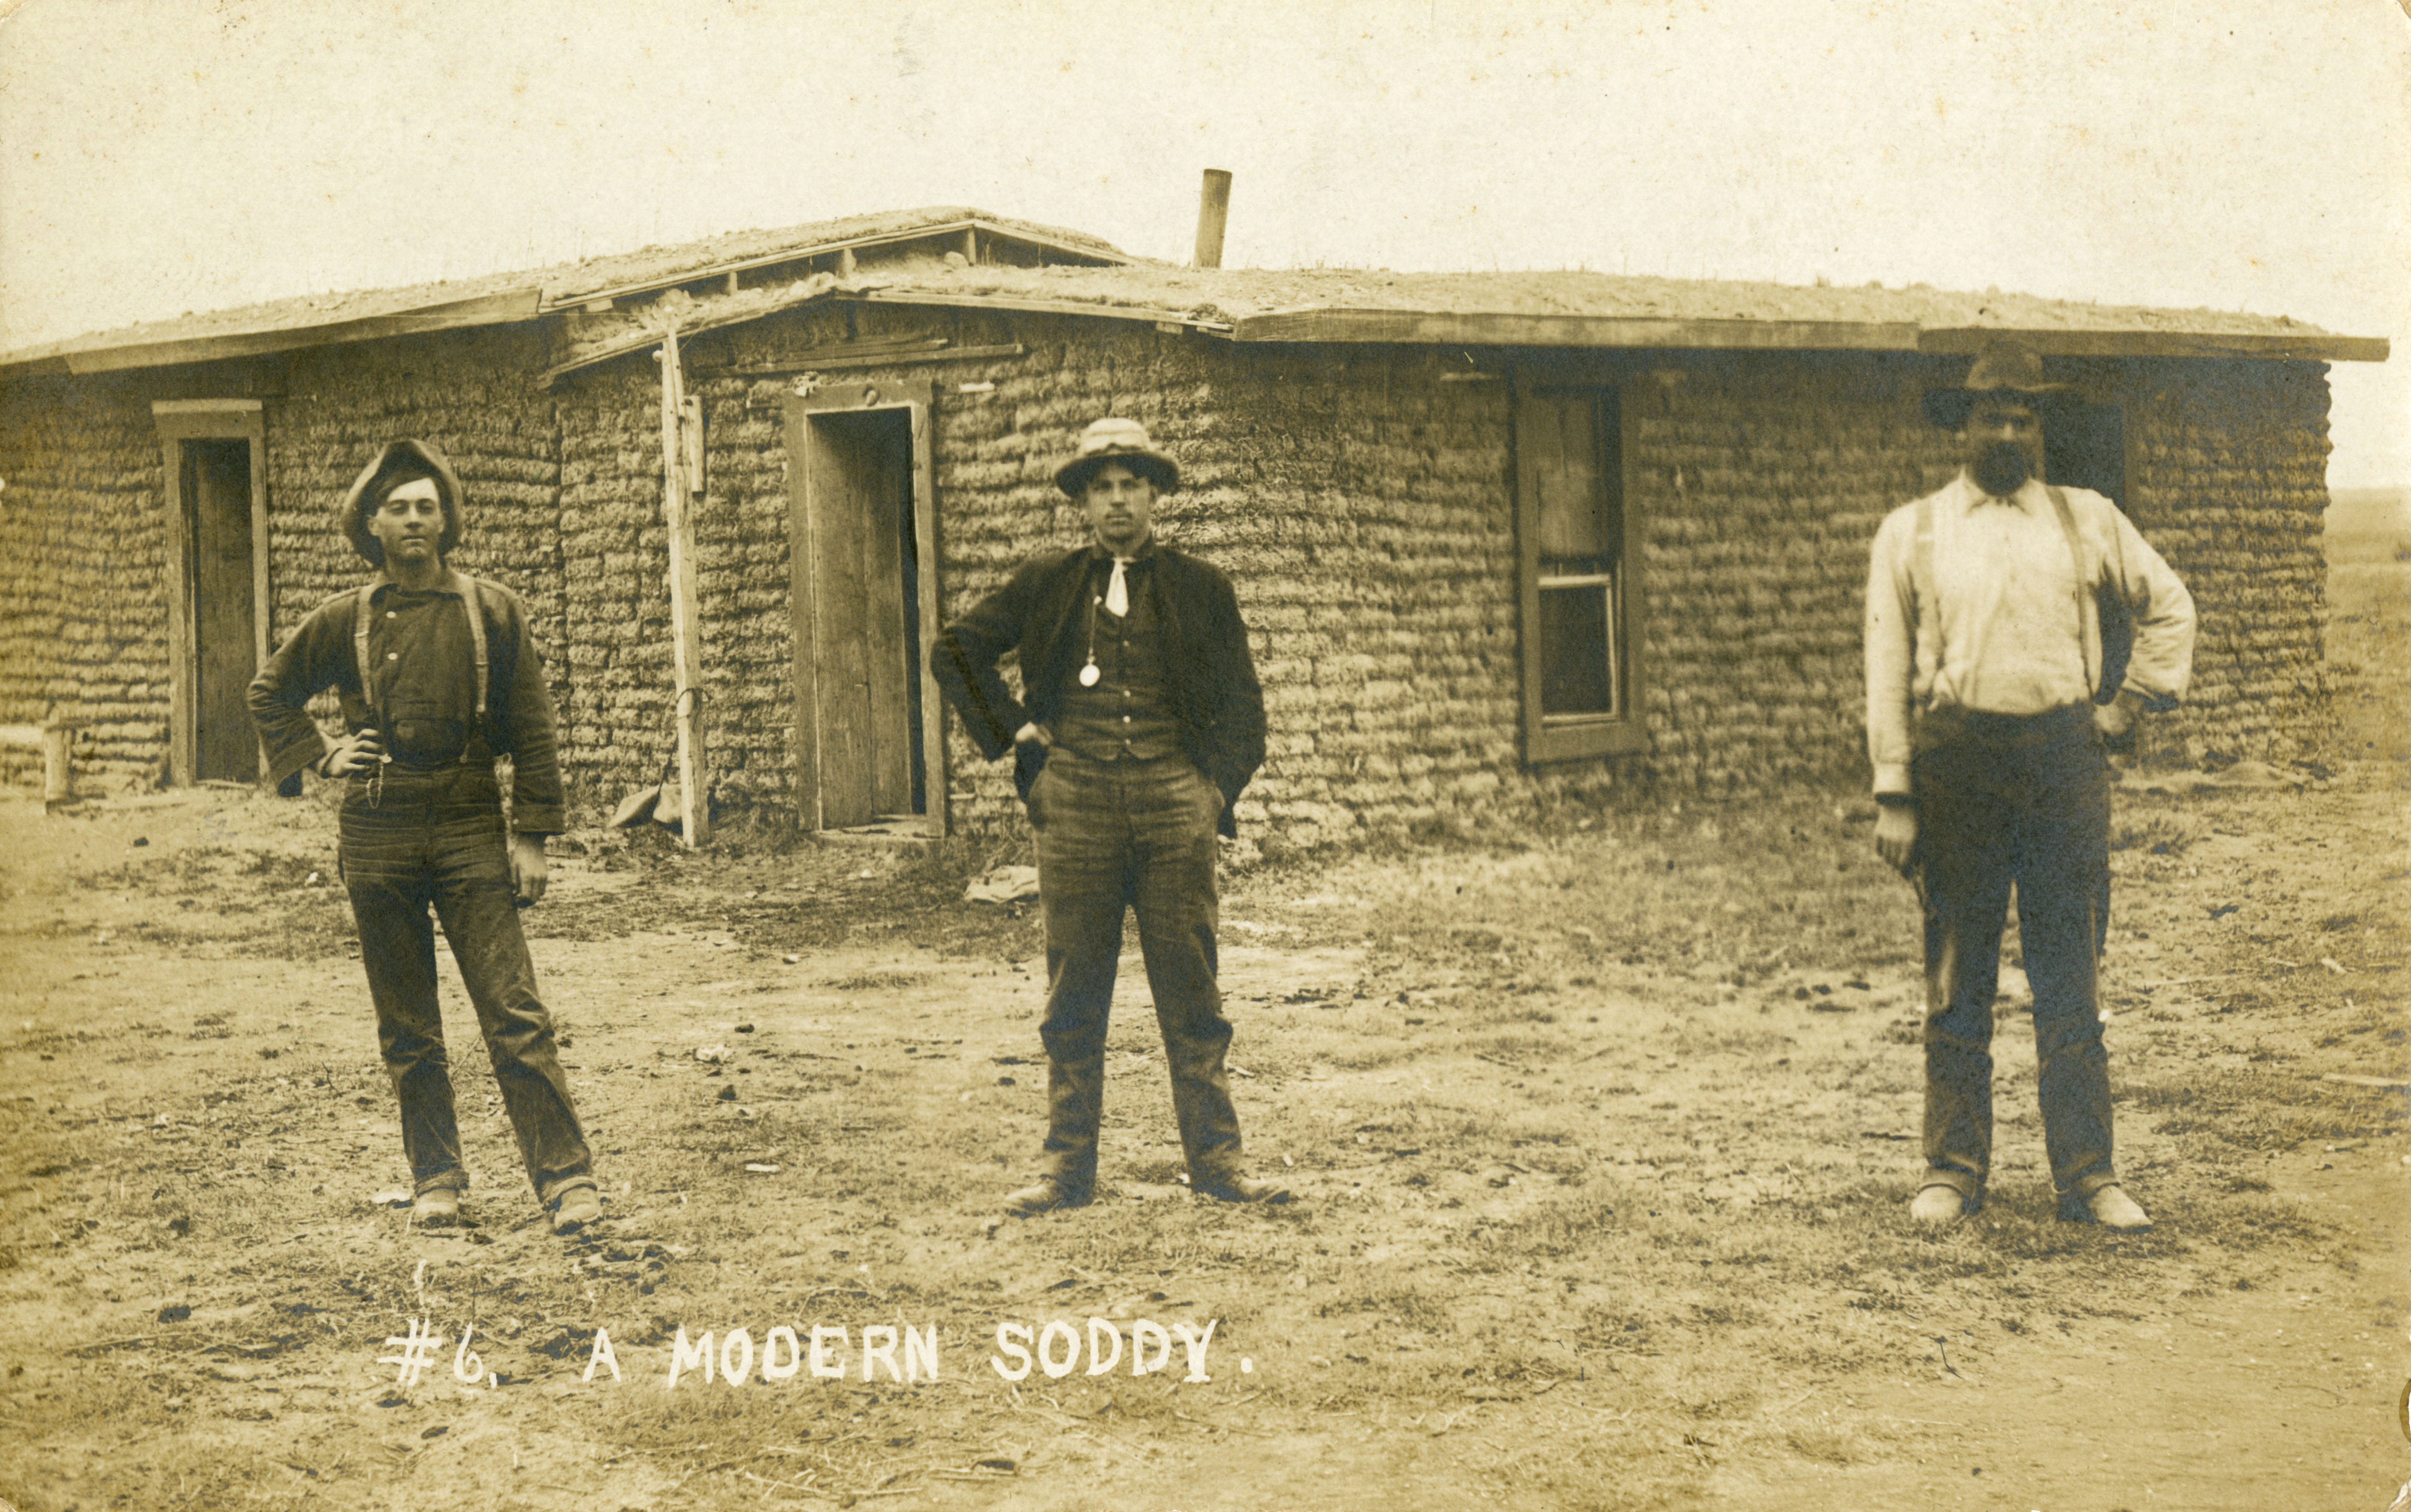 Figure 11: "Postcard: #6. A Modern Soddy" (2021). Tim Johnson Postcard Collection. 1200.
Activity: Build a Sod House
Which side of the sod was on the top when they built the walls of the soddy? Was the grass on top or bottom? Take a few pieces of sod (you can cut some yourself from a patch of grass — ask first — or buy some at a local nursery or landscape business) and cut them into pieces about six inches by six inches, or a reasonable size that allows you to stack them. Try stacking them with the grass side up and the grass side down. Which side do you think was facing up when building the walls of the soddy? Was the grass on top or bottom? Why do you think that?
Identifying Turfgrass Species
There are many reasons why proper identification of turfgrass species is important. For instance, not all turfgrass species have the same growing requirements. Warm-season and cool-season grasses germinate (begin to sprout) at different temperatures, and thrive within certain temperatures, going dormant or dying when the temperature gets too hot or too cold. The amount of water necessary for proper maintenance differs between species, as are the types and amounts of any fertilizer required. Some grasses thrive in shady environments, while others need sunny areas to grow. Finally, not all grasses are suitable for the same uses. As an example, creeping bentgrass is often used on golf course putting greens because it can tolerate a very low mowing height, which provides a smooth surface to putt on. Ryegrass is often over-seeded on sports fields during cooler seasons, to give an otherwise dormant and brown bermudagrass field a green appearance.
To properly identify different turfgrass species, you need to know about turfgrass anatomy and how it differs between species. Here are a few of the characteristics that distinguish species of turfgrass:
Vernation
Vernation is how young leaves are arranged inside the shoot of the grass. There are two types: folded and rolled. Folded vernation describes young leaves that are folded inside the shoot and show a v-cross section. Rolled vernation does not have folds; the young leaves appear circular in a shoot cross-section. The easiest way to determine the type of vernation that a grass has is to roll it between your fingers. If it rolls easily, it has rounded vernation. If it feels flat and flips over when you try to roll it, it has folded vernation.
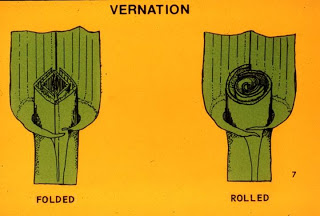 Figure 12: Types of vernation.
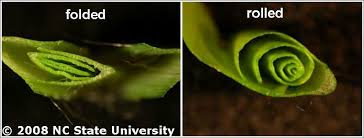 Figure 13: Types of vernation (North Carolina State University).
Leaf Blades
Some turfgrass leaves have one main vein running down the middle of their blades. Others have many similar-sized veins running the length of the blade. Some leaves are glossy on one side, some are dull. The length of the blade may be flat, rolled or twisted and have ends that are pointed, keeled (boat-shaped) or rounded. The blades themselves might be wide or fine and may be narrower at the base. The sides of the blades may be smooth, serrated or have hairs.
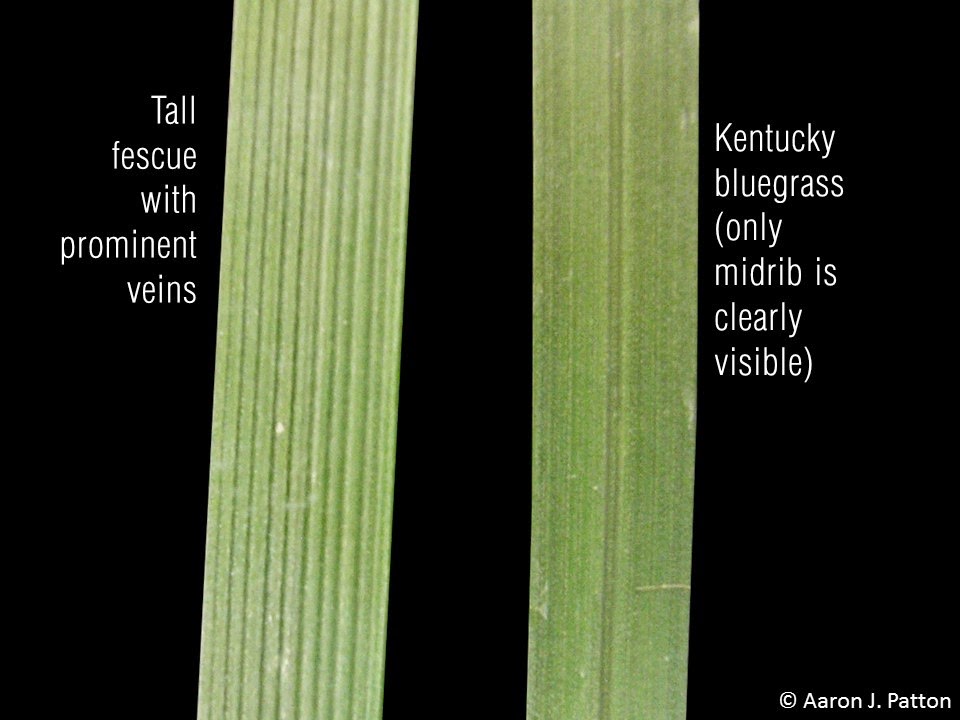 Figure 14: Multiple versus one main vein in grass blades (Purdue University).
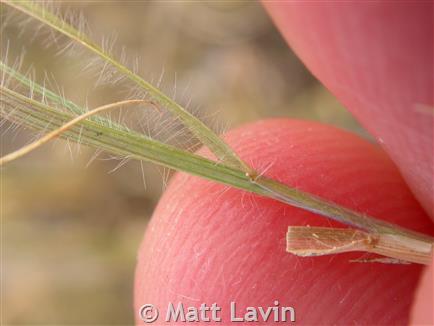 Figure 15: Hairy edges of buffalograss (Matt Lavin, North Carolina State University).
 Figure 16: Leaf blades and tips (University of California Agriculture and Natural Resources IPM).
Collars
The collar is the area where a leaf blade and sheath meet. The collar allows the leaf to move with the wind but not break. The collar also has components called ligules and auricles. Collars can help identify a grass because they come in a range of colors (lighter or darker than nearby tissue), shapes (broad, divided or narrow) and textures (smooth, hairy or rough). If the collar is protected from grazing or mowing, leaf blades will keep growing from the collar.
 Figure 17: Collar on a leaf blade (University of California Agriculture and Natural Resources).
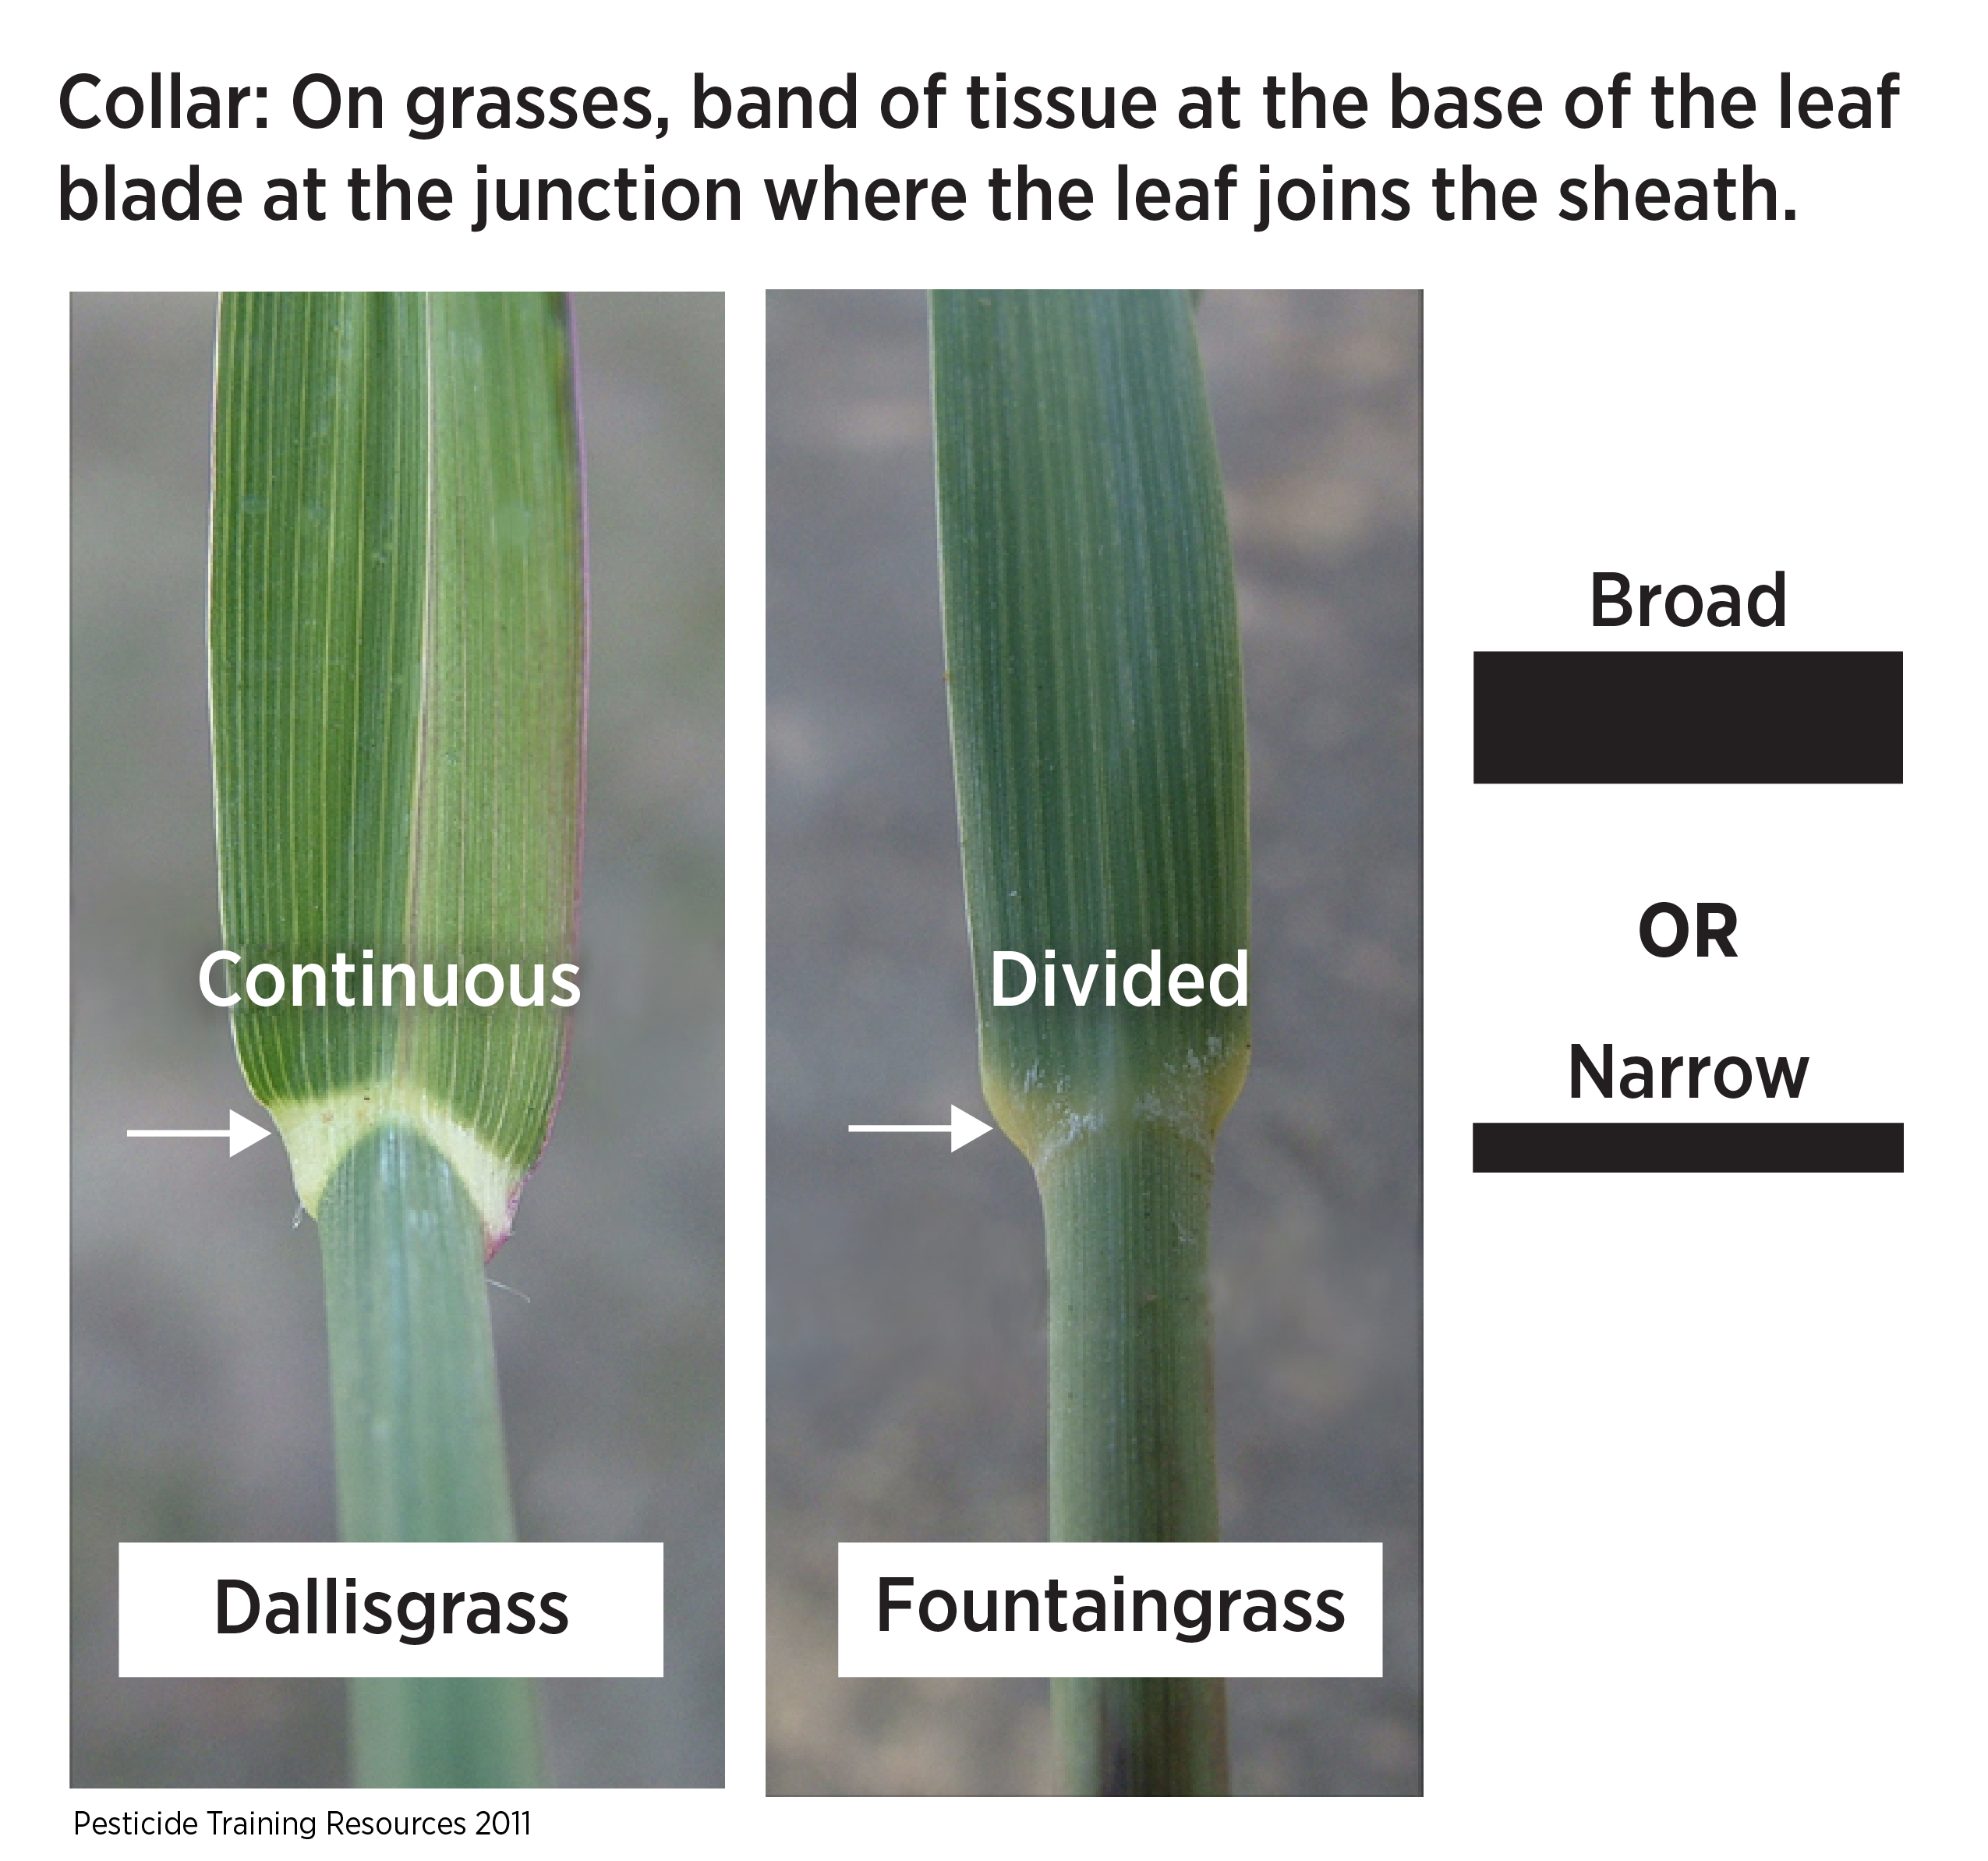 Figure 18: Two types of collars (Dr. Michael Pfeifer's Pesticide Training Resources.)
Ligules
Growing from the collar on the inner side of the leaf are structures called ligules. Ligules can be membranous (white or clear tissue between the collar and leaf sheath), hairy or even absent. In Latin, ligule means little tongue. Ligules keep water and soil out of the collar region. They can be barely visible or several millimeters long. The ligules can be round, pointed or irregular.
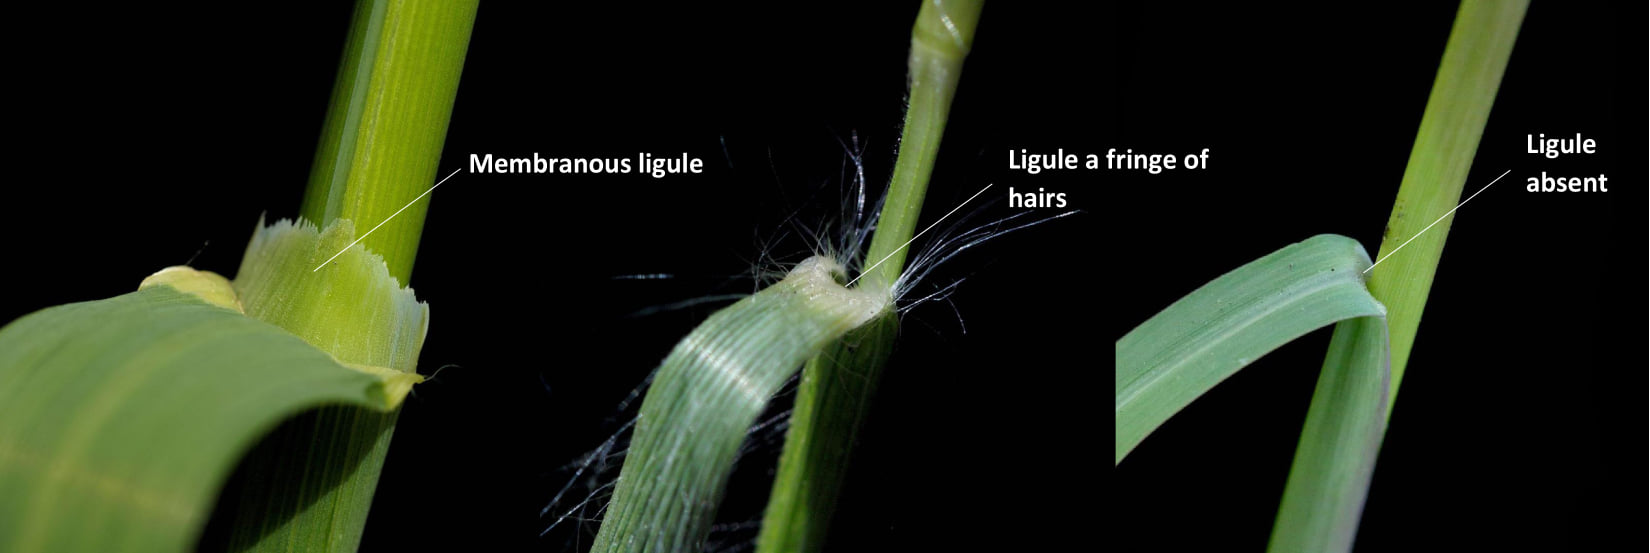 Figure 19: Types of ligules (A Field Guide to Grasses and Grass-like Plants of Idaho, Justin Trujillo, Eva Strand).
Auricles
The collar also has structures called auricles. They are extensions of the collar, and can be long and clasping, small or absent. They may even have hairs on the edges.
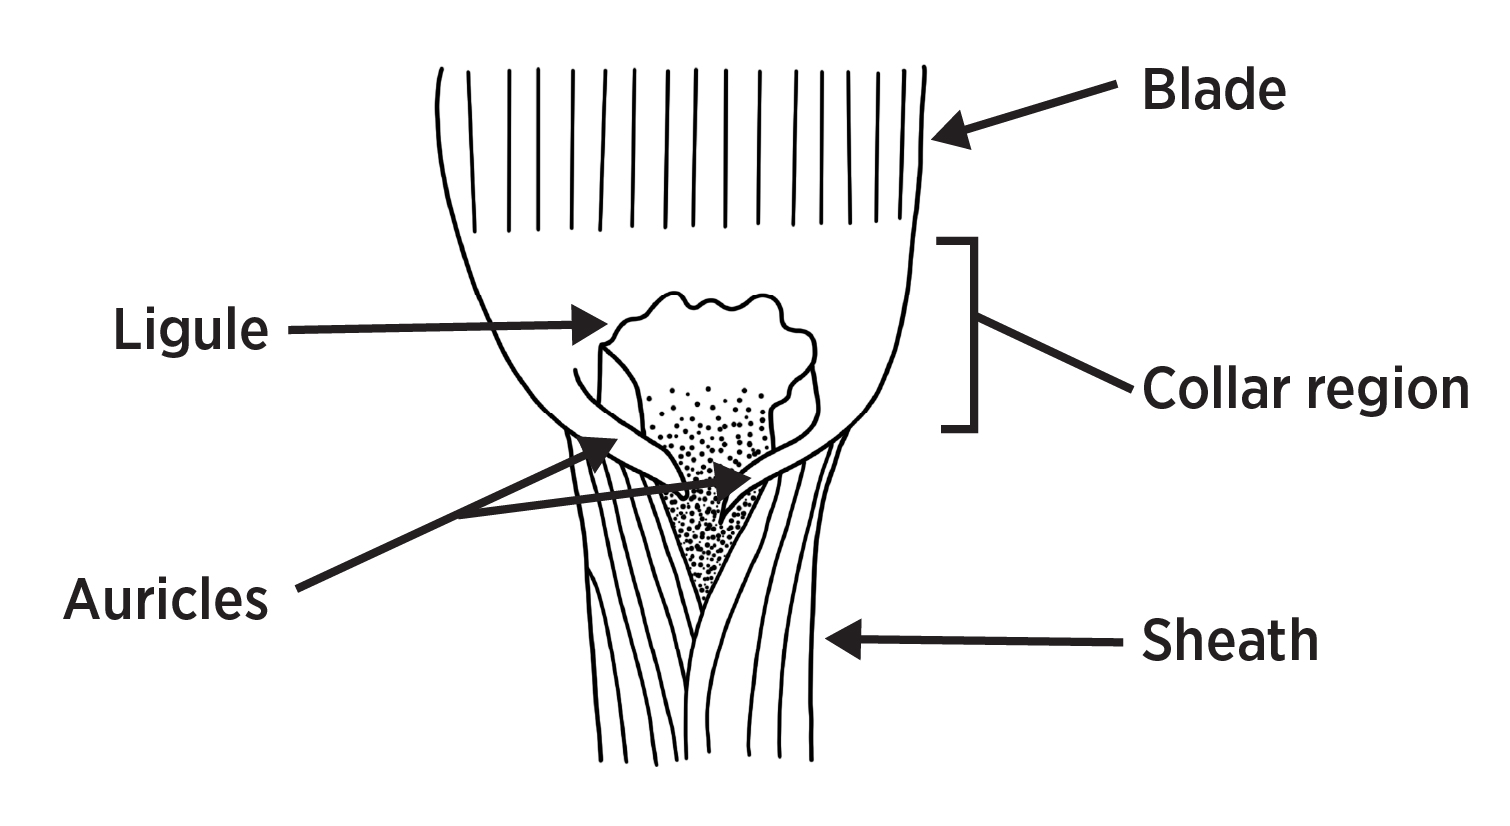 Figure 20: Identifying characteristics of grasses (University of Illinois Crop Sciences).
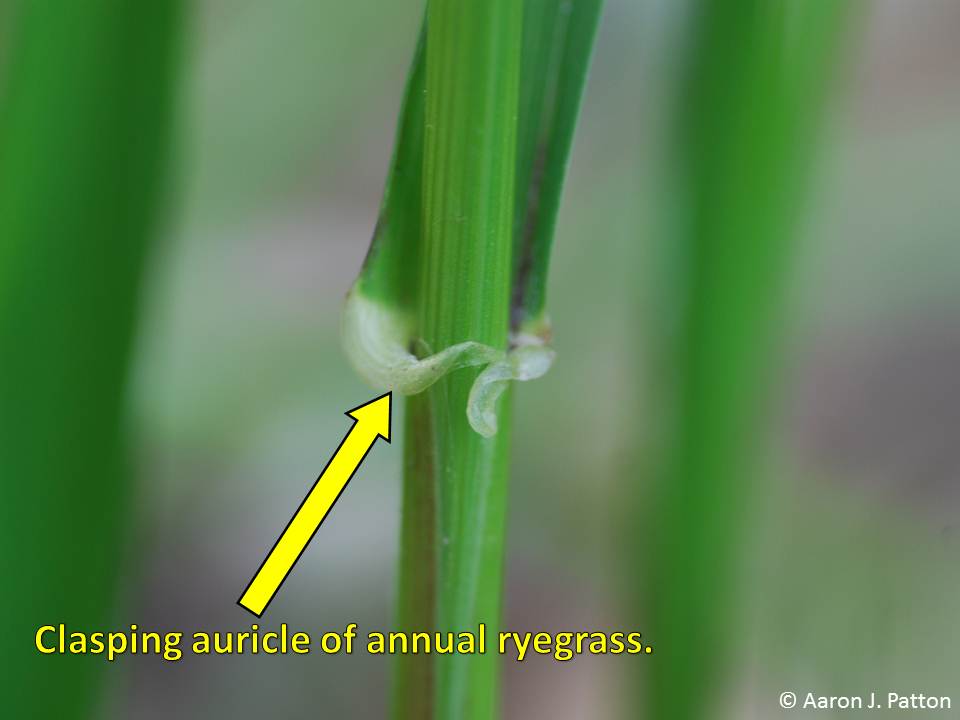 Figure 21: Clasping auricles (Purdue University)
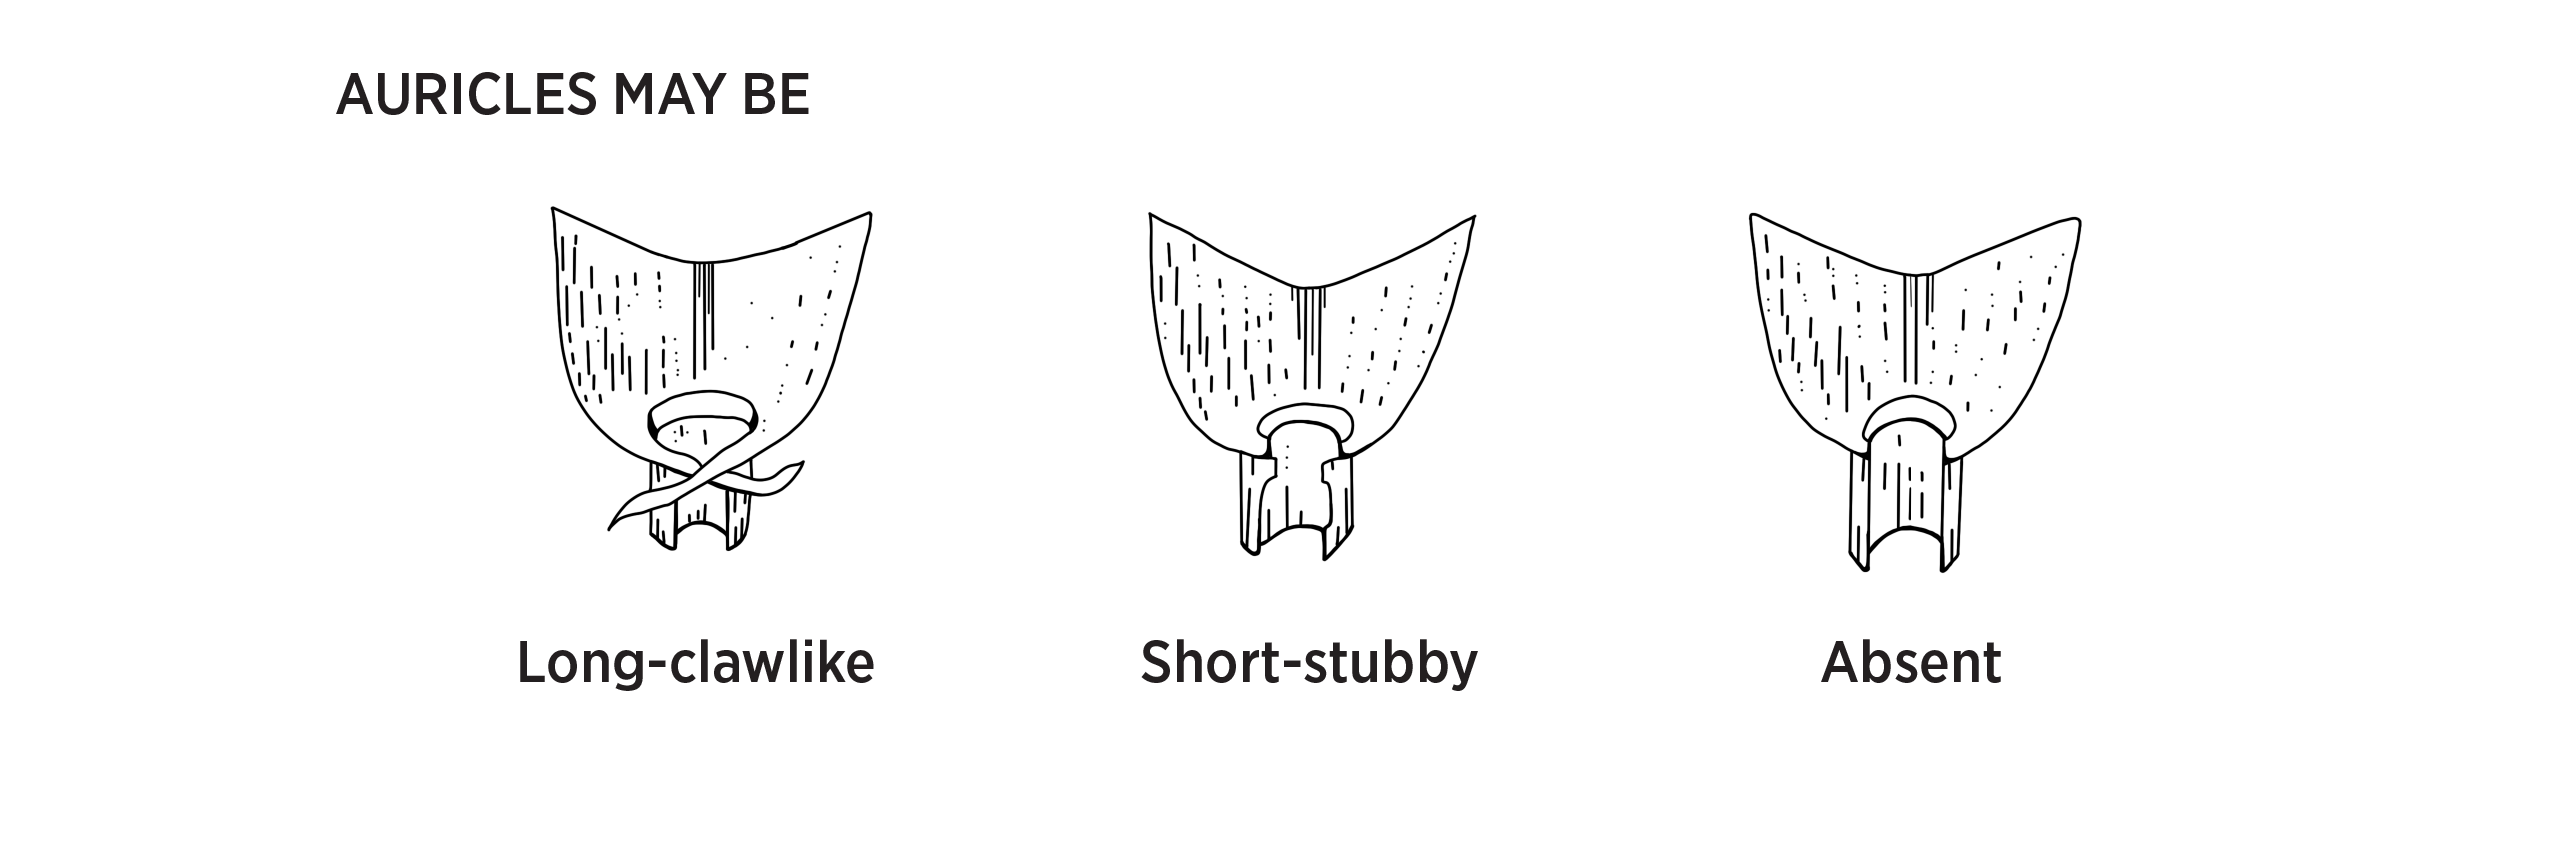 Figure 22: Types of auricles (North Carolina State University Extension).
Leaf Sheaths
The sheath is the lowest part of the leaf attached to the grass node. It can be split partway (overlapped) from the collar to the node, split the whole length between the collar and node, or closed. They may have hairs as well. The sheath protects developing leaves and strengthens the stem.
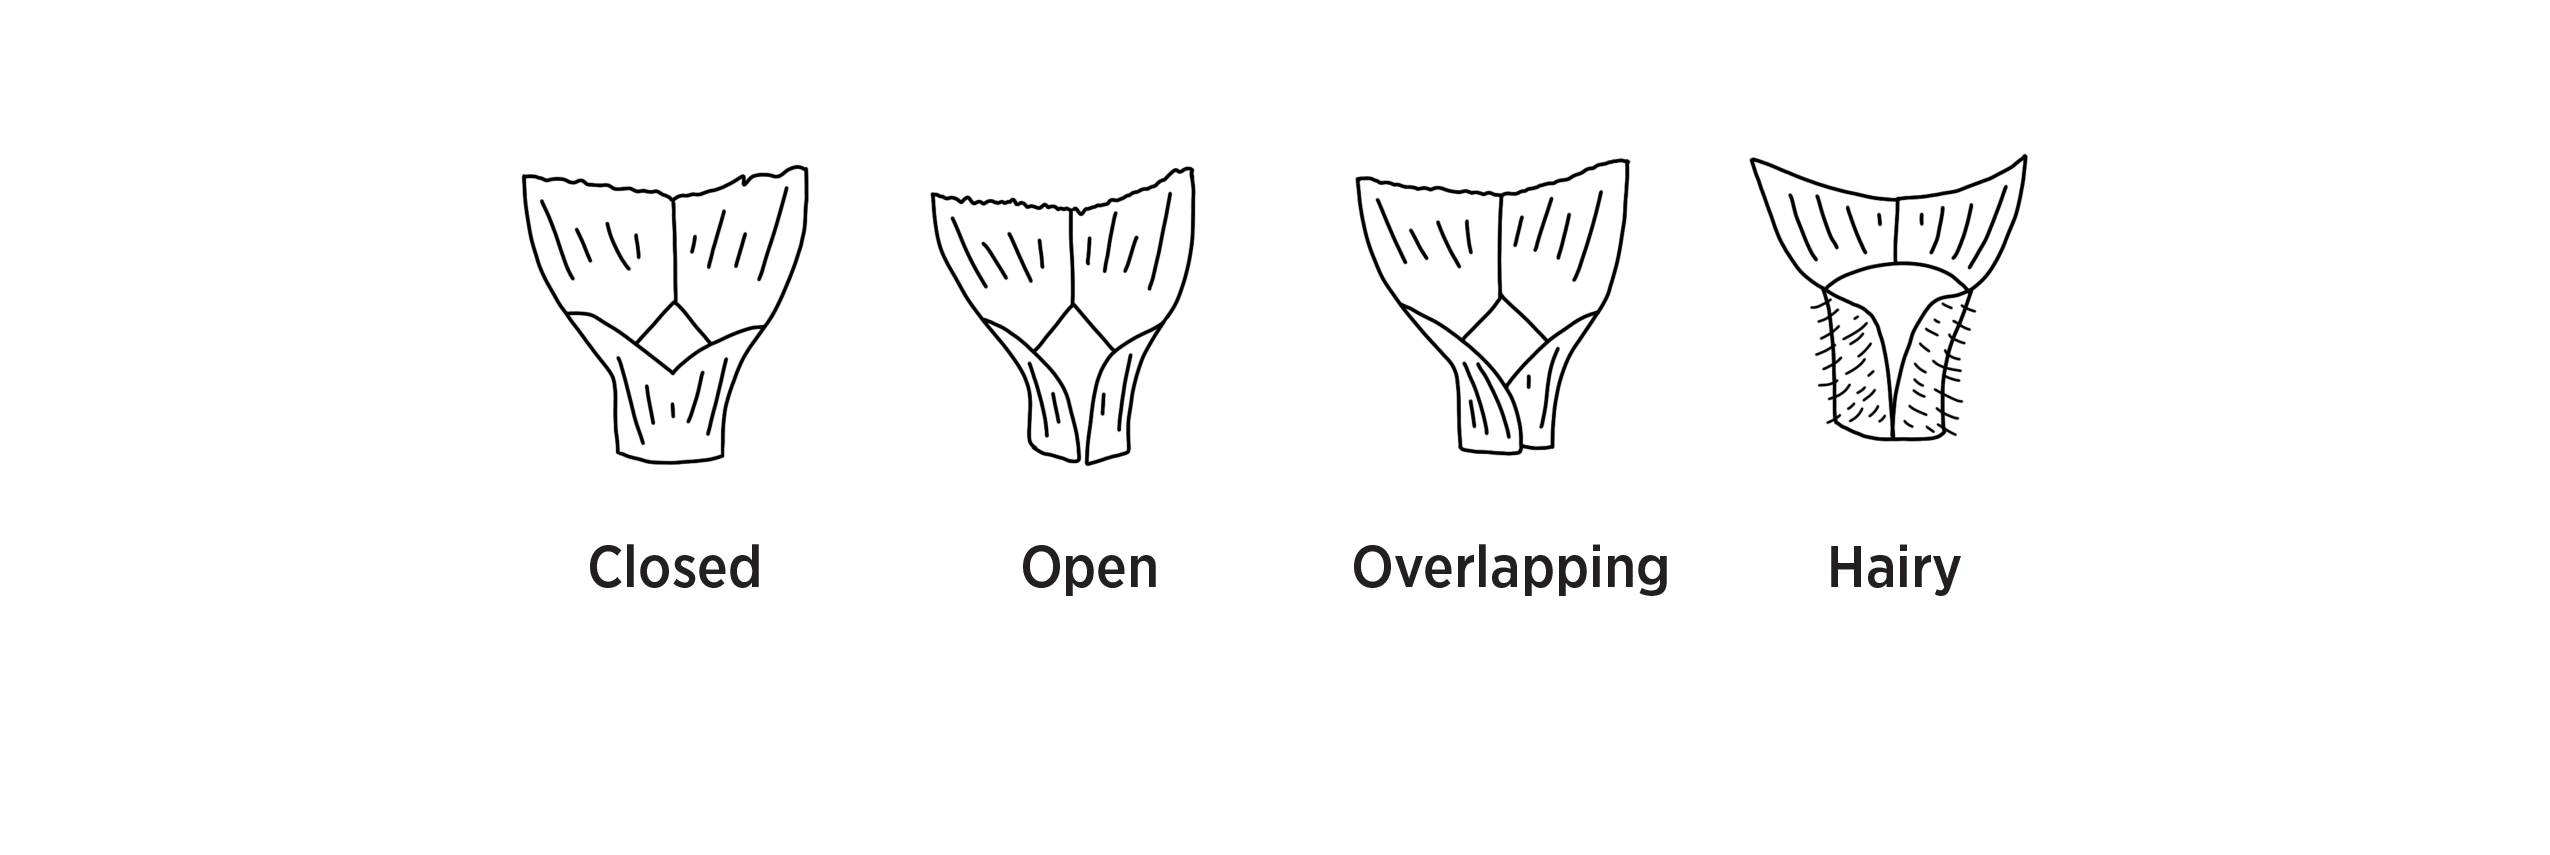 Figure 23: Types of leaf sheaths (Montana State University).
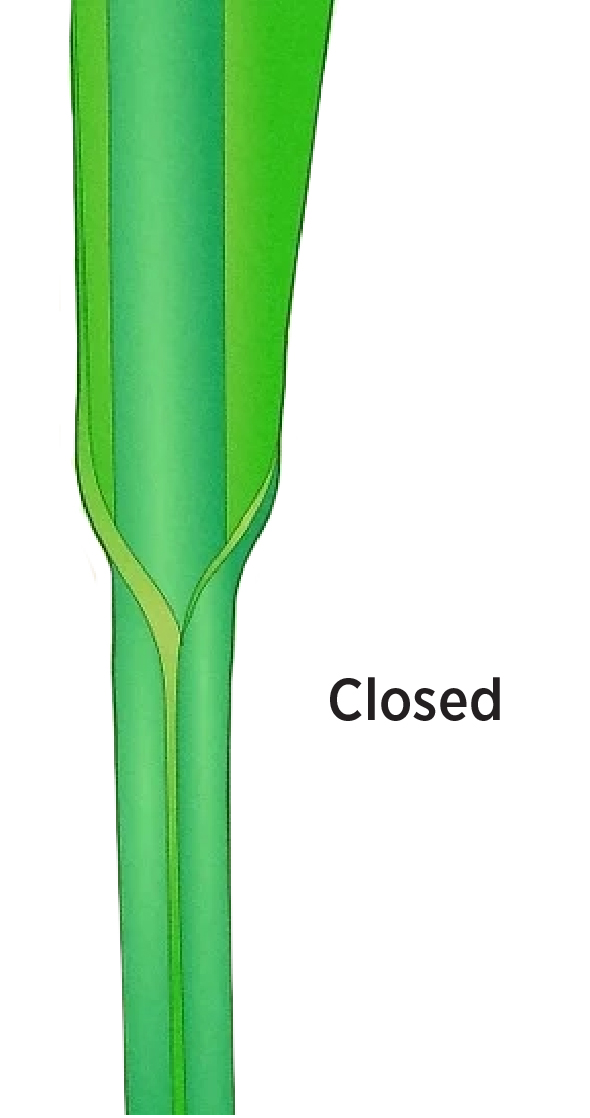 Figure 24: Closed leaf sheath (University of Wyoming).
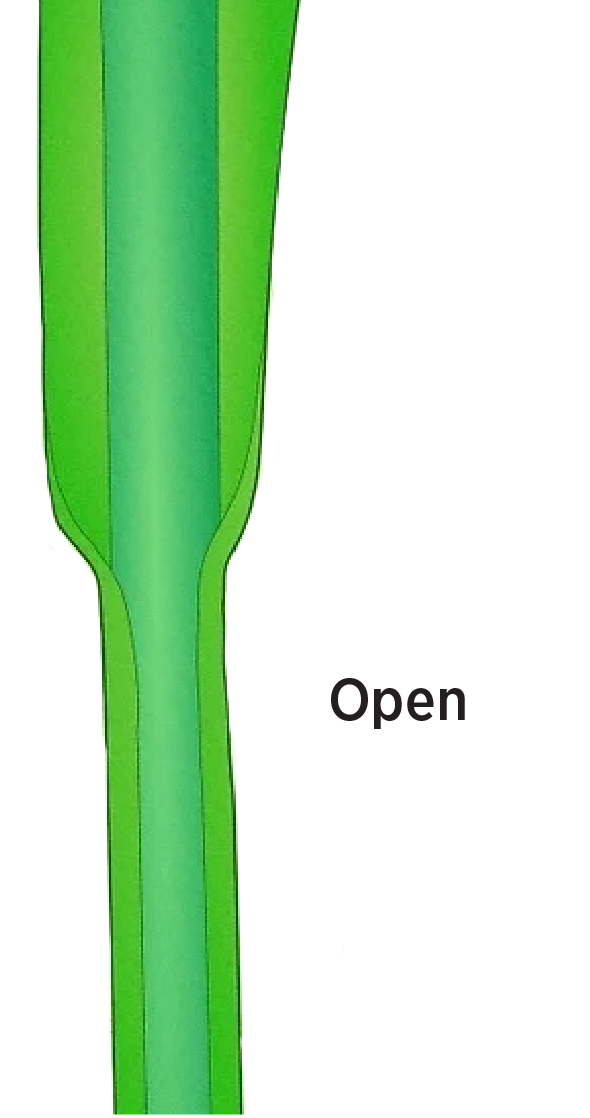 Figure 25: Open leaf sheath.
Common Turfgrasses Used in Oklahoma
Buffalograss
Bouteloua dactyloides
Buffalograss is a perennial warm-season grass that is the only turfgrass native to the prairies of North America, from Mexico to Canada. In Oklahoma, it is found in the Western two-thirds of the state, as well as dry areas in the eastern half of the state. It needs less water compared to other warm-season grasses (it only needs about one inch per month) but will go dormant with prolonged drought. It prefers loamy-clay soils. Buffalograss is tolerant of both heat and cold. It grows best in full-sun areas, as it has low shade tolerance. It spreads via stolons, and is an aggressive grower. Unmowed, it can reach a height of 8–10 inches. Reproduction is with seeds and stolons. Buffalograss is dioecious, meaning there are male and female plants.
Characteristics
Vernation: Rolled
Leaf blades: Light green with small hairs
Collars: Broad, continuous with long hairs
Ligules: Fringe of hairs
Auricles: None
Leaf sheaths: Open
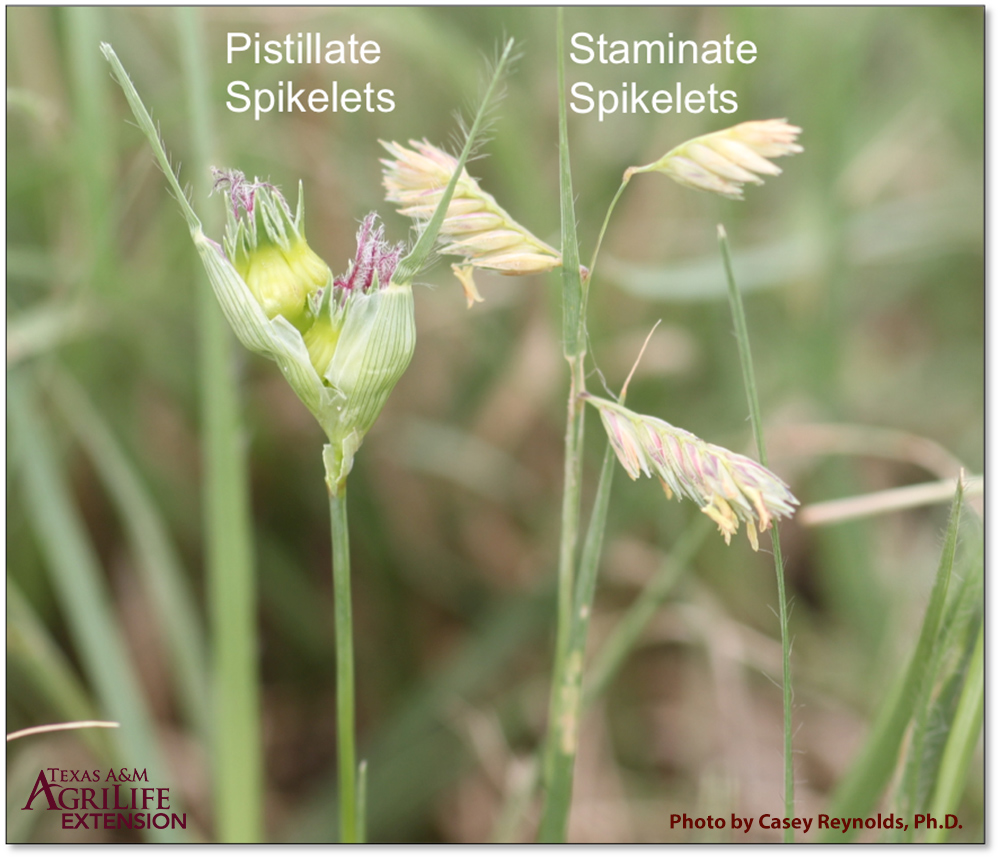 Figure 26: Female (pistillate) and male (staminate) flowers on buffalograss.
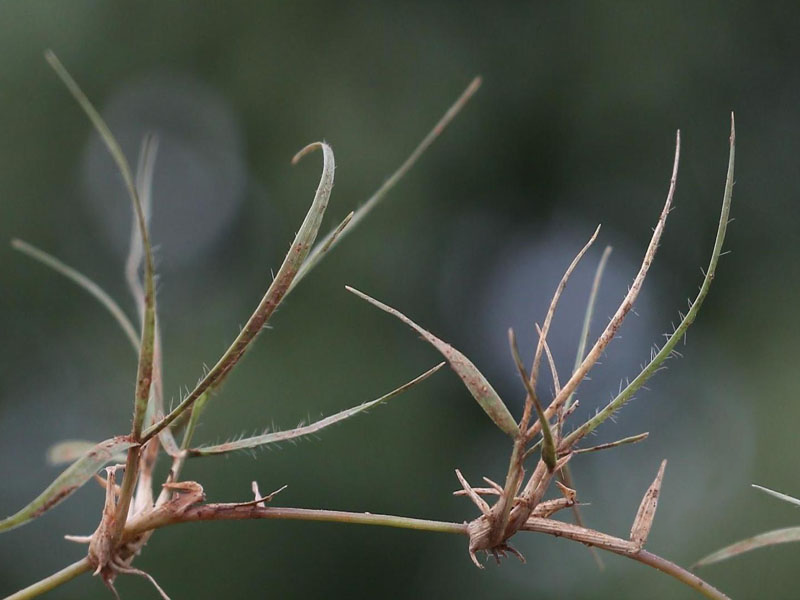 Figure 27: Smooth stolons of buffalograss.
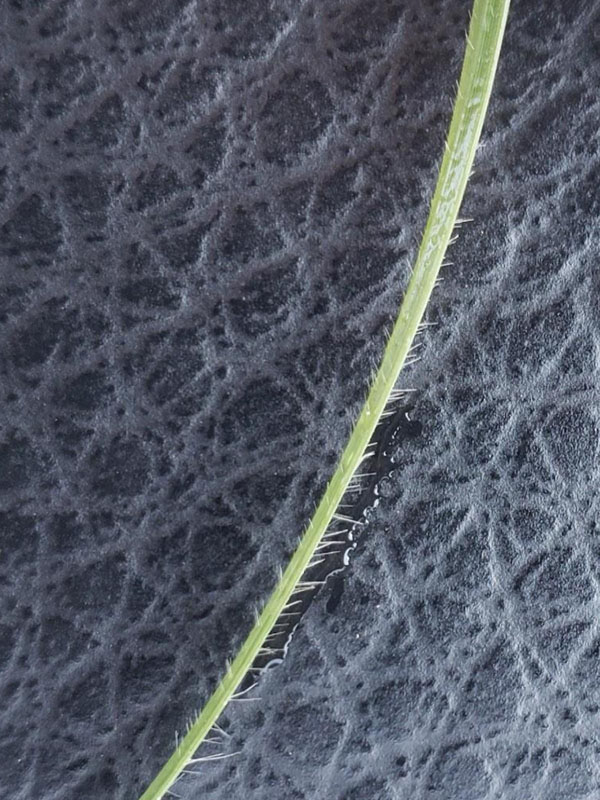 Figure 28: Hairs on leaf blades of buffalograss.
Bermudagrass
Cynodon dactylon
Bermudagrass is a perennial warm-season grass that originated in Africa and was brought to the US in the mid-1700s. It is located throughout Oklahoma, as well as the southern United States. One of the primary warm-season grasses, it is used extensively for lawns, parks, athletic fields, schools and golf courses because it can tolerate a low mowing height and forms a nice sod, spreading via rhizomes and stolons. It has a low water requirement. Bermudagrass is sensitive to cool temperatures, and will go dormant and turn brown when soil temperatures fall below 50 F. It has poor shade tolerance. The seedhead has 3–5 branches attached at the tip of the stem, looking like a windmill. It grows in a variety of soils.
Characteristics
Vernation: Folded
Leaf blades: Alternate on opposite sides of the stem; about 1 inch wide
Collars: Narrow, continuous with hairs
Ligules: Fringe of hairs
Auricles: None
Leaf sheaths: Open
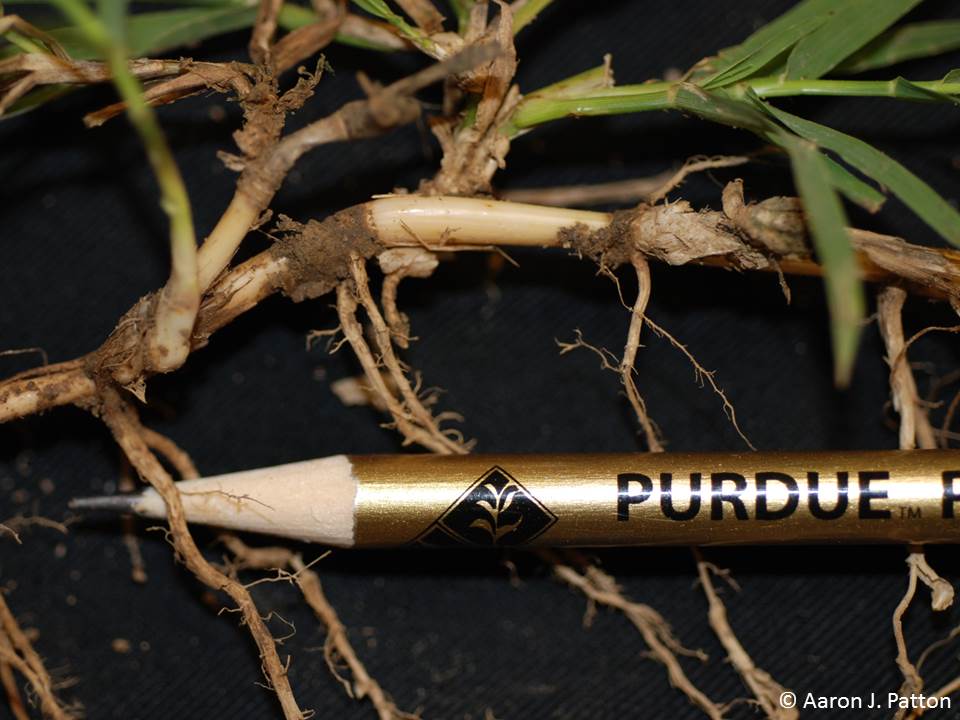 Figure 29: Bermudagrass rhizomes and stolons have scales.
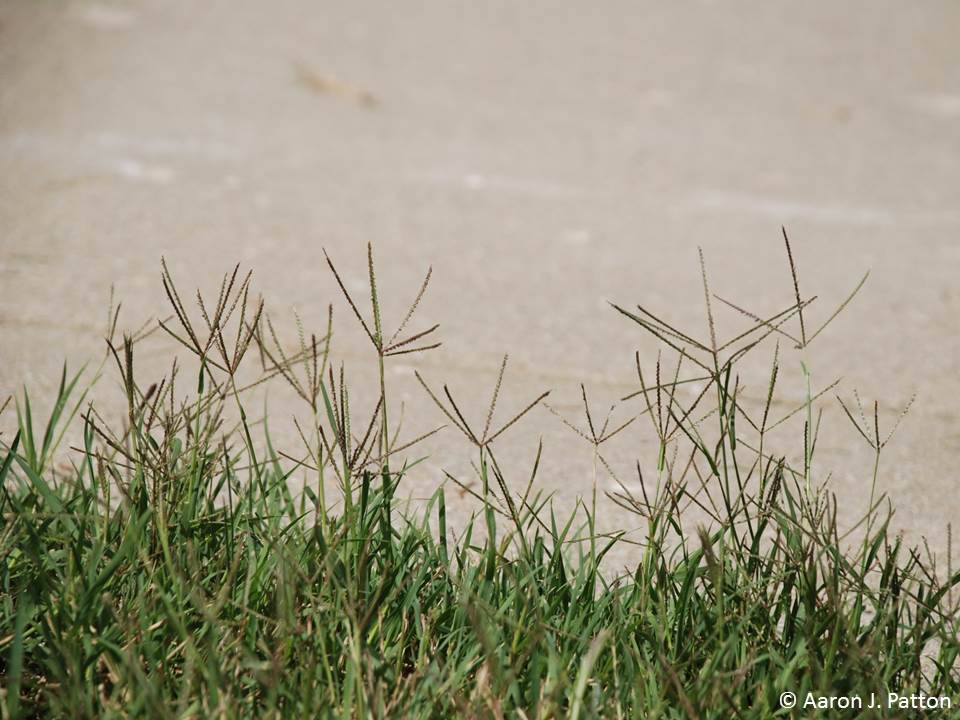 Figure 30: Bermudagrass seed heads.
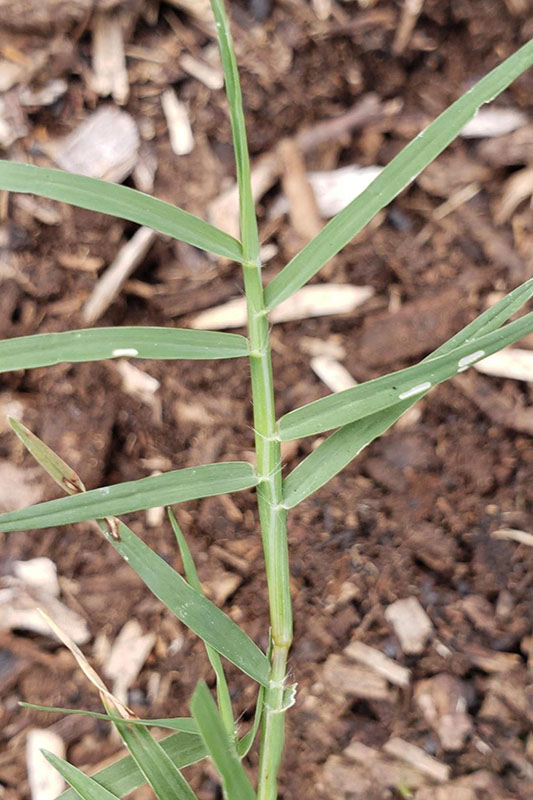 Figure 31: Alternating leaves on bermudagrass.
Zoysiagrass
Zoysia sp.
Zoysiagrass is a perennial warm-season grass that originated in Asia and was brought to the US in 1895. Zoysiagrass has heat and cold tolerance, which allows it to thrive in the transition zone, although it will go dormant in very cold weather. Zoysiagrass is used for lawns, parks, athletic fields, schools and golf courses because it can tolerate trafc and forms a nice sod, spreading via rhizomes and stolons. It is tolerant of drought and shade. It produces seeds, but is typically started vegetatively from sprigs, plugs or sod.
Characteristics of Zoysia japonica (the most widely used Zoysiagrass in the US)
Vernation: Rolled
Leaf blades: Stif; may also have fine hairs; short with sharp points; about 1 inch wide
Collars: Broad, continuous with long hairs
Ligules: Fringe of hairs
Auricles: None
Leaf sheaths: Open and hairy
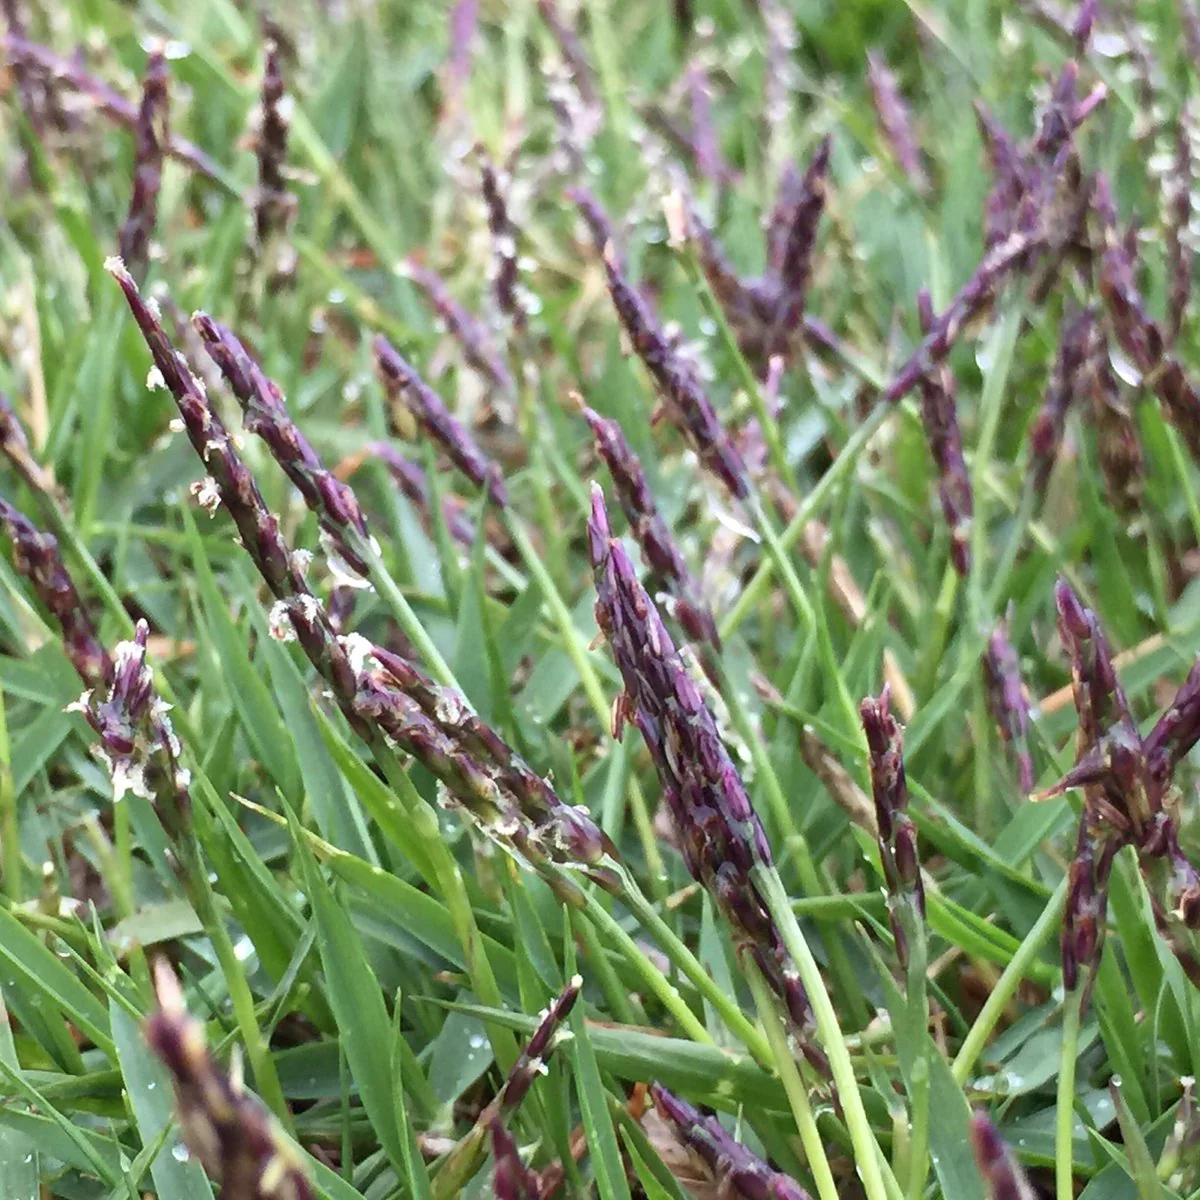 Figure 32: Zoysia japonica seed heads.
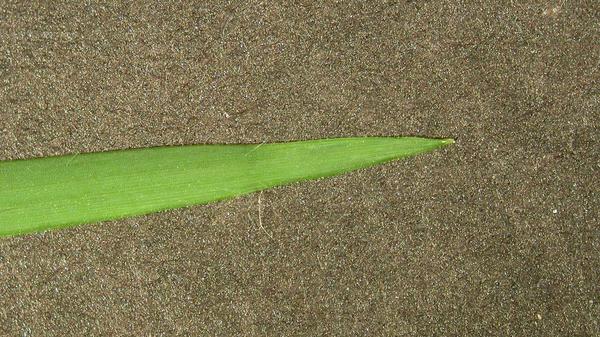 Figure 33: Zoysiagrass leaf blade.
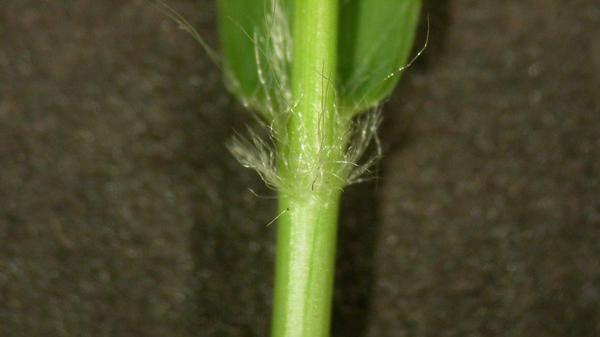 Figure 34: Zoysiagrass sheath.
St. Augustinegrass
Stenotaphrum scundatum
St. Augustinegrass is a perennial warm-season turfgrass widely used in Florida and the Gulf Coast. It is native to the West Indies and is found in extreme southern Oklahoma. St. Augustinegrass is adapted to moist coastal areas with mild temperatures. Because it has poor cold tolerance, it will go dormant below a soil temperature of 55 F. It requires irrigation in drier areas, and has poor drought tolerance. It quickly propagates using stolons only (no rhizomes) and forms a coarse, dense turf. St. Augustinegrass has good shade tolerance. St. Augustinegrass has poor traffic tolerance, and is therefore mainly used for lawns, not sports fields or school grounds. It is usually propagated via stolons, plugs or sod. A healthy St. Augustinegrass lawn crowds out most weeds.
Characteristics
Vernation: Folded
Leaf blades: Flat and smooth with blunt tip; leaves opposite at nodes
Collars: Narrow and constricted; blade turns 90° from sheath at collar
Ligules: Fringe of hairs
Auricles: Absent
Leaf sheaths: Open; slightly hairy along edges; compressed (takes effort to pull them apart)
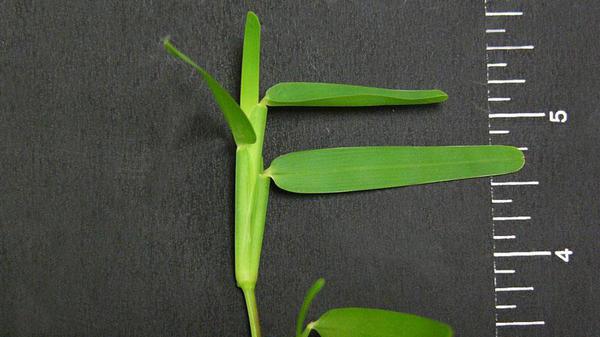 Figure 35: St. Augustinegrass leaves.
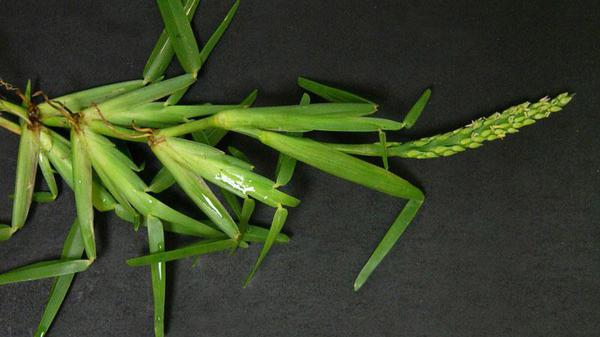 Figure 36: St. Augustinegrass leaves.
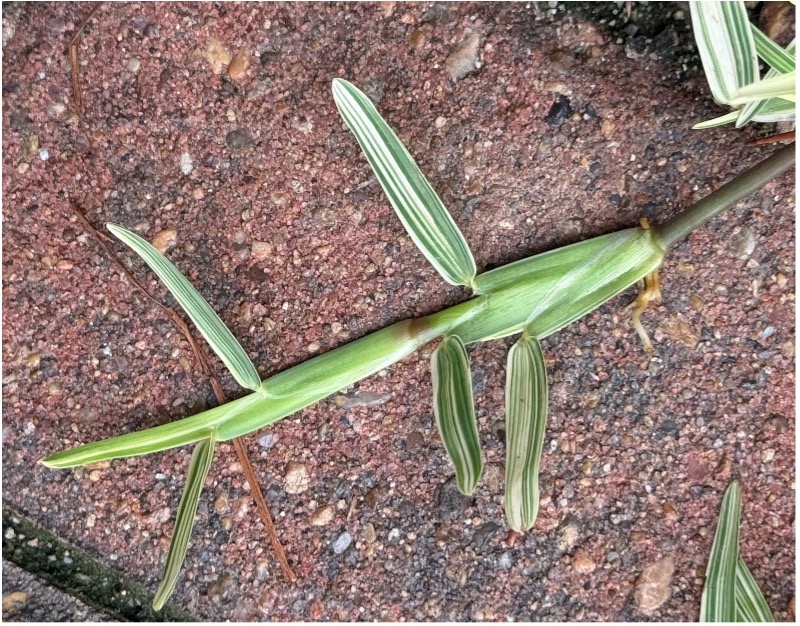 Figure 37: Variegated St. Augustinegrass that has two colors that make a pattern.
Kentucky Bluegrass
Poa pratensis
Kentucky bluegrass is the most widely used perennial cool-season grass in the United States. It arrived from Europe during the 1600s and continued west with the settlers. It tolerates close, frequent grazing more than most grasses. It was a particularly good forage in Kentucky, which is why it's called Kentucky bluegrass. It provides a dense cover, and is used in many areas, such as schools, athletic fields, lawns, golf courses and parks. It has good cold tolerance. It has a shallow root system and needs regular watering, but can go dormant during droughts. It reproduces via rhizomes, which gives it the ability to recuperate and reproduce quickly, and is also started from seed. It “is the grass that made sod production possible in northern climates" (Oregon State University). It has some shade tolerance.
Characteristics
Vernation: Folded
Leaf blades: Light-colored lines down both sides of midrib; boat-shaped tip
Collars: Broad and divided
Ligules: Membranous and very short
Auricles: None
Leaf Sheaths: Closed, but splits with maturity
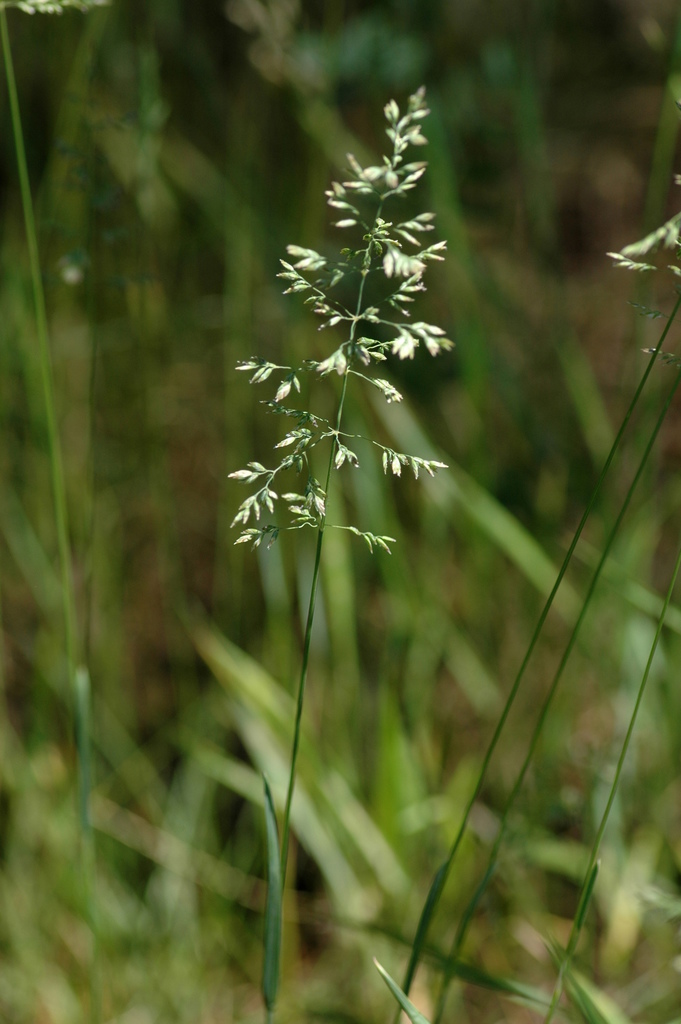 Figure 38: Kentucky bluegrass seed head.
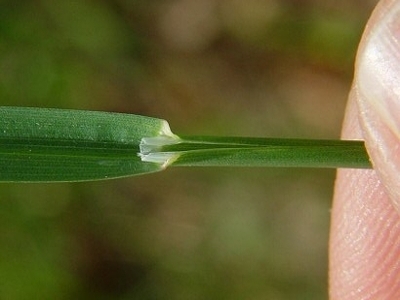 Figure 39: Kentucky bluegrass ligule.
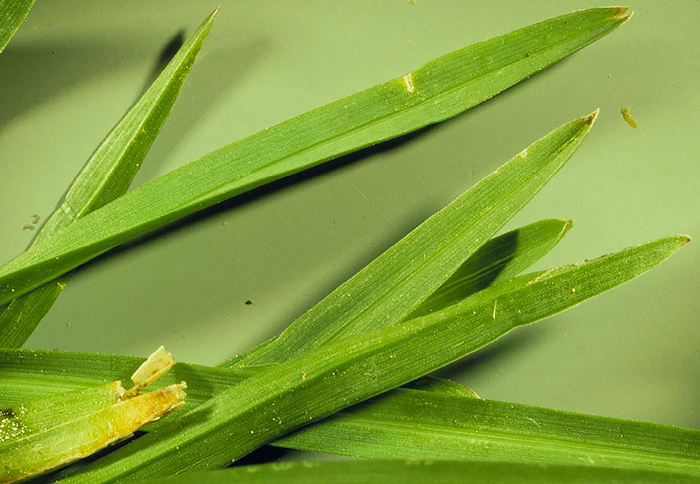 Figure 40: Boat-shaped leaves of Kentucky bluegrass.
Tall Fescue
Festuca arundinacea
Tall fescue is a cool-season turfgrass introduced from Europe in the early 1800s. It is heat tolerant and is used in the transition zone. In Oklahoma, it is found in the eastern third of the state. It is a bunch grass, producing tufts of growth. It grows best in moist environments but can tolerate some dryness (although it thins out in hot summers and needs to be overseeded to maintain a good turf). It also has good shade tolerance and will stay green year-round if irrigated. It is tolerant of traffic, but not as much as bermudagrass, and must be mowed high (over 1.5 inches) to stand up to much traffic. Some cultivars have fungi called endophytes that live inside the grass, which improves disease and insect tolerance and gives more vigorous growth. However, the endophytes can reduce animal growth and reproduction.
Characteristics
Vernation: Rolled
Leaf blades: Wide, with pointed tip and prominent veins on upper surface, rough edges
Collars: Very broad, conspicuous
Ligules: Membranous and short
Auricles: Short, hairy, non-clasping
Leaf sheaths: Open
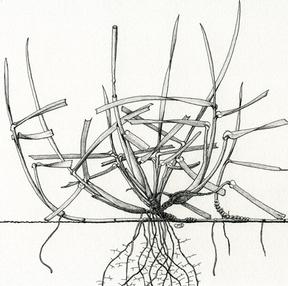 Figure 41: Tall fescue plant structure.
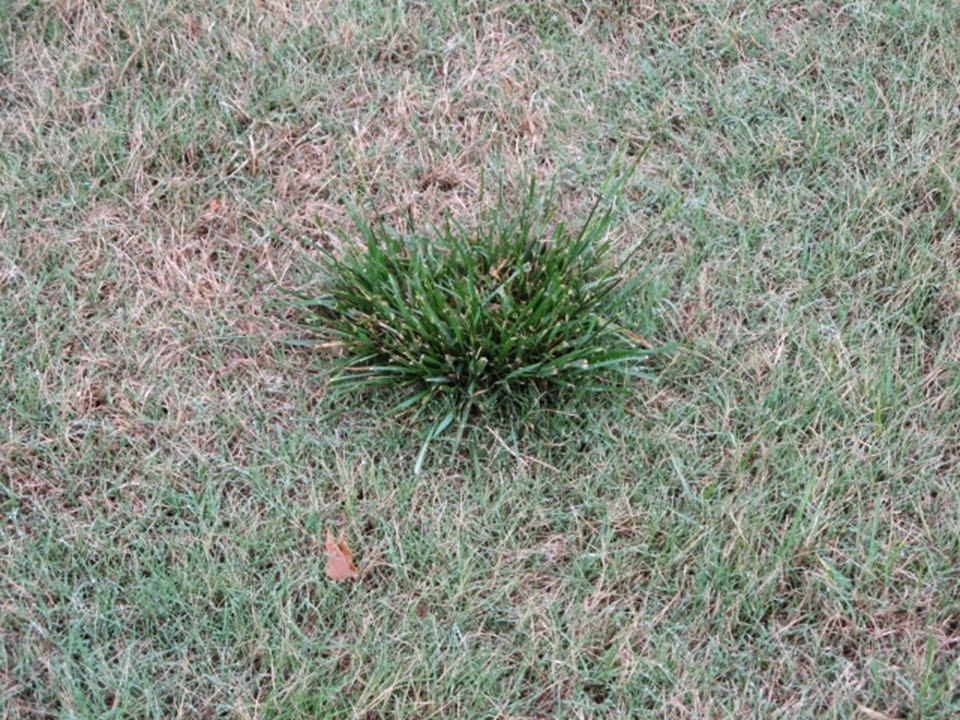 Figure 42: Clump of tall fescue in bermudagrass.
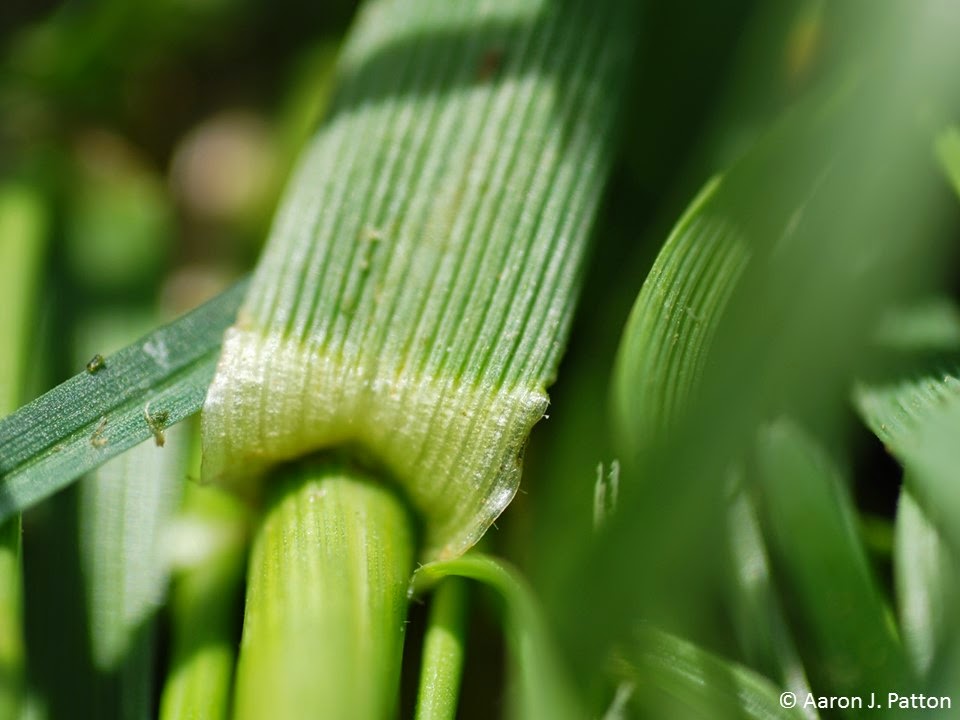 Figure 43: Broad collar on tall fescue.
Perennial Ryegrass
Lolium perenne
Perennial ryegrass is a cool-season grass native to Europe and Asia. It has been used as animal forage for over 300 years. It can tolerate heavy traffic and has the highest wear tolerance of any cool-season grass. It germinates quickly and is often used during winter to overseed warm-season grasses. It has a bunch-type growth habit, so is often mixed with Kentucky bluegrass for lawns and athletic fields. It has poor cold tolerance and is one of the least drought-tolerant turfgrasses in the southern United States. It is a more permanent turfgrass where temperatures are moderate and there is ample moisture.
Characteristics
Vernation: Folded
Leaf blades: Pointed, boat-shaped tip, shiny backside with smooth margins
Collars: Broad, divided
Ligules: Short, membranous
Auricles: Straight, distinctly pointed; may be clasping
Leaf Sheaths: Red coloration at base, flattened.
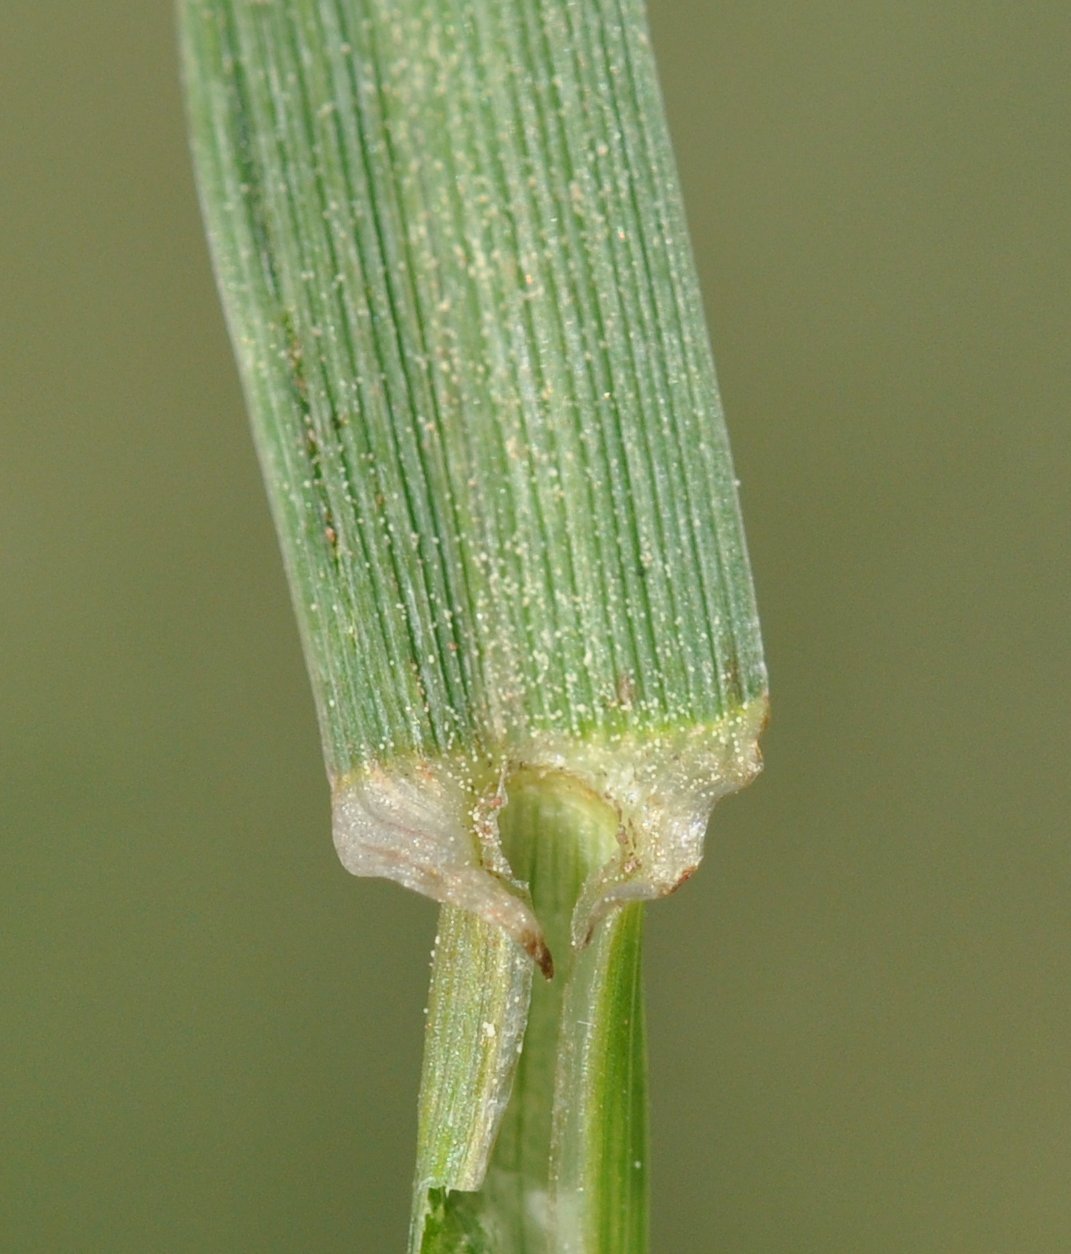 Figure 44: Broad, divided collar of perennial ryegrass.
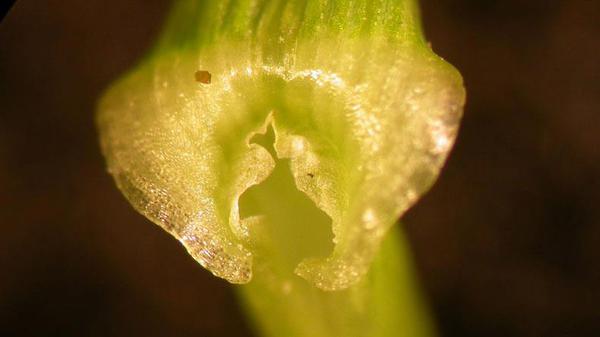 Figure 45: Perennial ryegrass auricle.
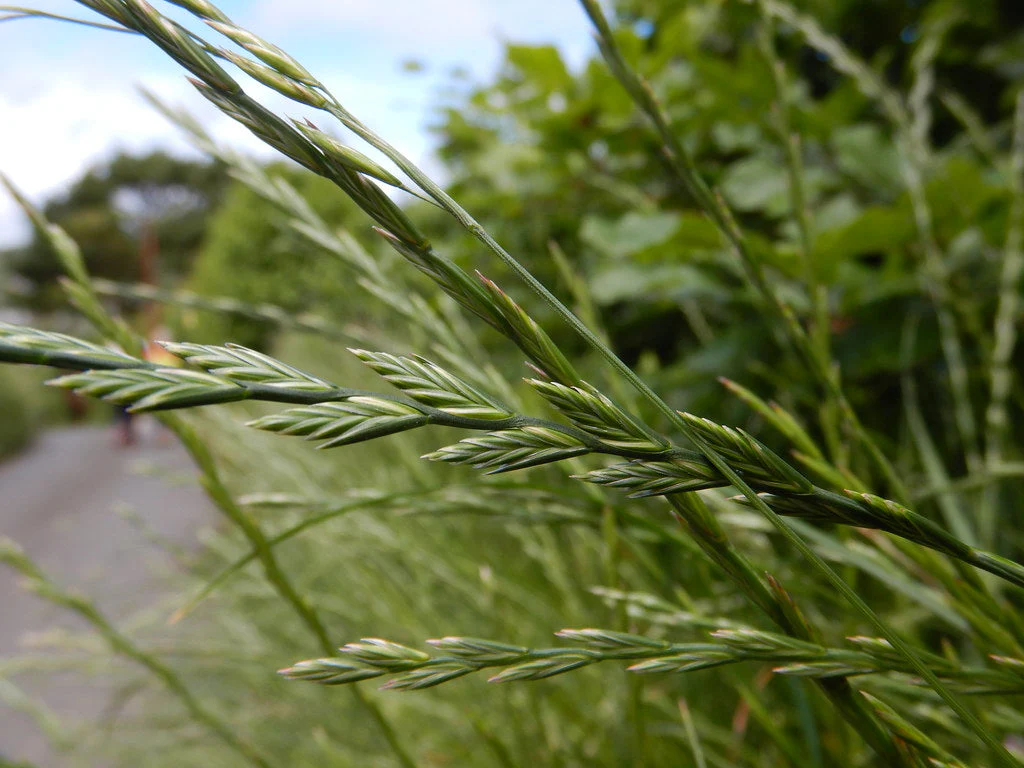 Figure 46: Perennial ryegrass flowers.
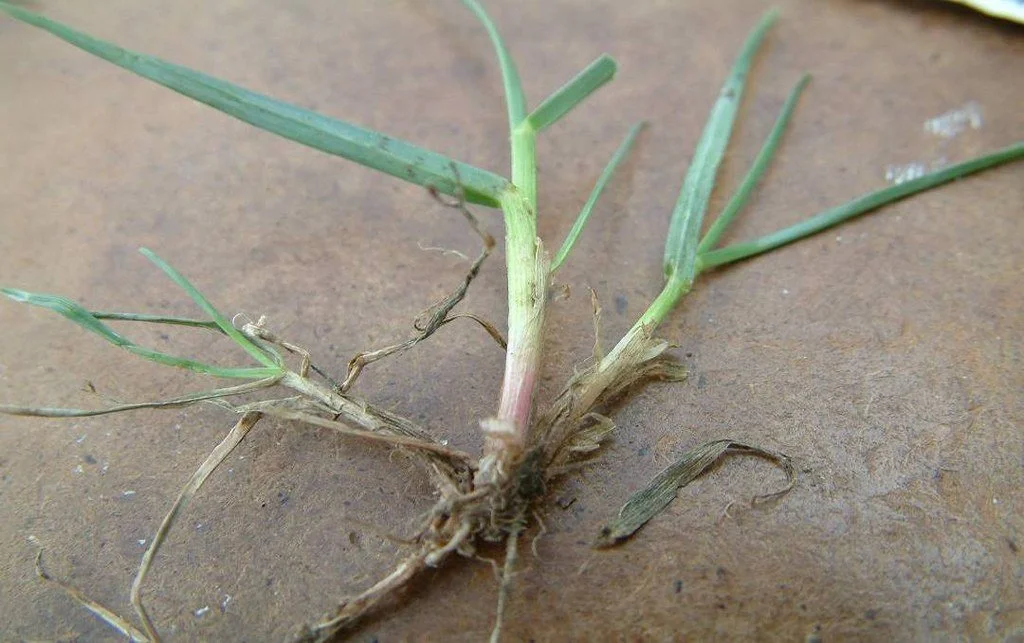 Figure 47: Red at base of perennial ryegrass
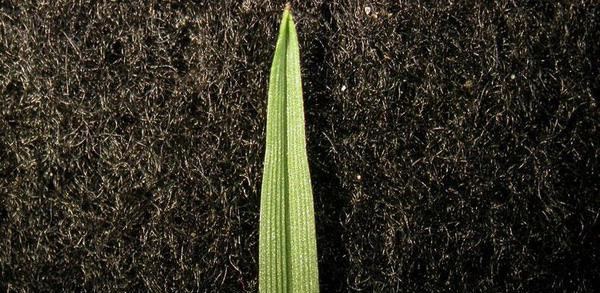 Figure 48: Perennial ryegrass leaf tip.
Creeping Bentgrass
Agrostis stolonifera
Creeping bentgrass is a cool-season turfgrass and can tolerate very low mowing heights (0.125 inches), making it ideal for putting surfaces on golf courses. It does not make a good lawn turf, as it requires intense management, including frequent watering, mowing, aerating, dethatching and heavy amounts of fertilizer. It can spread via very short rhizomes or stolons and can be started from seed.
Characteristics
Vernation: Rolled
Leaf blades: Distinctly ridged upper surface, surface and edges rough, sharp point
Collar: Divided, indistinct, usually slanted with unequal sides
Ligules: Membranous, rounded or blunt
Auricles: None
Leaf sheath: Open
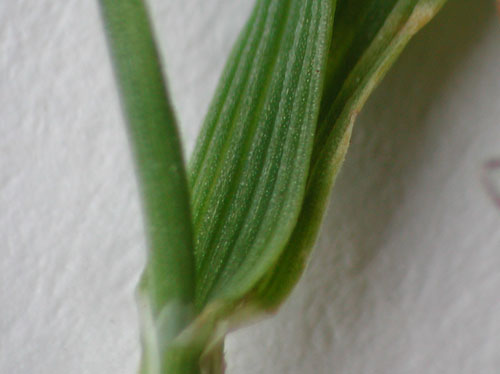 Figure 49: Distinctly ridged upper surface of creeping bent grass.
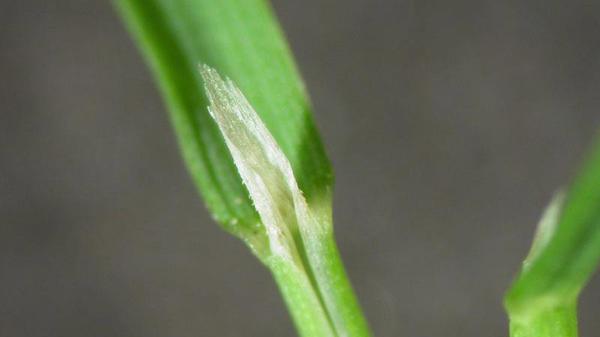 Figure 50: Creeping bentgrass ligule.
Classification
Living organisms, such as grass, are classified. Classification is organizing similar things into groups. It also allows us to distinguish between different organisms, and to make sure we all call something the same thing. If we say donkey, we all know what we are talking about. If you are talking about your donkey and refer to him as Frank, not many people would know what Frank refers to. But most people know what a donkey is.
Living organisms are classified based on their characteristics, such as the number of cells they have (one or more than one), whether their cells have cell walls (such as plants and fungi), what their food source is (sun, chemicals, plants, etc.), whether they have a backbone, etc. It’s like sorting your clothes into shirts, pants, socks, etc.
Scientists also use DNA (DeoxyriboNucleic Acid — the genetic code of a living organism) to determine which organisms are closely related, depending on how much of their DNA is the same. Sometimes species look closely related, but their DNA shows that they are not. Some species have had to be reclassified after discovering that their DNA shows that they were misclassified the first time, especially if classified earlier based on outward appearance.
When a new species is discovered, scientists determine where it fits in the classification of all living things. There are different levels of classification (kingdom, phylum/division, class, order, family, genus, species). Species that share a kingdom (animal, plant, fungi, etc.) are more related than species from a different kingdom. The more categories two species share, the more related they are. For instance, two animals will be more closely related that an animal and a plant.
The genus and species of an organism are the two names that make up their scientific name. The scientific name uses binomial nomenclature (two-name naming system). In binomial nomenclature, the first word is the genus, and the second word is the species. (Scientific names are underlined or italicized and only the genus name is capitalized). For instance, Equus caballus is the scientific name of the domesticated horse. Plains zebras, which look a lot like horses, are Equus quagga. They share the genus Equus, so you know horses and zebras are closer relatives than something in a different genus (such as the hippopotamus, Hippopotamus amphibius).
One way to determine which organism you are looking at is to use a dichotomous key. Dichotomous means divided into two parts. A dichotomous key is a tool to help identify organisms by using their physical characteristics. For example, to help differentiate between the grasses described earlier, here is one example of a dichotomous key you can use. There are many ways to make a dichotomous key, depending upon which characteristics you choose to start with.
To use the key, start at the top. At each step, choose the arrow pointing to the corresponding traits of your grass. For example, from ligules you have two choices: fringe of hairs or membranous. If your grass sample has fringe of hairs, continue down that path. If the ligule is membranous, your grass either has an auricle or does not have an auricle. If your grass has an auricle, and there are prominent veins on the leaf blade, then you have identified tall fescue. (This is a simplified key that only contains the species we’ve covered.)
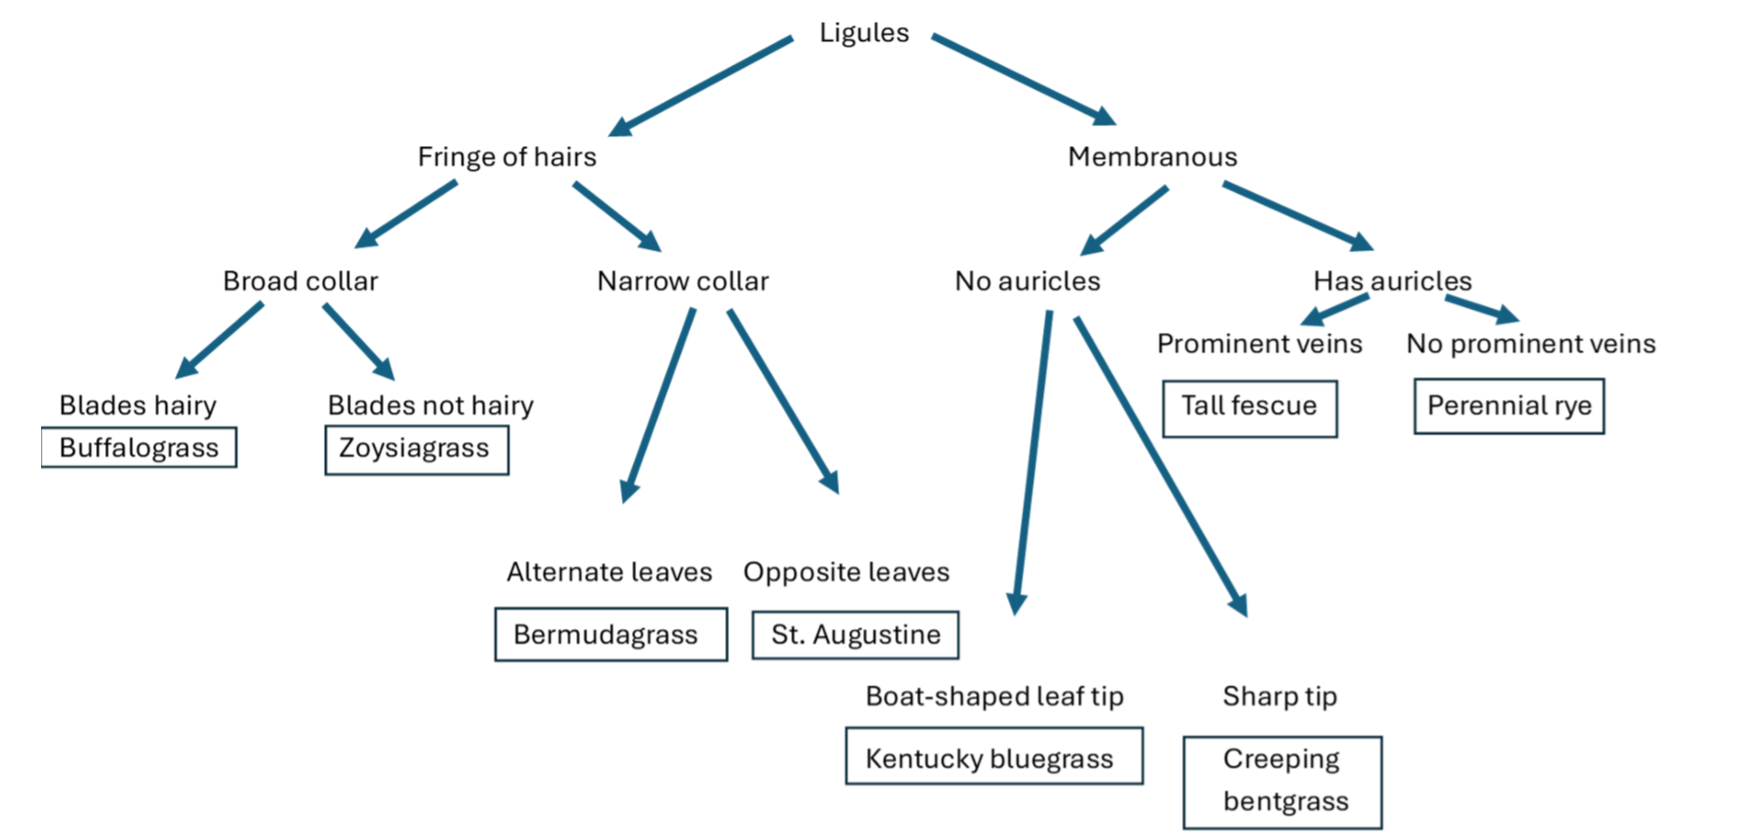 Figure 51: Dichotomous key for various turfgrasses.
Now that you understand how to use a dichotomous key, we will practice making one and then you will have the chance to make your own. For practice, we will make a dichotomous key for some dessert organisms.
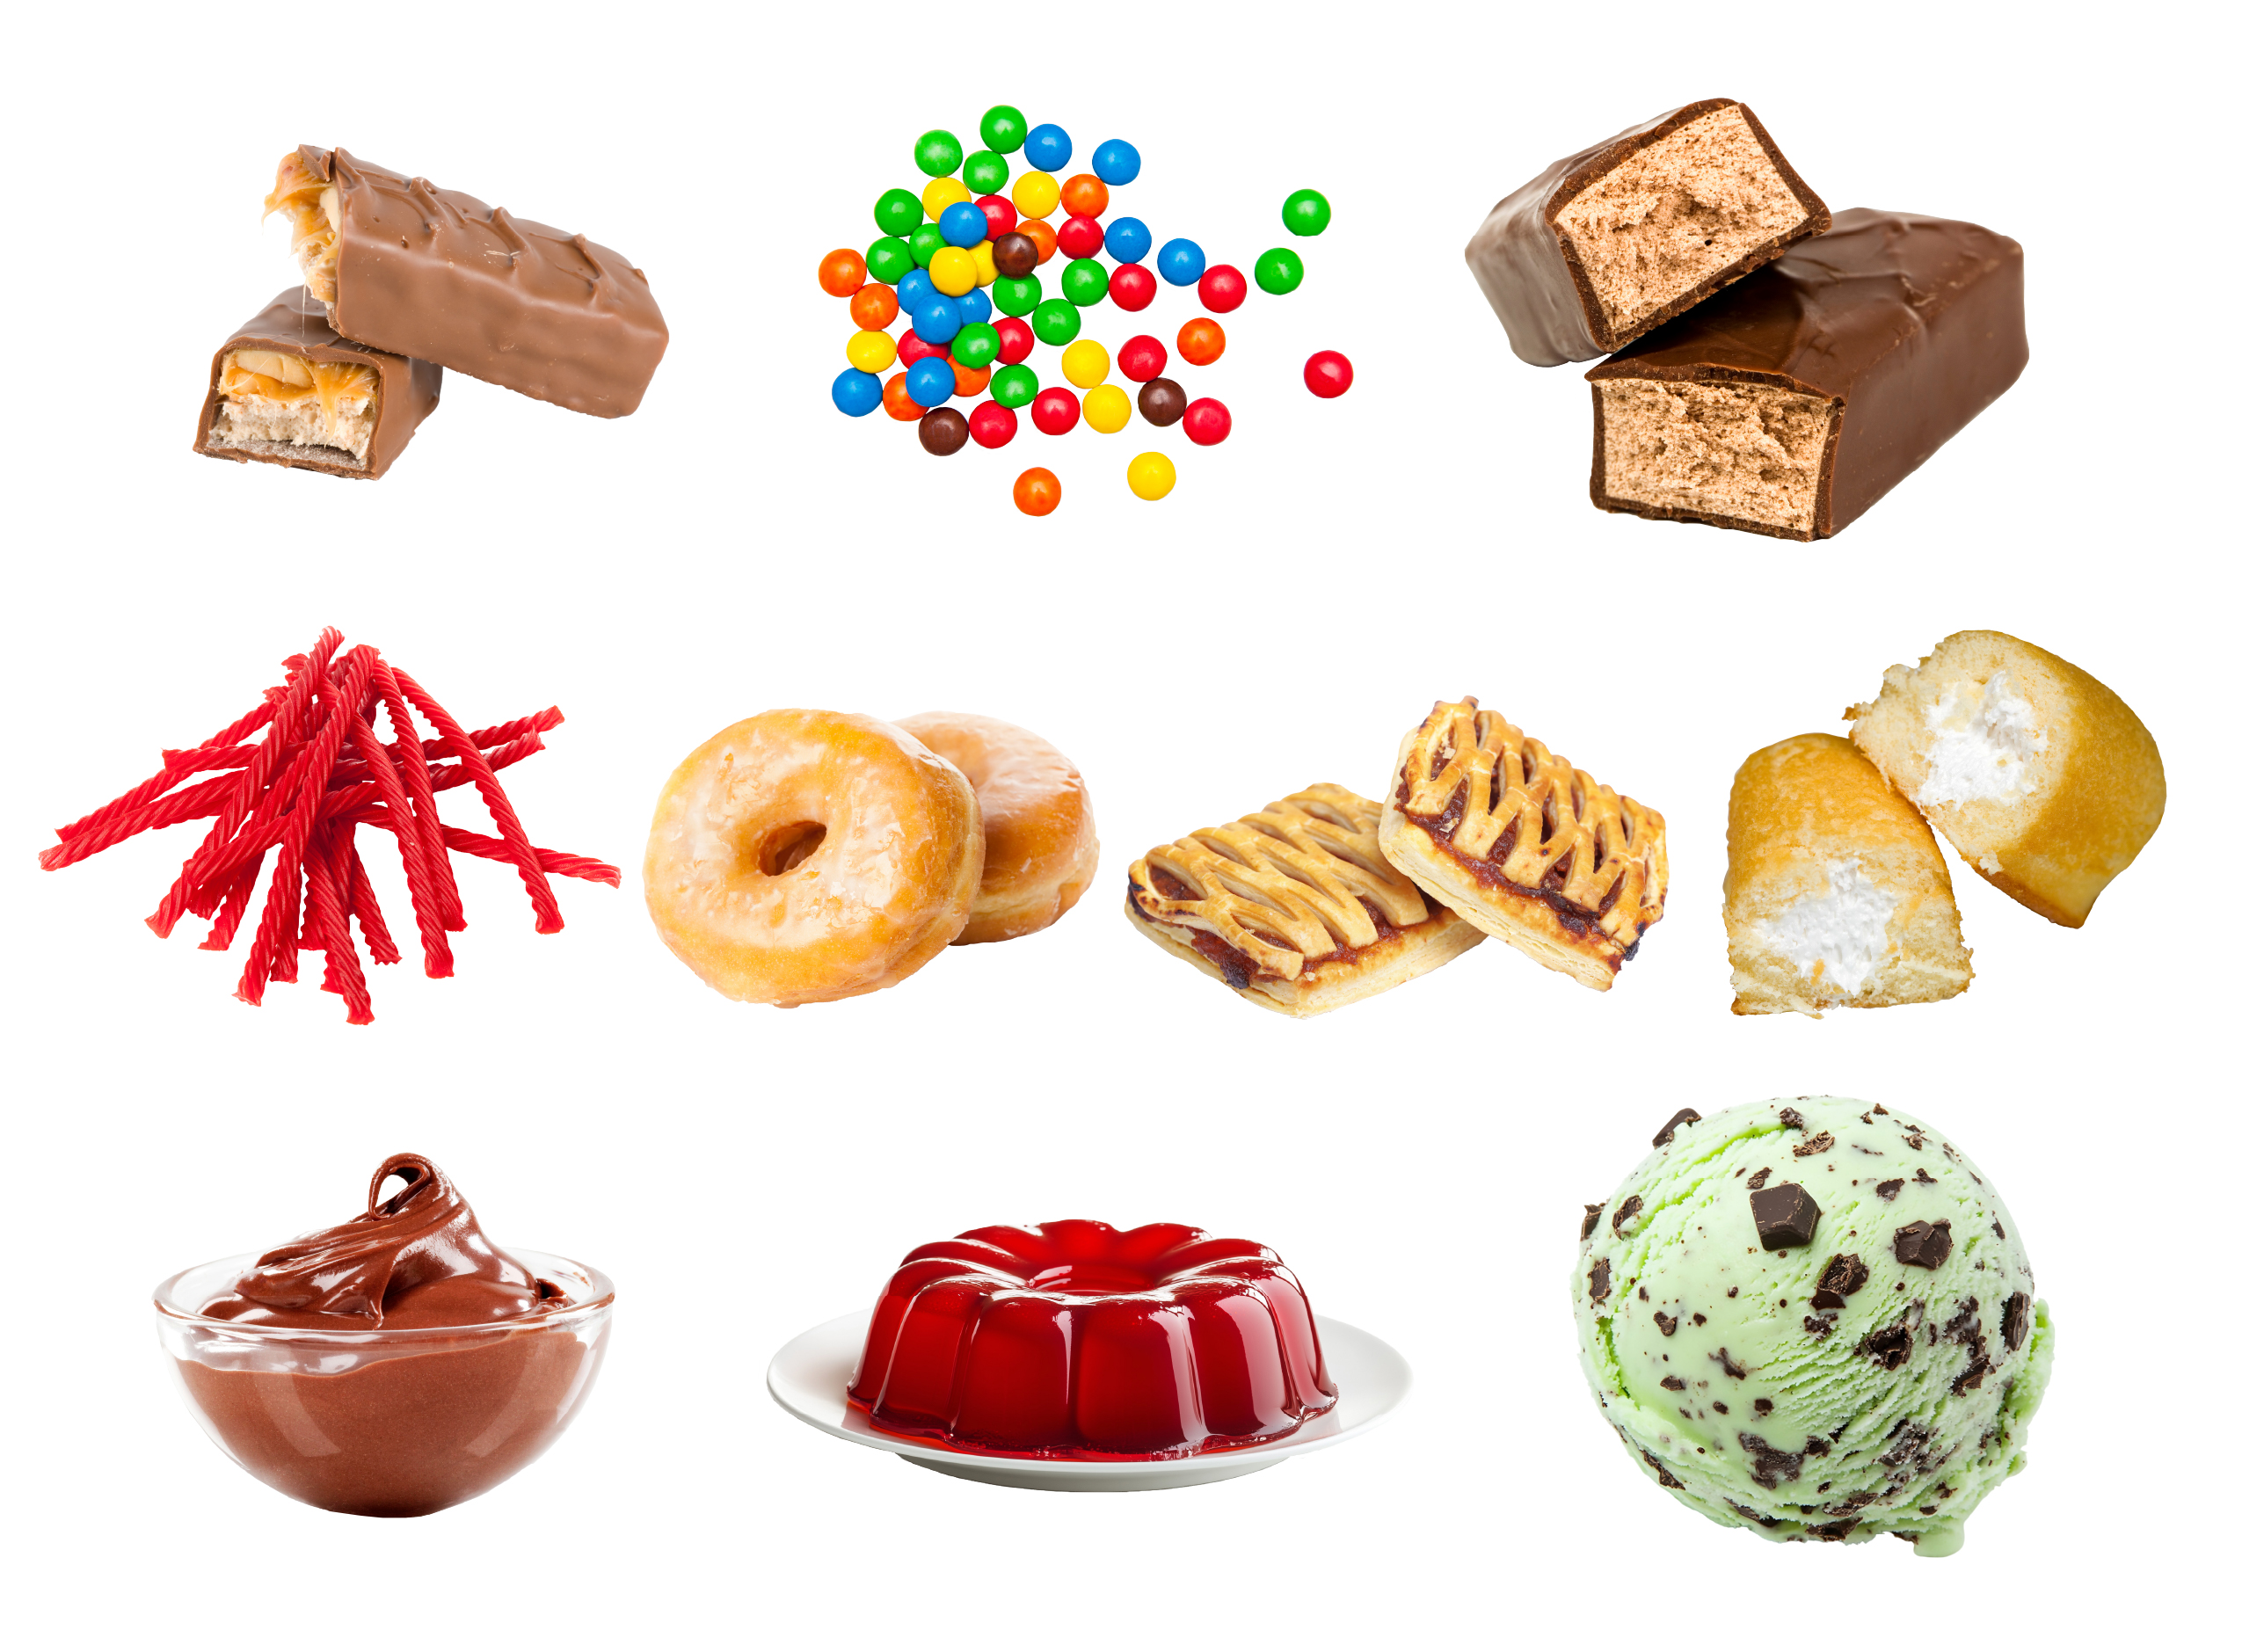
Divide these organisms into two groups to start with. There is no wrong answer, so let’s start with shape: long or not long.
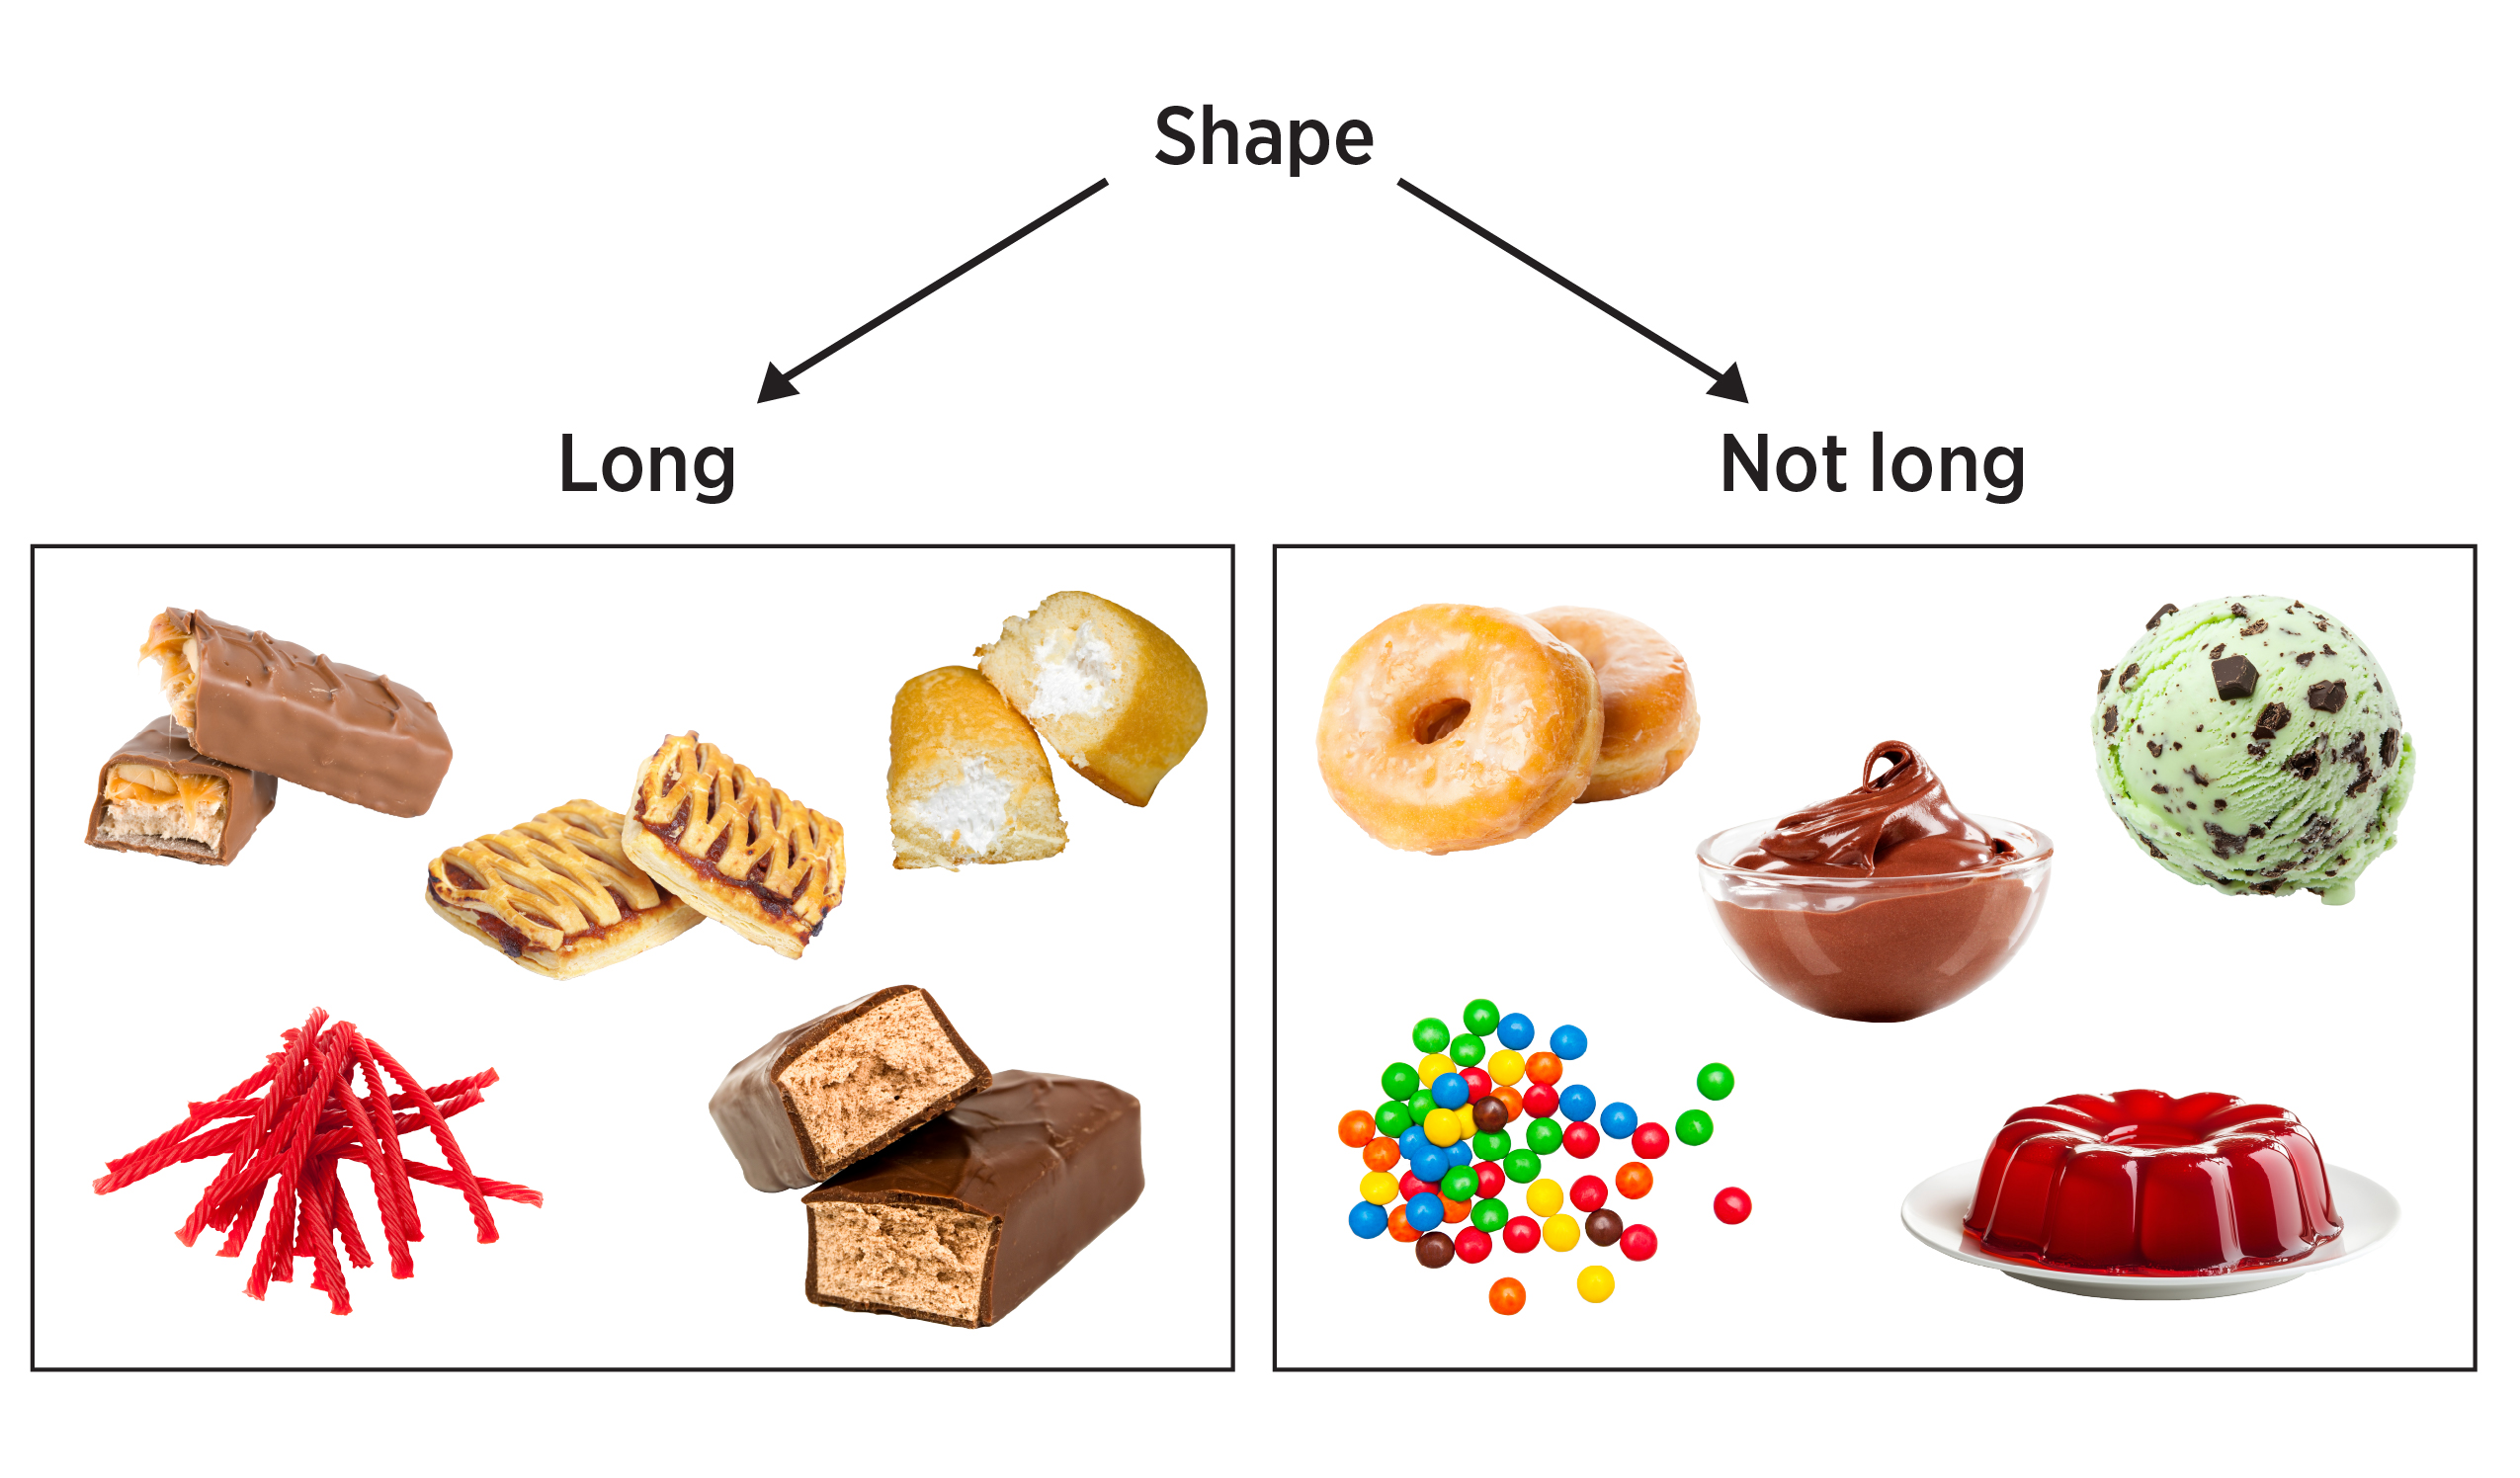
This is not specific enough for identifying a species, so we must make smaller groups. Next pick another characteristic to make the groups smaller. Let’s choose color. We will divide these two groups into smaller groups based on whether they are one color or more than one color:
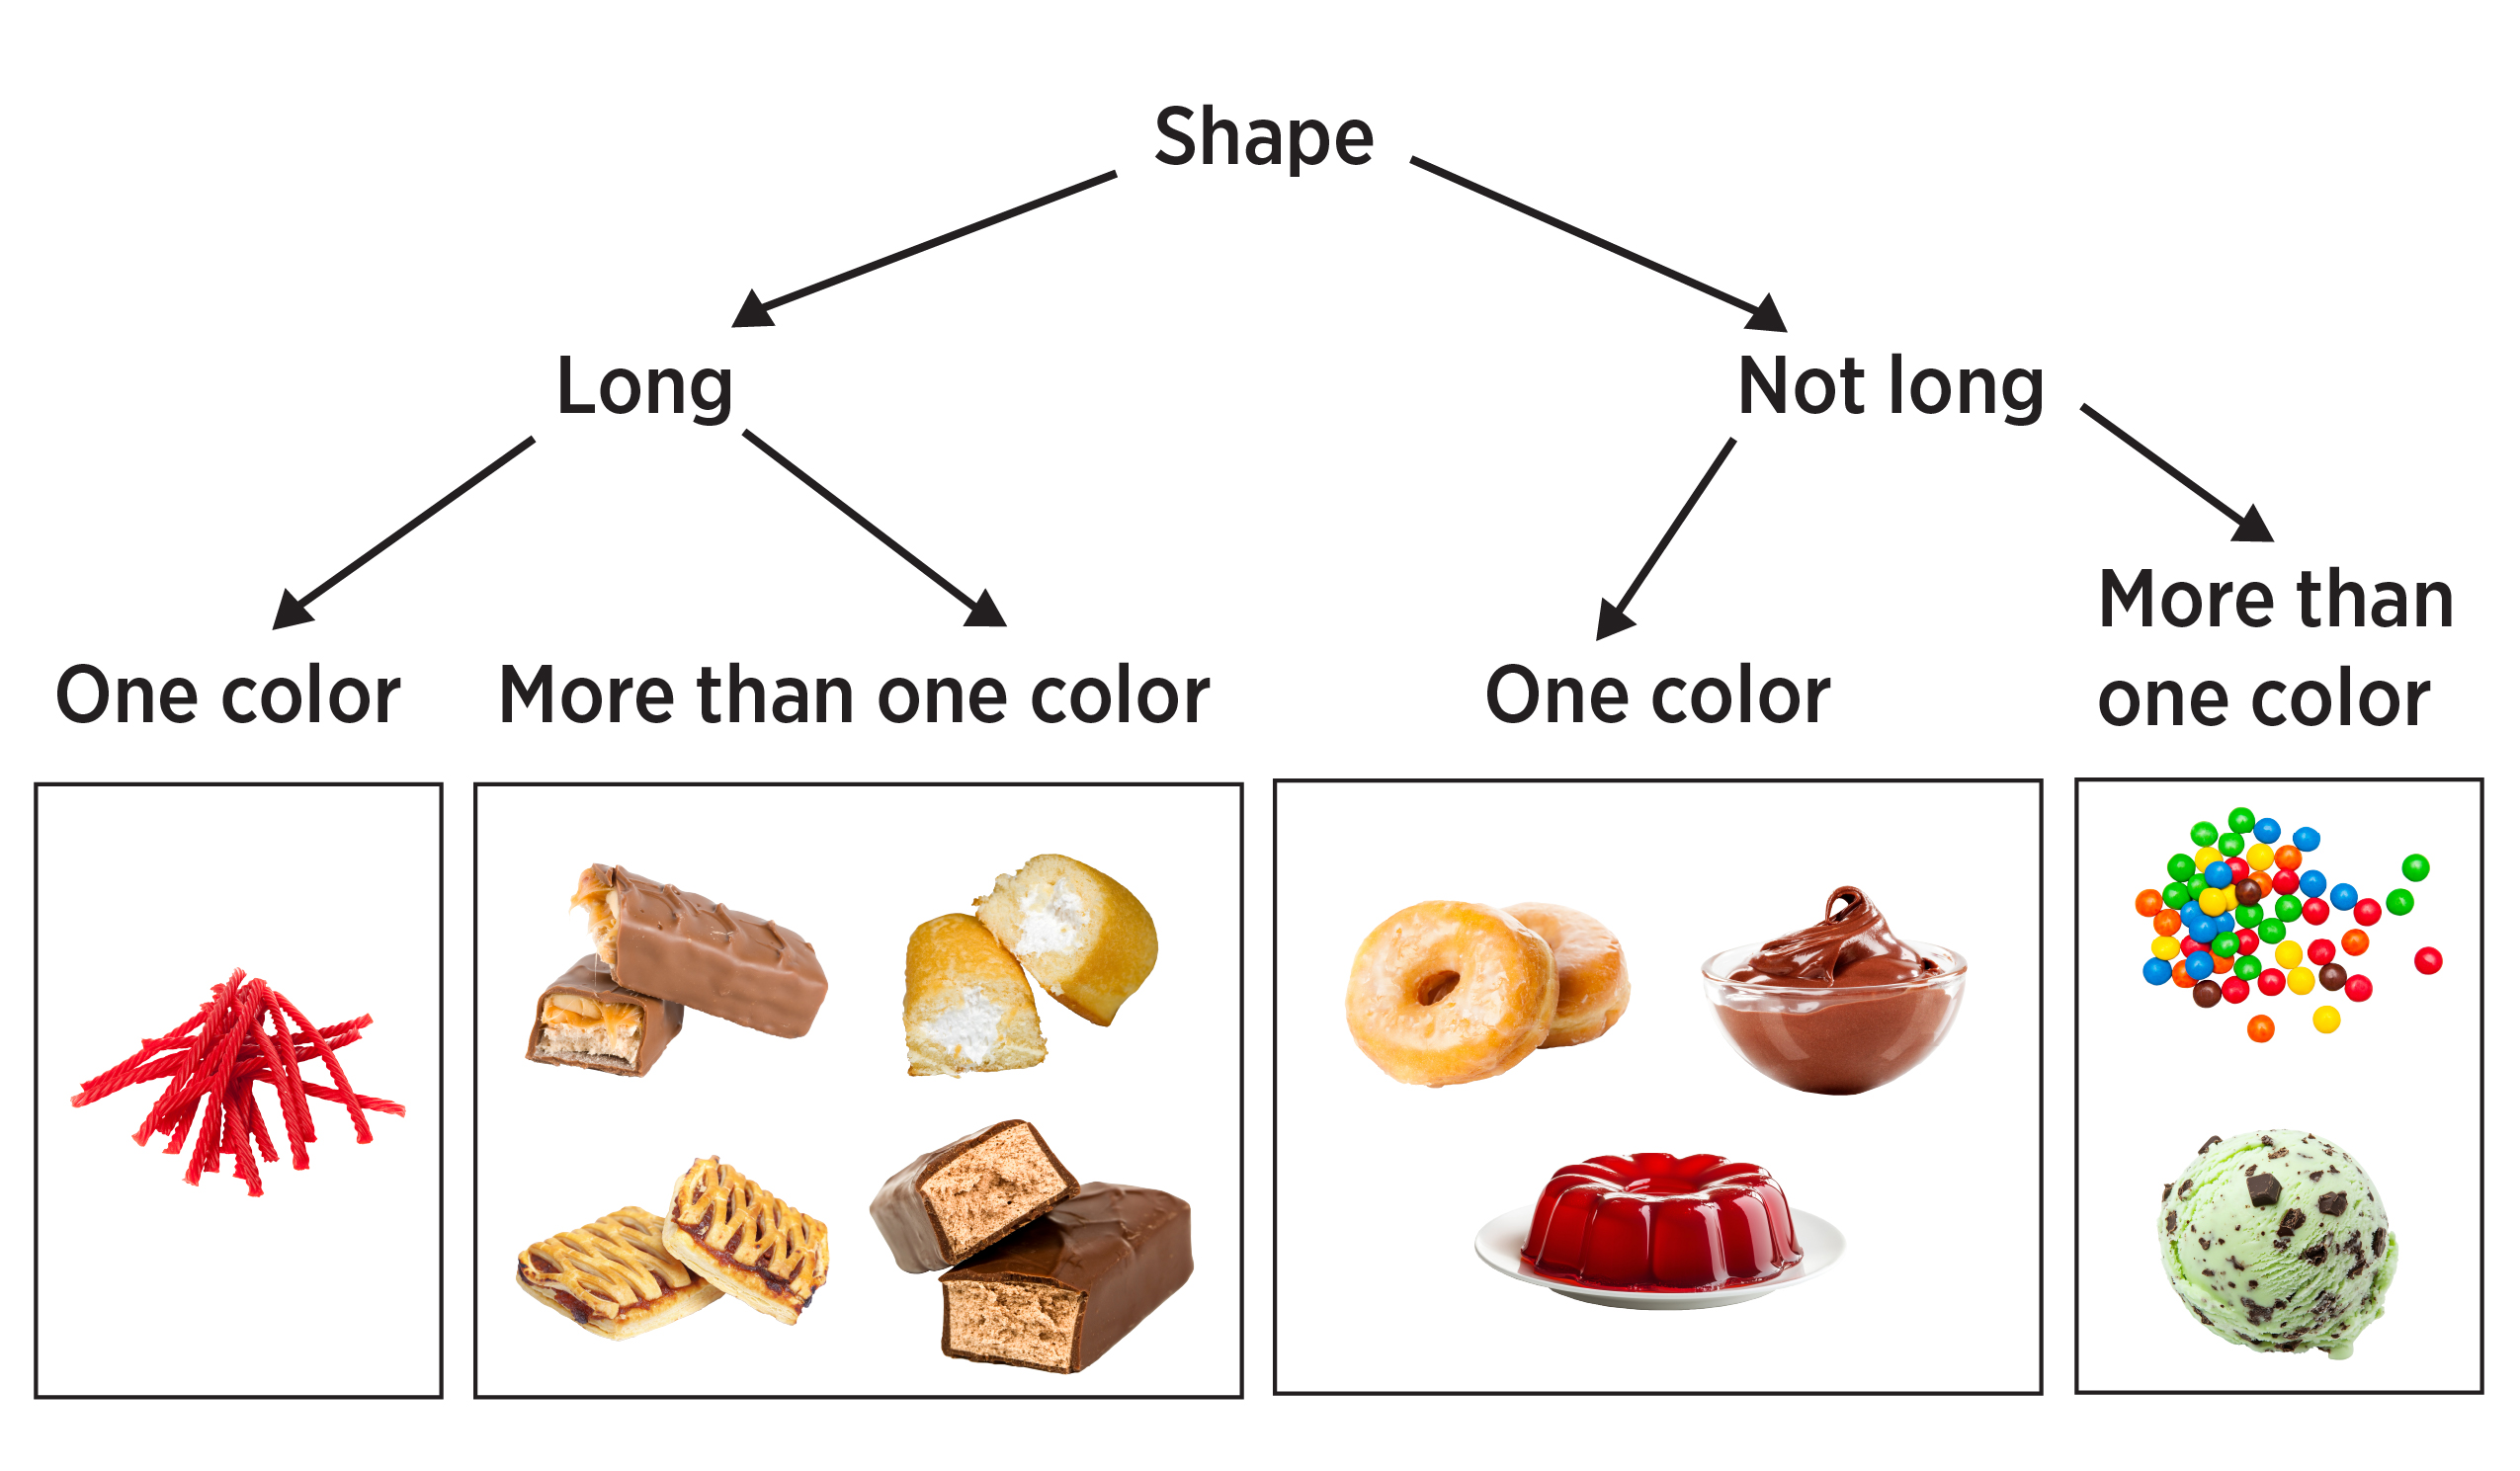
The long, one color category only has one species in it, so it doesn’t need to be divided any further. We still have to divide the others until we get down to one dessert in each group.
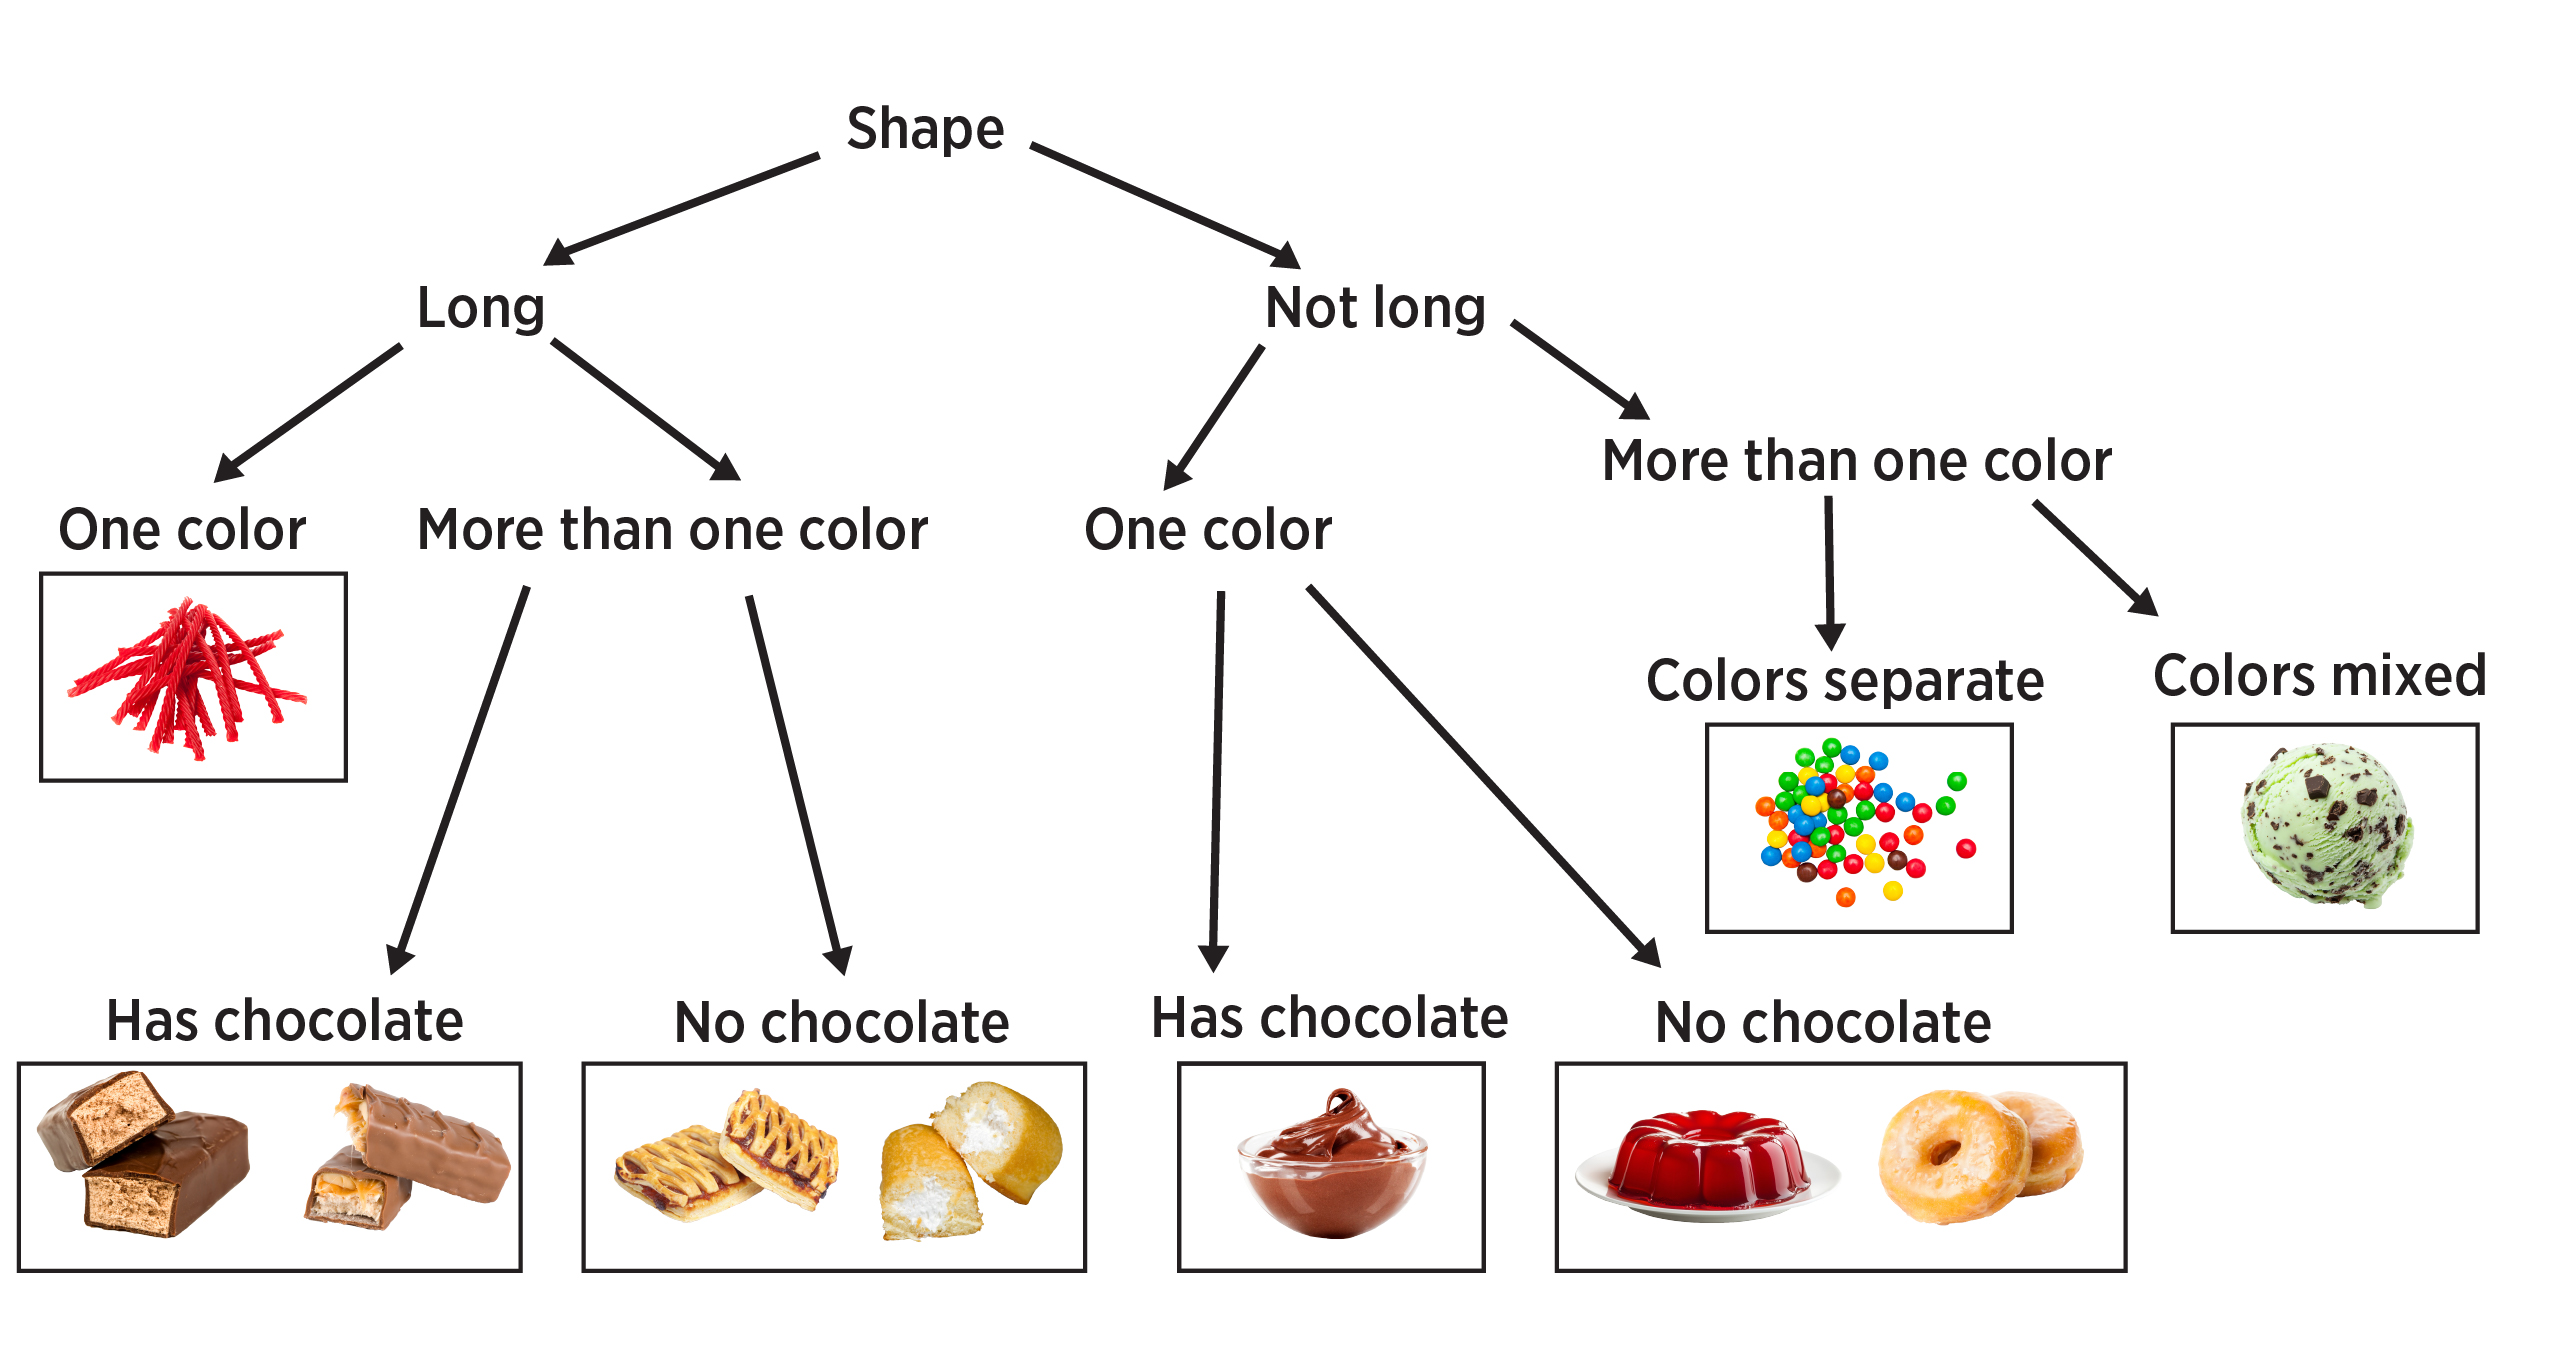
Keep dividing until only one species is in a category.
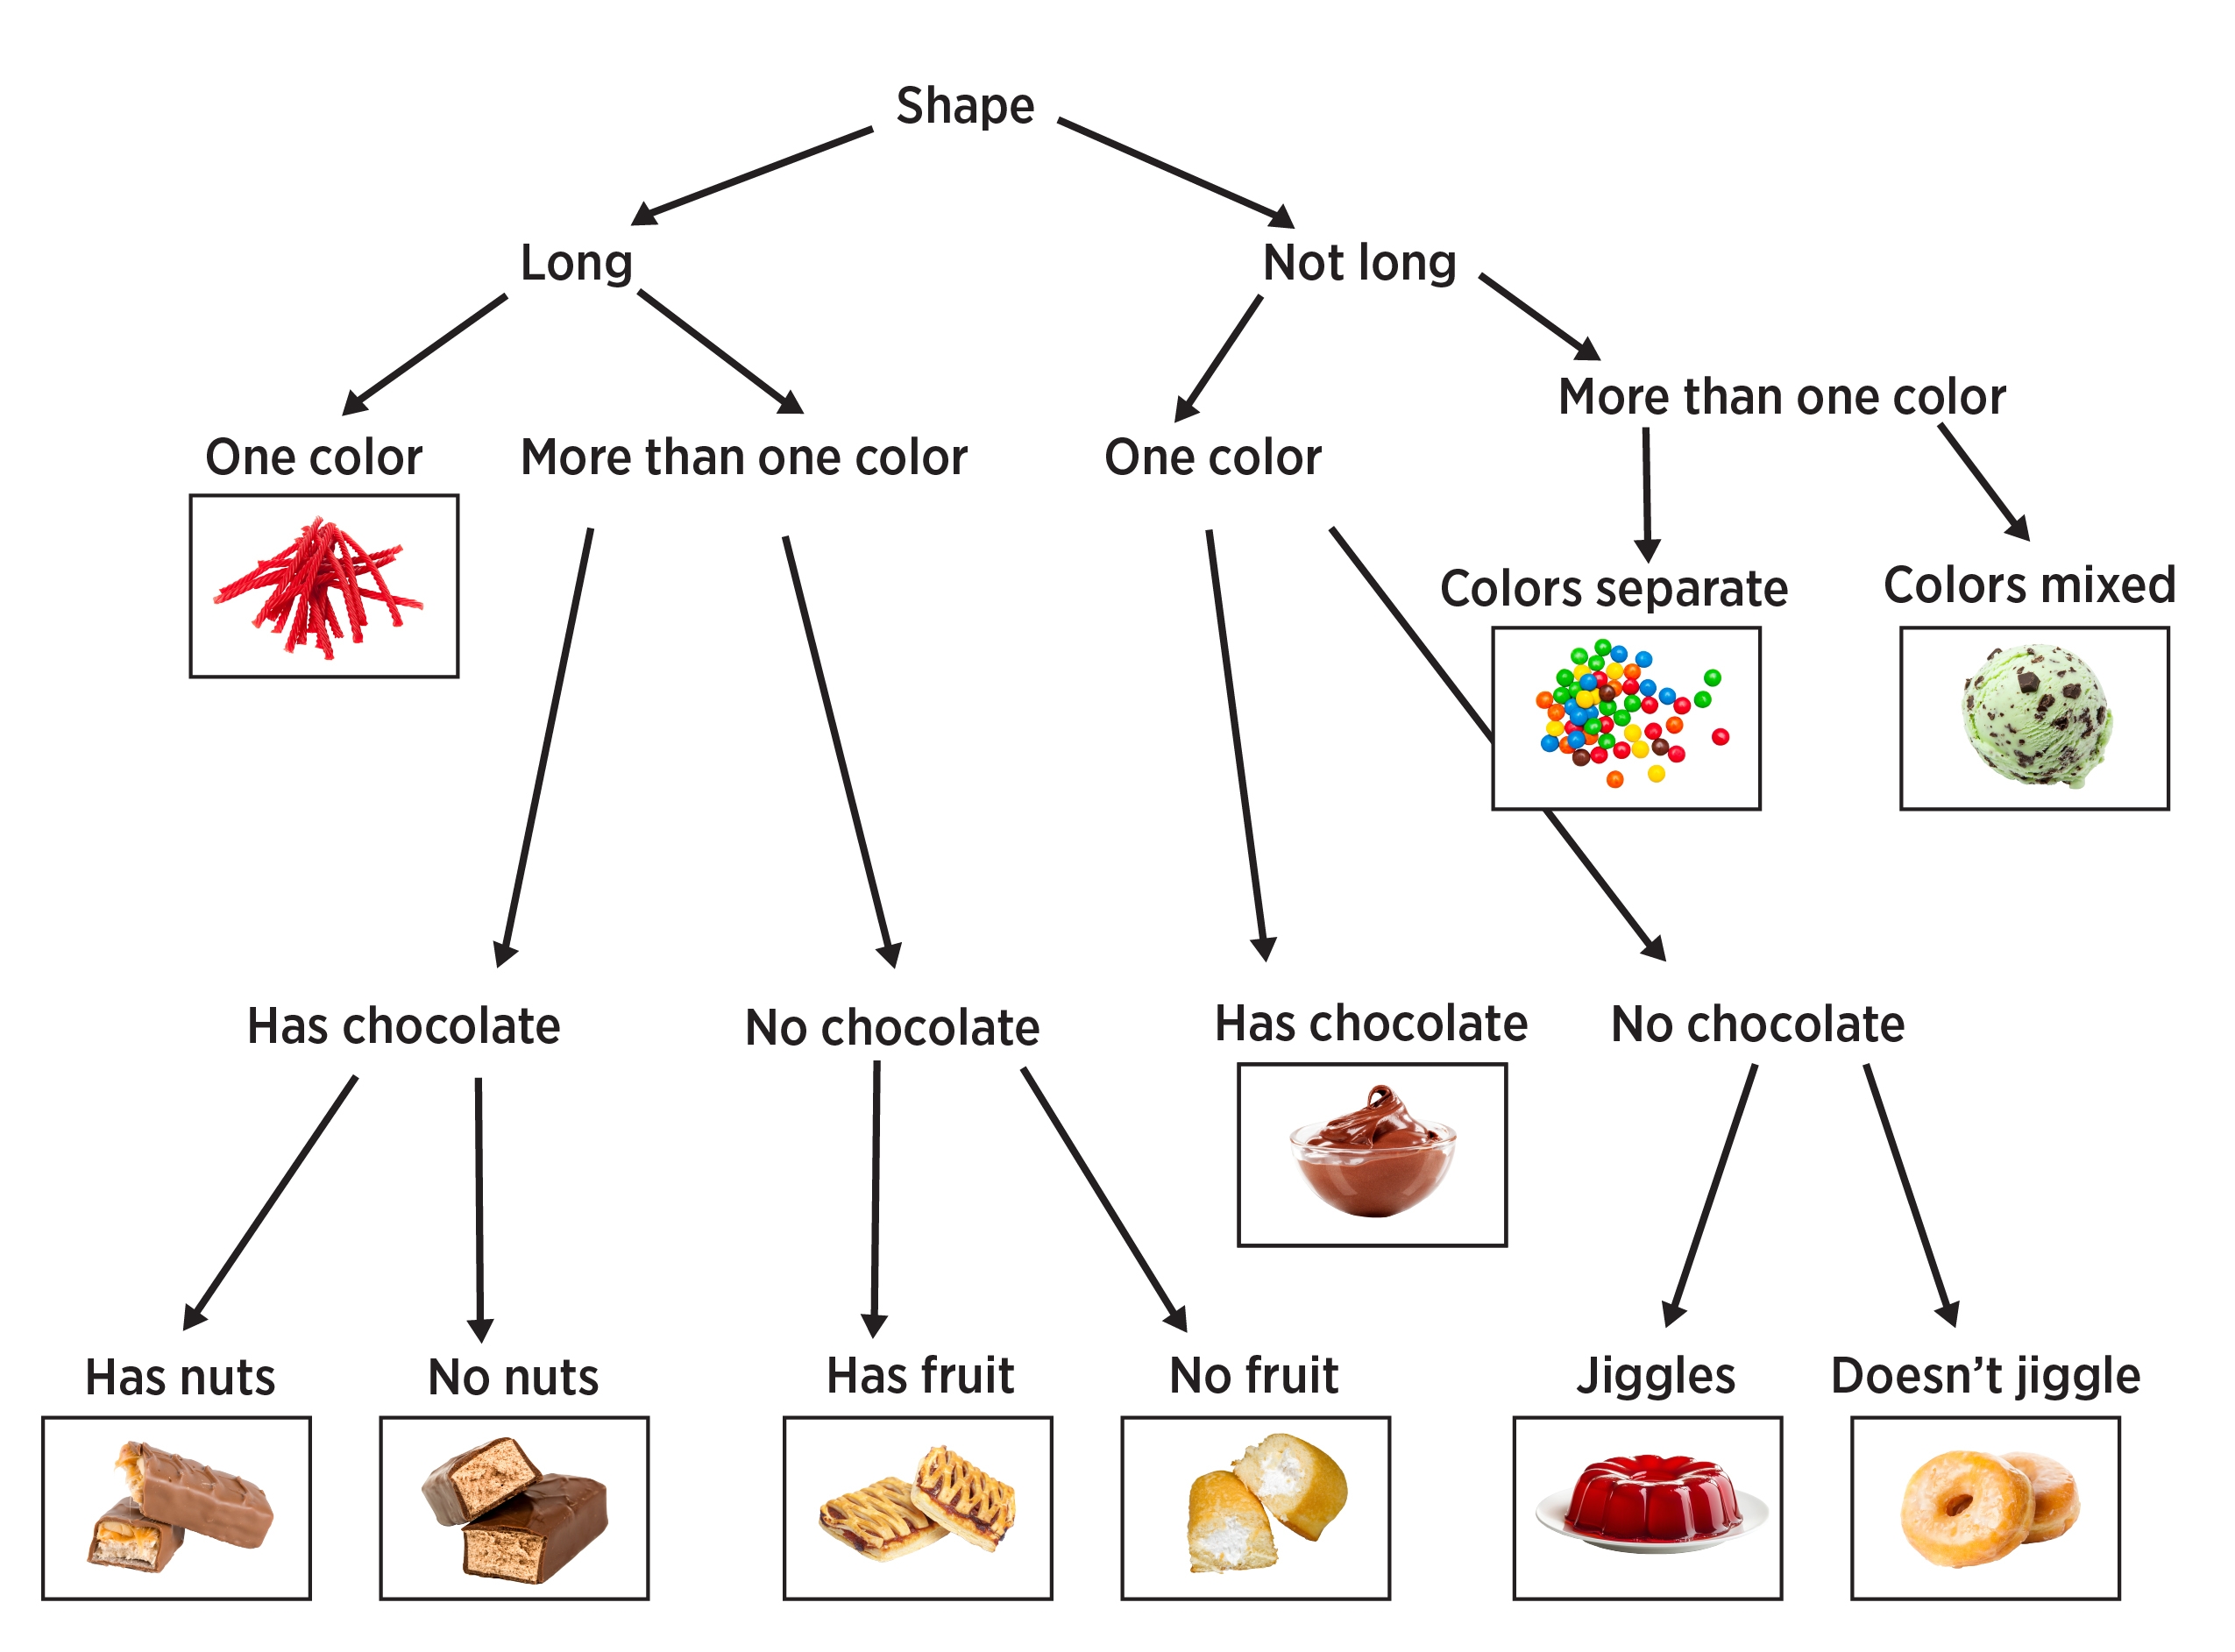
Now that there is only one species in each category, if someone asks what each organism is, we can look at the key and find out. Each of these species has a name, and so if someone hands us an organism that is not long, only has one color, has no chocolate and jiggles, it is Gelatinus rosus (red gelatin...I just made that name up!).
Wait! What if there is a newly discovered organism that is not in the key? We can modify the key to include new organisms.
Someone just discovered this dessert (see figure 52). Where does it belong? It is not long, has more than one color, the colors are mixed. There is already one species in that category. Now we have to divide that category. We could divide that category into fruit/no fruit or flat/ round or anything else that would differentiate it.
 Figure 52: New dessert to categorize.
Activity: Alien Classification
Supplies Needed:
- Sheet of aliens (found on pages 59 and 60)
- Tape or glue stick
- Scissors
- Crayons or markers
- Paper
Now you get to make a dichotomous key. You have a page full of aliens. They have different kinds of heads, bodies, eyes, etc. Take your aliens (you can color them if you want), cut them apart and make a key that divides each alien species into its own category, so that someone could find an alien and be able to tell where it fits in your key. Tape or glue them all down to a blank piece of paper and draw your categories and arrows. Is every species of alien in its own class? Draw a picture of one of your aliens and give it to someone else and see if they can answer the questions in the key and end up in the same place you put it. Did it work?
After you have taped them all down, turn to the next page in this book (don’t look until you have finished this activity.). We just discovered four new aliens! They need to be placed in your key. Where can you put them? Make a space for them in your key.
Services Provided by Turfgrass
Most turfgrasses today are used for lawns and sports fields, as they can tolerate continuous mowing or grazing. People have been selectively breeding turfgrasses for hundreds of years, to create turf with desired characteristics for different uses. Turfgrass is the grass that covers lawns, parks and sports fields, but beyond that, it provides benefits for our environment.
Clean Air
Turfgrass absorbs carbon dioxide (CO₂) from the air during photosynthesis. This process helps lower the amount of CO₂, a green-house gas, in the atmosphere. As the grass absorbs CO₂ it releases oxygen (O₂) back into the air, which we need to breathe. A healthy lawn can produce enough oxygen for a family of four.
The dense growth of turfgrass traps dust and other particulate matter (ash, pollen, etc.) from the air. The roots also keep soil in place by preventing dust from being blown into the air. This helps reduce the amount of dust that can cause respiratory problems.
Activity: Photosynthesis Observation
Supplies Needed:
- Paper hole punch
- Large syringe without needle
- Fresh wide grass blades (or leaves from other plants)
- Spoon
- Baking soda
- Water
- Dish soap
- Clear container
- Lamp or bright window
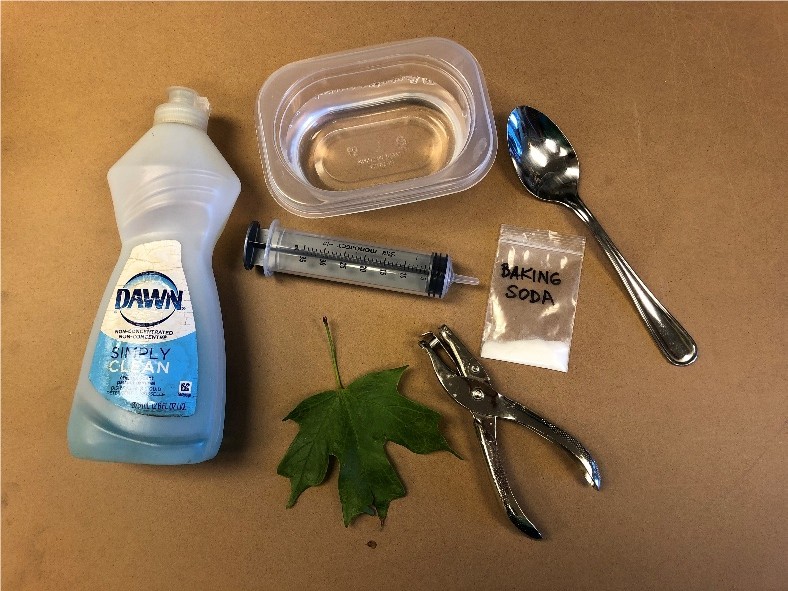 Figure 53: Supplies needed.
In this activity we will see the release of gas (mainly oxygen) during photosynthesis. Photosynthesis is the process that plants use to make their own food in the form of sugar. Carbon dioxide and water combine in the presence of light to produce sugar, oxygen and water. The carbon dioxide and oxygen get into and out of the plant via pores called stomata.
Before gas exits a leaf through stomata, it's inside the leaf and will help keep it floating in water (the large surface area of a leaf compared to its light weight also helps it float). If we could replace the air inside a leaf with water, the leaf would sink. Just holding a leaf under water does not fill the air space inside. Leaves have a waxy coating on them, called the cuticle, that prevents water from getting inside. In order to get water inside a leaf, we will have to remove this waxy coating. Then water will go inside the leaf.
Find some fresh blades of grass to use for this experiment. Get a leaf that is smooth and not very thick. Use a hole punch to cut out circles from the leaf. Avoid cutting through any big veins in the leaf. Fill your clear cup or container about 2 full of water and add the baking soda. Add a couple of drops of dish soap. Use the spoon to gently stir the water, baking soda and dish soap. You do not want suds to form.
Pull your syringe apart. Place your leaf disks into the syringe, reassemble the syringe and push the air out until there is not much space left in the syringe. Do not push far enough to smash the leaf disks. We are now going to pull the baking soda and soap solution into the syringe. Fill the syringe about 1 to ½ full. Hold the syringe upright and push the plunger so that there are no pockets of air in the syringe. The leaf disks will float at the top of the solution. They still have air inside.
The soap in the solution is going to remove the waxy cuticle of the leaf disks and allow water to get into the leaf. To get all the air out of the leaf disks, we need to suck the remaining air out of the leaves. To do that, place a finger over the opening of the syringe and pull back the plunger for about 10 seconds. You may have to do this several times. While you're creating a vacuum seal in the plunger, swirl the disks around.
The leaf disks should start dropping to the bottom of the syringe as they fill with water instead of air. If they aren’t sinking, you can add a little more soap and try again. When no disks are floating, pop open the syringe and dump the contents into your container of water/baking soda/dish soap. The disks will all sink to the bottom of the container because there is no air inside them anymore. Place the container with the leaf disks in front of a bright window or under a lamp. With the presence of light, the leaves will continue photosynthesis. Under water, the leaves will use baking soda (NaHCO3) instead of carbon dioxide to get the carbon they need for photosynthesis.
As the leaf disks perform photosynthesis, they will release oxygen, which pushes the water out of the spaces in the leaves. After the water is removed and the leaf disks are filled with oxygen again, the leaf disks will start floating. You will see them stand up and float to the top of the water. They will not all do it at the same time. When they have all risen to the top, put the container in a dark room or a closet and they will eventually sink again.
You can time how long it takes for the disks to float to the surface. Try a different kind of leaf and see if the float time gets longer or shorter. Have a race with someone else to see who can get their disks to float first!
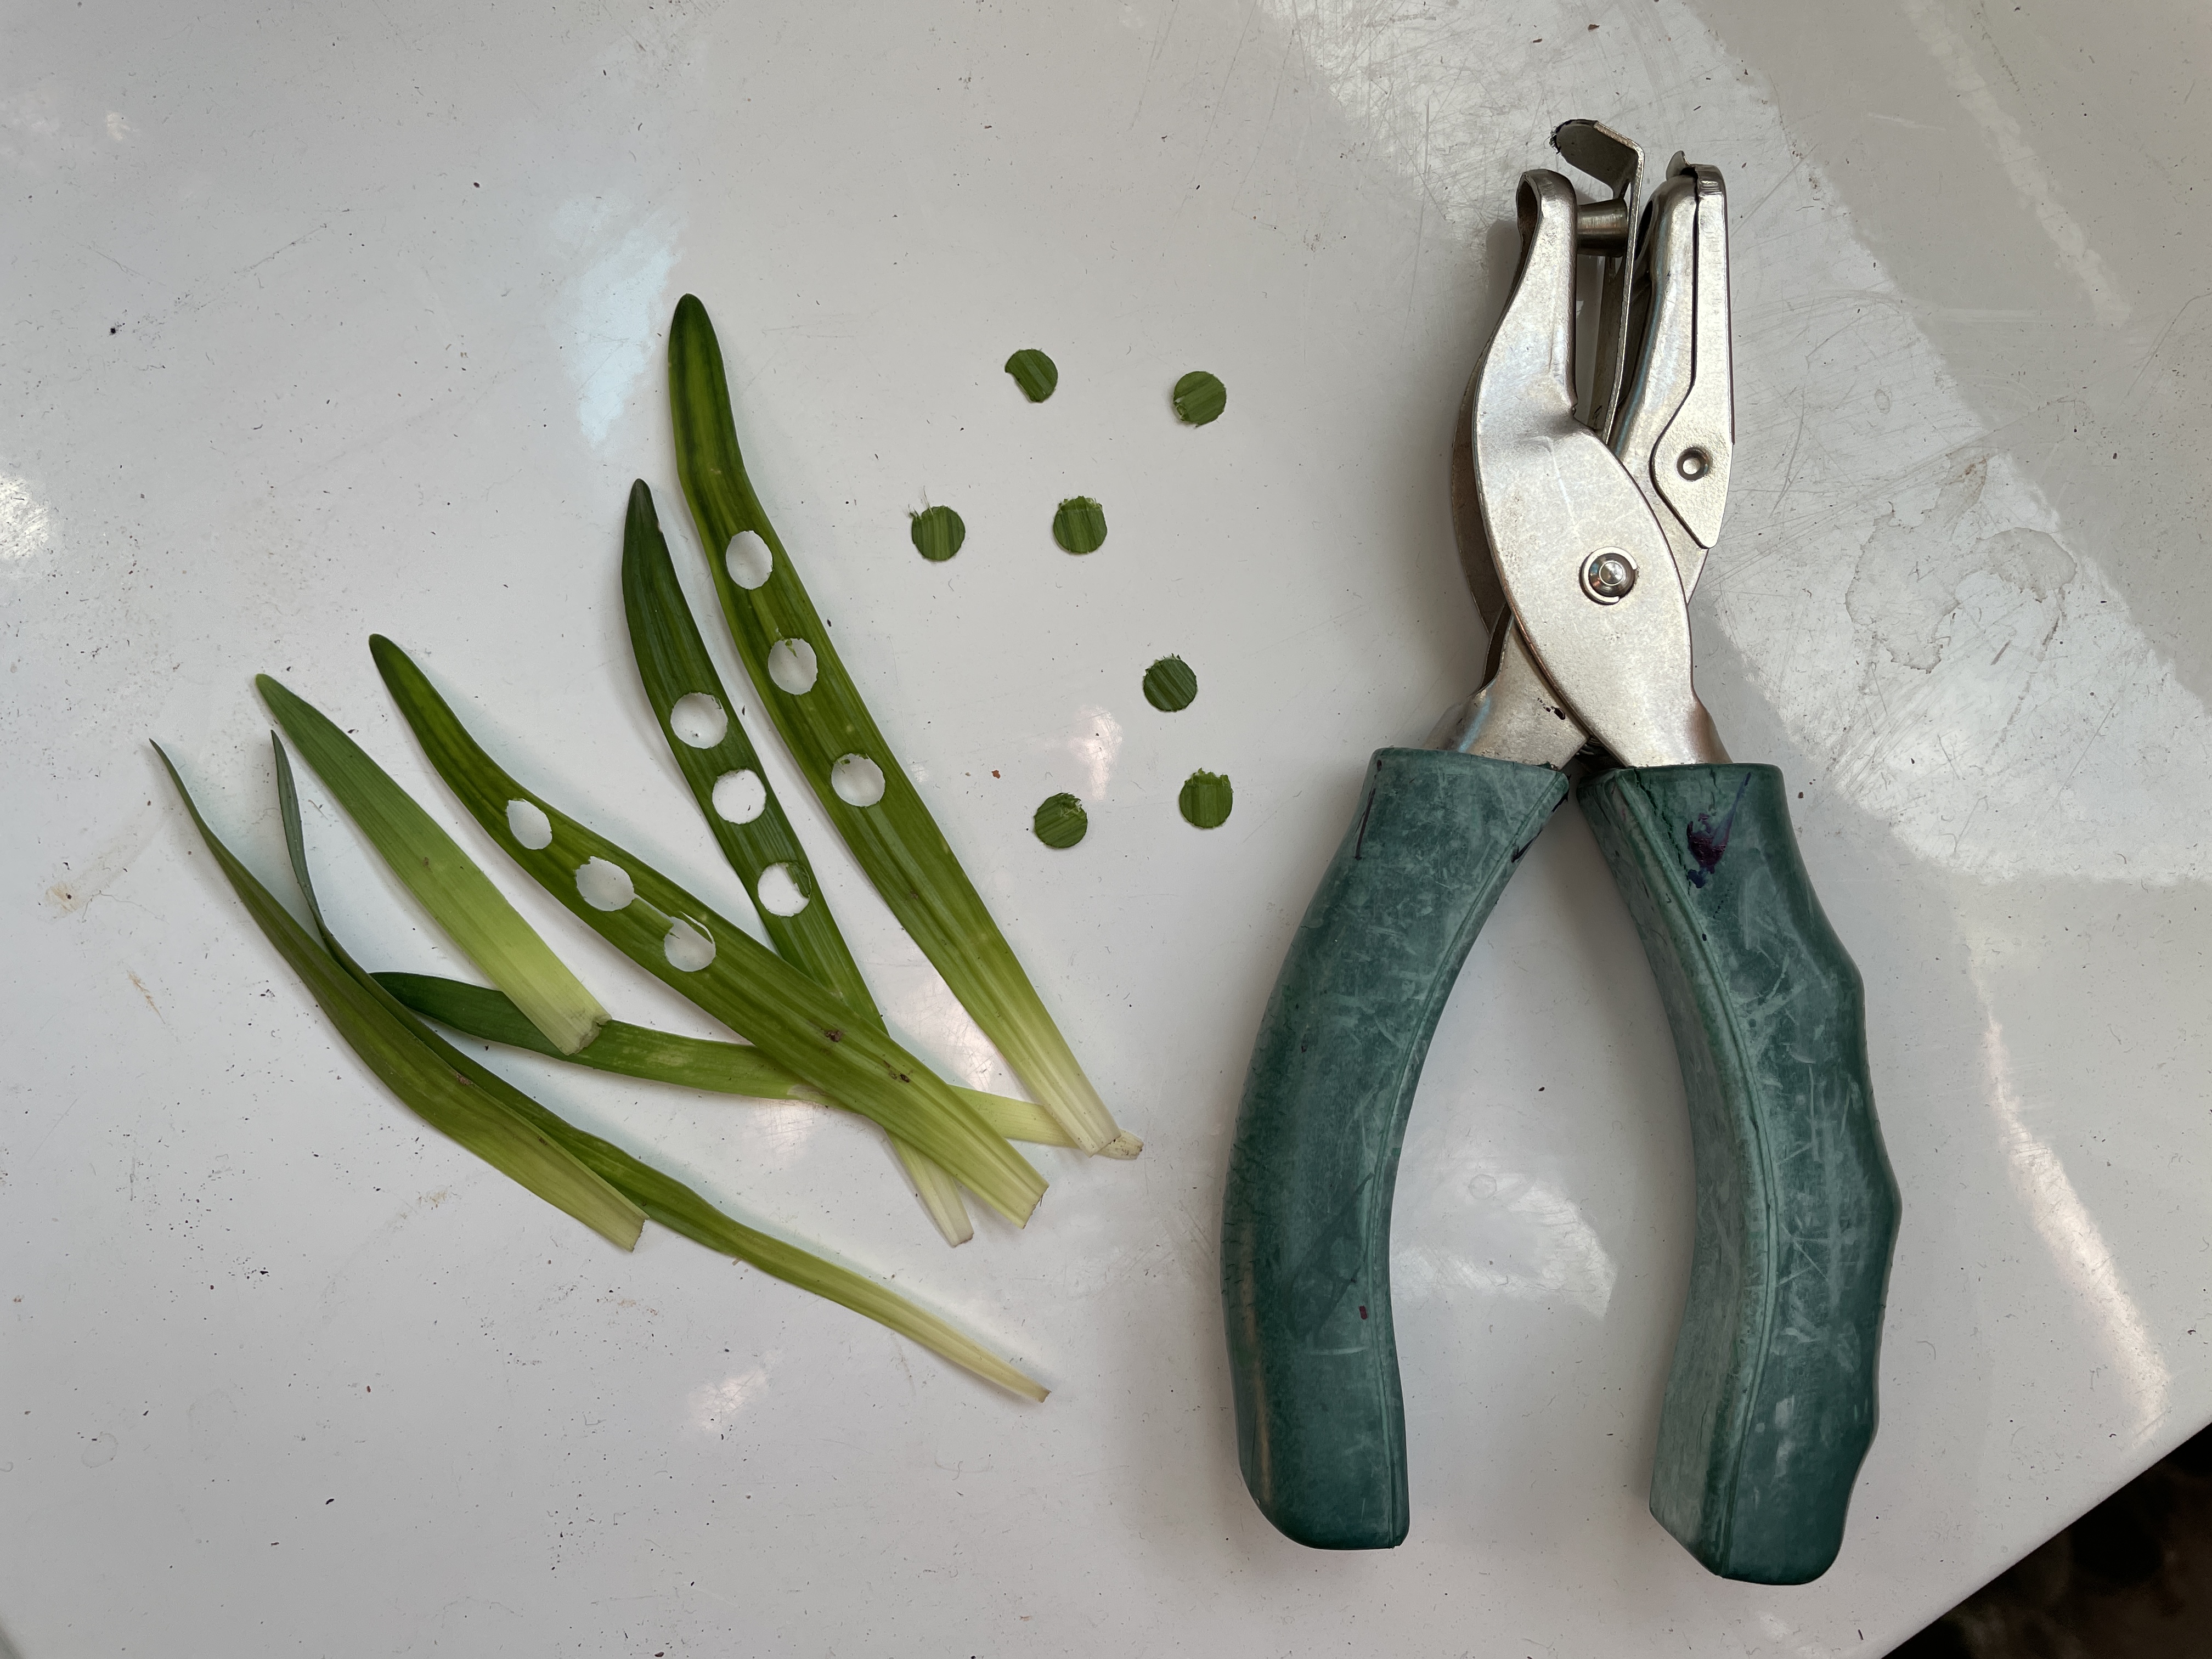 Figure 54: Hole punched leaves.
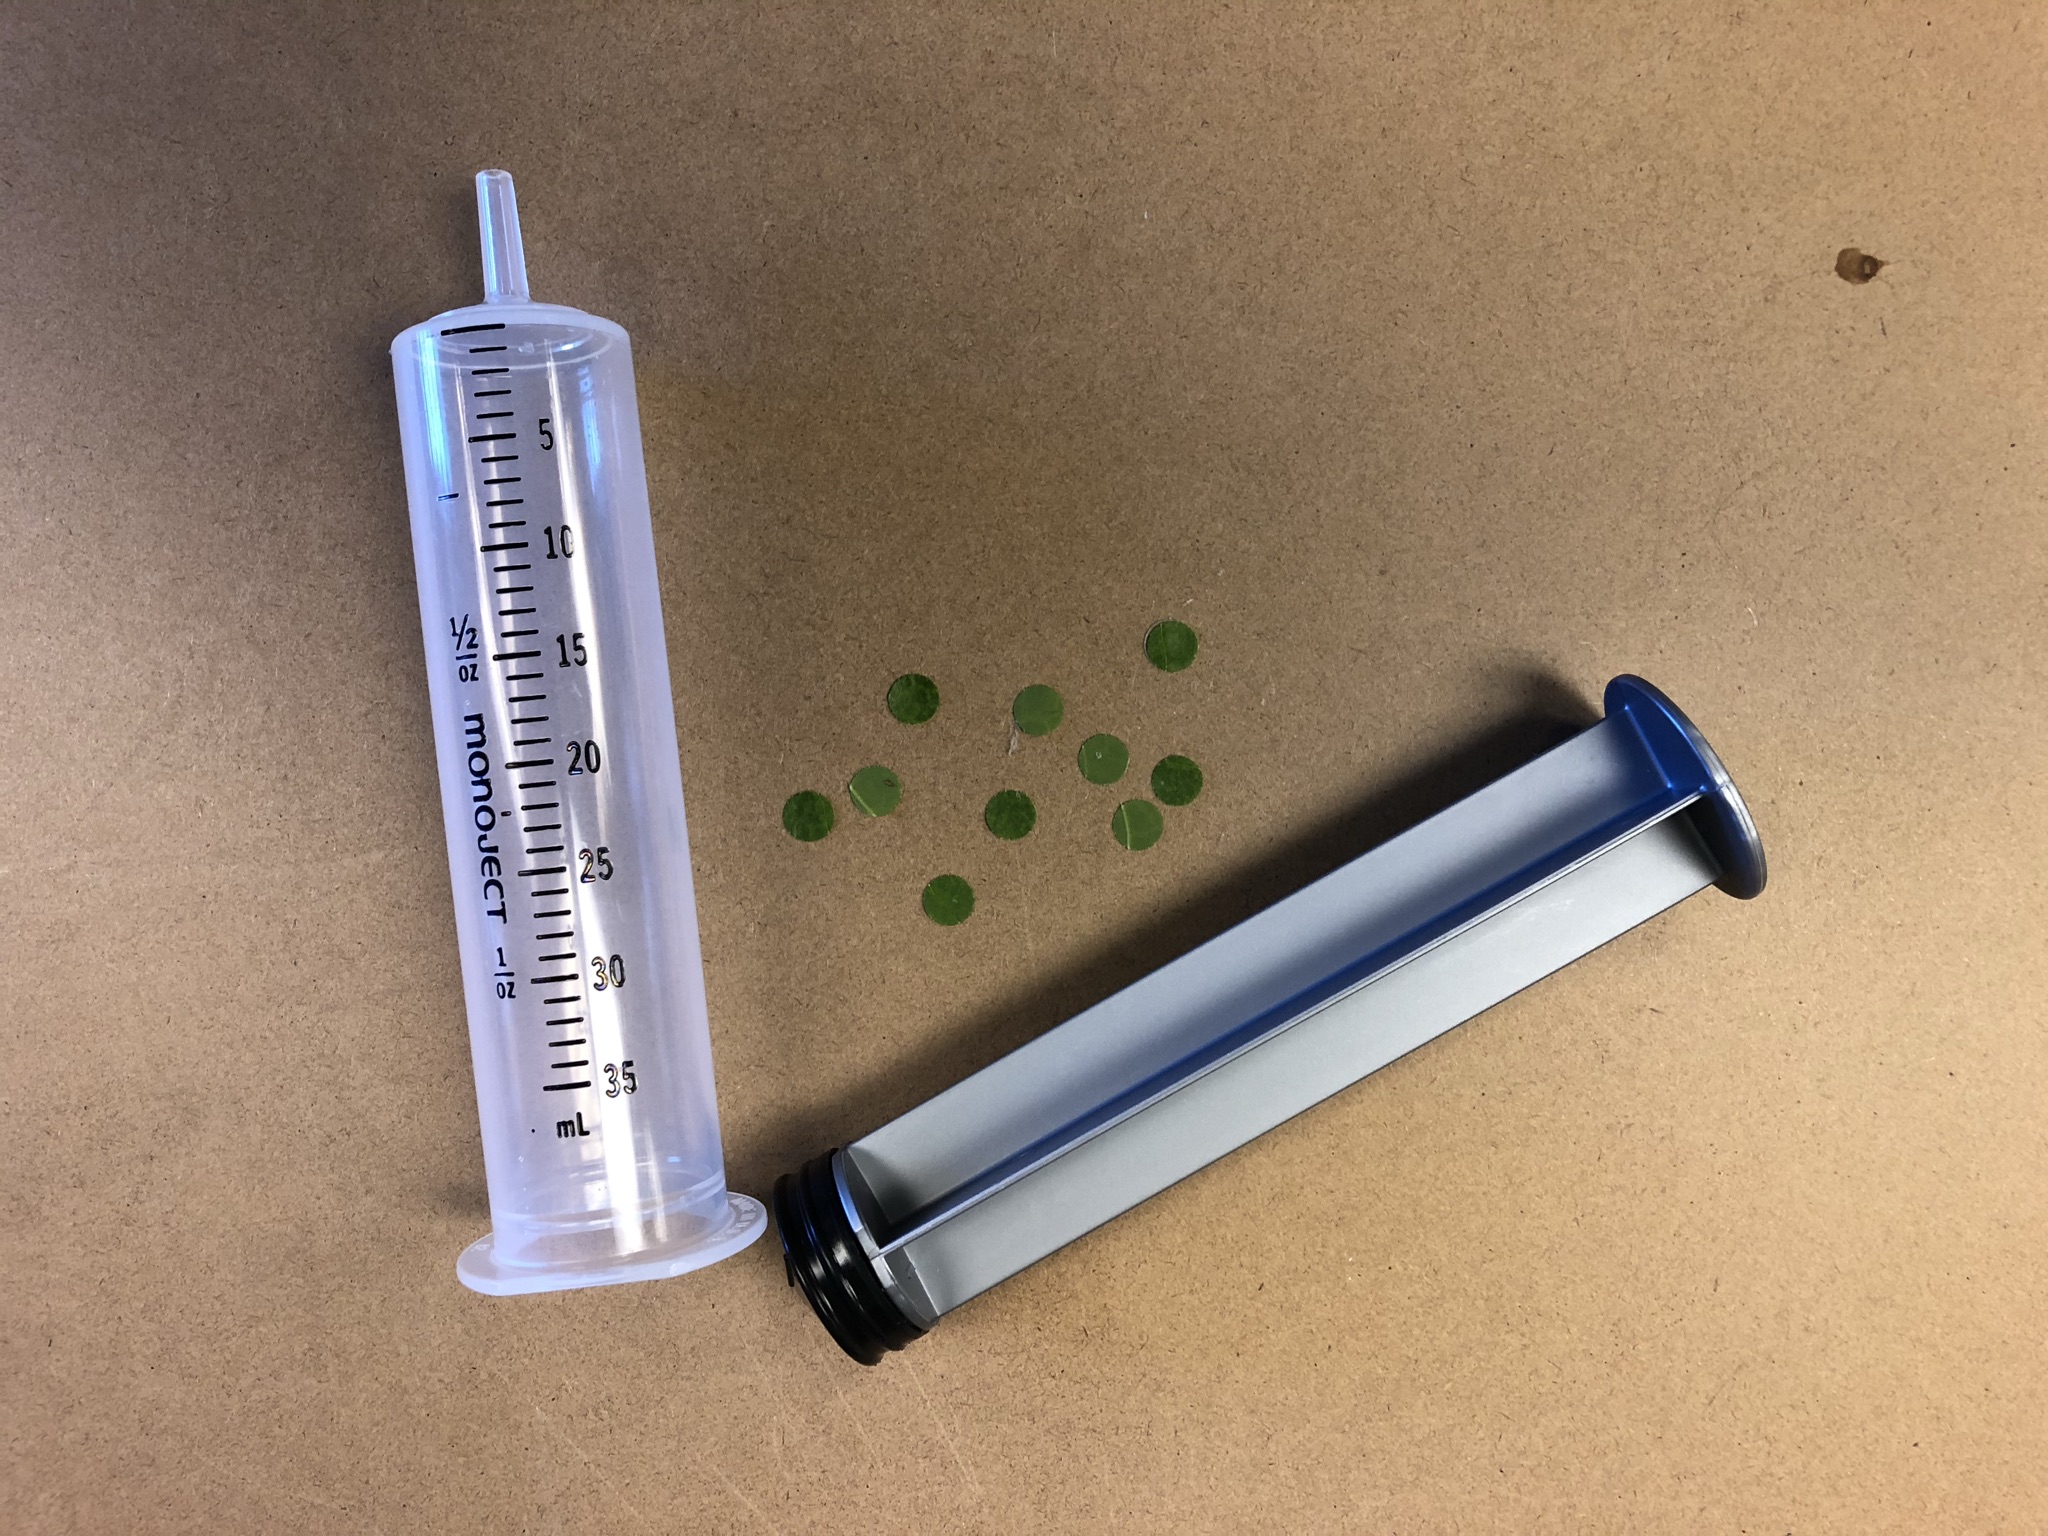 Figure 55: Syringe disassembled.
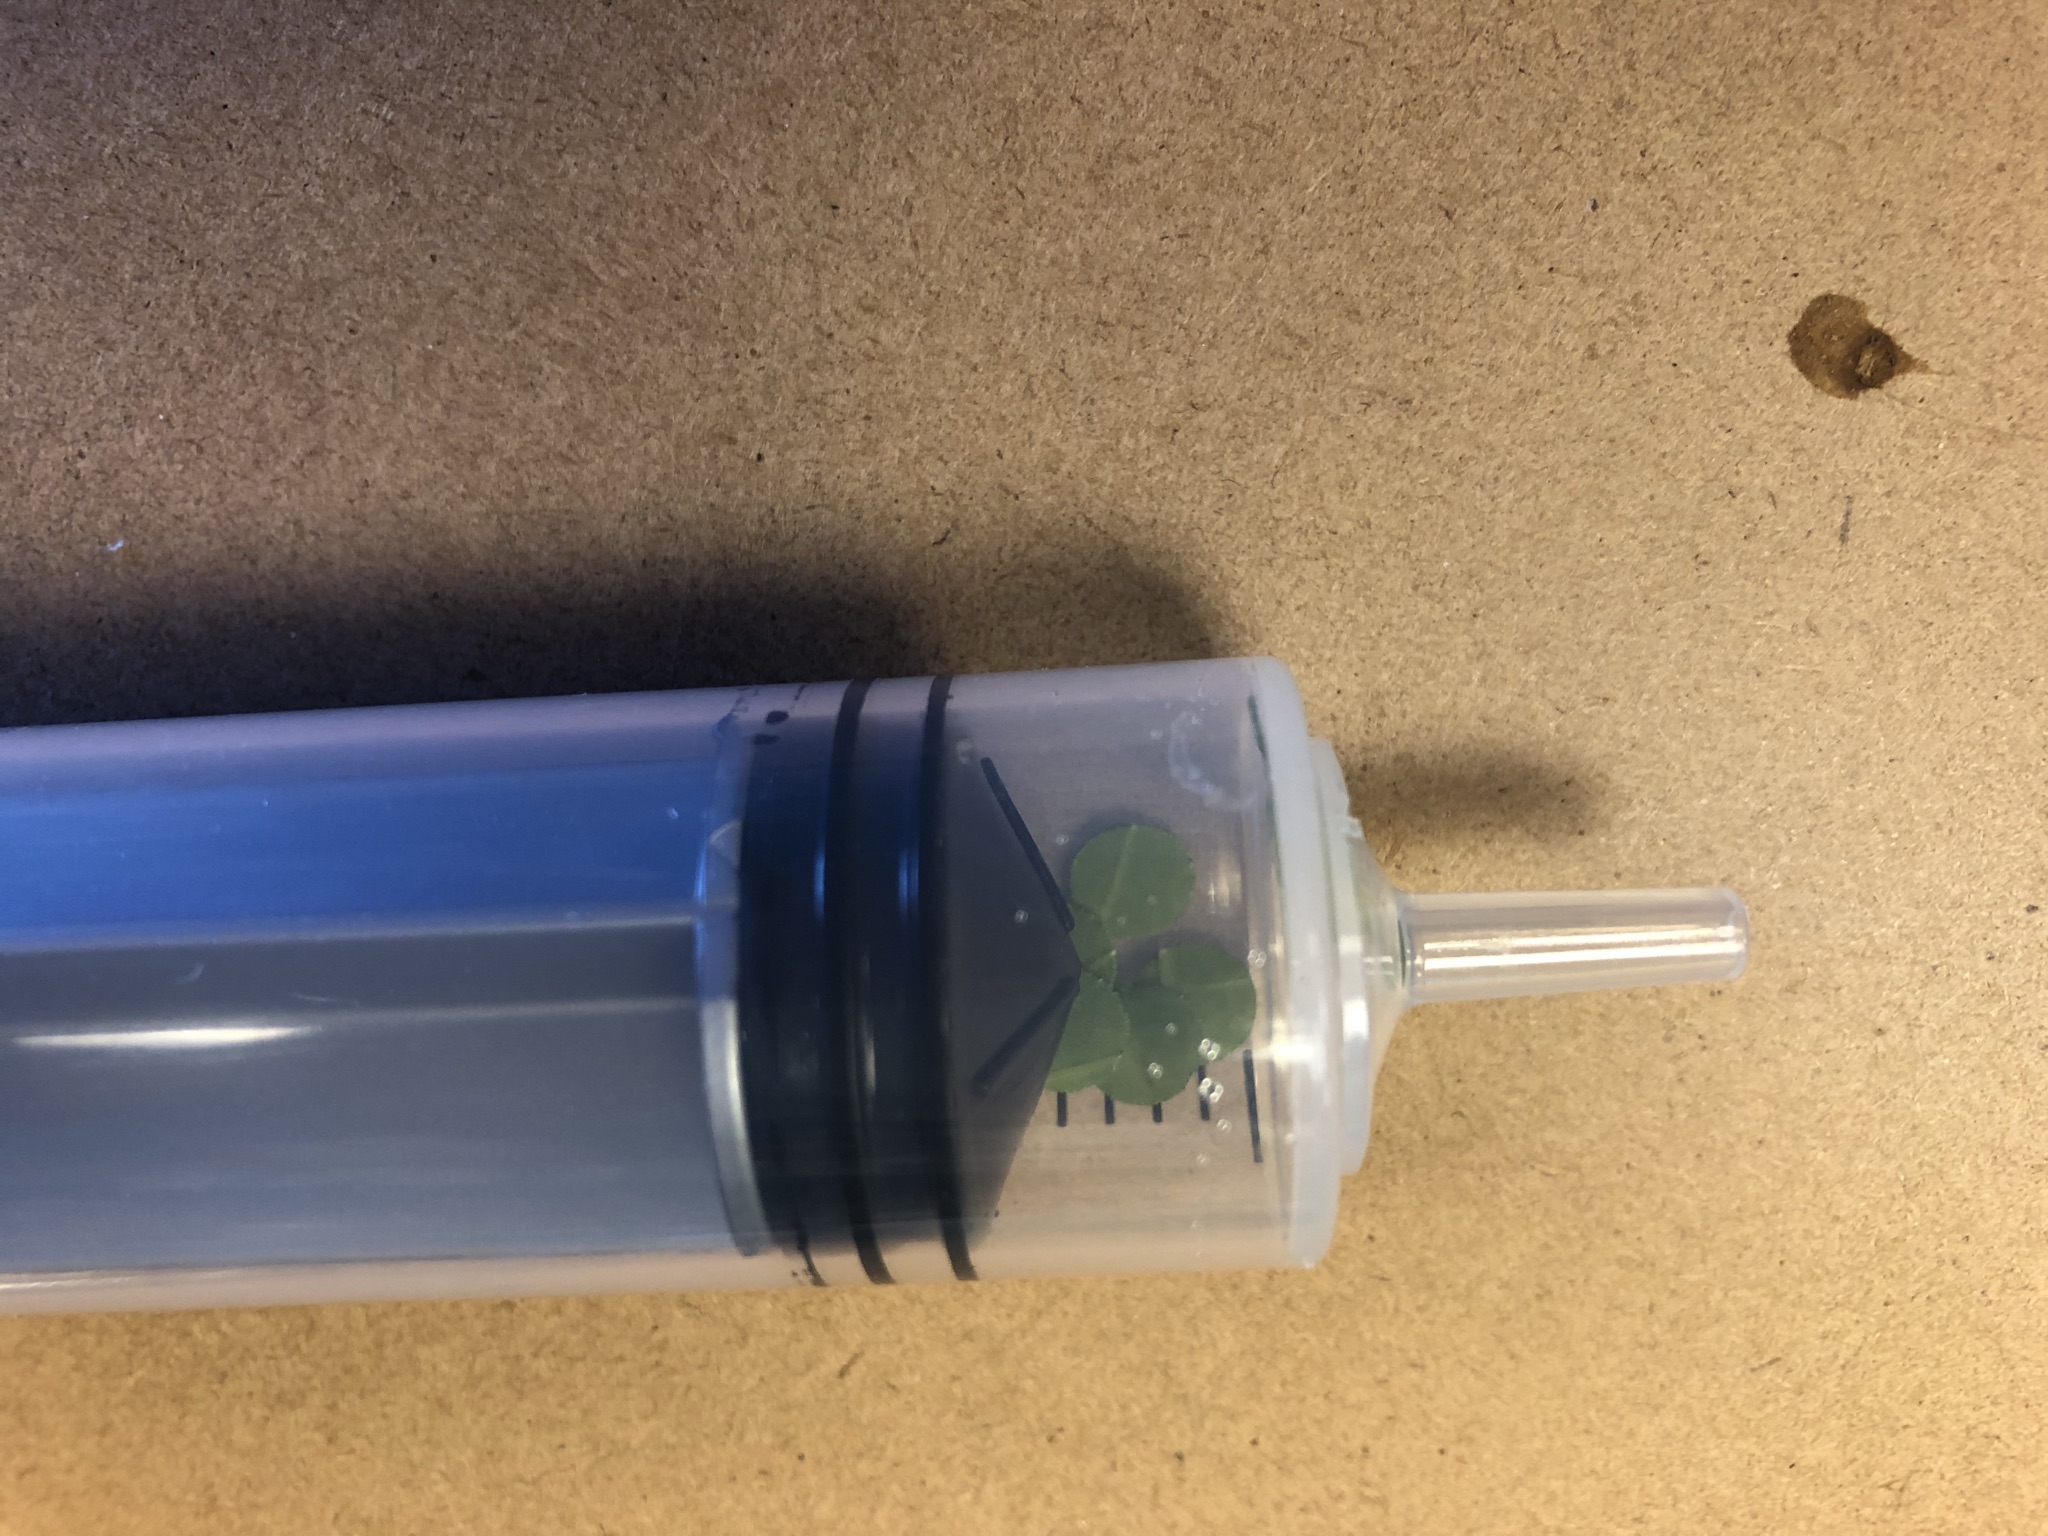 Figure 56: Leaves in the syringe.
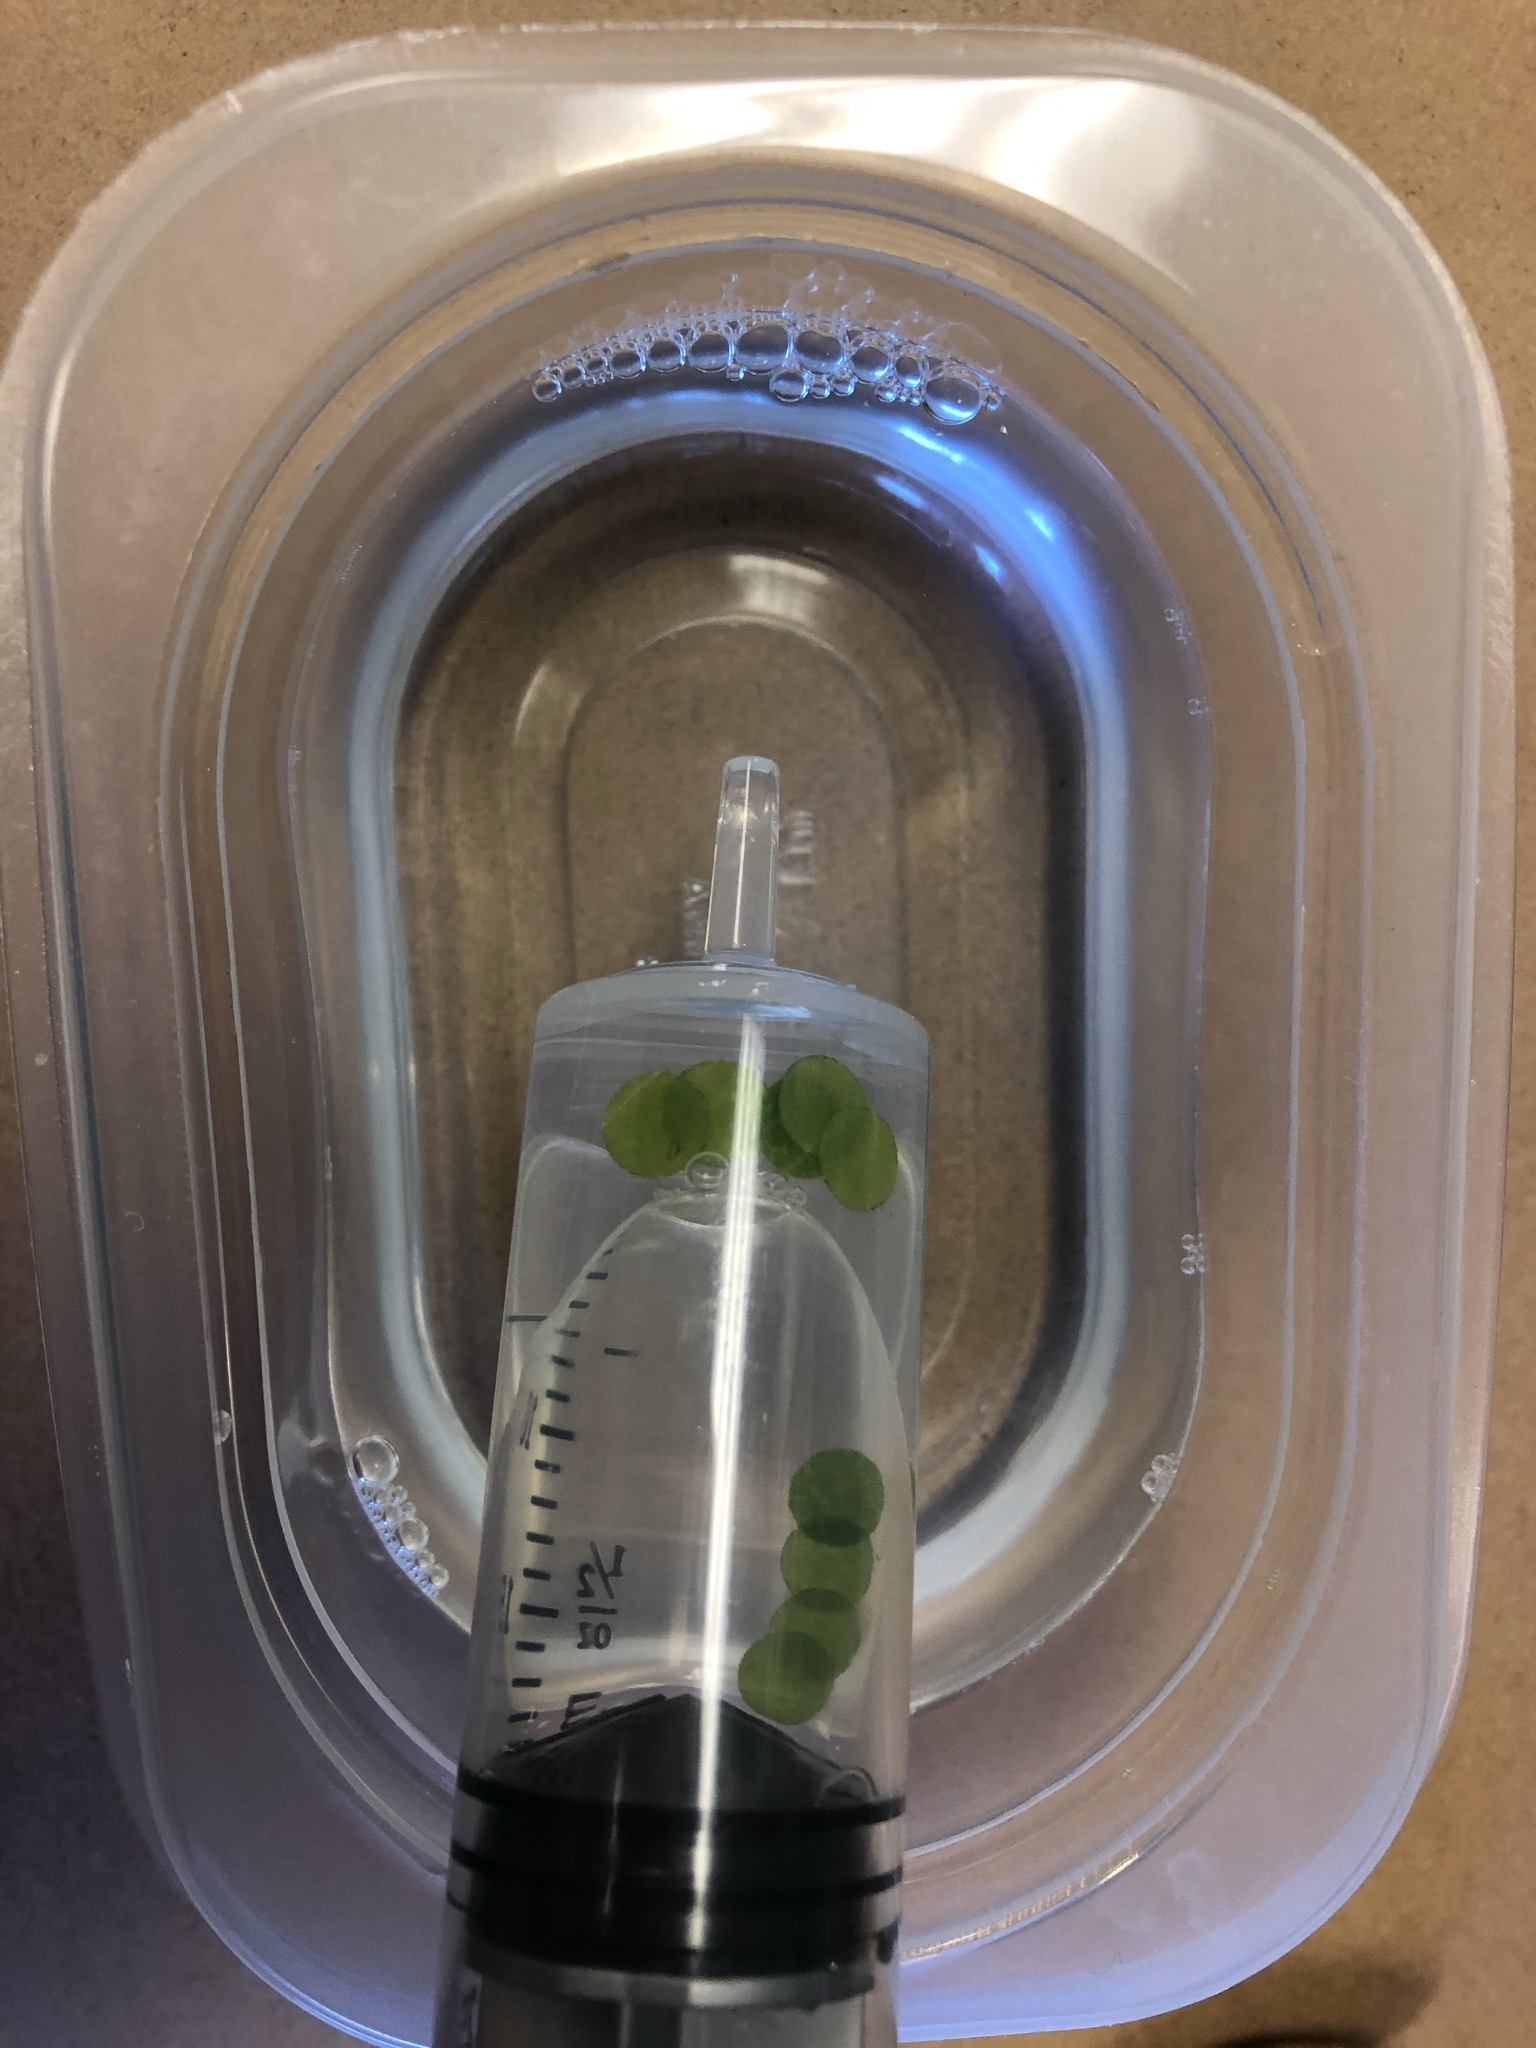 Figure 57: Pulling the baking soda and soap solution into the syringe.
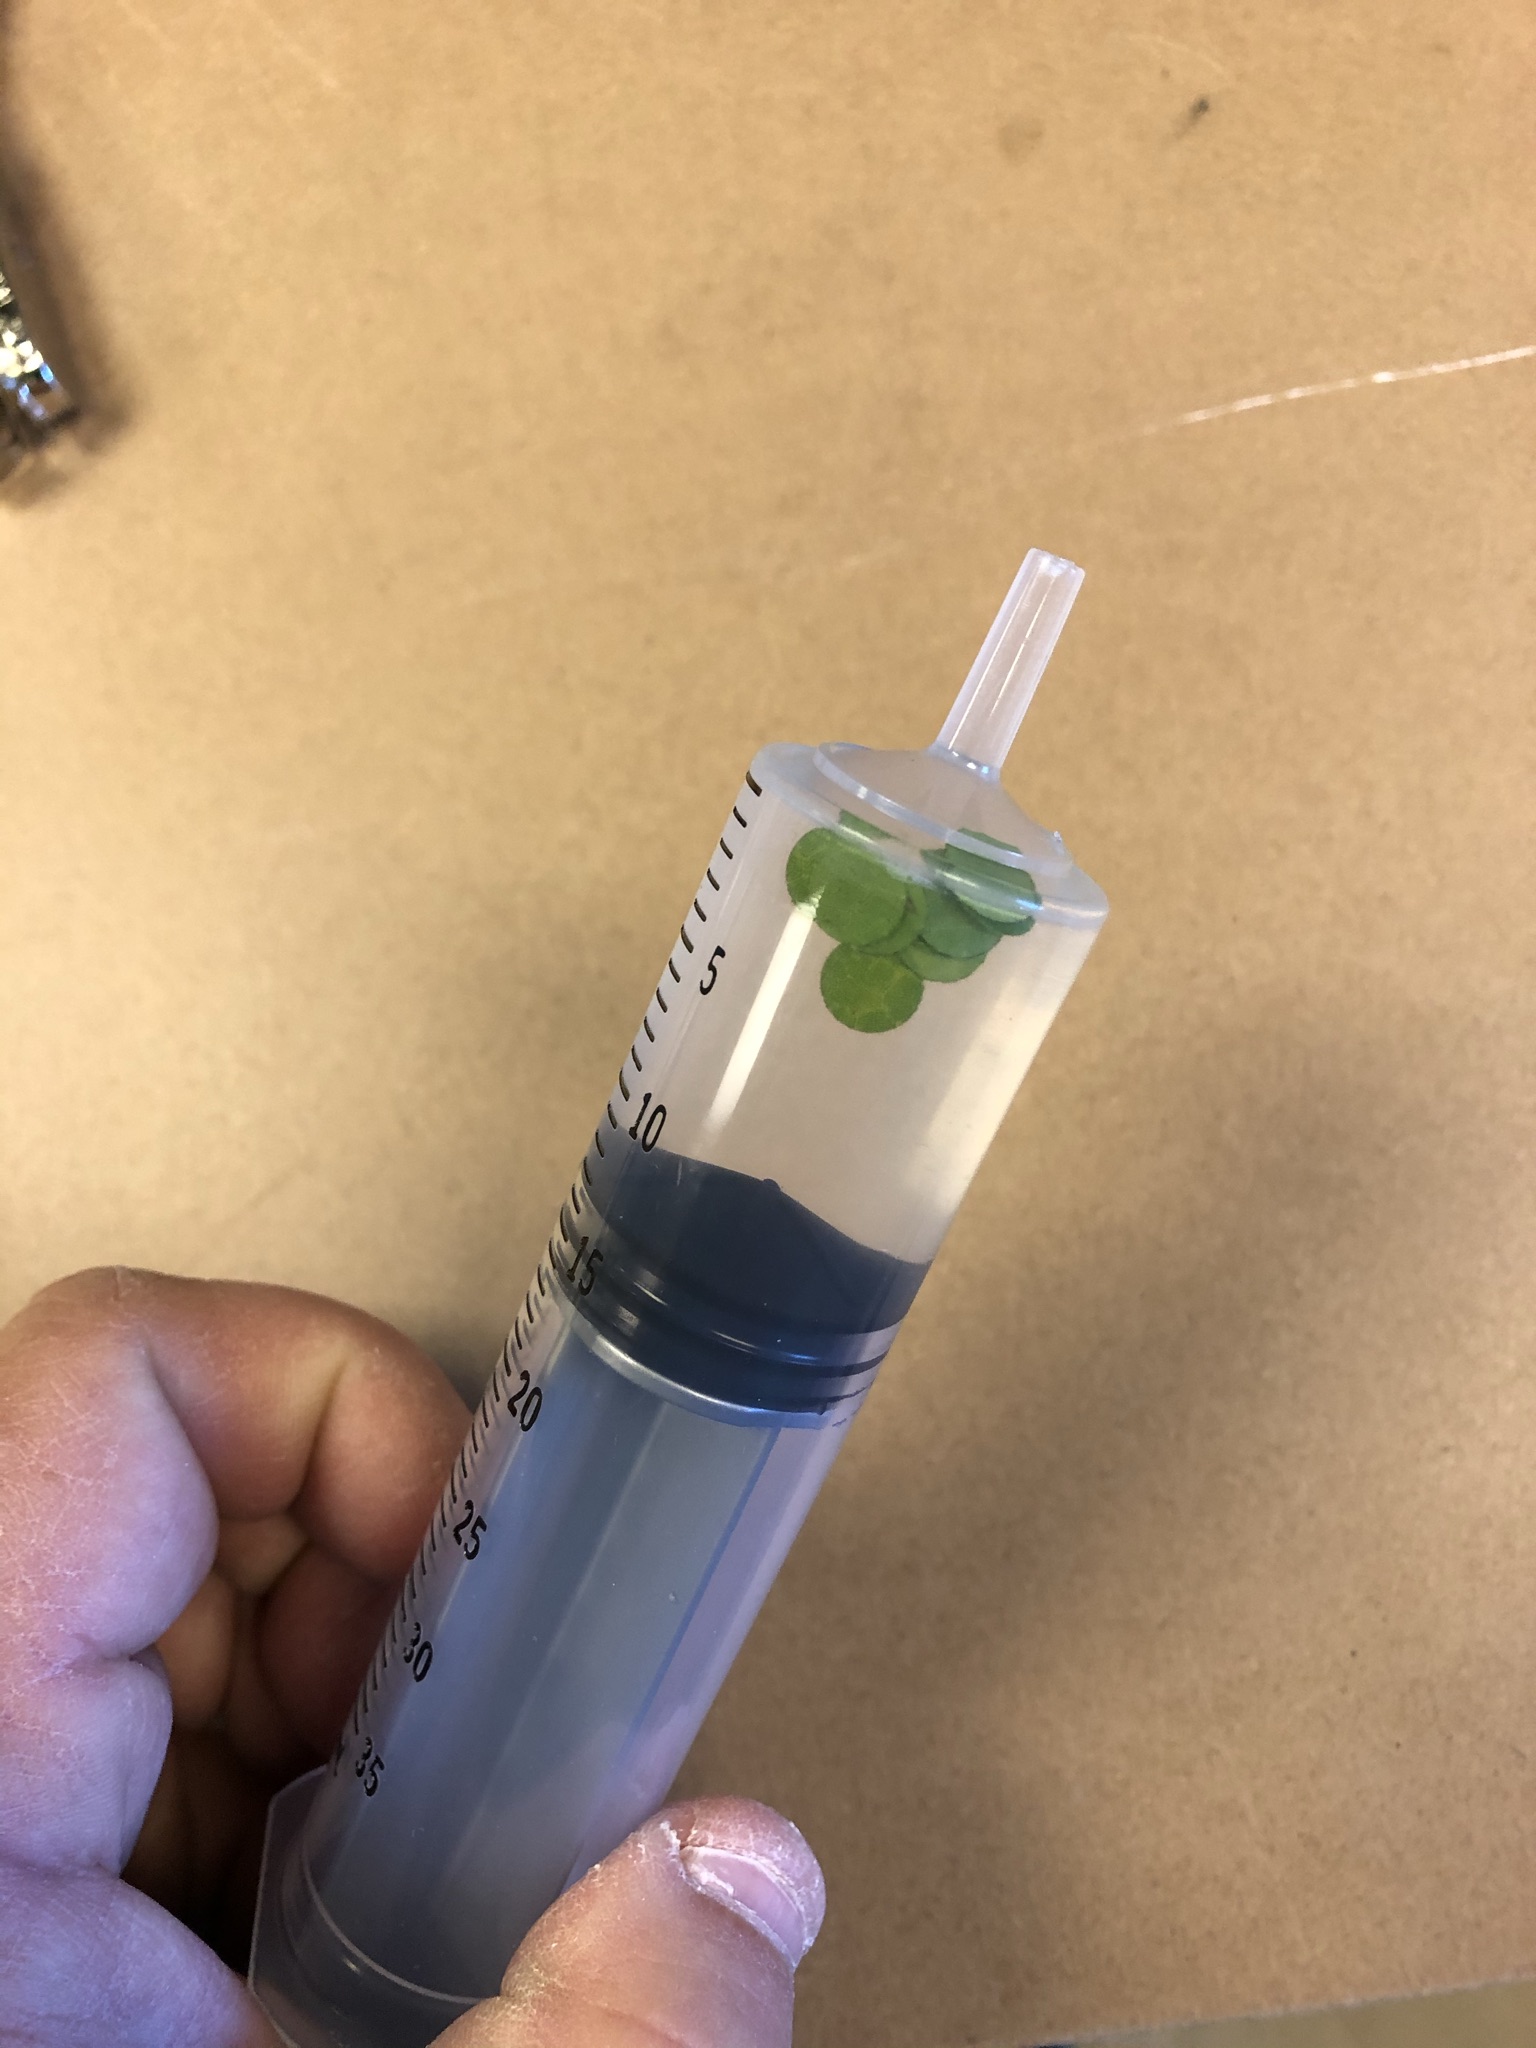
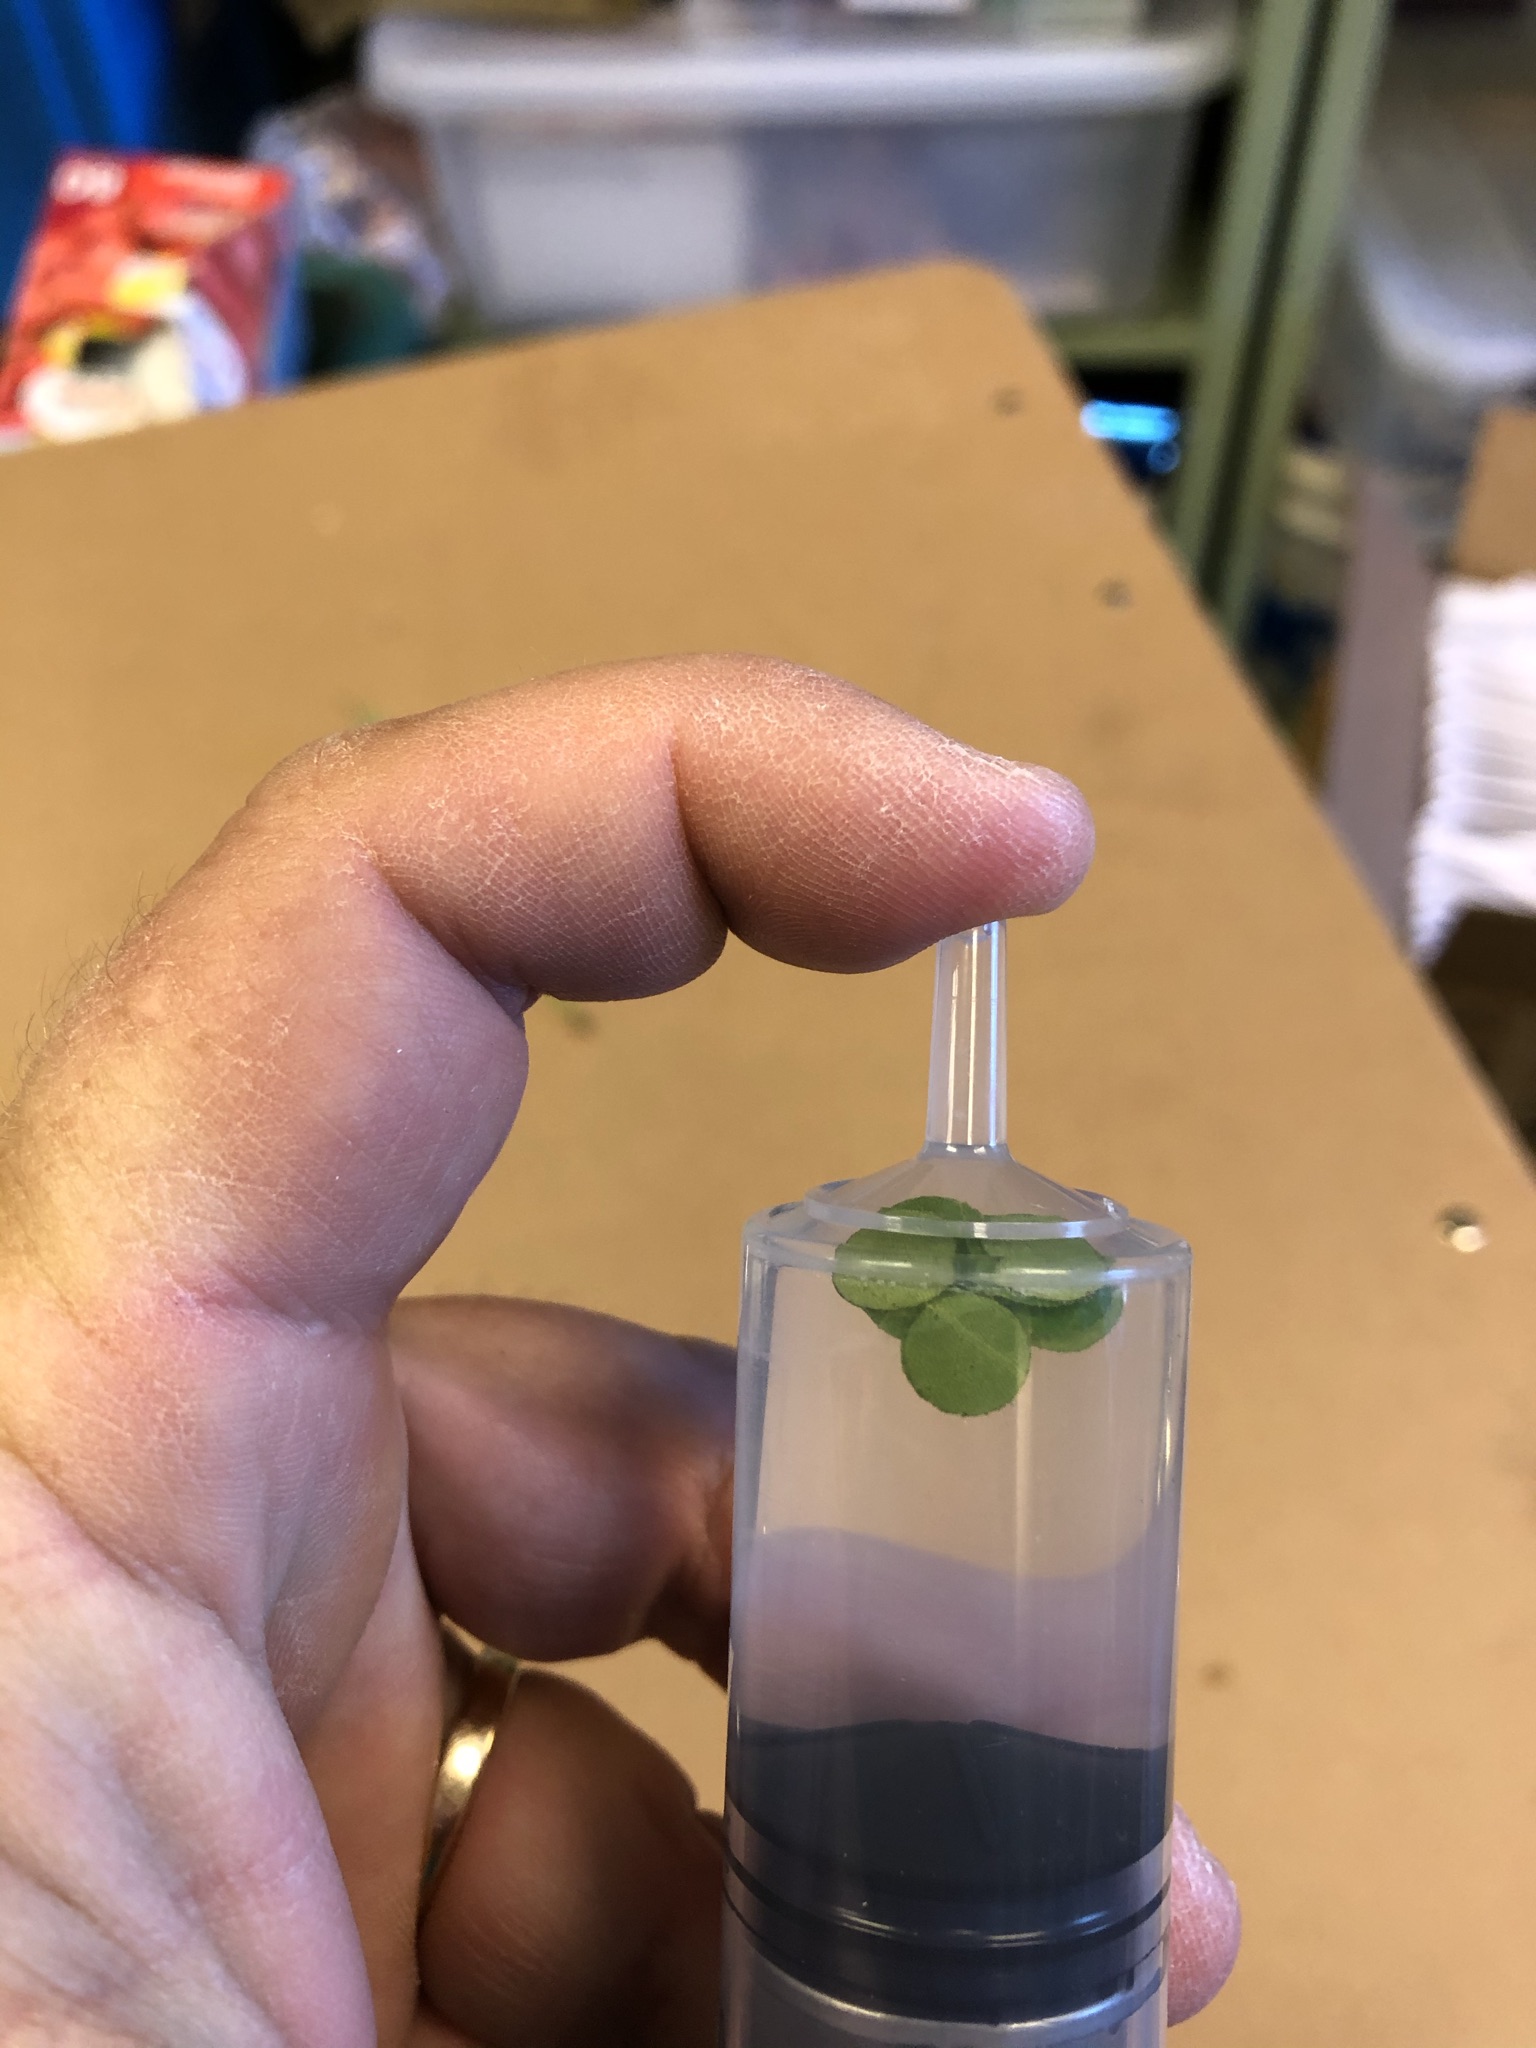 Figures 58 and 59: Syringe with leaves and solution.
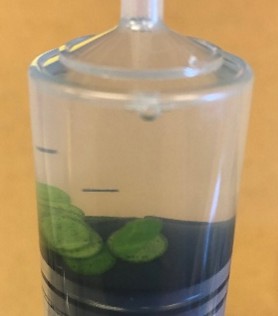 Figure 60: Leaf disks at the bottom of the syringe.
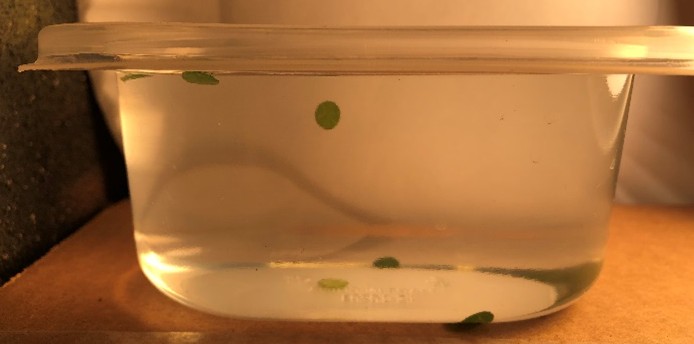 Figure 61: Leaf disks floating.
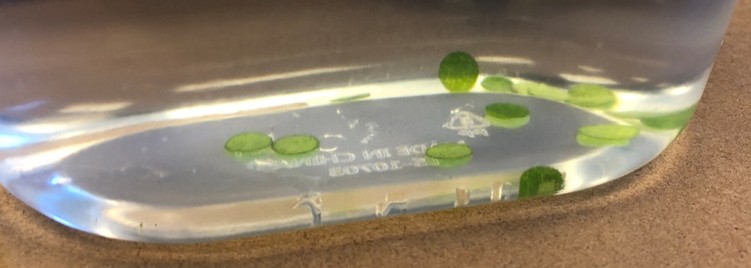 Figure 62: Sunken leaf disks.
Cooler Temperatures
Have you noticed that it feels cooler to walk on the grass, instead of the sidewalk, on a hot day? Cities that have more green areas (grass, trees, etc.) are actually cooler by several degrees than cities with fewer green areas. This is because of the urban heat island effect. All of the concrete, asphalt and metal heat up a lot more than living plants do on a hot, sunny day. Turfgrass blades help shade the surface of the soil, which keeps the soil cooler than bare ground or concrete. Grass also helps cool the environment by reflecting more sunlight than darker surfaces like asphalt and therefore absorbing less heat.
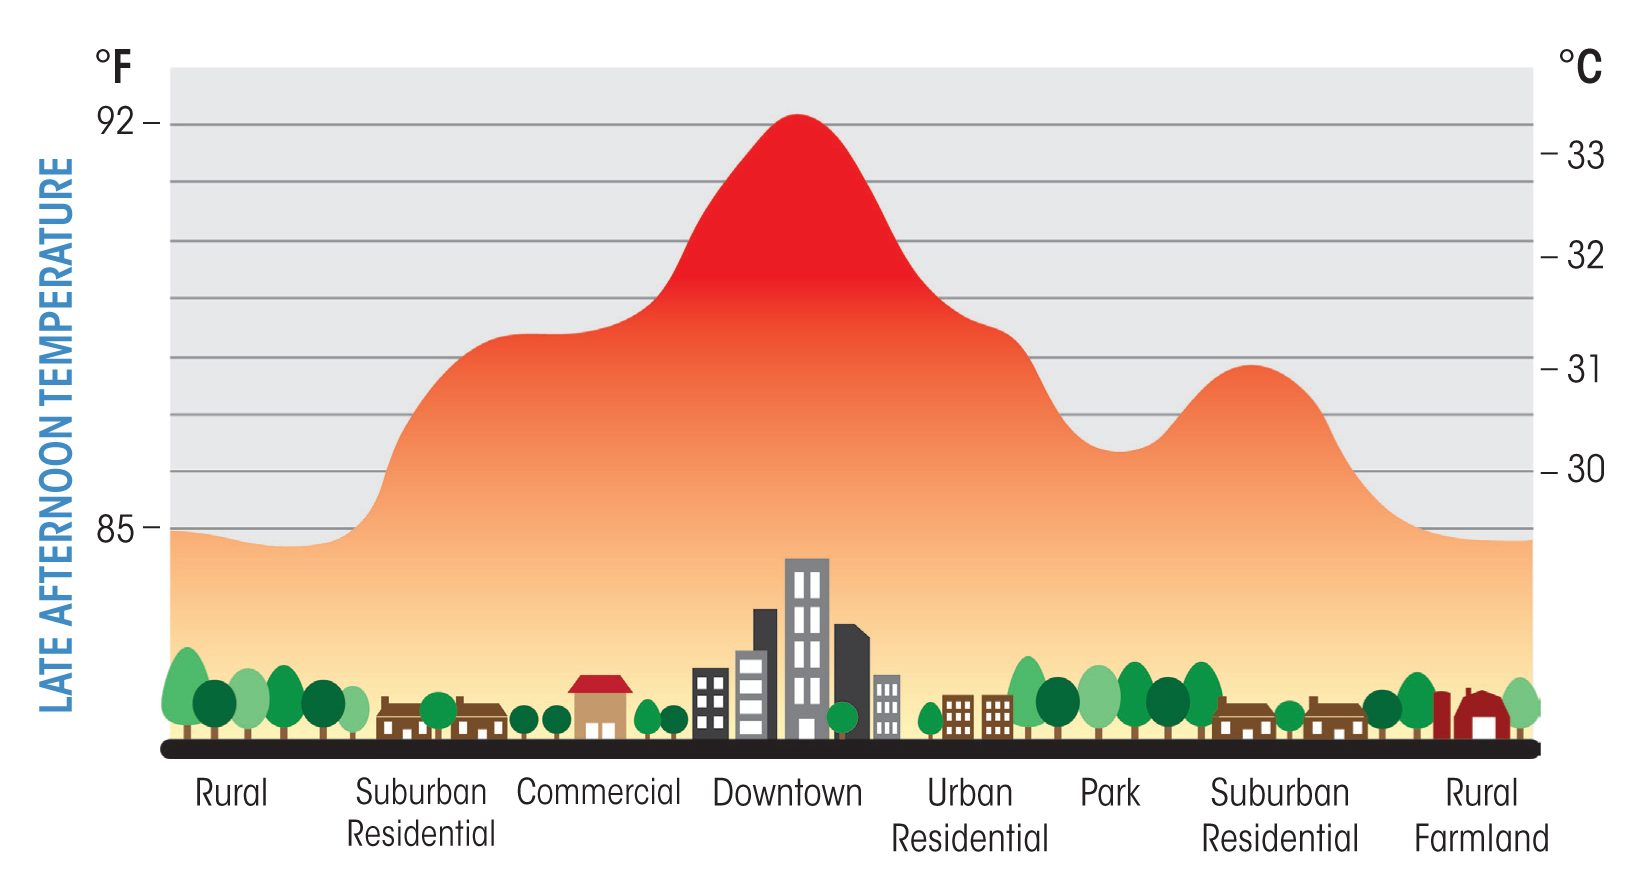 Figure 63: Chart showing the heat island effect.
Activity: Temperature Differences
Supplies Needed:
- Infrared thermometer (for precise measurement, costs about $20)
- Outside area with multiple types of surfaces (grass, asphalt, cement, metal, wood, etc.)
- Sunny day
Every object emits infrared radiation, which is a part of the electromagnetic spectrum that humans cannot see. One type of infrared radiation is thermal radiation (the radiation of heat). The hotter something is, the more thermal radiation it emits. Infrared thermometers work by measuring thermal radiation.
You can see thermal radiation with thermal imaging, which you probably are familiar with (see figure 65).
Infrared thermometers are also measuring thermal radiation, but converting it into numbers, rather than pictures.
Go outside on a sunny day and point the infrared thermometer at a surface (not on a person or into eyes). Pull the trigger and let go. You will see a temperature reading on the display. Try measuring the temperatures of different surfaces, such as concrete, wood, metal, soil, grass, mulch, etc. How do the temperatures compare?
On a sunny day, we took the following measurements: Concrete: 119.1 F
Brown wood mulch: 150 F
Dead grass: 132 F
Living grass: 110.8 F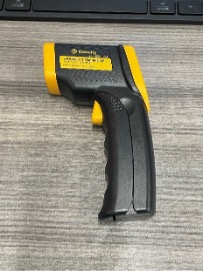 Figure 64: Infrared thermometer (Shelley Mitchell).
 Figure 65: A thermal imaging scanner (Adobe Stock).
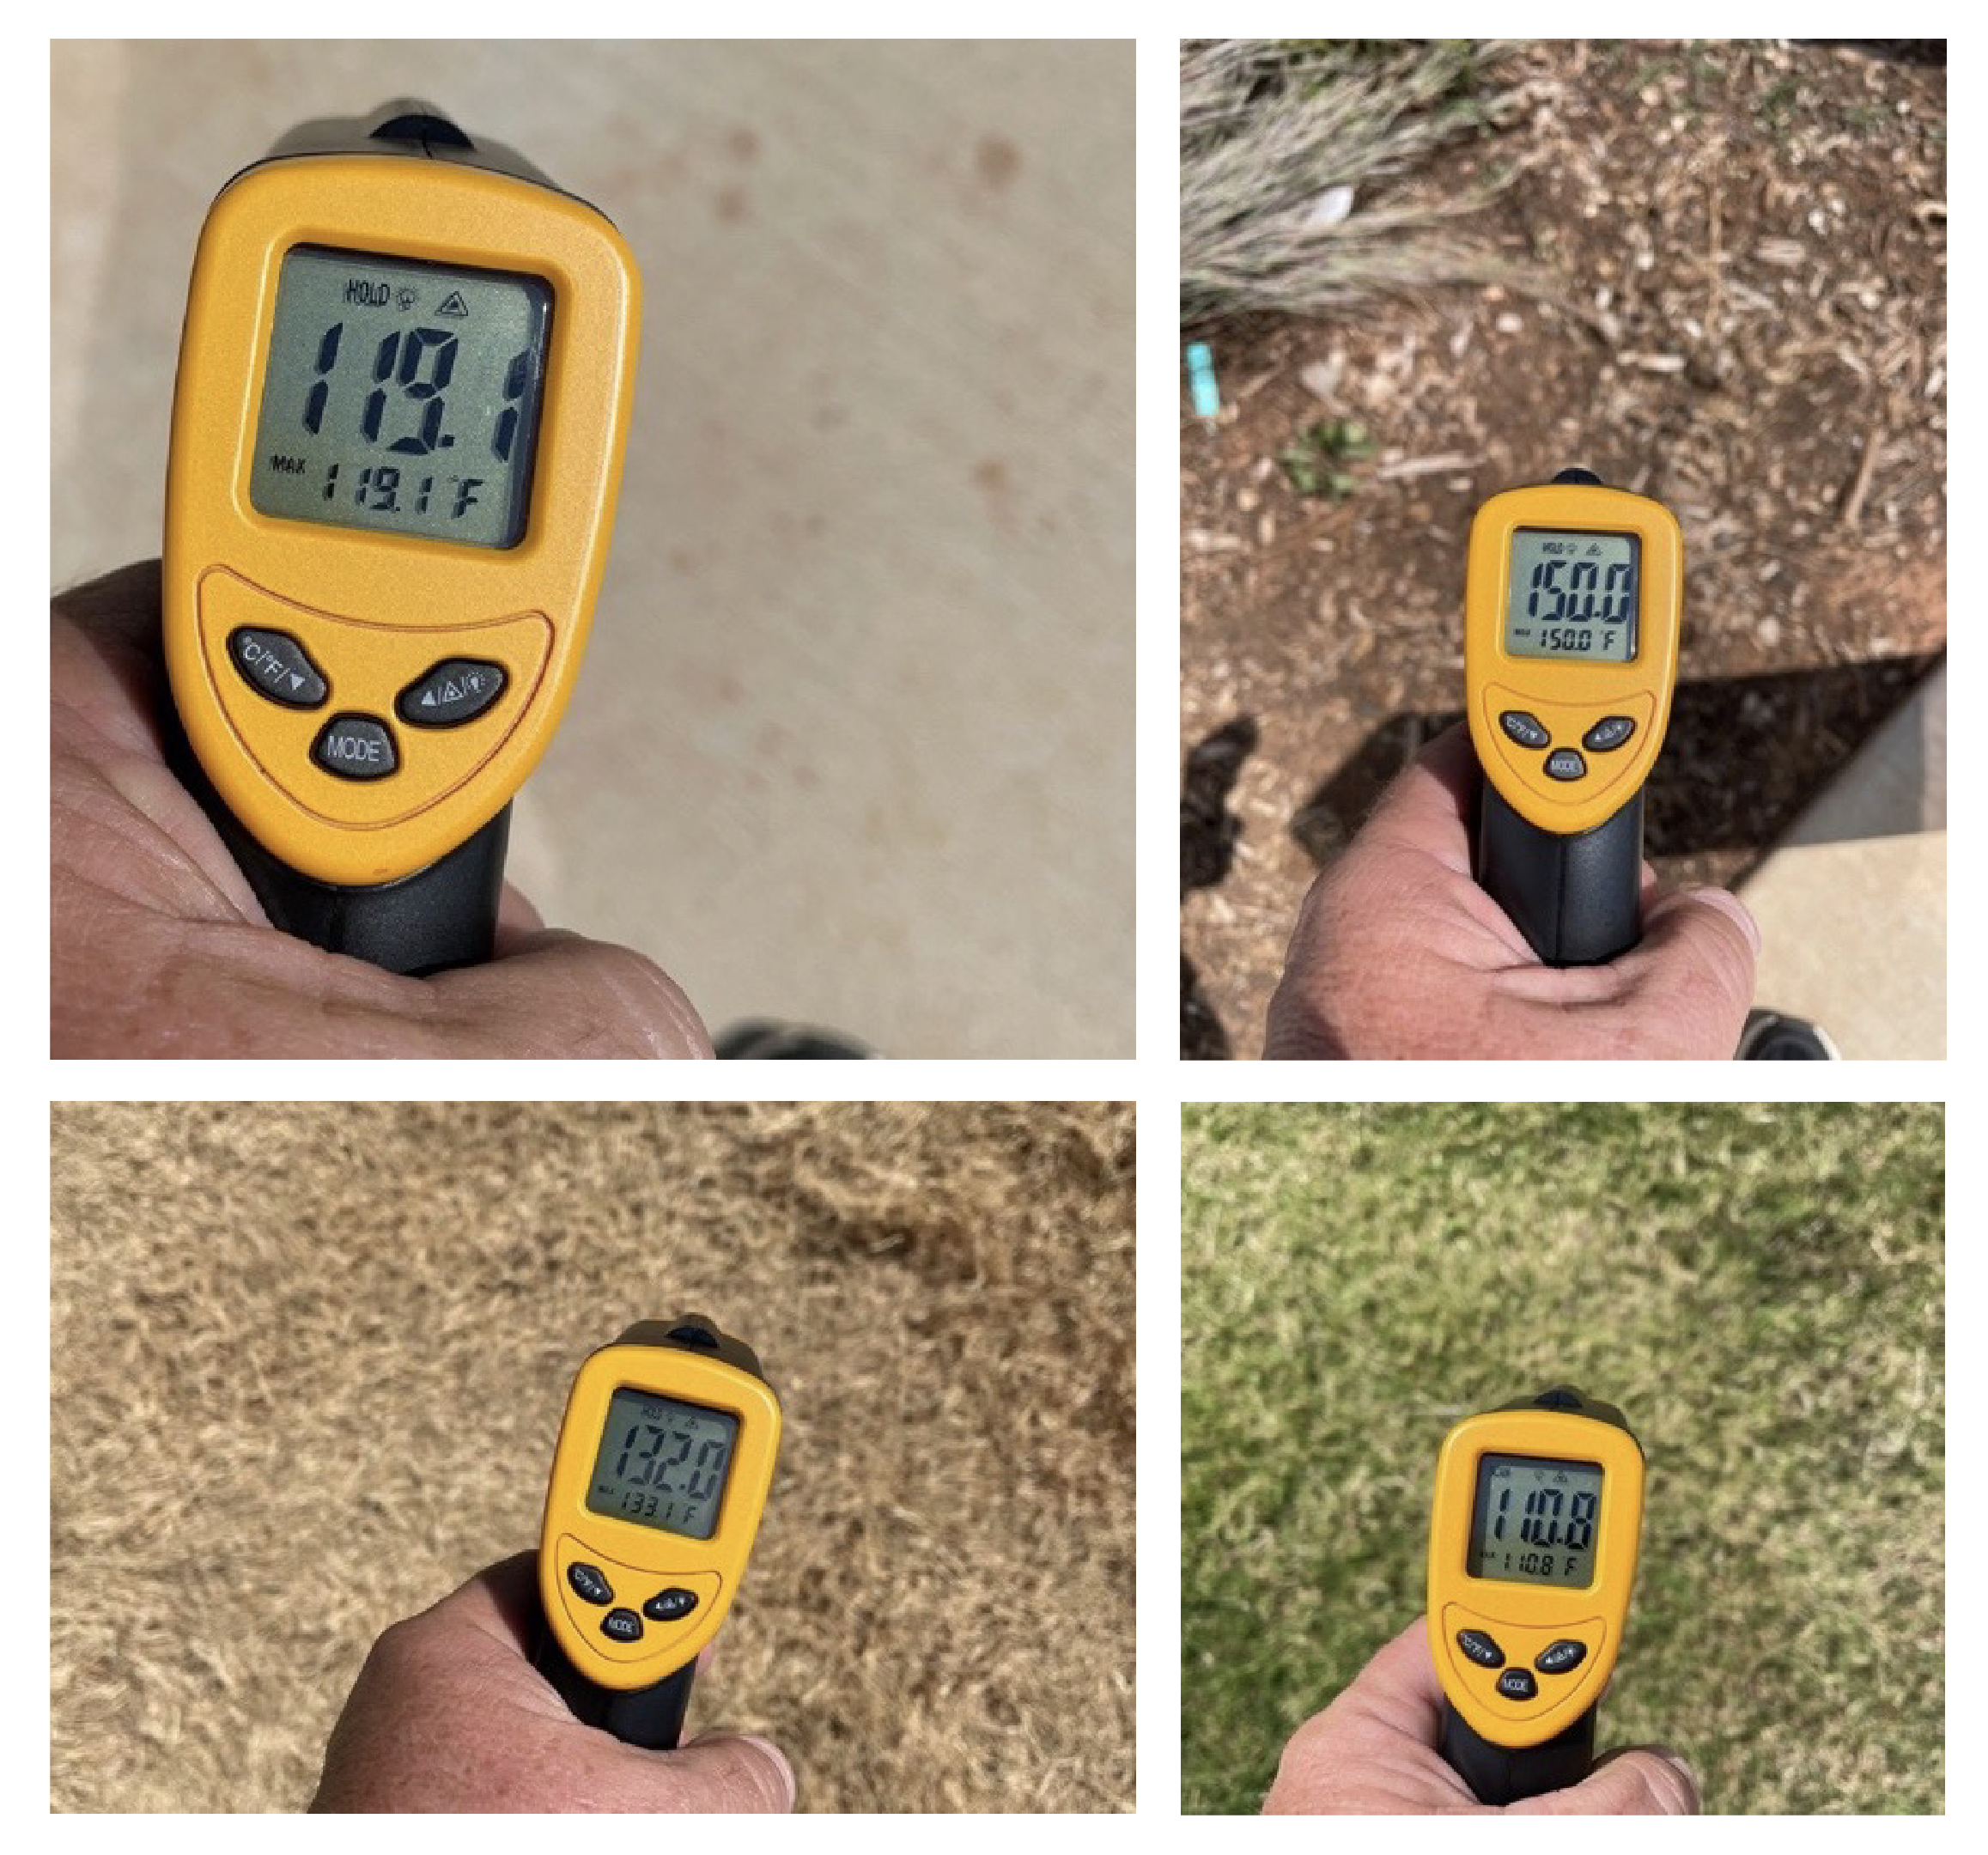 Figure 66: An infrared thermometer taking the temperature of concrete, brown wood mulch, dead grass and living grass (Shelley Mitchell).
On a sunny day, we laid out different colors of artificial turf to see if their colors made a difference in temperature. Here are our average readings (in Fahrenheit):
White: 127.1 F
Brown: 162.6 F
Lighter green: 163.0 F
Blue: 164.6 F
Black: 171.5 F
Dark green: 164.9 F
Red: 146.8 F
Which temperature reading surprises you? How would you determine what is causing the unusual result?
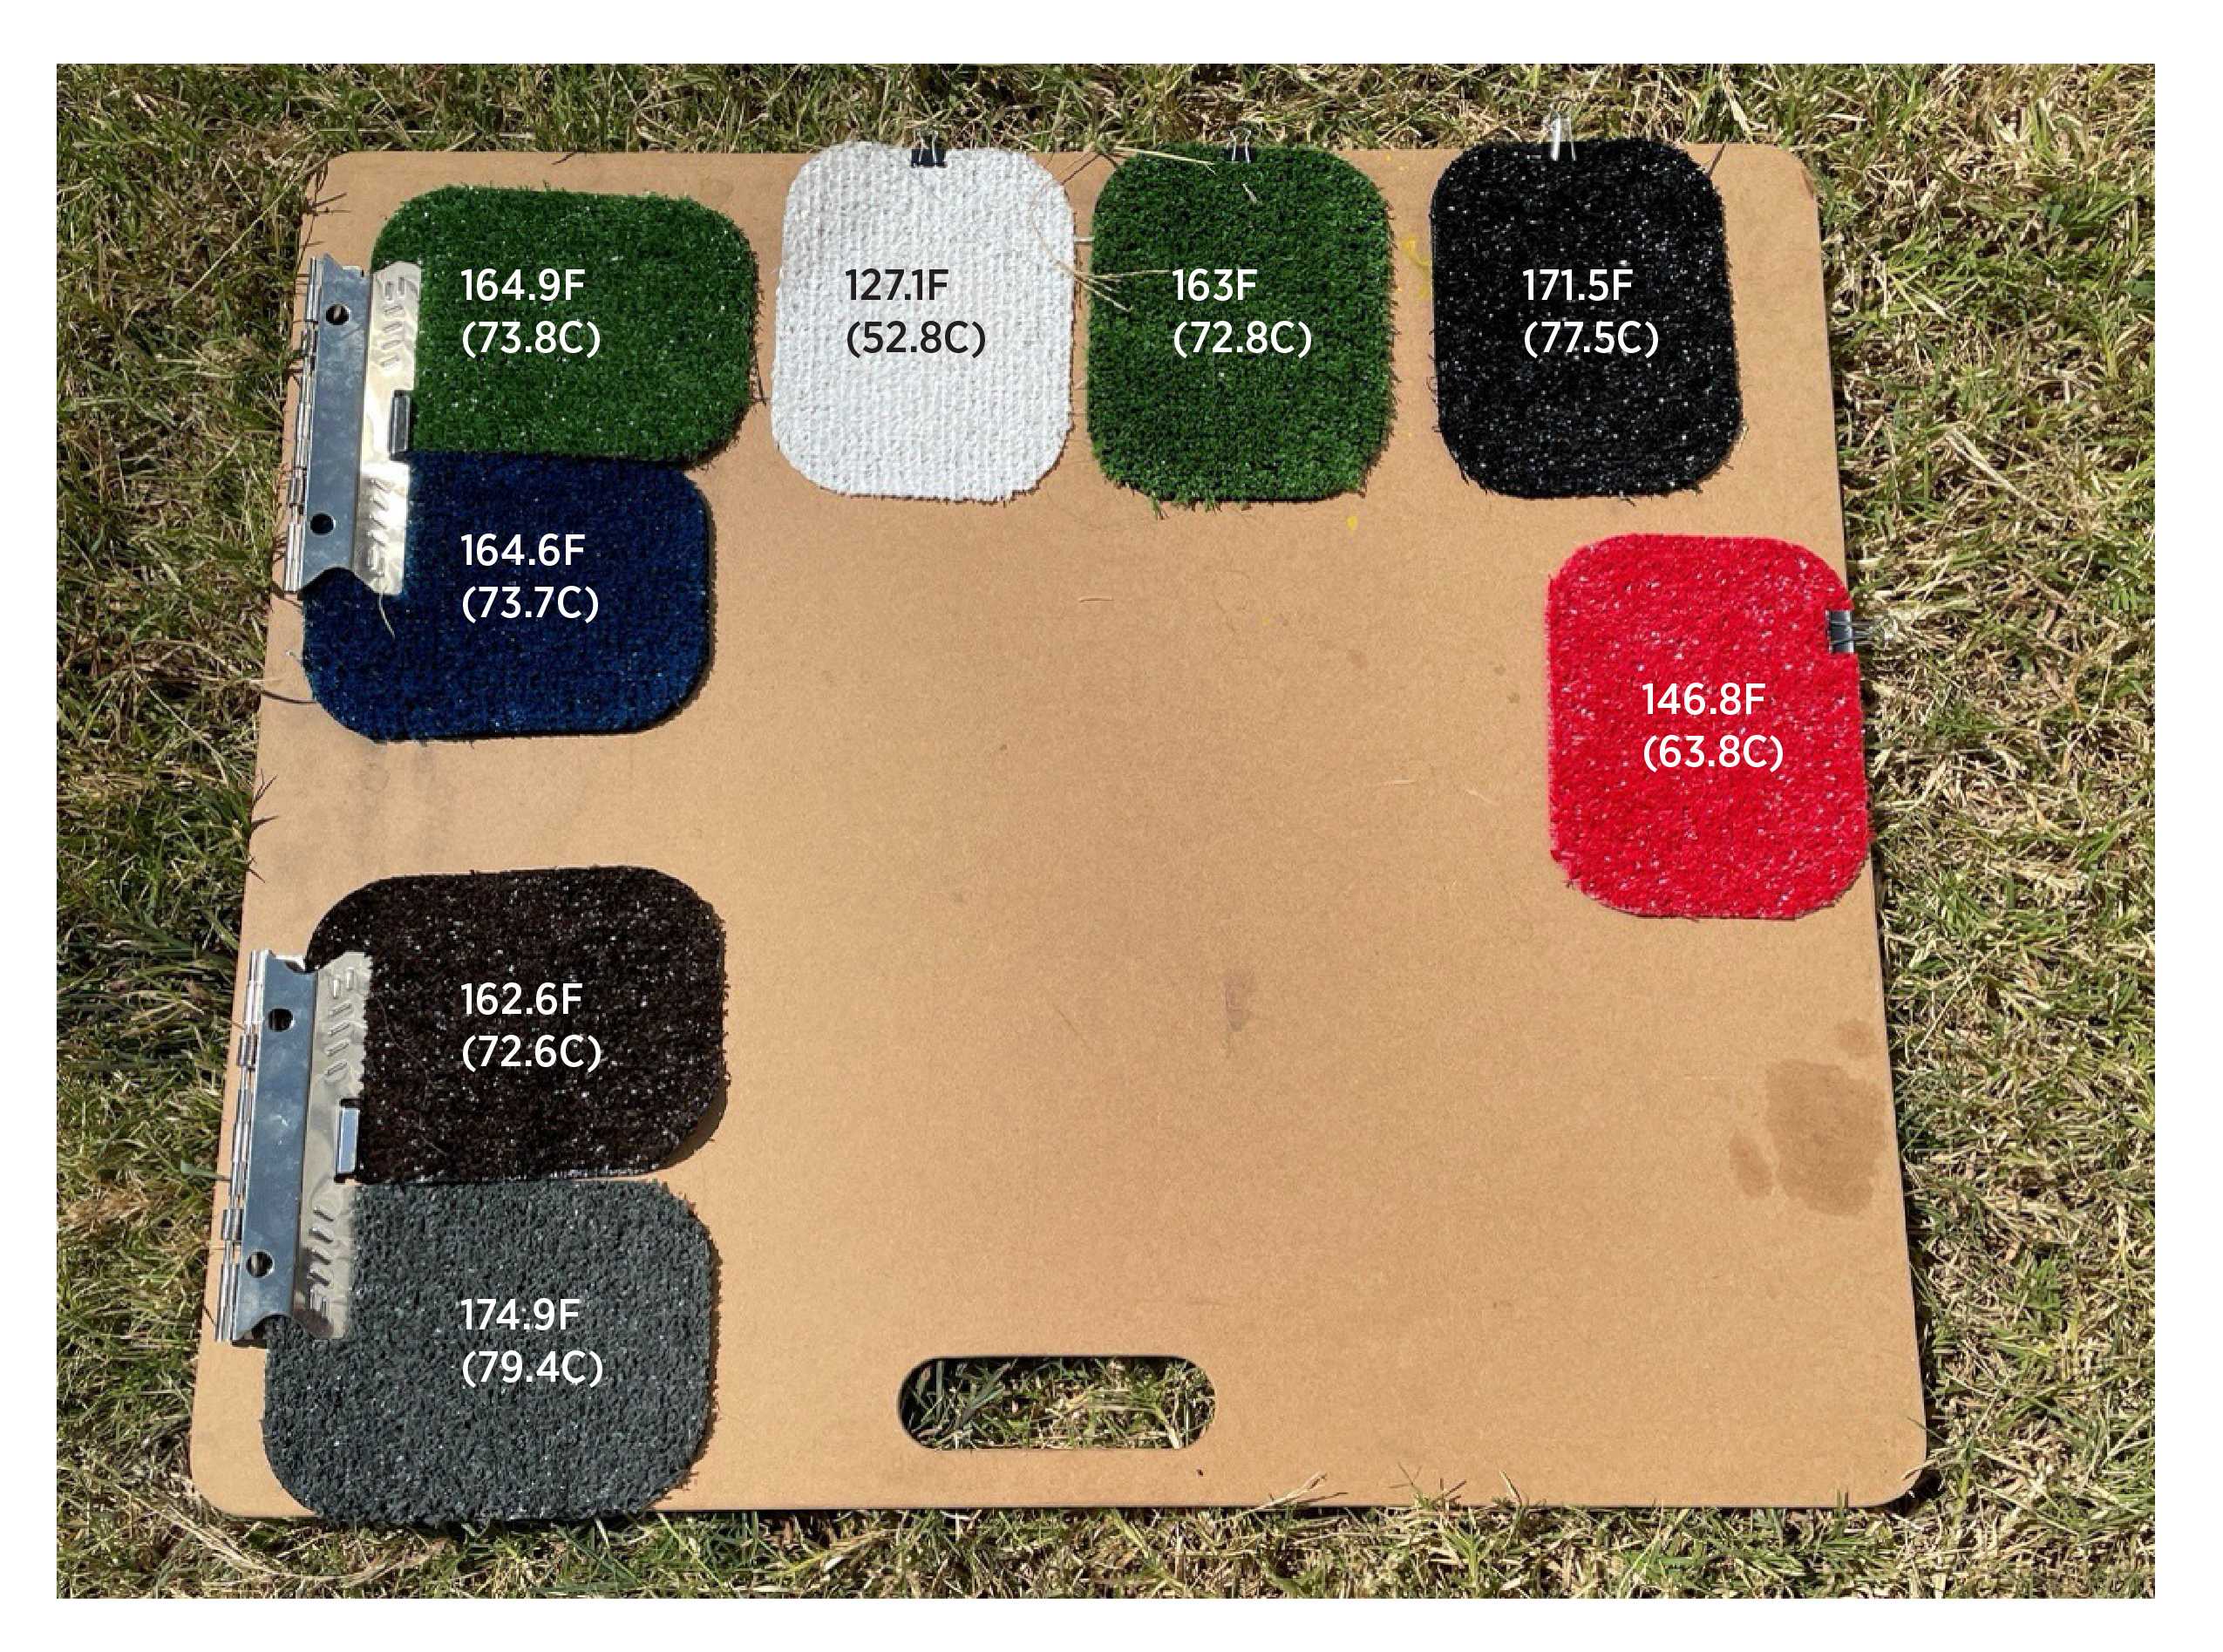 Figure 67: Temperatures of different colored artificial turf (Shelley Mitchell).
Activity: Plant Sweat = Transpiration
Supplies Needed:
- Plastic bag
- Plastic-covered wire tie
- A plant (outside is best)
- Warm sunny day
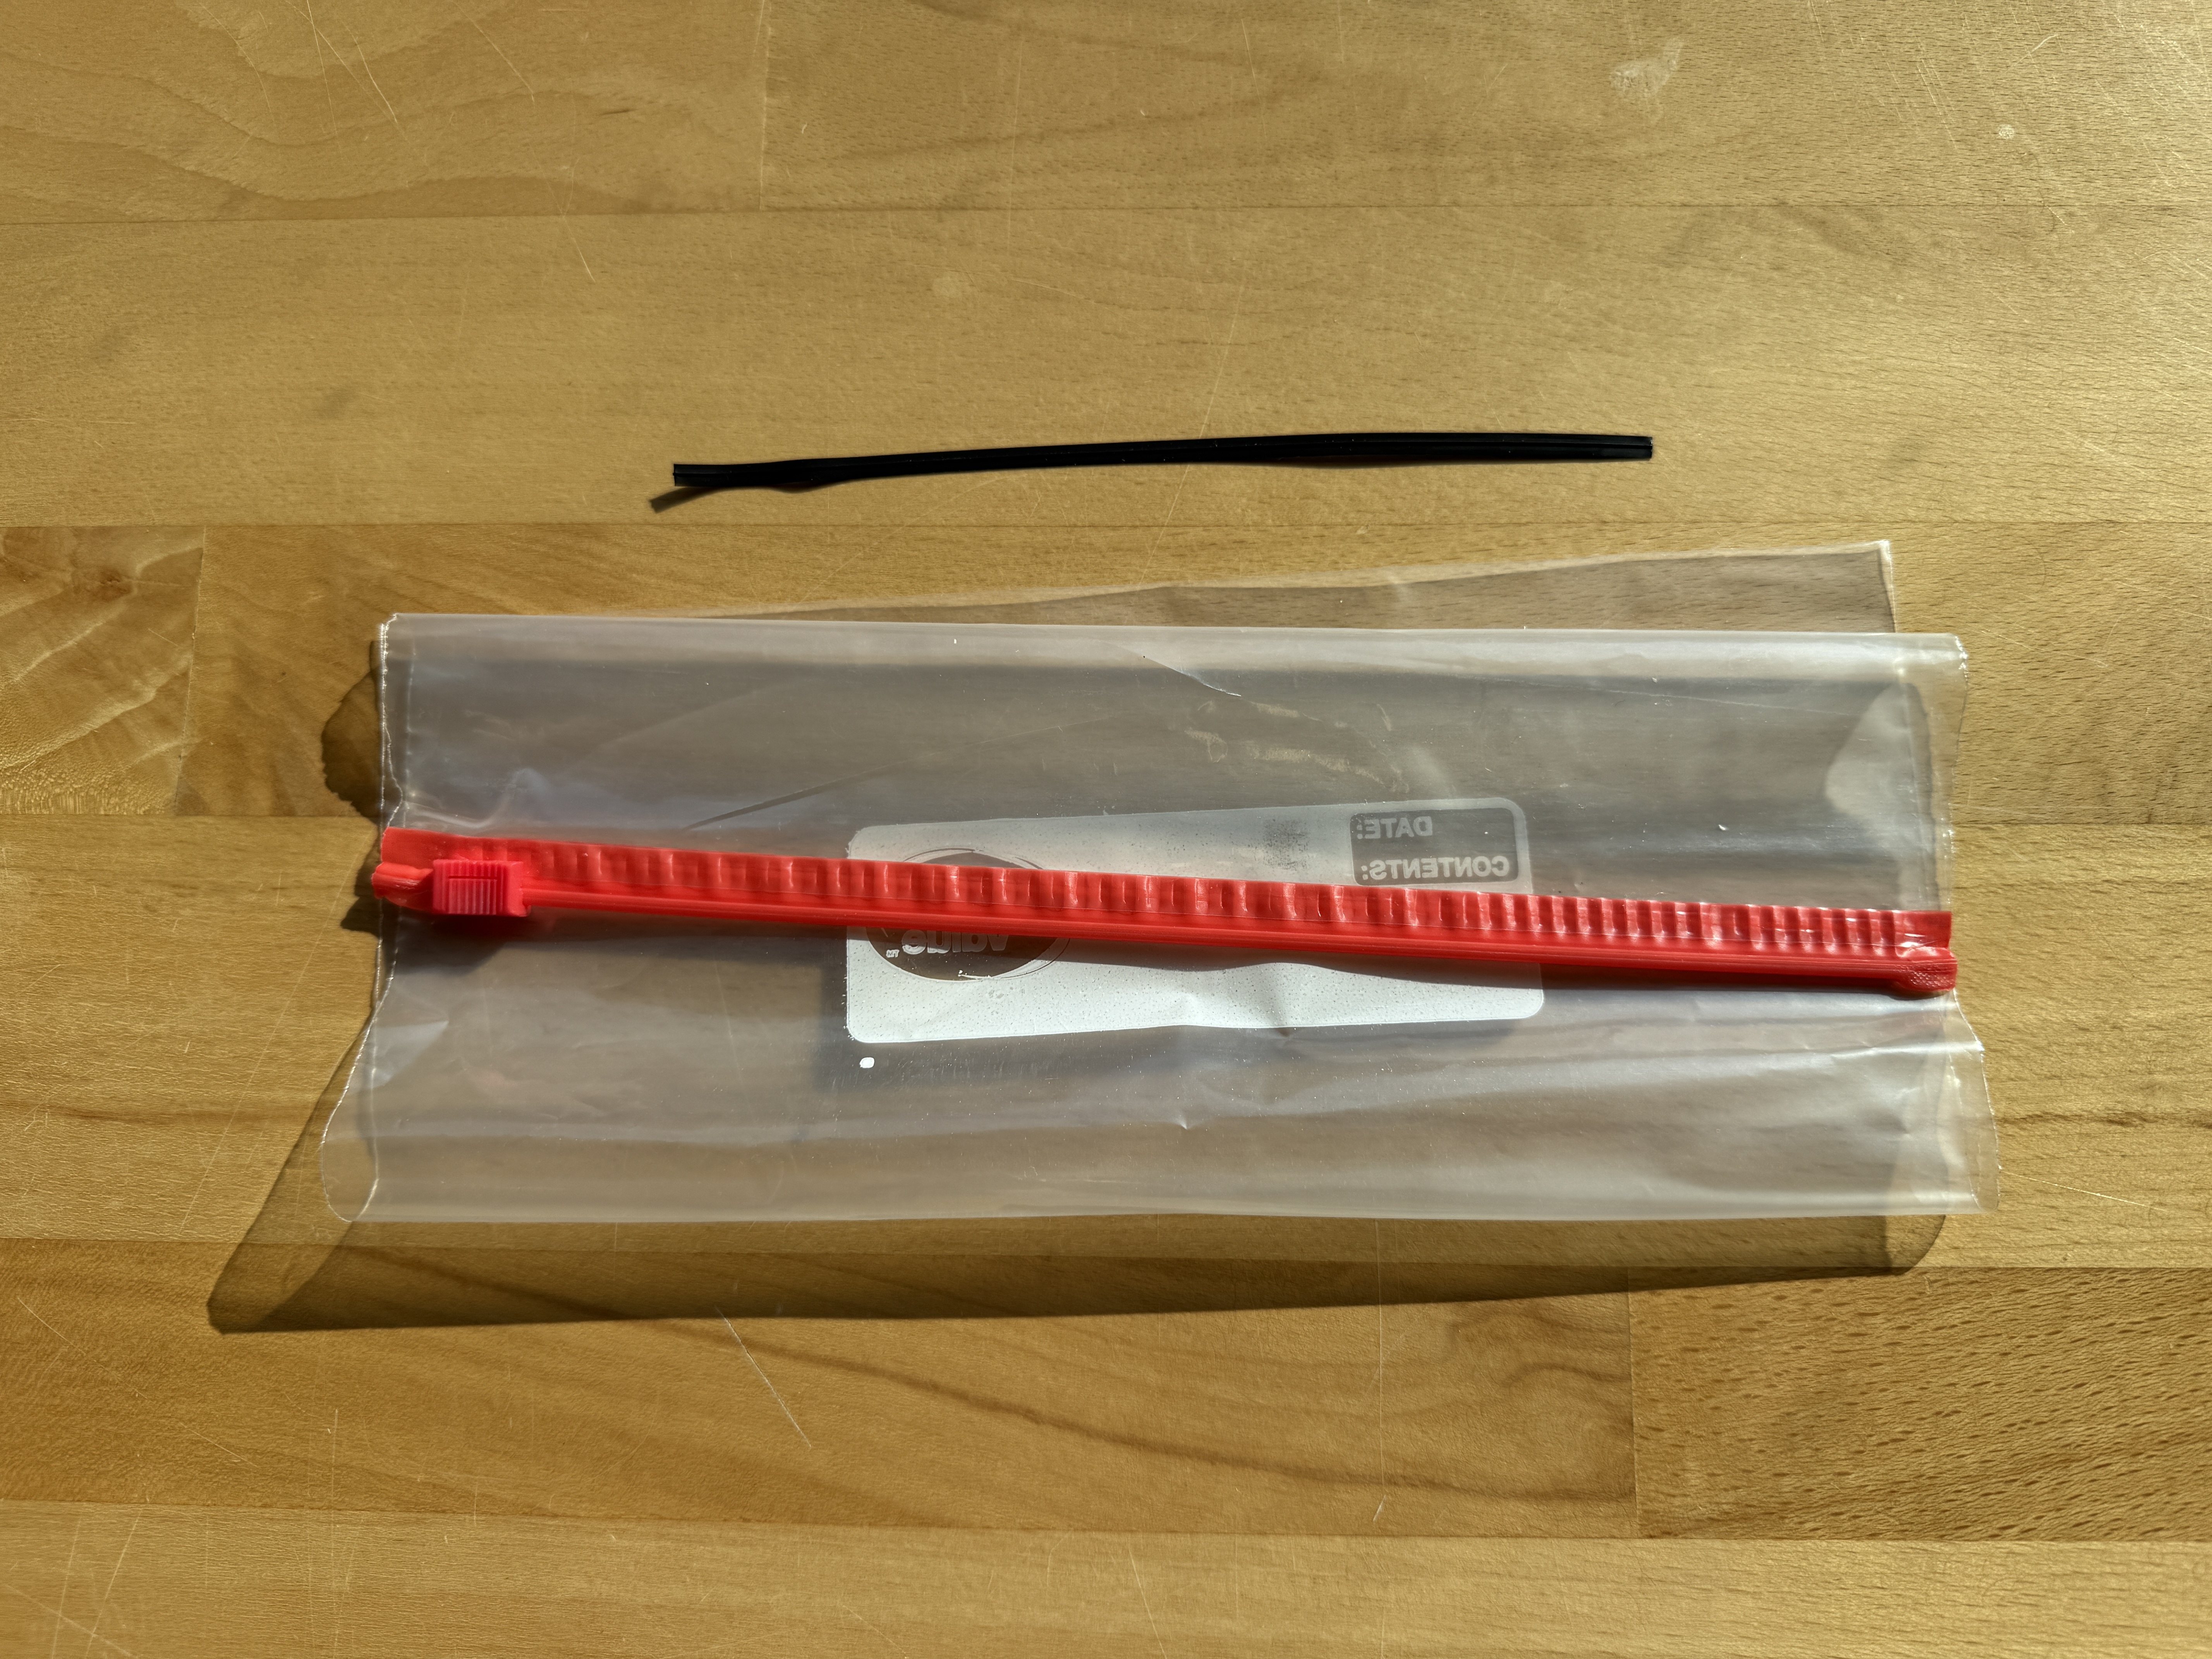 Figure 68: Supplies needed.
As we learned before, plants have pores (called stomata) on their leaves which allow gas such as carbon dioxide to enter and oxygen to exit during photosynthesis. In general, plants can have stomata on their stems, as well as on top of their leaves, on the bottom of their leaves, or on both sides of their leaves.
When the pores are open, water is lost through transpiration. Just like when you breathe, you lose water. It’s why you can breathe on glass and fog it up. Plants can open and close their stomata, depending on temperature, humidity, amount of sunlight and other factors. When it is very hot or dry, plants can close some of their stomata to prevent too much water loss. On cooler or more humid days, plants can open more of their stomata without losing much water.
To see how much water is lost through stomata, find a plant with leaves that you can reach. Open a plastic bag and put it on the plant so that several leaves are inside the bag. Tie the bag shut so water vapor coming out from the stomata cannot escape. As water vapor exits the stomata, the water will condense and form small droplets inside of the bag. When the droplets get big enough, they will fall to the bottom of the bag. If you leave your bag on for an hour or more, you will see water at the bottom of the bag.
This water loss is why we water our plants. Even inside plants lose water through the stomata in their leaves. The hotter and drier it is, the more water our plants need. For plants that live in very dry areas, they may limit water loss by having thick, waxy leaves, many small leaves, or even by using their stems or roots to store water. During a drought, trees may drop all their leaves to lose less water and survive. Try this with different plants — which one sweats the most?
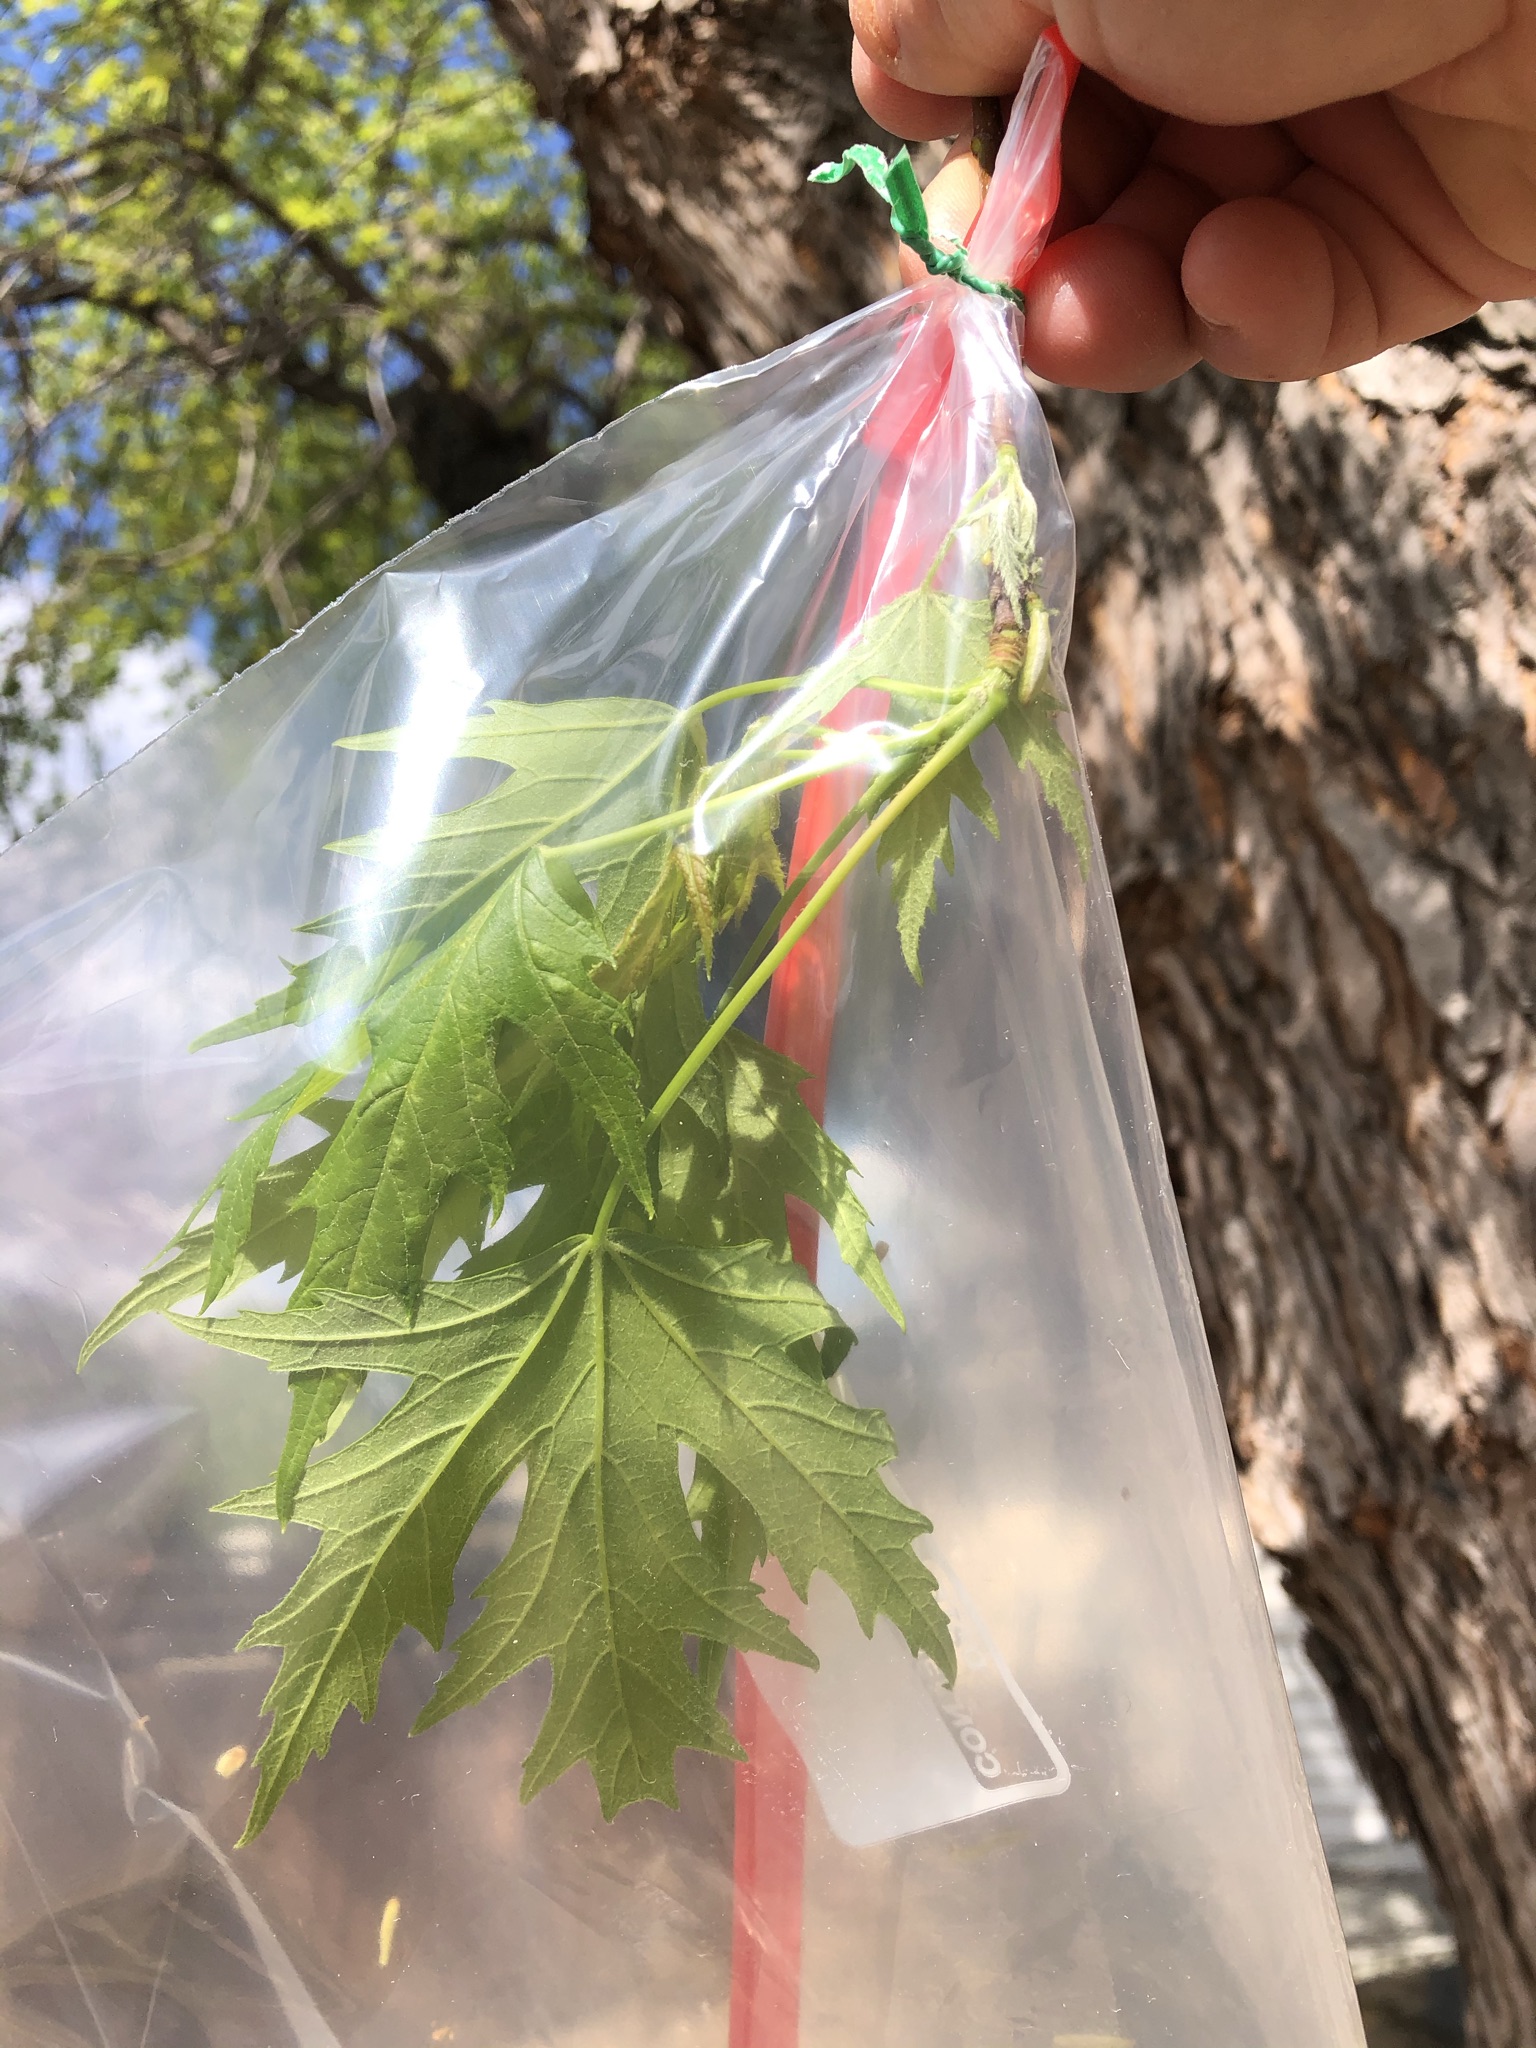 Figure 69: Plastic bag covering plant.
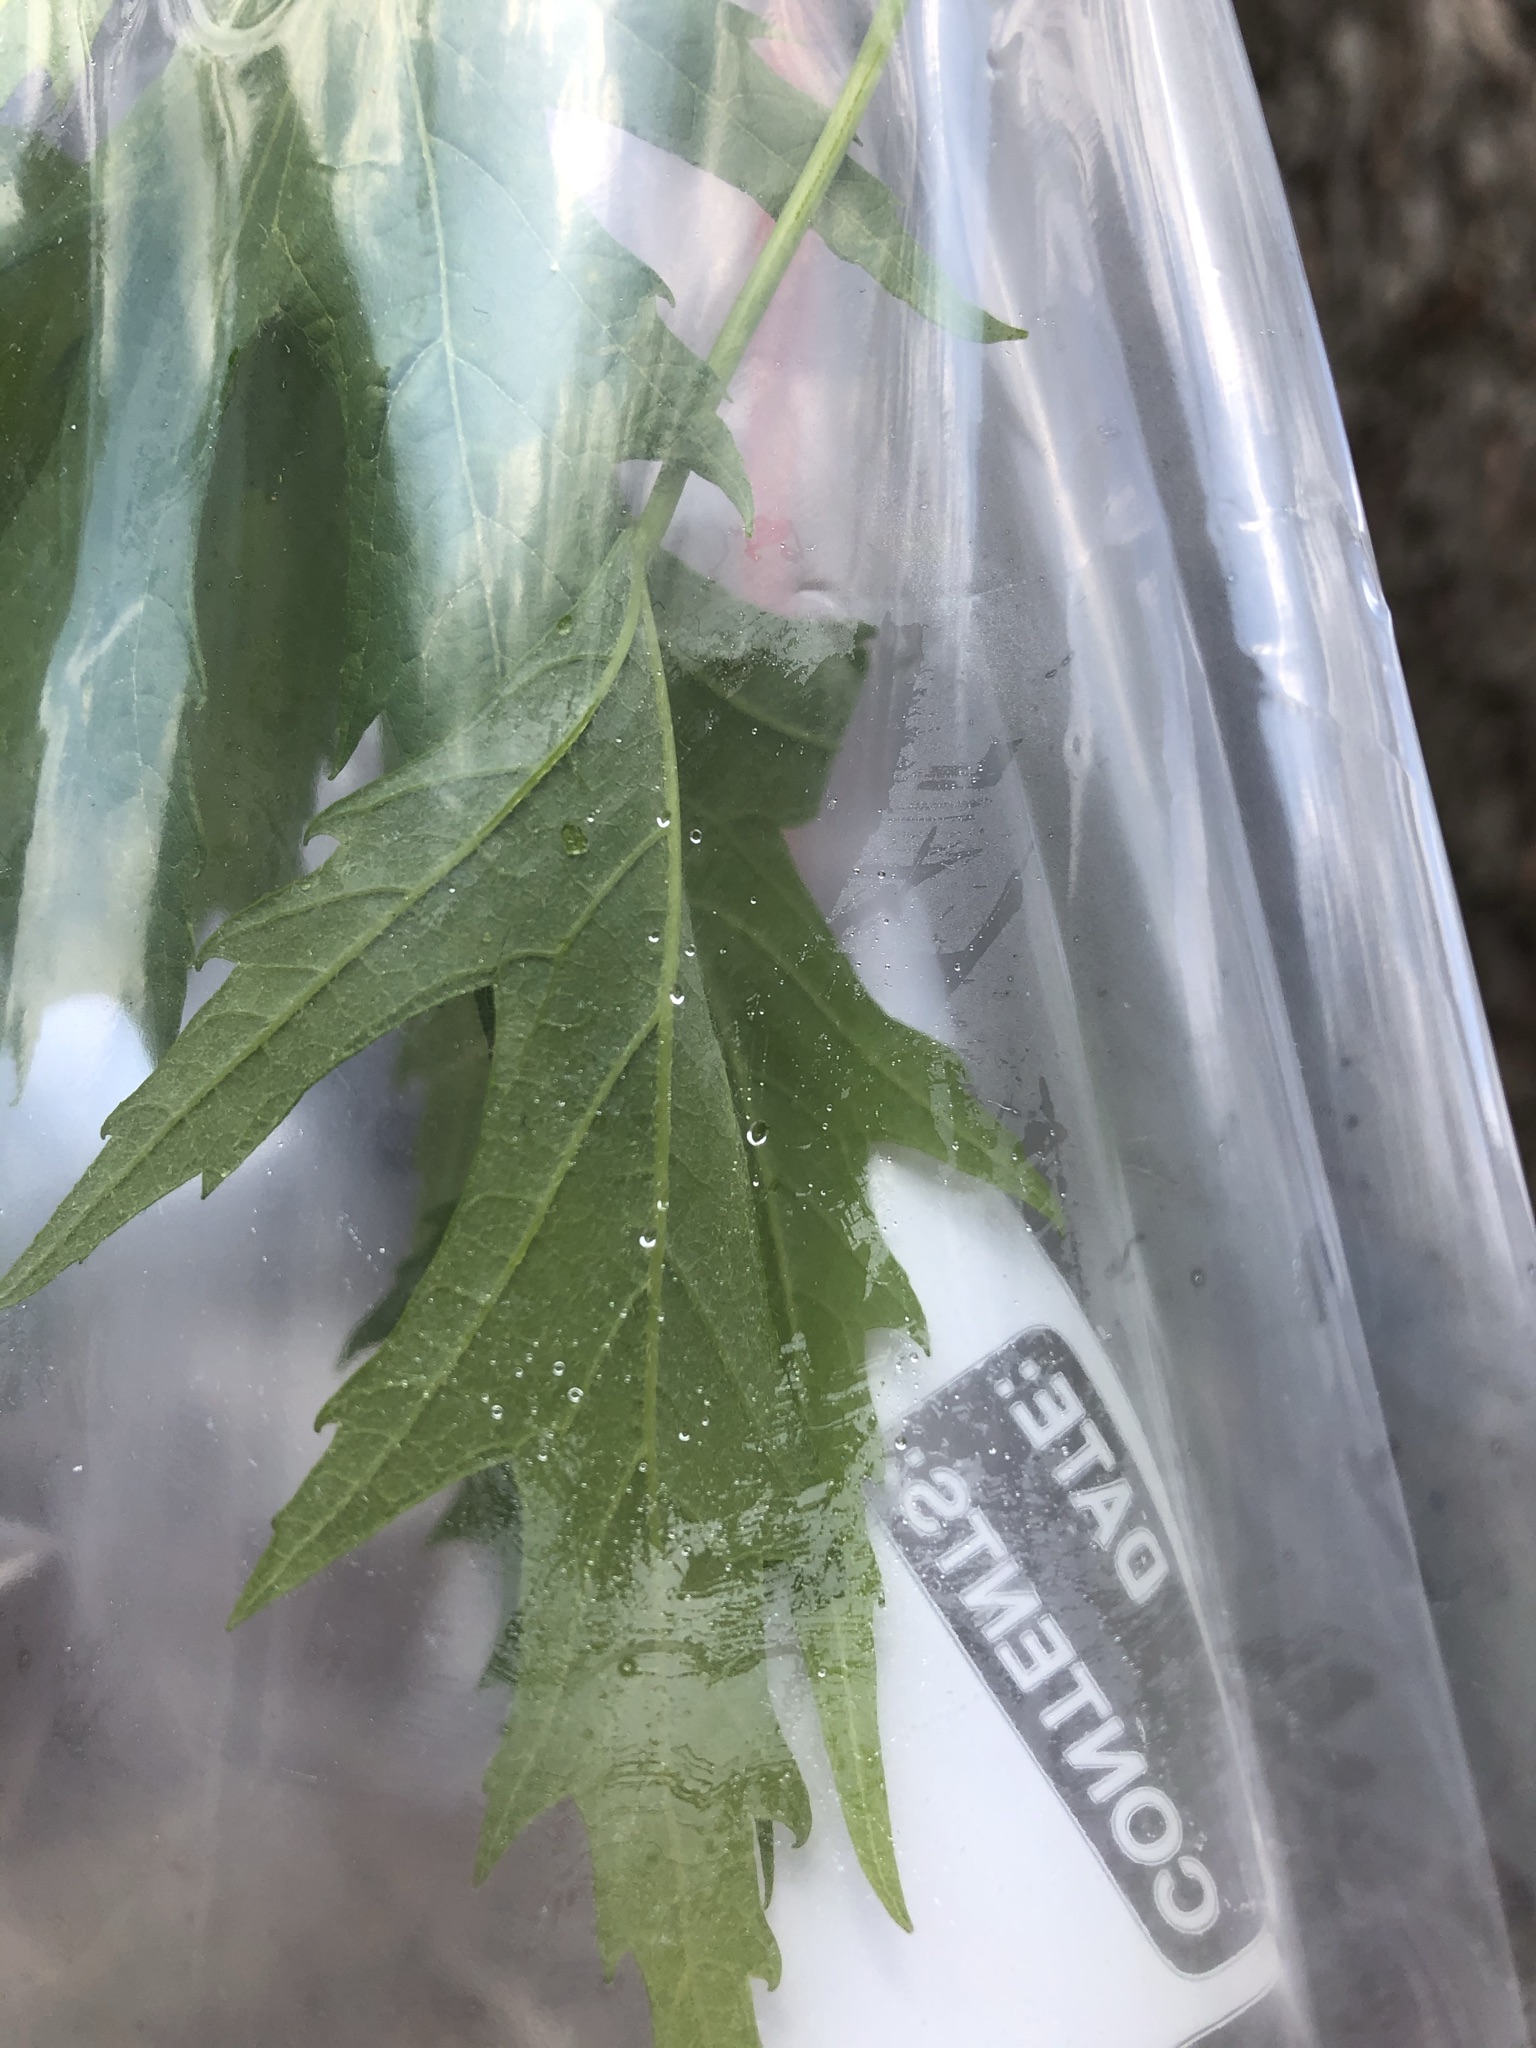 Figure 70: Beginning of condensation (a few minutes on a hot day).
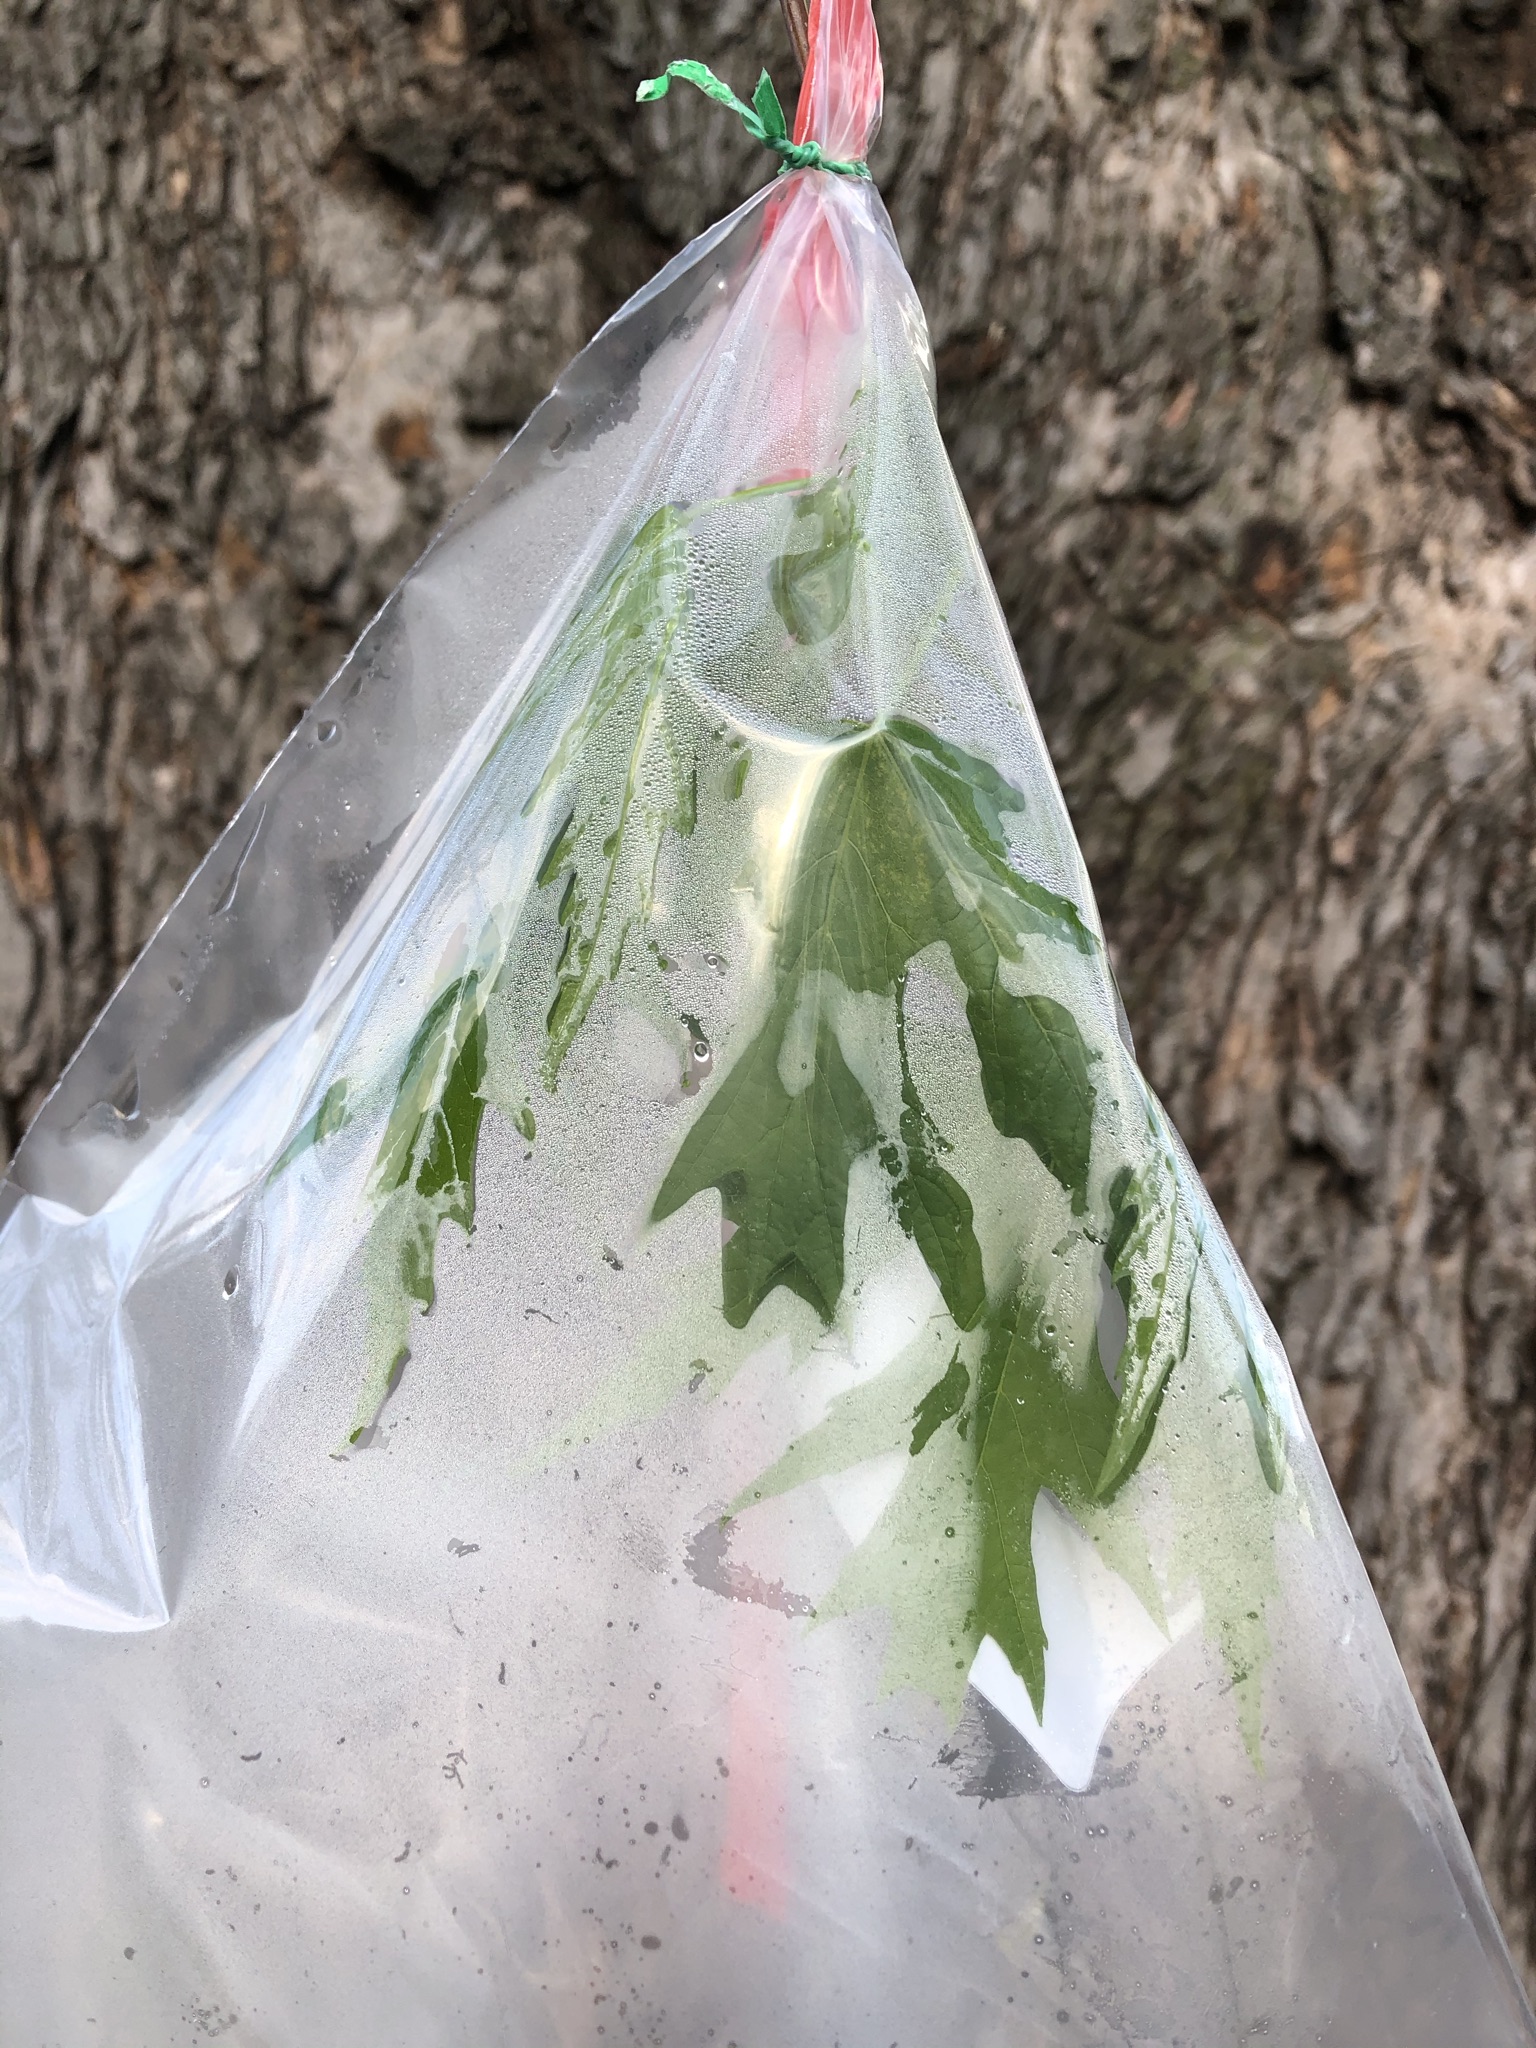 Figure 71: Lots of condensation an hour later on a hot day.
Activity: Visualizing Transpiration
Supplies Needed:
- Small blue pop beads
- Clear straw that beads can fit through
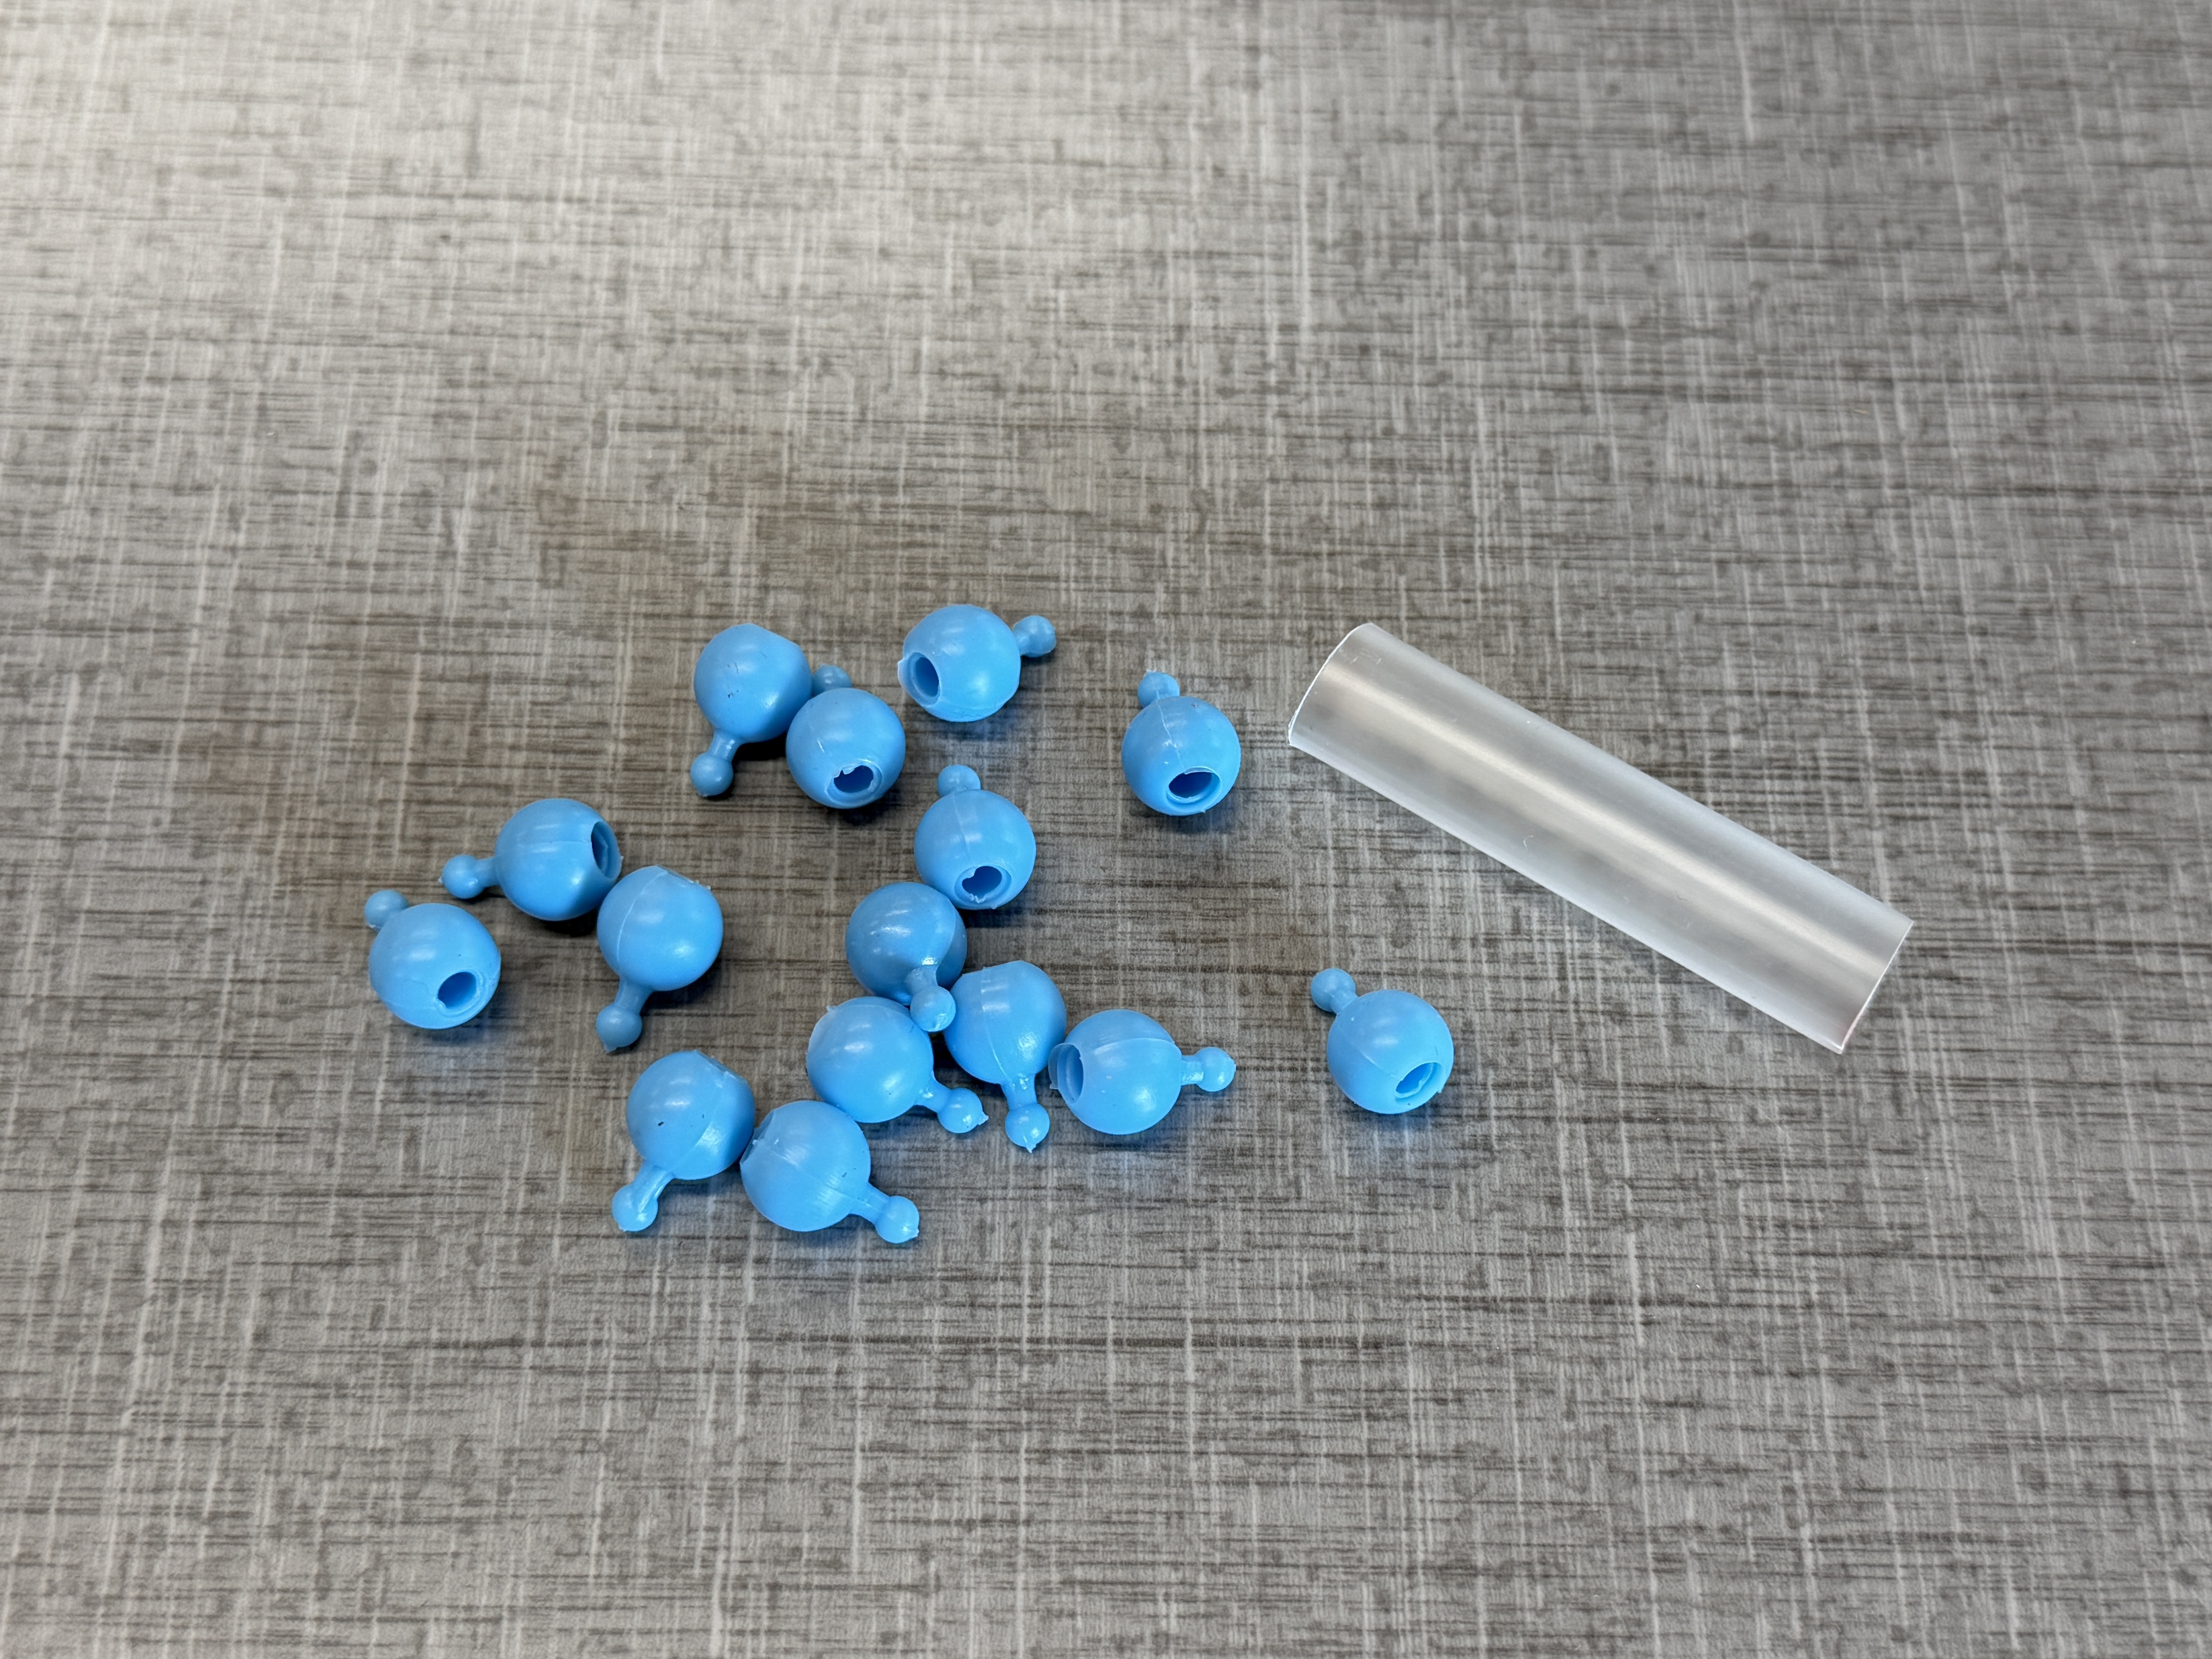 Figure 72: Supplies needed.
Blue pop beads are going to represent water molecules as we model transpiration.
First assemble the pop beads in a line, popping them together. Water droplets like to stick to other water droplets (this is called cohesion — you see this when water drops join together on glass during a rain).
Next, place the line of pop beads inside the clear straw. This represents the water molecules inside the xylem (the vascular tissue inside plants that conducts water up through the plant), right under the stomata. The stomata is the opening where water leaves the plant, usually on leaves.
Now grab the top bead and pull. What happens to all of the other water molecules when you pull the first one out? They all follow along because of how strong the cohesion is between the water molecules, and water is pulled up through the plant as water at the stomata surface evaporates.
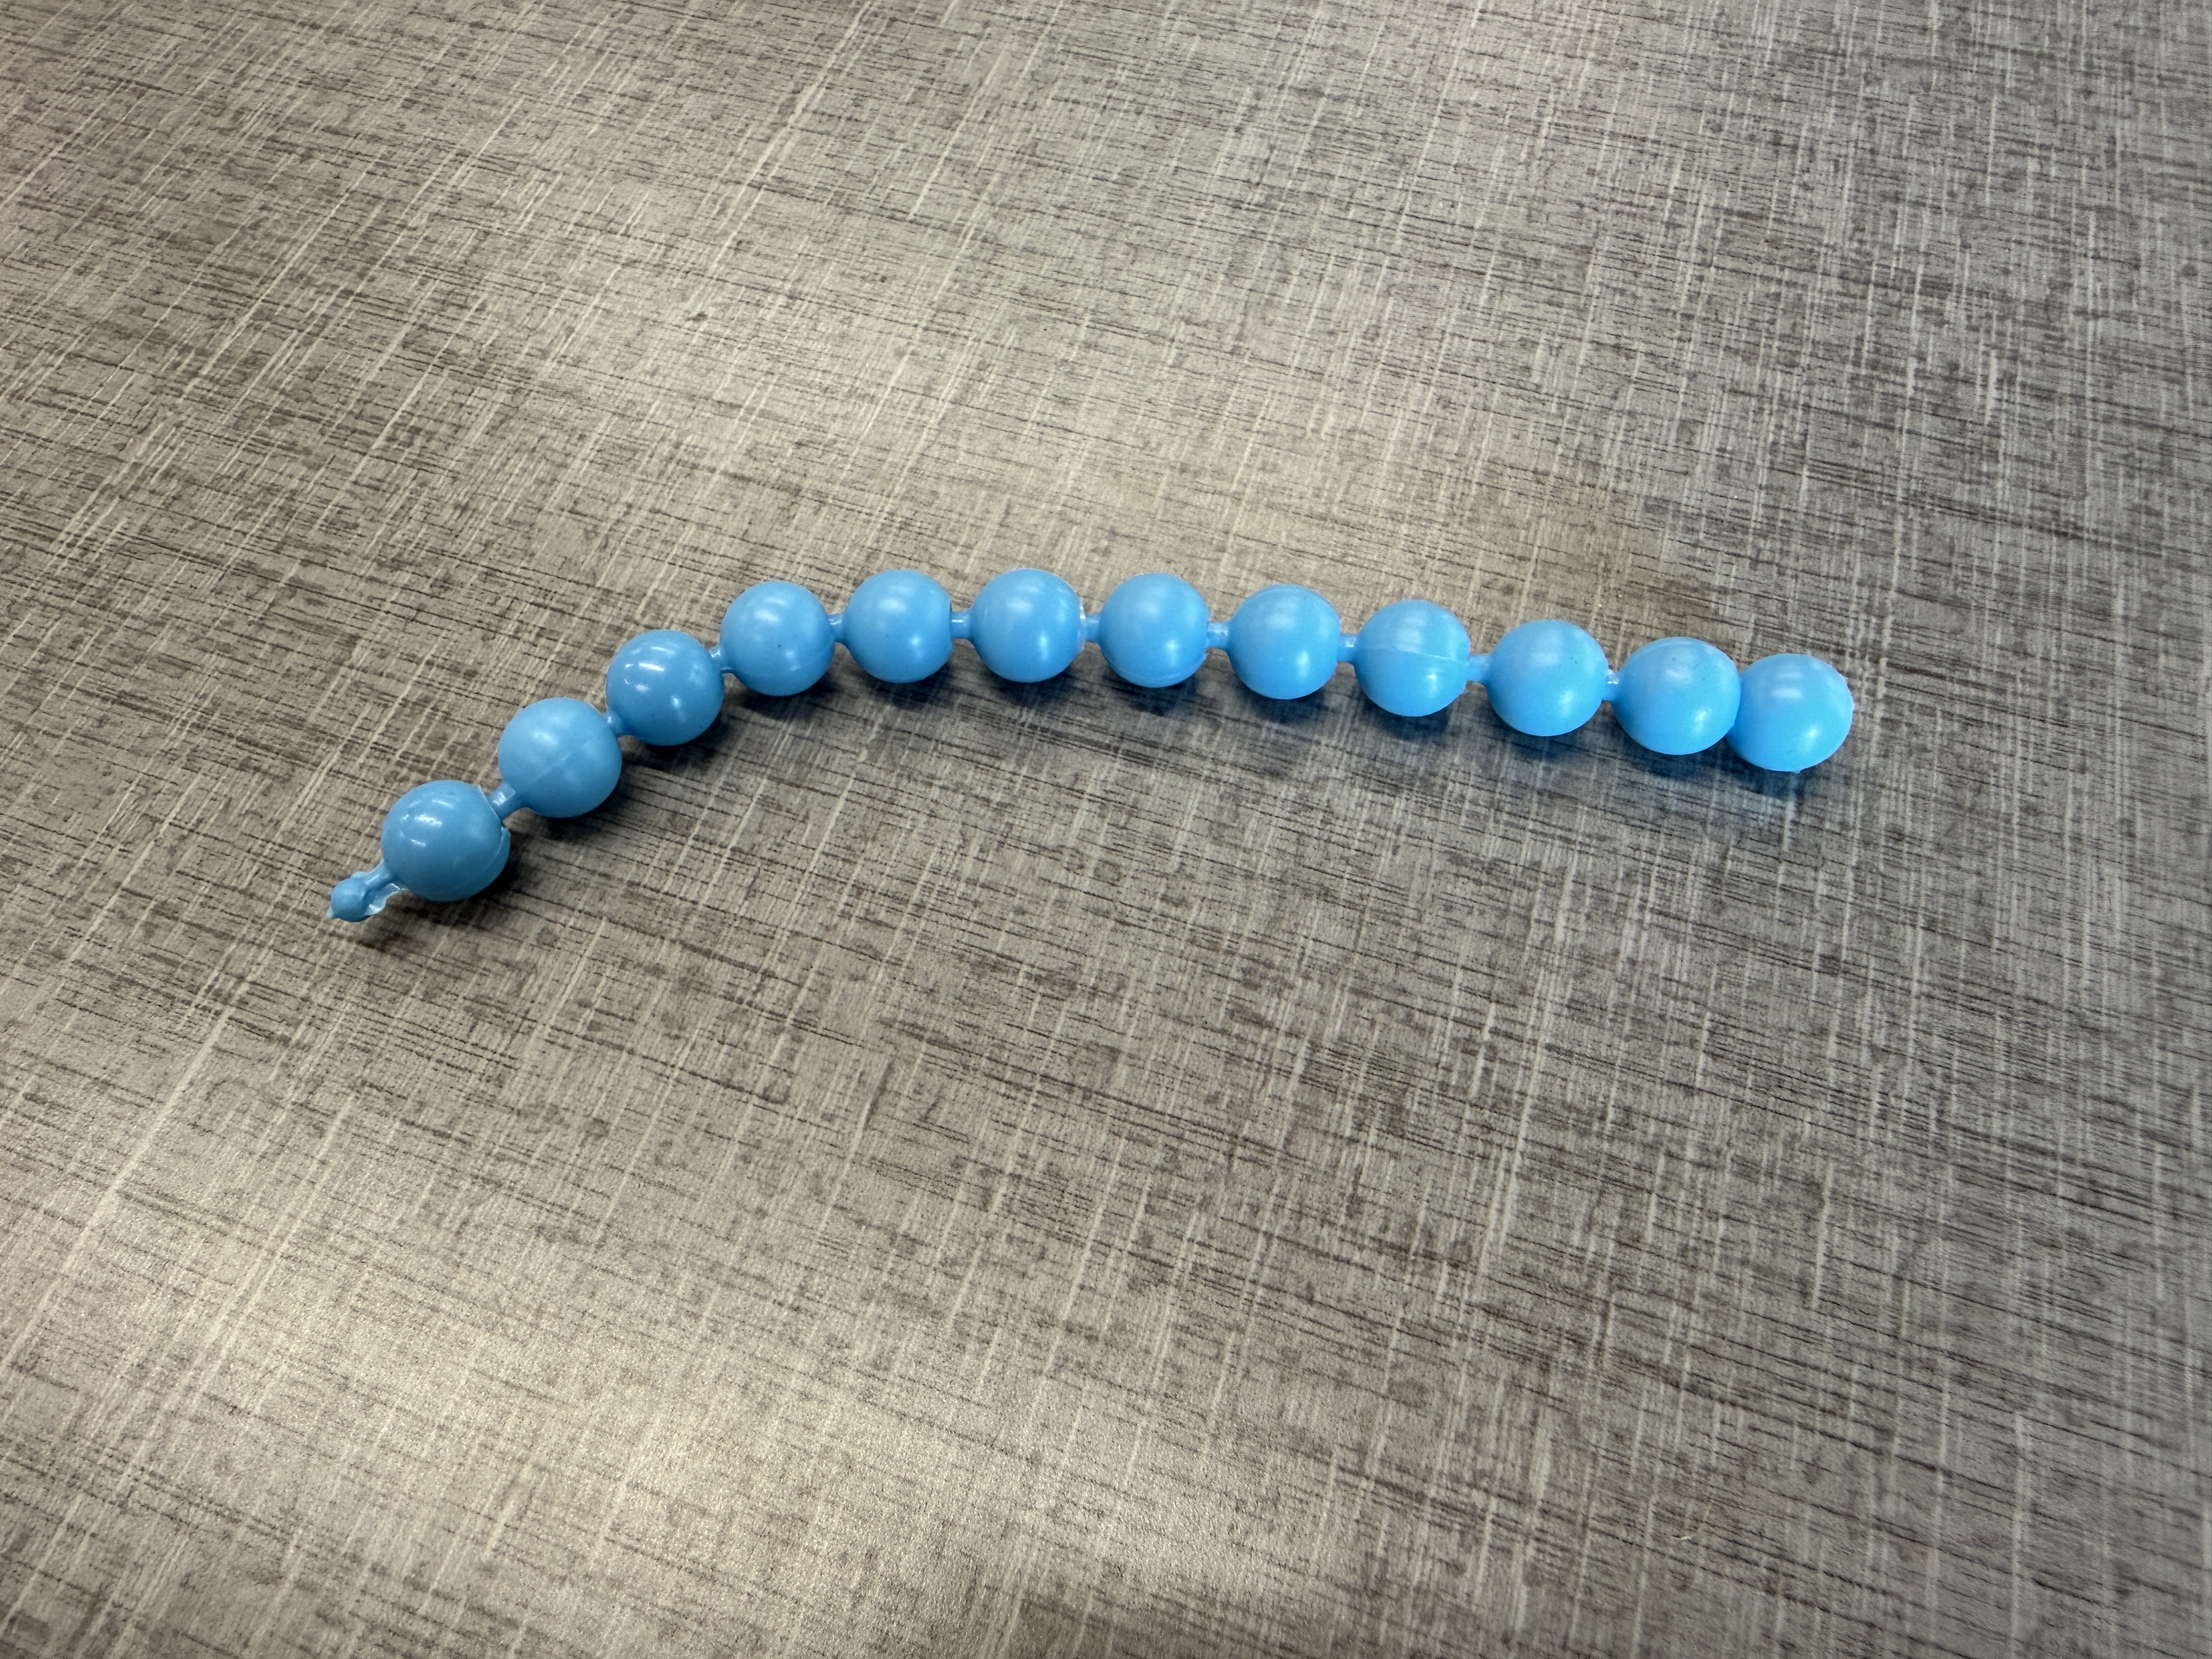 Figure 73: Pop beads assembled in a line.
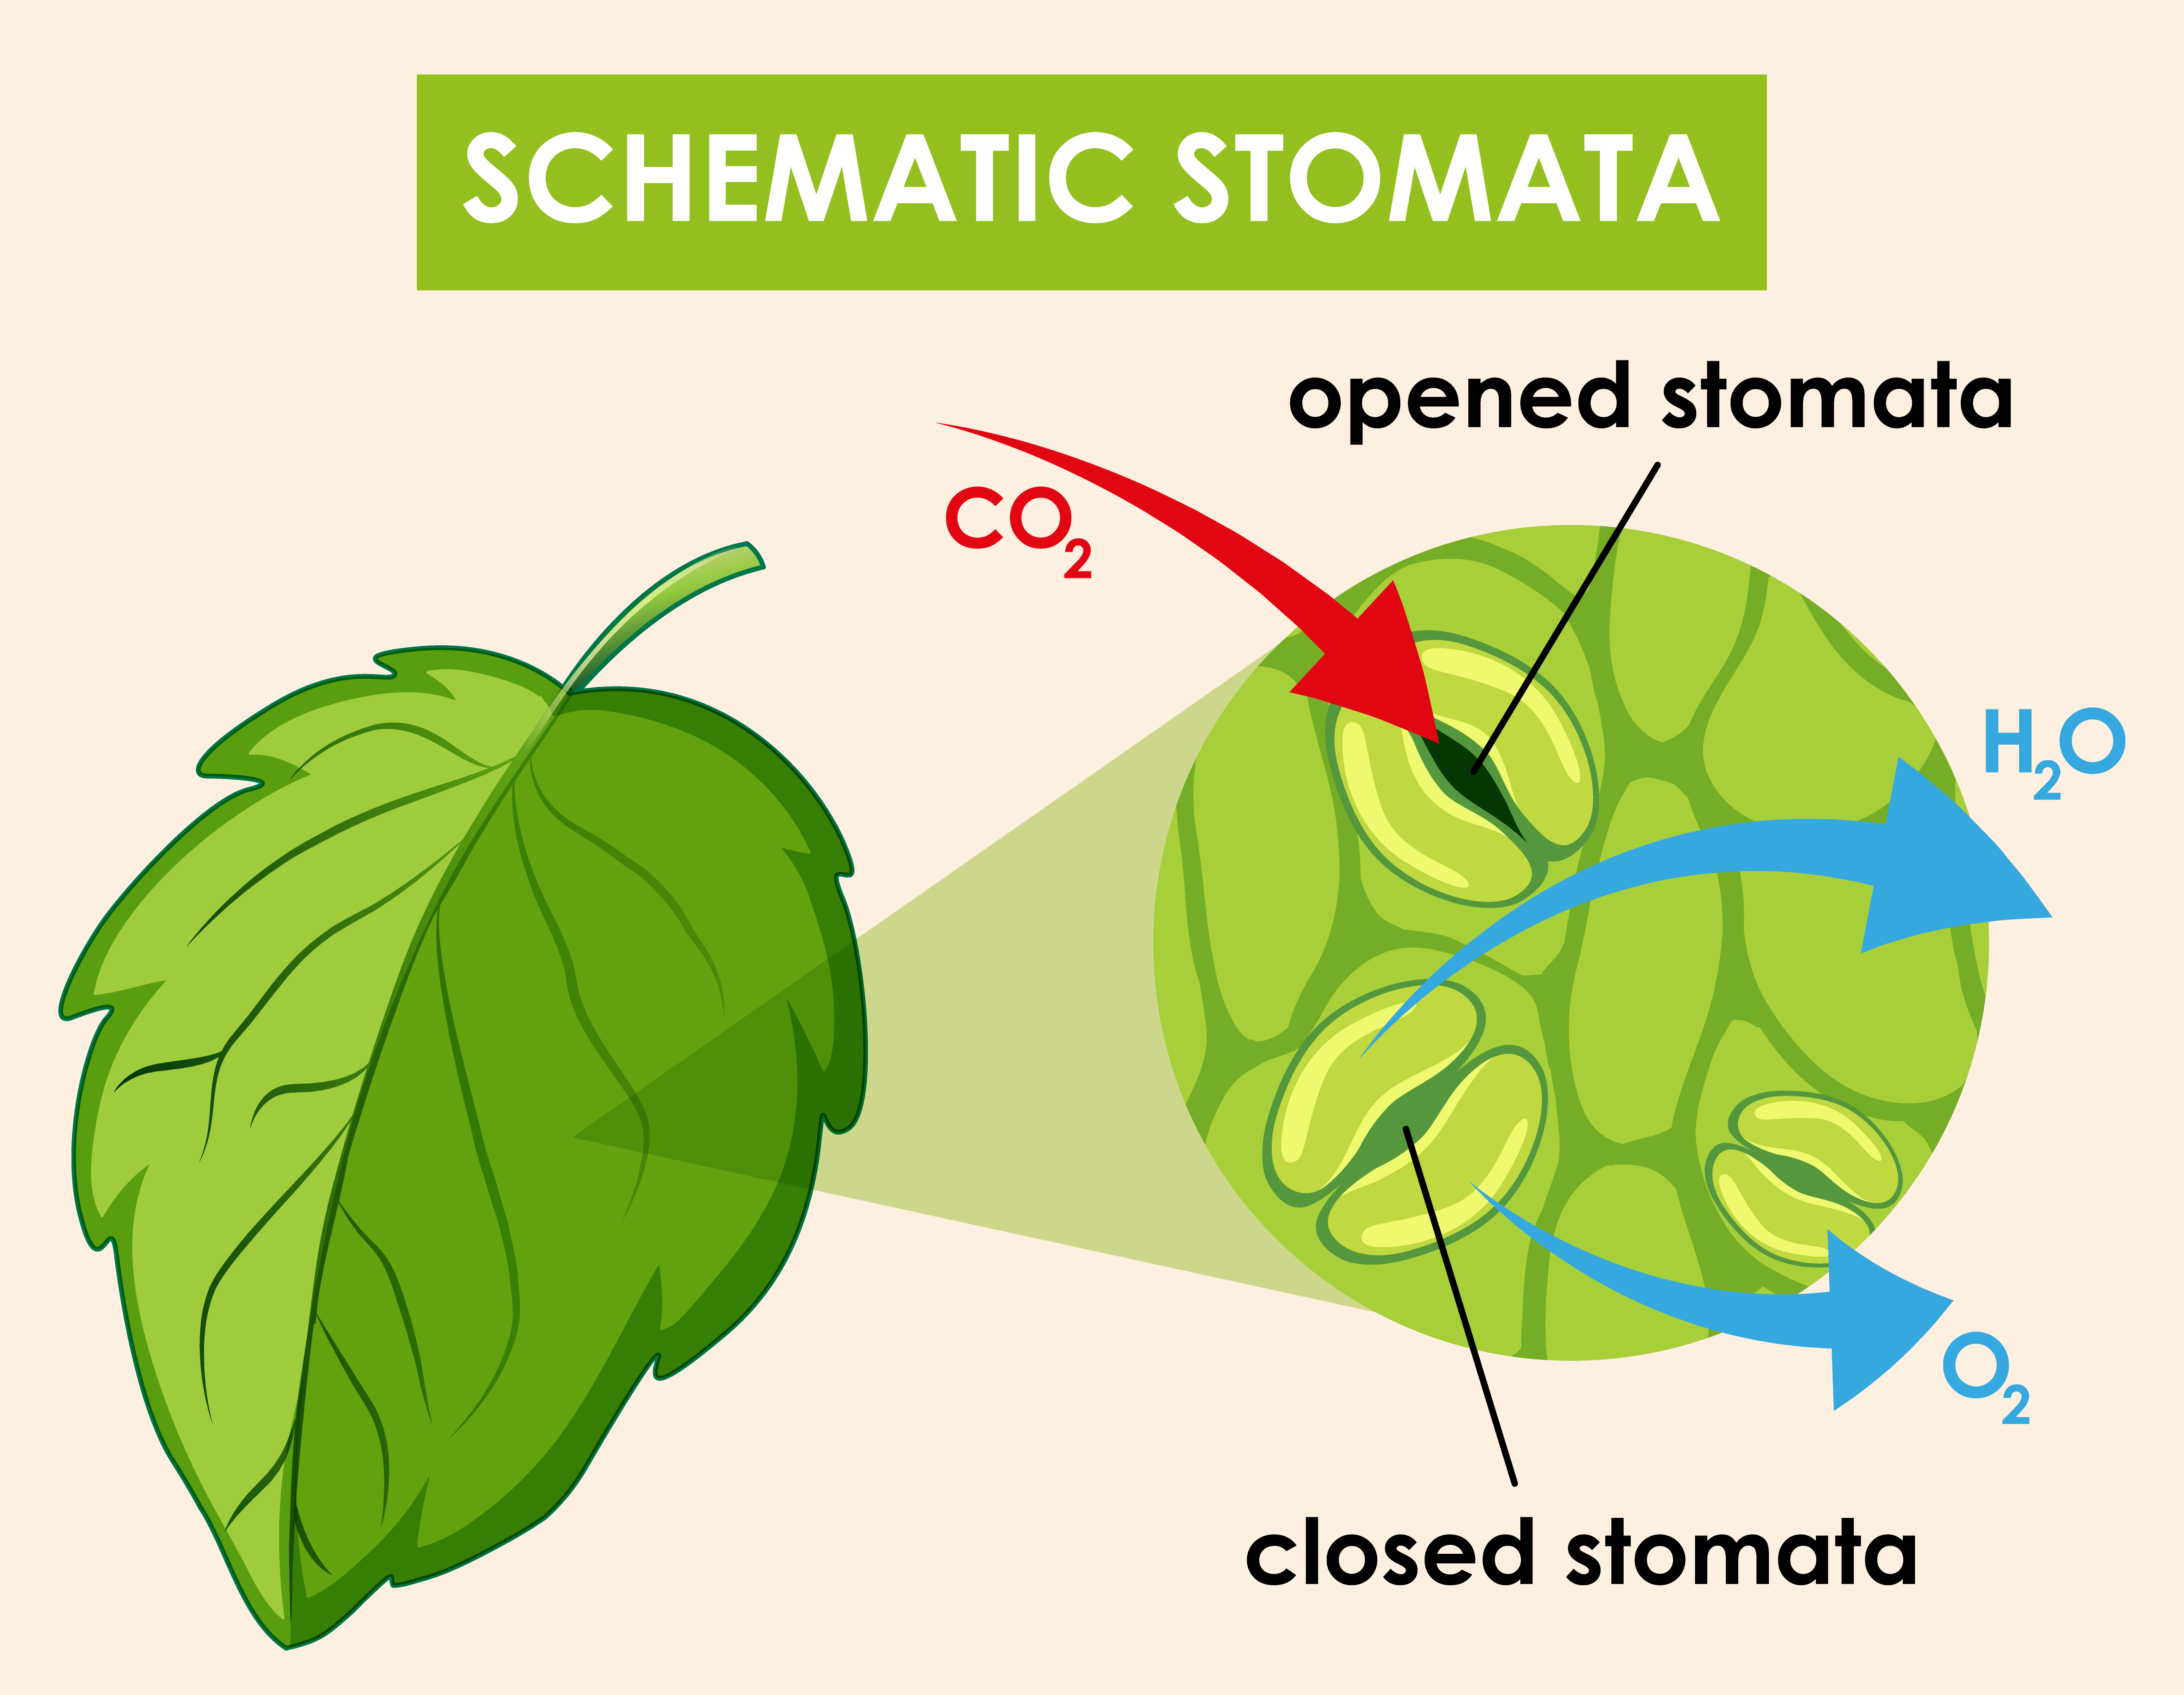 Figure 74: When the stomata is opened, water and gas leave. When the stomata is closed, no water or gas molecules pass into or out of the plant.
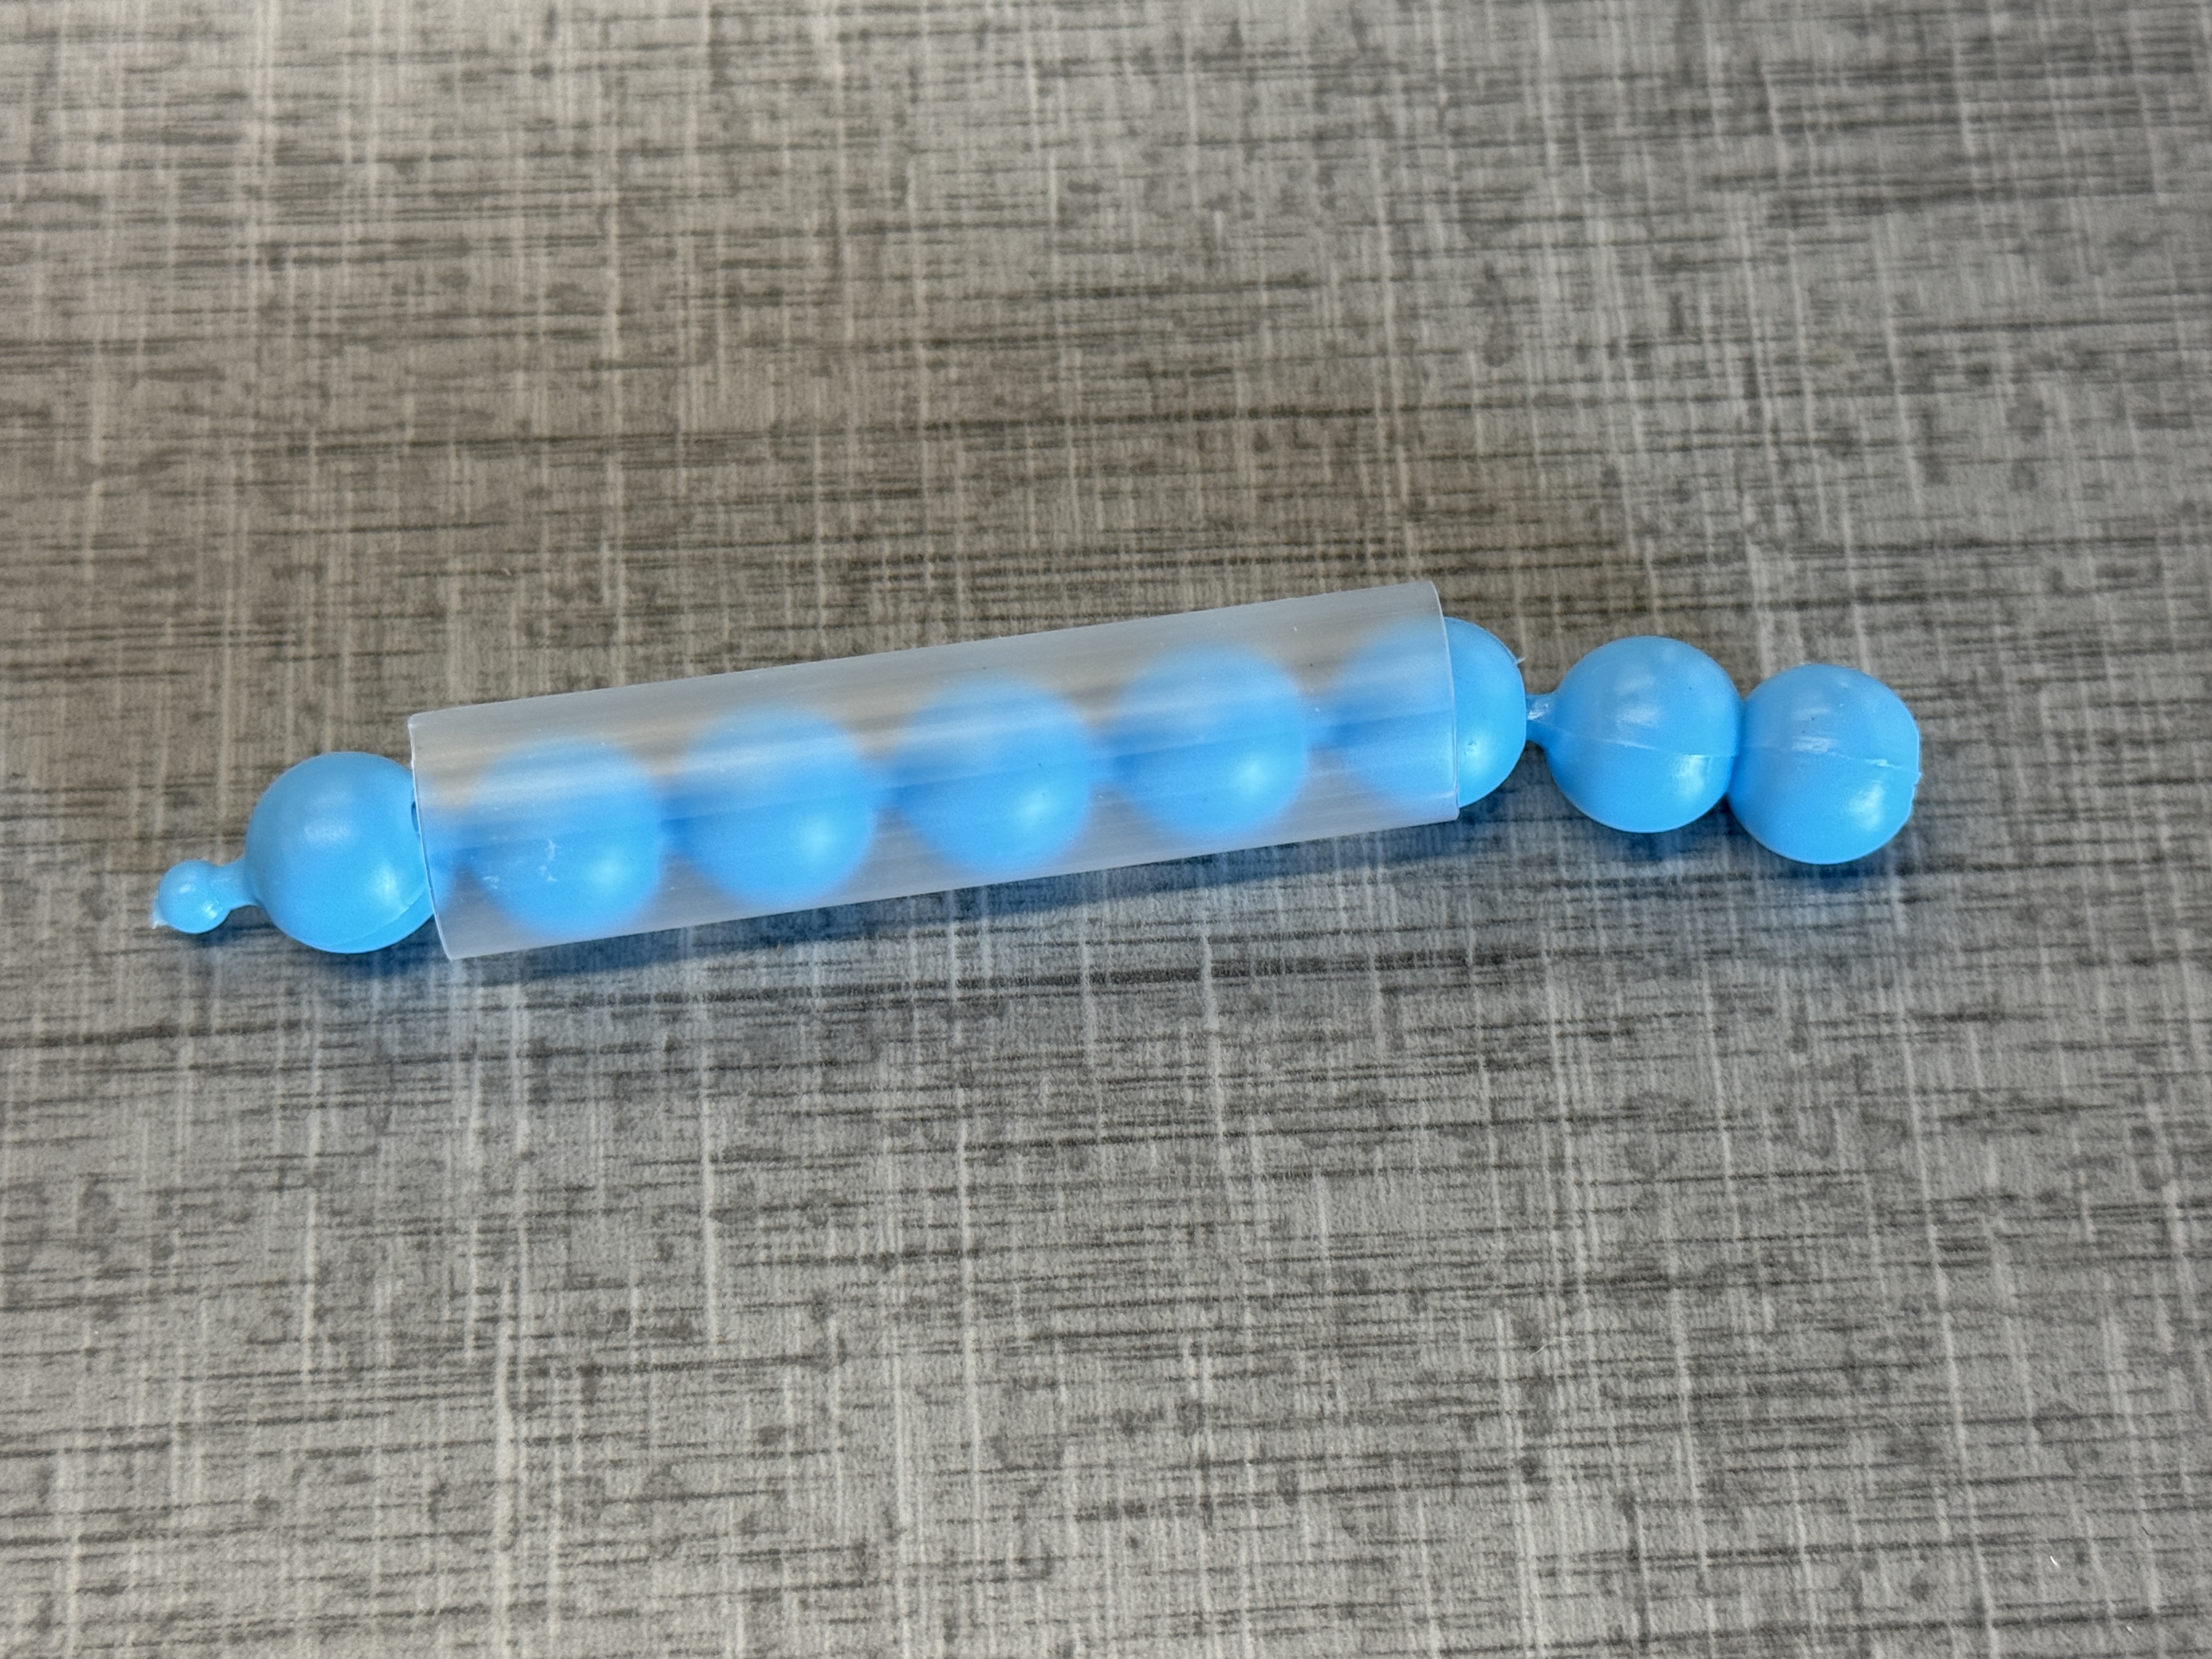 Figure 75: Pop beads in the clear straw.
For plants to survive, they make sugar (their food) during photosynthesis. Photosynthesis requires the plant’s stomata to be open to exchange carbon dioxide and oxygen. But as we’ve learned, when stomata are open, water is lost through transpiration. How do plants make sure to get enough carbon dioxide for photosynthesis, when doing so makes them lose water (vital for survival)? It can be tricky balancing the pros and cons of opening their stomata. Do you think you could do this successfully? Let’s play a game to find out.
Activity: The plant Game
Developed at the Cornell Institute for Biology Teachers.
Supplies Needed:
- Graduated cylinder
- Dice
- Laminated leaves and flowers
- Paper clips
- Wooden rod
- Pipet
- Game sheet
- Cup to hold water
- Weather chart (found on page 61)
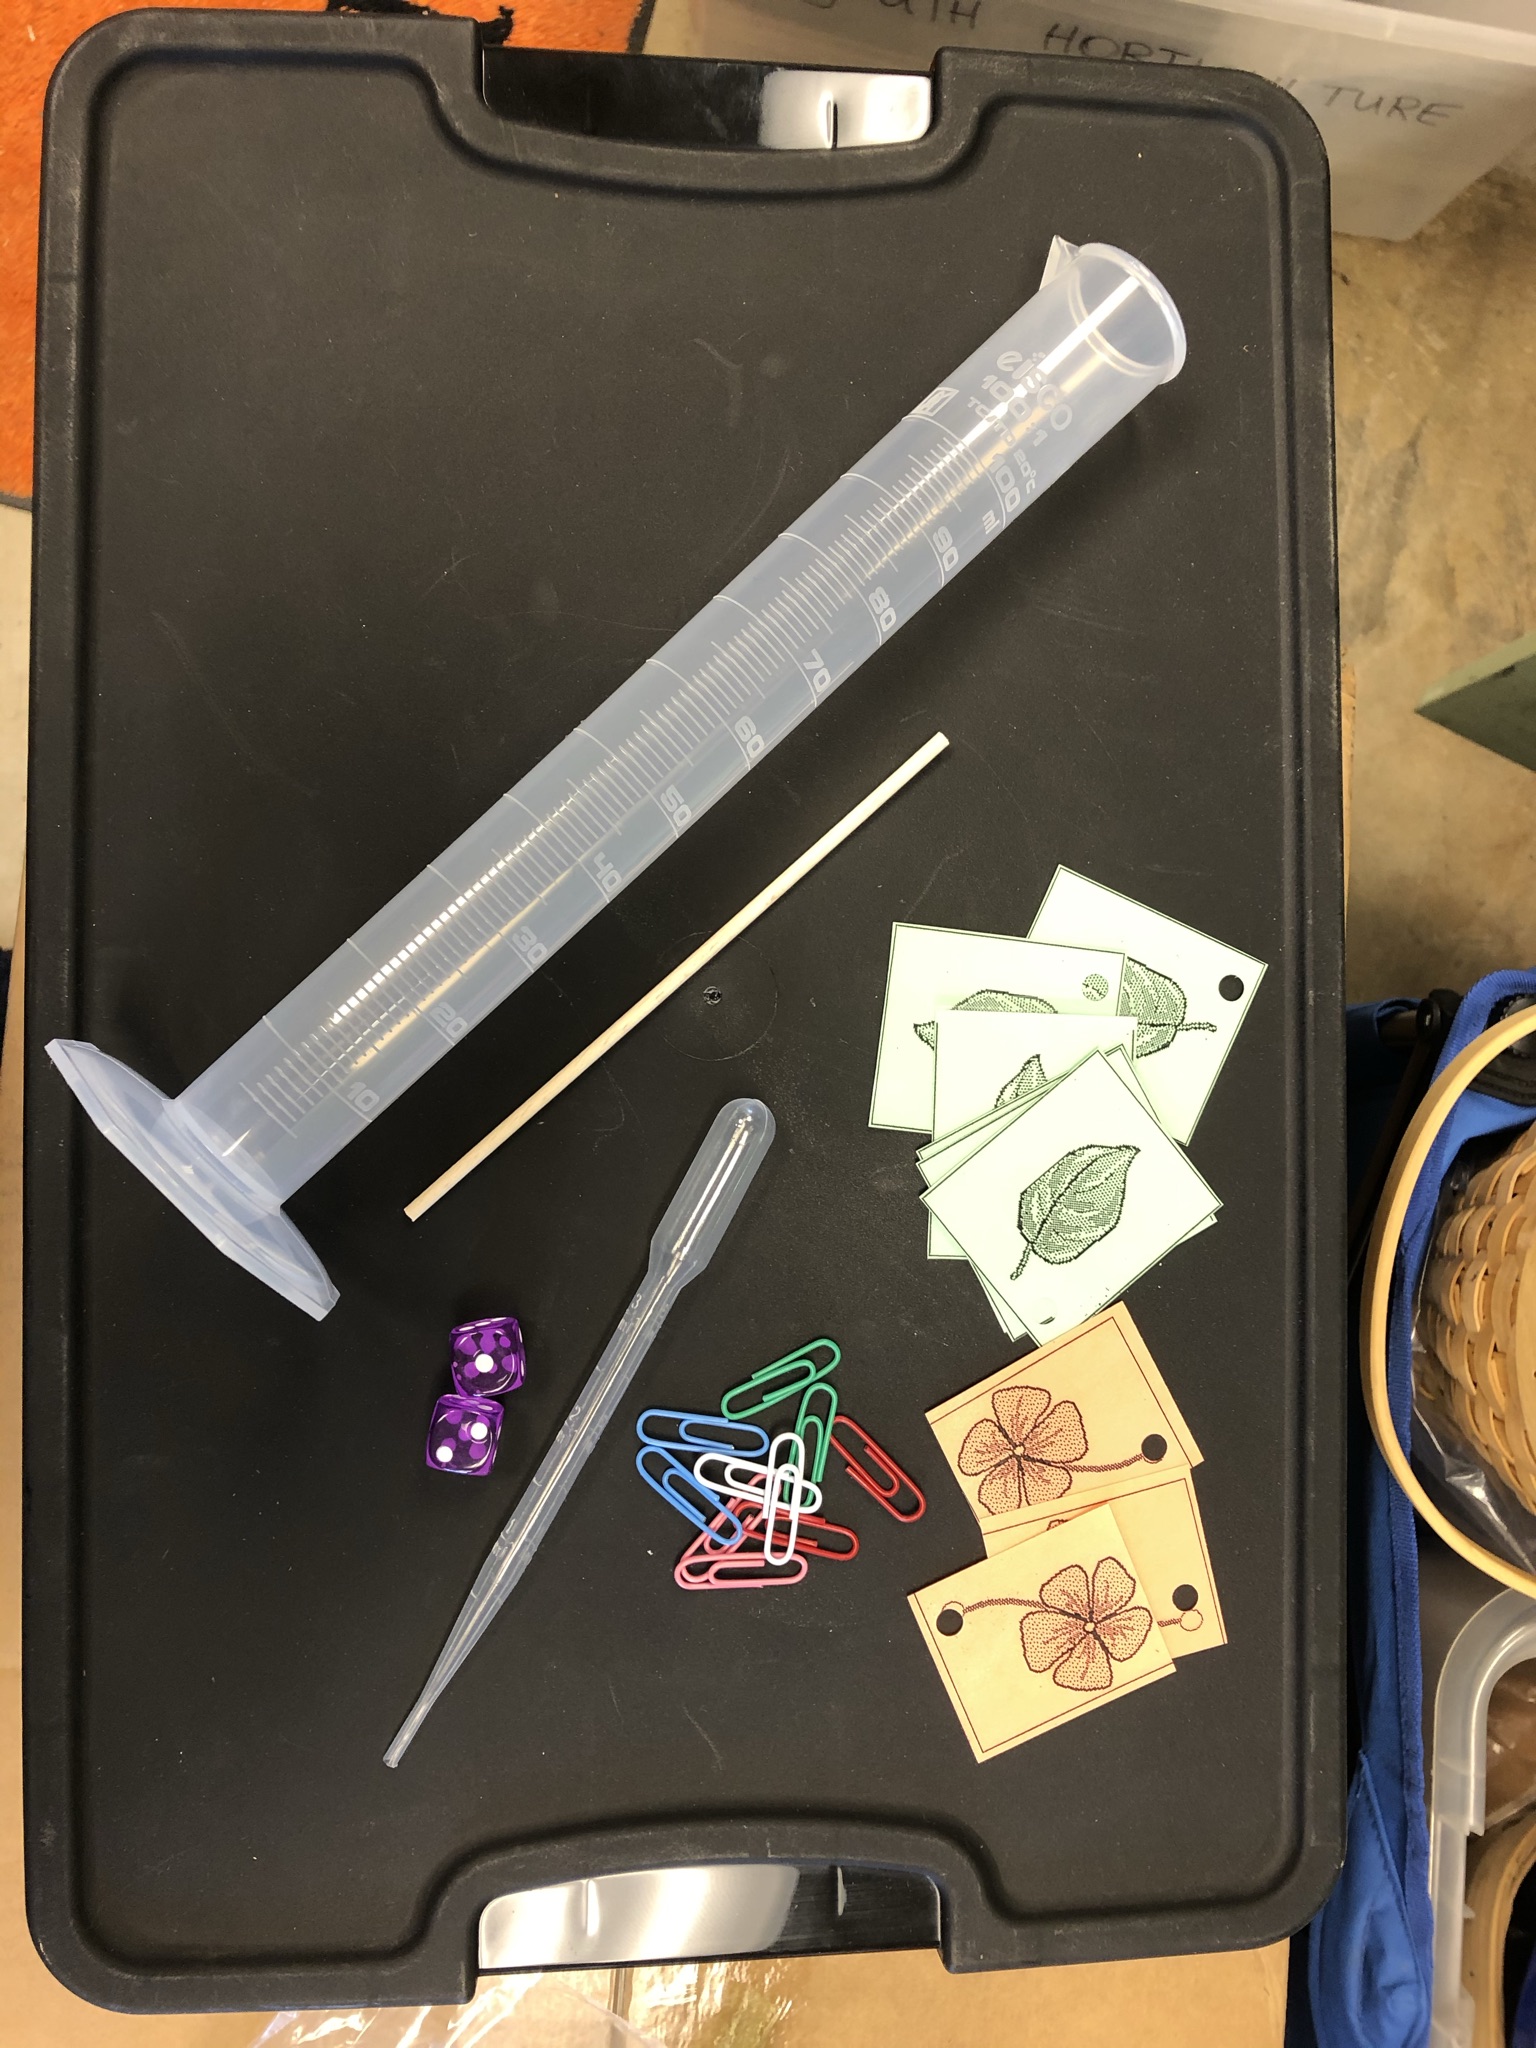 Figure 76: Supplies needed.
Do you have what it takes to be a plant? Can you survive a growing season (and even better, reproduce within the growing season?)
Plants make their own food using a process known as photosynthesis. Plants perform photosynthesis using the sun. That is, they use carbon dioxide from the atmosphere and water from the ground to make sugar for themselves, and release oxygen and water as waste products. We use that oxygen and release carbon dioxide.
The photosynthesis reaction is:
6 CO2 + 12 H2O
Carbon dioxide + water (during photosynthesis) yields sugar, oxygen and water (water is always a byproduct of metabolism which is all of the chemical reactions occurring to keep life going):
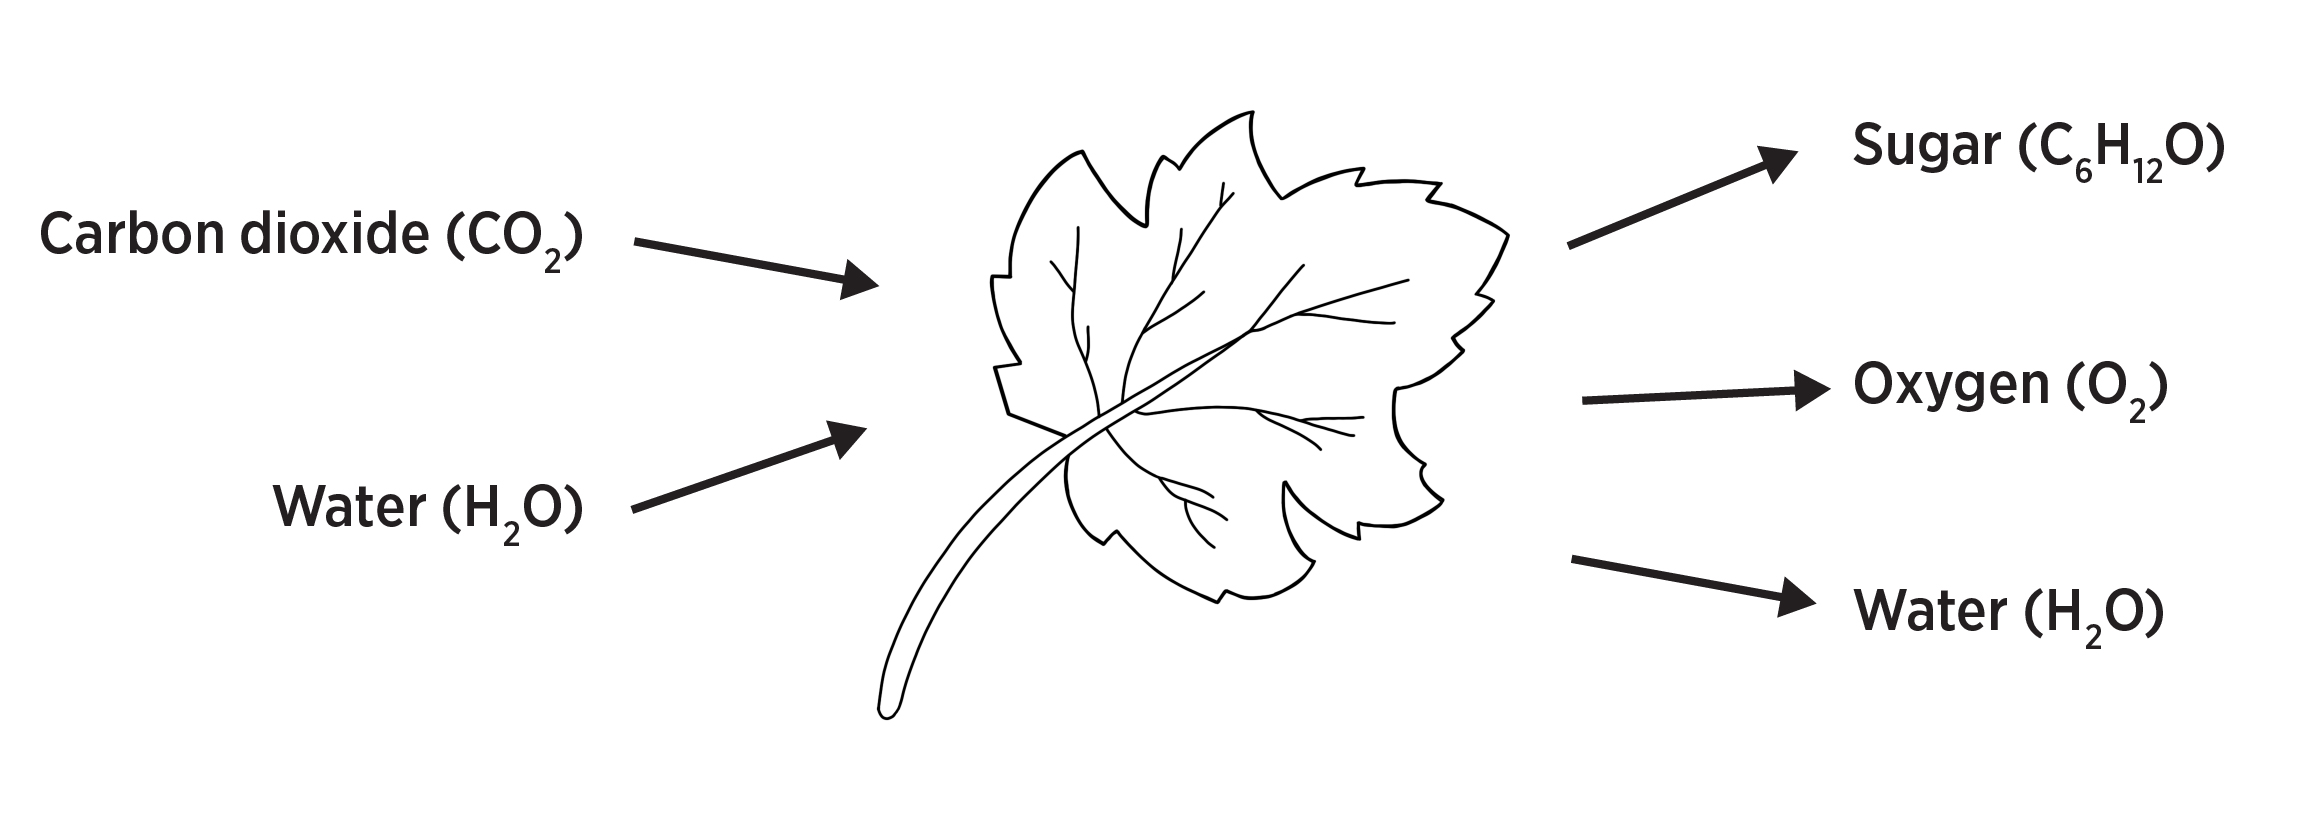 Figure 77: Visualizing photosynthesis
Carbon dioxide is taken in via pores in the leaves called stomata. While the stomata are open, gases such as carbon dioxide and oxygen can freely enter and leave the plant. However, open stomata also let water evaporate from the leaf.
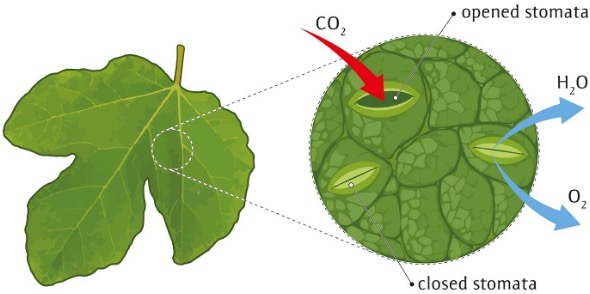 Figure 78: Opened and closed stomata.
Water is taken in through the roots of a plant, and it goes up (and only up) the plant in vascular tissue (think of it as tubes) called xylem. Water molecules are attracted to each other, and as some evaporate from the stomata, the water molecules behind it are also pulled up (this process is called transpiration).
Water moves from the roots to the leaves and then exits the plant. If too much water is lost through the leaves, the plant will wilt and eventually die.
| Image | Description |
|---|---|
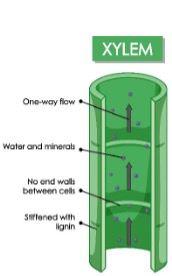 | Figure 79: Diagram of xylem. |
The sugar produced by photosynthesis is used as energy by the plant to grow, stay alive, repair itself, and reproduce.
Photosynthesis and transpiration are impacted by weather, as you are about to experience.
The object of the Plant Game is to successfully make flowers (reproduce) before the killing frost of autumn. To set up the plant, fill your graduated cylinder to the very top with water (past all the markings). Put one leaf and one paper clip on the wood stick and lay it across the top of the cylinder so that the paper clip is in the water. This represents a newly germinated plant in the spring, in soil soaked from spring rains.
The weather you roll (with one die) will affect plant growth. Depending on the weather, you may undergo photosynthesis and make sugars, and/or lose water through your leaves. The more leaves you have, the more sugar you make and the more water you lose.
From week to week (depending on the weather), you will accumulate sugars. You can use these sugars to grow another root or leaf, or even a flower. Roots and leaves cost 10 sugars each; flowers cost 21 sugars. You can spend your sugars or save them up as you go. It’s up to you.
Use the pipet to add or remove water. The millimeters are etched on the pipet. Use a cup to hold extra water. If it rains and you add more water than you have room for in your cylinder, you don't get to save it. In real life it would wash away downhill. Plants don’t get to save extra water. Just put in as much of that rain shower as can fit in your cylinder.
As you buy roots, you can make a paperclip chain to show your roots growing down. As you add leaves (or flowers), put them on your stick.
If the water level falls below the last paperclip, your roots cannot reach water and you will not be able to perform photosynthesis. You will have to buy a root or wait for a rainy week.
You don’t know when the growing season will end with the killing frost. Starting with week 15, Mother Nature (another person) will roll a pair of dice before every turn that you take. If doubles are rolled, the first frost has occurred, and your plant is dead. Otherwise your plant gets to grow that week.
Successful plants make at least one flower (and hopefully more) before dying.
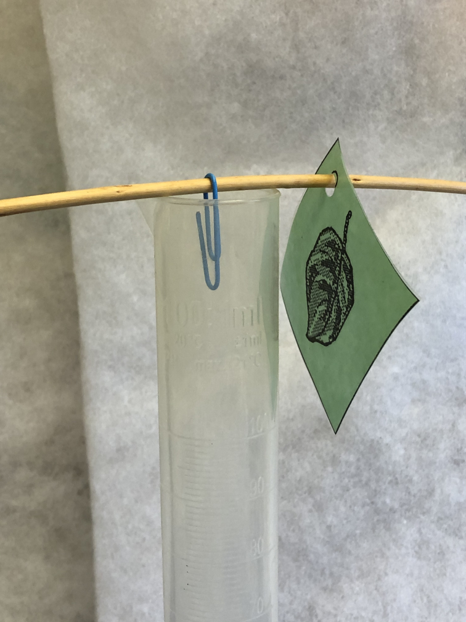 Figure 80: Set up for the Plant Game.
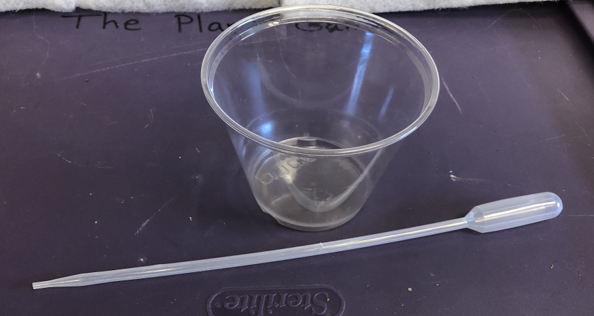 Figure 81: Cup and pipet.
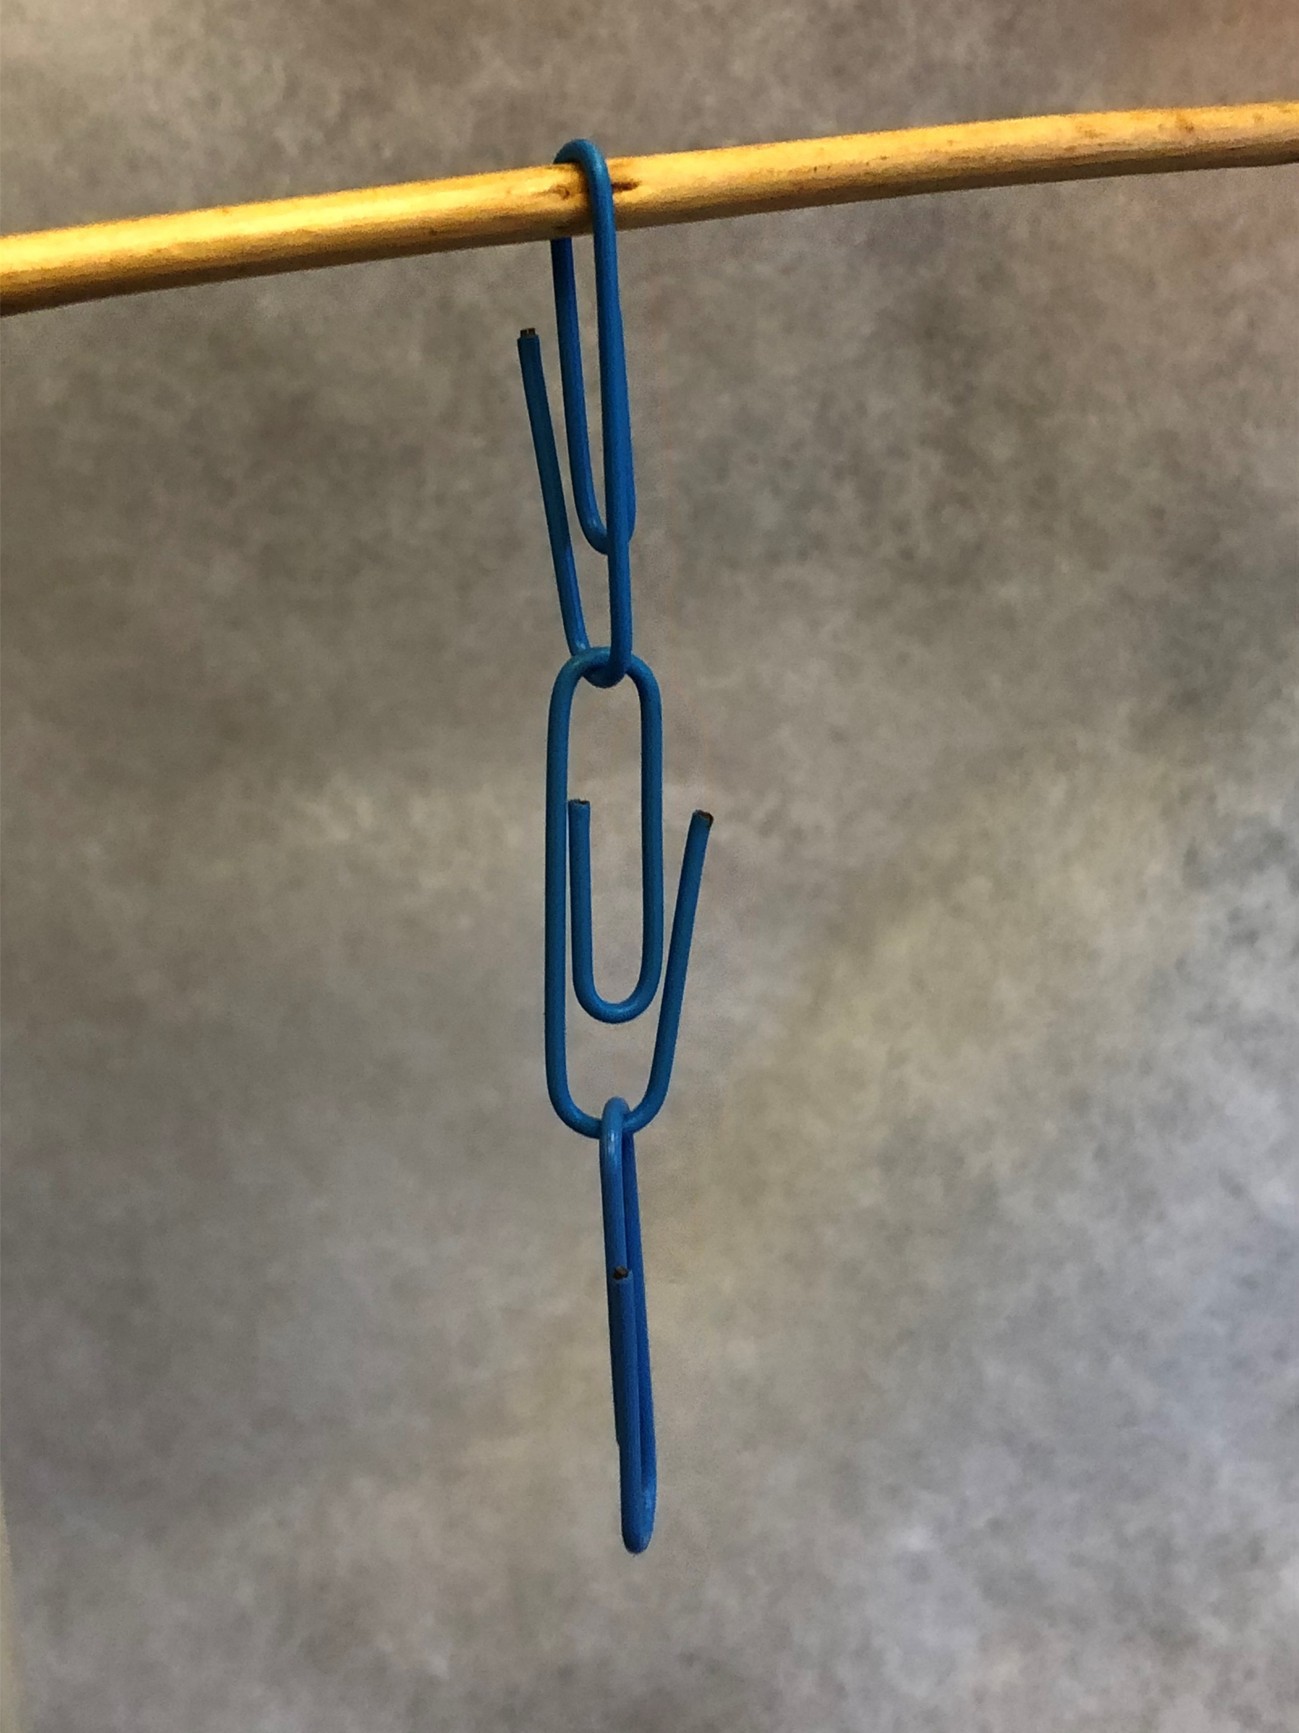 Figure 82: Three roots.
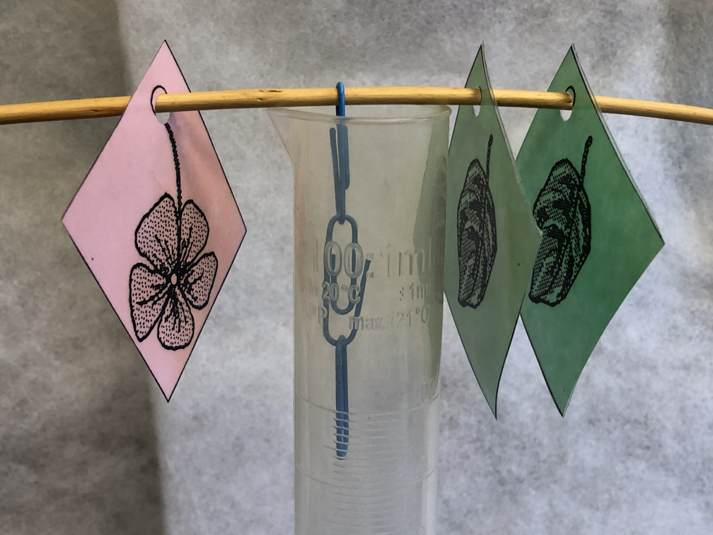 Figure 83: One flower and two leaves.
| Numbers rolled | Weather for the week | Photosynthesis rate | Water gain/loss |
|---|---|---|---|
| 1 | Chilly, downpour | No photosynthesis | Gain 20 mL of water |
| 2 | Cool, light rain | Make 1 sugar per leaf | Gain 5 mL of water |
| 3 | Very humid, cloudy | Make 2 sugars per leaf | Lose 1 mL per leaf |
| 4 | Warm, partly cloudy | Make 3 sugars per leaf | Lose 2 mL per leaf |
| 5 | Humid, sunny | Make 4 sugars per leaf | Lose 3 mL per leaf |
| 6 | Sunny, very dry, hot | Make 4 sugars per leaf | Lose 4 mL per leaf |
Here’s how the game works:
After you have set up your plant, roll the die. Let’s say the first roll is a 6. According to the weather chart, it is a sunny, very dry, hot week. You make 4 sugars per leaf (at this point you have one leaf, so you make 4 sugars) and lose 4 mL of water per leaf (you lose 4 mL because of your one leaf).
| Week | Frost? | Number of sugars made | Add or remove water - are your roots in water? If not, buy a root | Subtract 10 sugars per leaf or root bought (grown) | Subtract 21 sugars per flower bought (grown) | Grand total of sugars in plant |
|---|---|---|---|---|---|---|
| 1 | x | 4 | Yes/No | 4 | ||
| 2 | x | Yes/No | ||||
| 3 | x | Yes/No | ||||
| 4 | x | Yes/No | ||||
| 5 | x | Yes/No |
You write a 4 for the number of sugars you made this week, remove 4 mL of water using the pipet and circle yes that your roots are touching water. The righthand column is your checkbook with a running total of sugars that you have saved.
Let’s say your next roll is a 4. According to the weather chart, the weather for the week is warm and partly cloudy. You make 3 sugars per leaf and lose 2 mL per leaf.
Enter 3 sugars in your sugars made column because you have one leaf. Remove 2 mL of water because you have one leaf. Your roots are still in water. You now have 7 sugars. You don’t have enough to buy a root or a leaf yet.
| Week | Frost? | Number of sugars made | Add or remove water - are your roots in water? If not, buy a root | Subtract 10 sugars per leaf or root bought (grown) | Subtract 21 sugars per flower bought (grown) | Grand total of sugars in plant |
|---|---|---|---|---|---|---|
| 1 | x | 4 | Yes/No | 4 | ||
| 2 | x | 3 | Yes/No | 7 | ||
| 3 | x | Yes/No | ||||
| 4 | x | Yes/No | ||||
| 5 | x | Yes/No |
Let’s say your next roll is a 5. The weather is humid and sunny. You make 4 sugars (still just have one leaf) and lose 3 mL because you have one leaf. Write a 4 in the sugars made column and take out 3 mL of water. Perhaps you’ve decided that since you now have a total of 1 sugars, you want to buy a leaf. Subtract 10 sugars, put another leaf on your stick and put that you are down to one sugar in your grand total of sugars.
| Week | Frost? | Numbers of sugars made | Add or remove water - are your roots in water? If not, buy a root | Subtract 10 sugars per leaf or root bought (grown) | Subtract 21 sugars per flower bought (grown) | Grand total of sugars in plant |
|---|---|---|---|---|---|---|
| 1 | x | 4 | Yes/No | 4 | ||
| 2 | x | 3 | Yes/No | 7 | ||
| 3 | x | 4 | Yes/No | -10 (L) | 1 | |
| 4 | x | Yes/No | ||||
| 5 | x | Yes/No |
As you make sugars, remember to make sure that your roots can touch water or buy a root to stay safe. You can buy as many leaves and roots and flowers as you can aford. Remember, as you grow more leaves, you make more sugars but also lose more water. Good luck. Remember to have Mother Nature roll two dice every week starting with week 15. You never know when your chances to reproduce will end.
Preventing Soil Erosion
When it rains, water can wash away soil, which is called erosion. Soils covered in grasses don’t erode as fast. The grass roots are very fibrous and hold the soil around them tightly. Uncovered soil washes downhill, causing erosion. As land erodes, the stream follows it. Enough erosion in one area can affect the location of rivers, causing them to shift in position.
In the late 1800s, the federal government offered settlers 160-acre plots on lands in the west that were unoccupied (due to forced removal of the Native American tribes). These were claimed in land runs in which tens of thousands of people lined up to stake a claim. Some of these land runs occurred in present-day Oklahoma (such as the land run on April 22, 1889, which had millions of available acres).
The settlers weren’t always experienced farmers or ranchers, and the land was plowed deeply and became overstocked with cattle (who ate even the crowns of the grass plants). The deep plowing tore apart the deep roots of prairie grasses that were holding the soil together.
During the 1930s, several dry years in a row dried out the exposed topsoil. Dust storms, many severe, occurred when dry, bare topsoil was swept by the wind into huge clouds, traveling across the Great Plains and leaving drifts several feet high in places. Some of the worst storm damage was in the Oklahoma panhandle as well as parts of Colorado, Kansas, New Mexico and Texas. Fences and houses were partially or wholly buried, livestock starved to death and many families had to move (many to California) to keep from starving to death themselves.
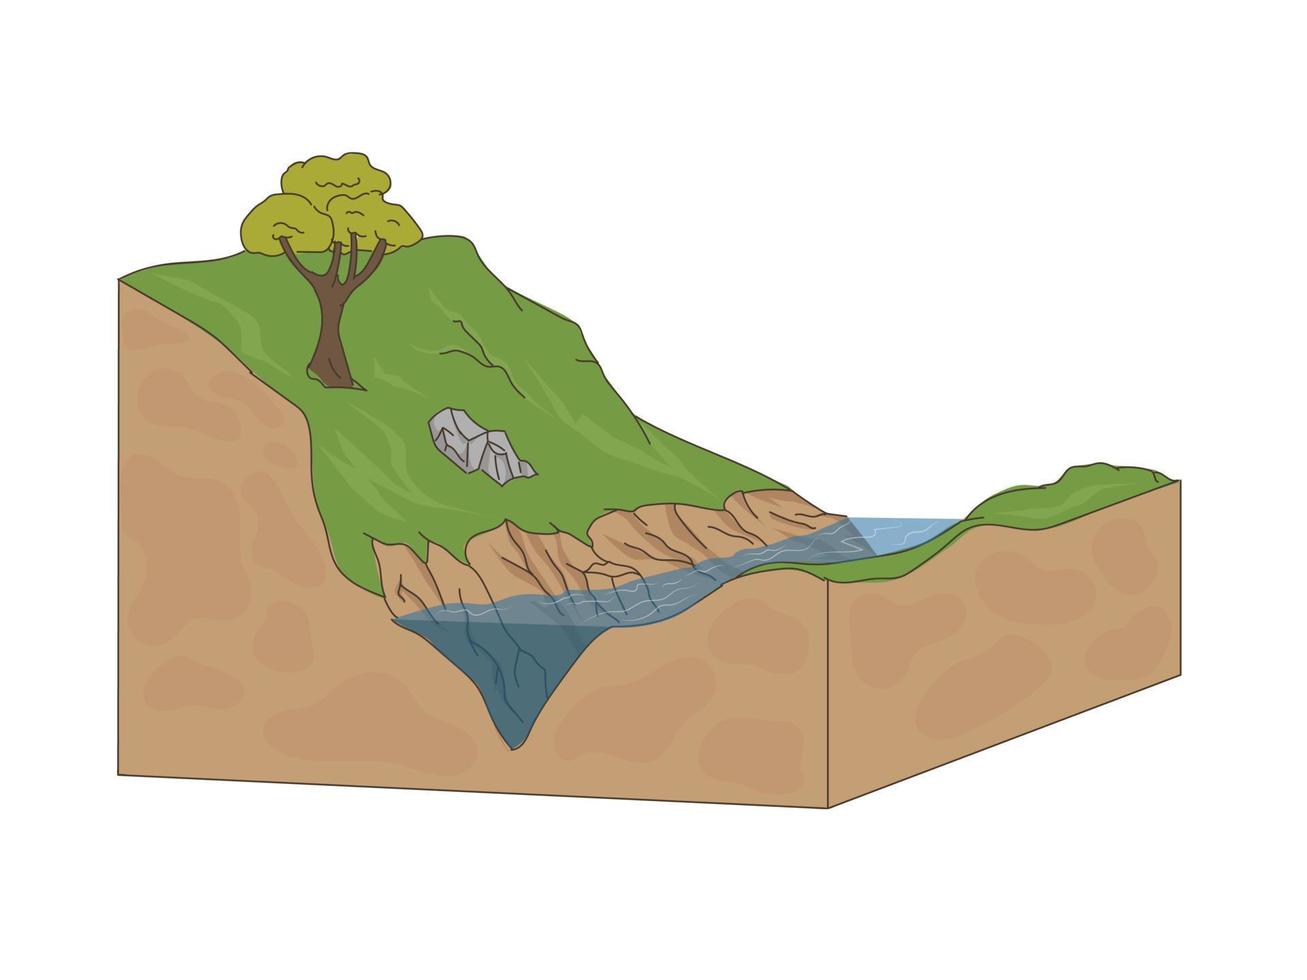 Figure 84: Soil without grass roots erodes.
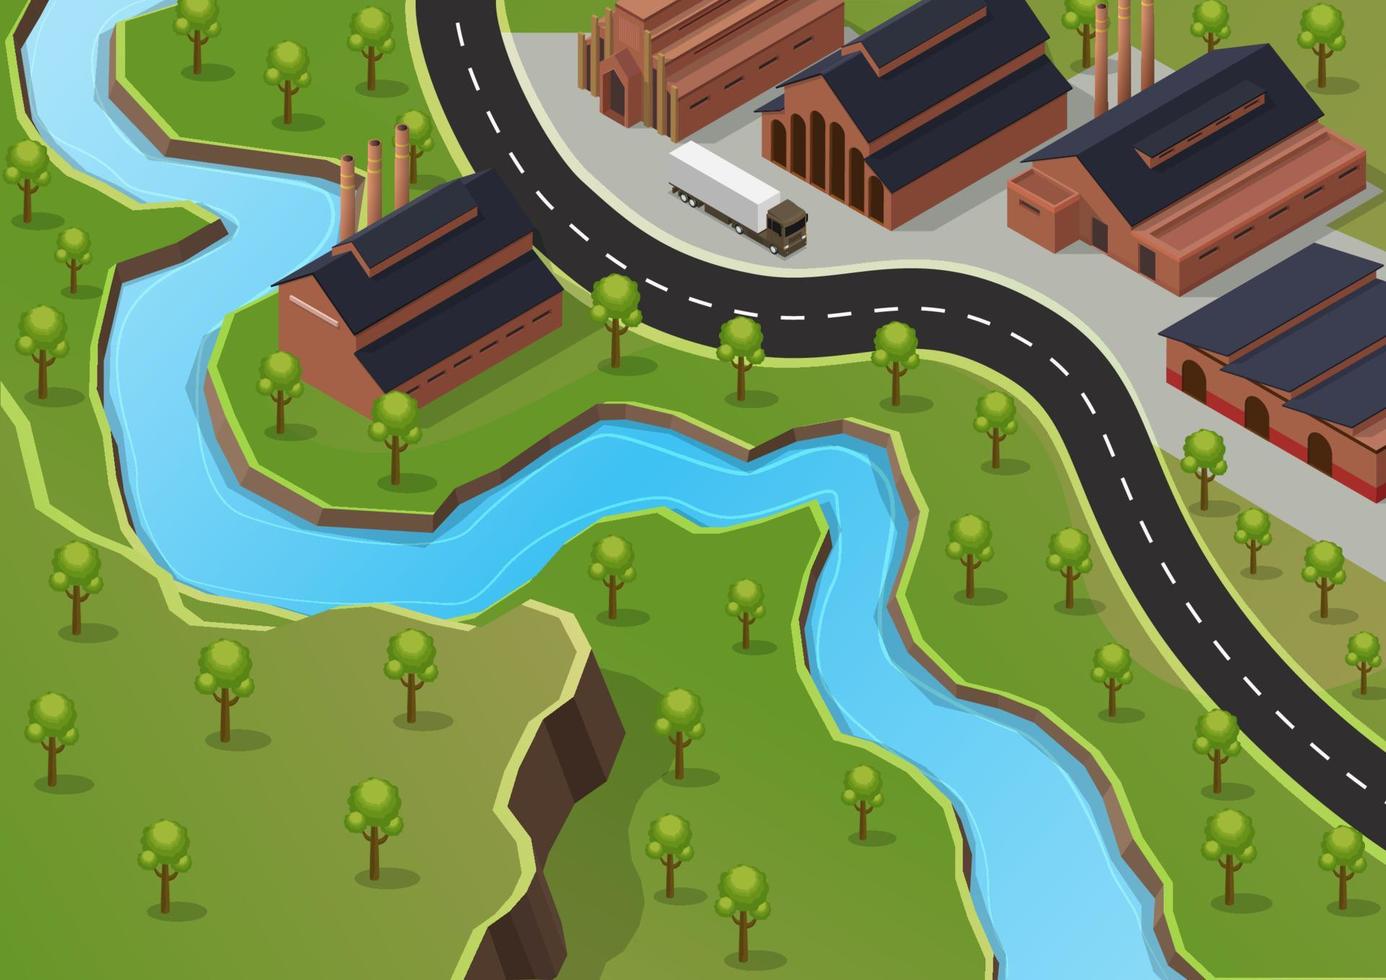 Figure 85: Rivers flow faster on the outside of curves. This river will eventually take out the street in two places.
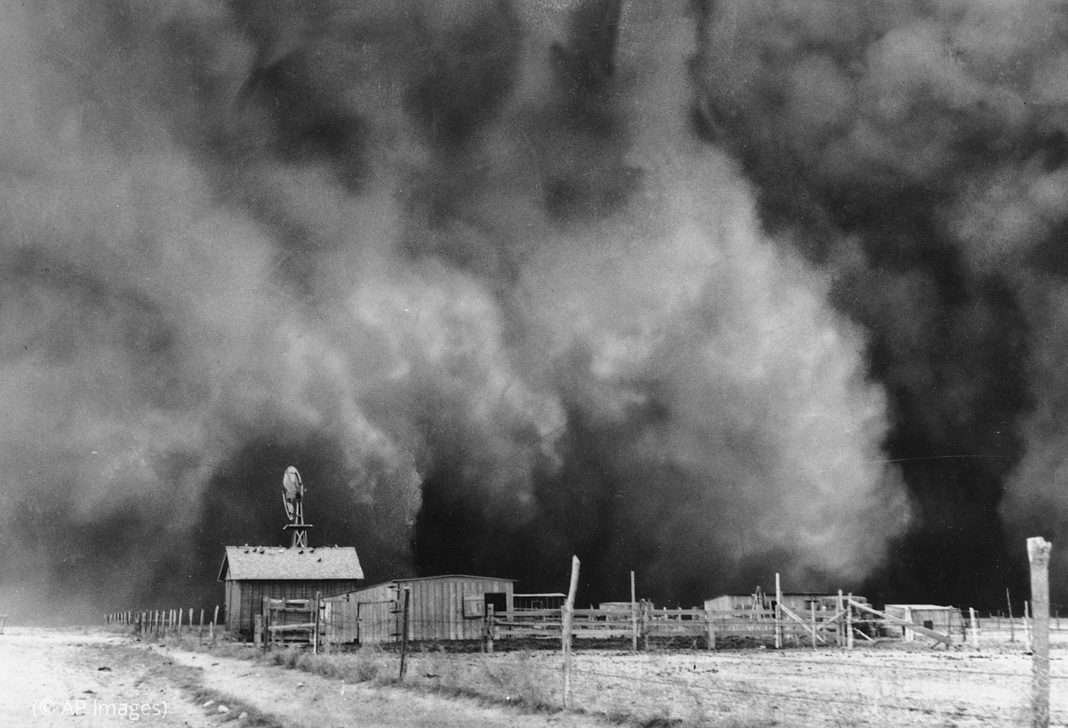 Figure 86: Dust storm, 1930s (Associated Press).
Activity: Erosion Control
To demonstrate the value of grass roots to erosion control, you can use two baking pans or similar containers. Plant one with grass seed and leave one with just potting mix. After the grass has established (a couple of weeks) and is a thick carpet, tilt both containers (one with grass, one just with soil) to the same degree. Using a watering can, start soaking the soil in both pans. See what happens when you water the pan with the grass, compared to the pan with just soil. Grass is used to help with erosion on hillsides, because the grass roots are good at holding onto the soil and not letting it wash away.
Another good demonstration of erosion and erosion prevention can be seen using one of the Oklahoma Stream Trailers. Contact your local Extension office to get information on scheduling one for your group.
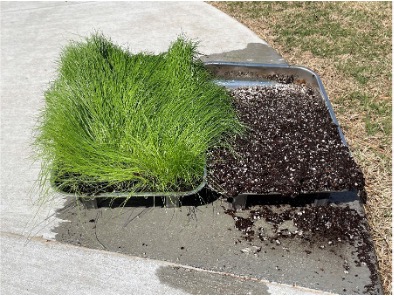 Figure 87: Baking pan with planted grass in it and baking pan with potting mix in it.
Water Filtration
Phytoaccumulation
Grasses absorb pollutants from water through their roots and store them in their stems and leaves (phytoaccumulation). Roots have little projections coming out of the outside layer of root cells (epidermal cells) that increase the root’s surface area. These are called root hairs, and help roots encounter and absorb additional water and nutrients. When roots take up excess nutrients such as phosphorus, it can prevent those nutrients from fertilizing local bodies of water and causing algal blooms, which can lead to eutrophication and the depletion of oxygen in the water, killing fish and other organisms.
Roots can also adsorb pollutants, holding onto the chemicals and preventing them from moving along with water.
Phytodegradation
Some grasses can absorb and break down pollutants (phytodegradation) such as heavy metals into less toxic or non-toxic compounds. The purpose of growing plants to absorb pollutants is called phytoremediation, and it is one way to remove toxins from an environment (the plants are then removed from the area and disposed of).
Soil Microbes
Turfgrass roots support many species of bacteria and fungi that help break down pollutants before they reach water supplies.
Storm Water Management
When rainwater hits concrete, it does not get absorbed. It rapidly flows downhill, taking small objects (sticks, rocks, etc.) and bare soil with it. Too much water coming down quickly can cause flooding.
Grassy areas absorb water. Grass roots help bind soil particles together and improve drainage, which slows water flow and lets water soak into the ground instead of rolling of. This helps alleviate local flooding by keeping the water in place.
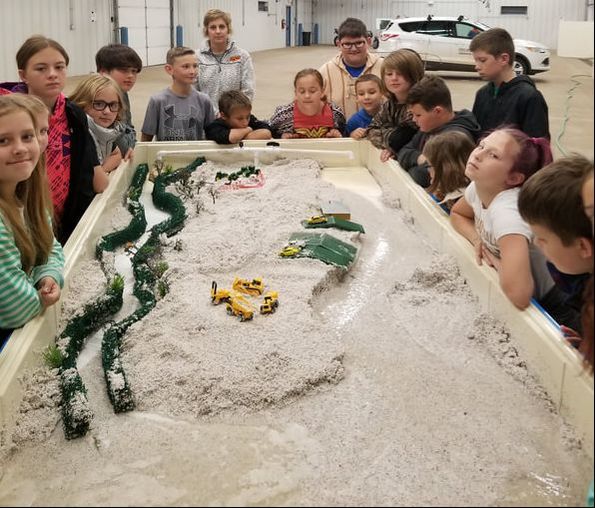 Figure 88: Stream trailer in use (Oklahoma State University Extension).
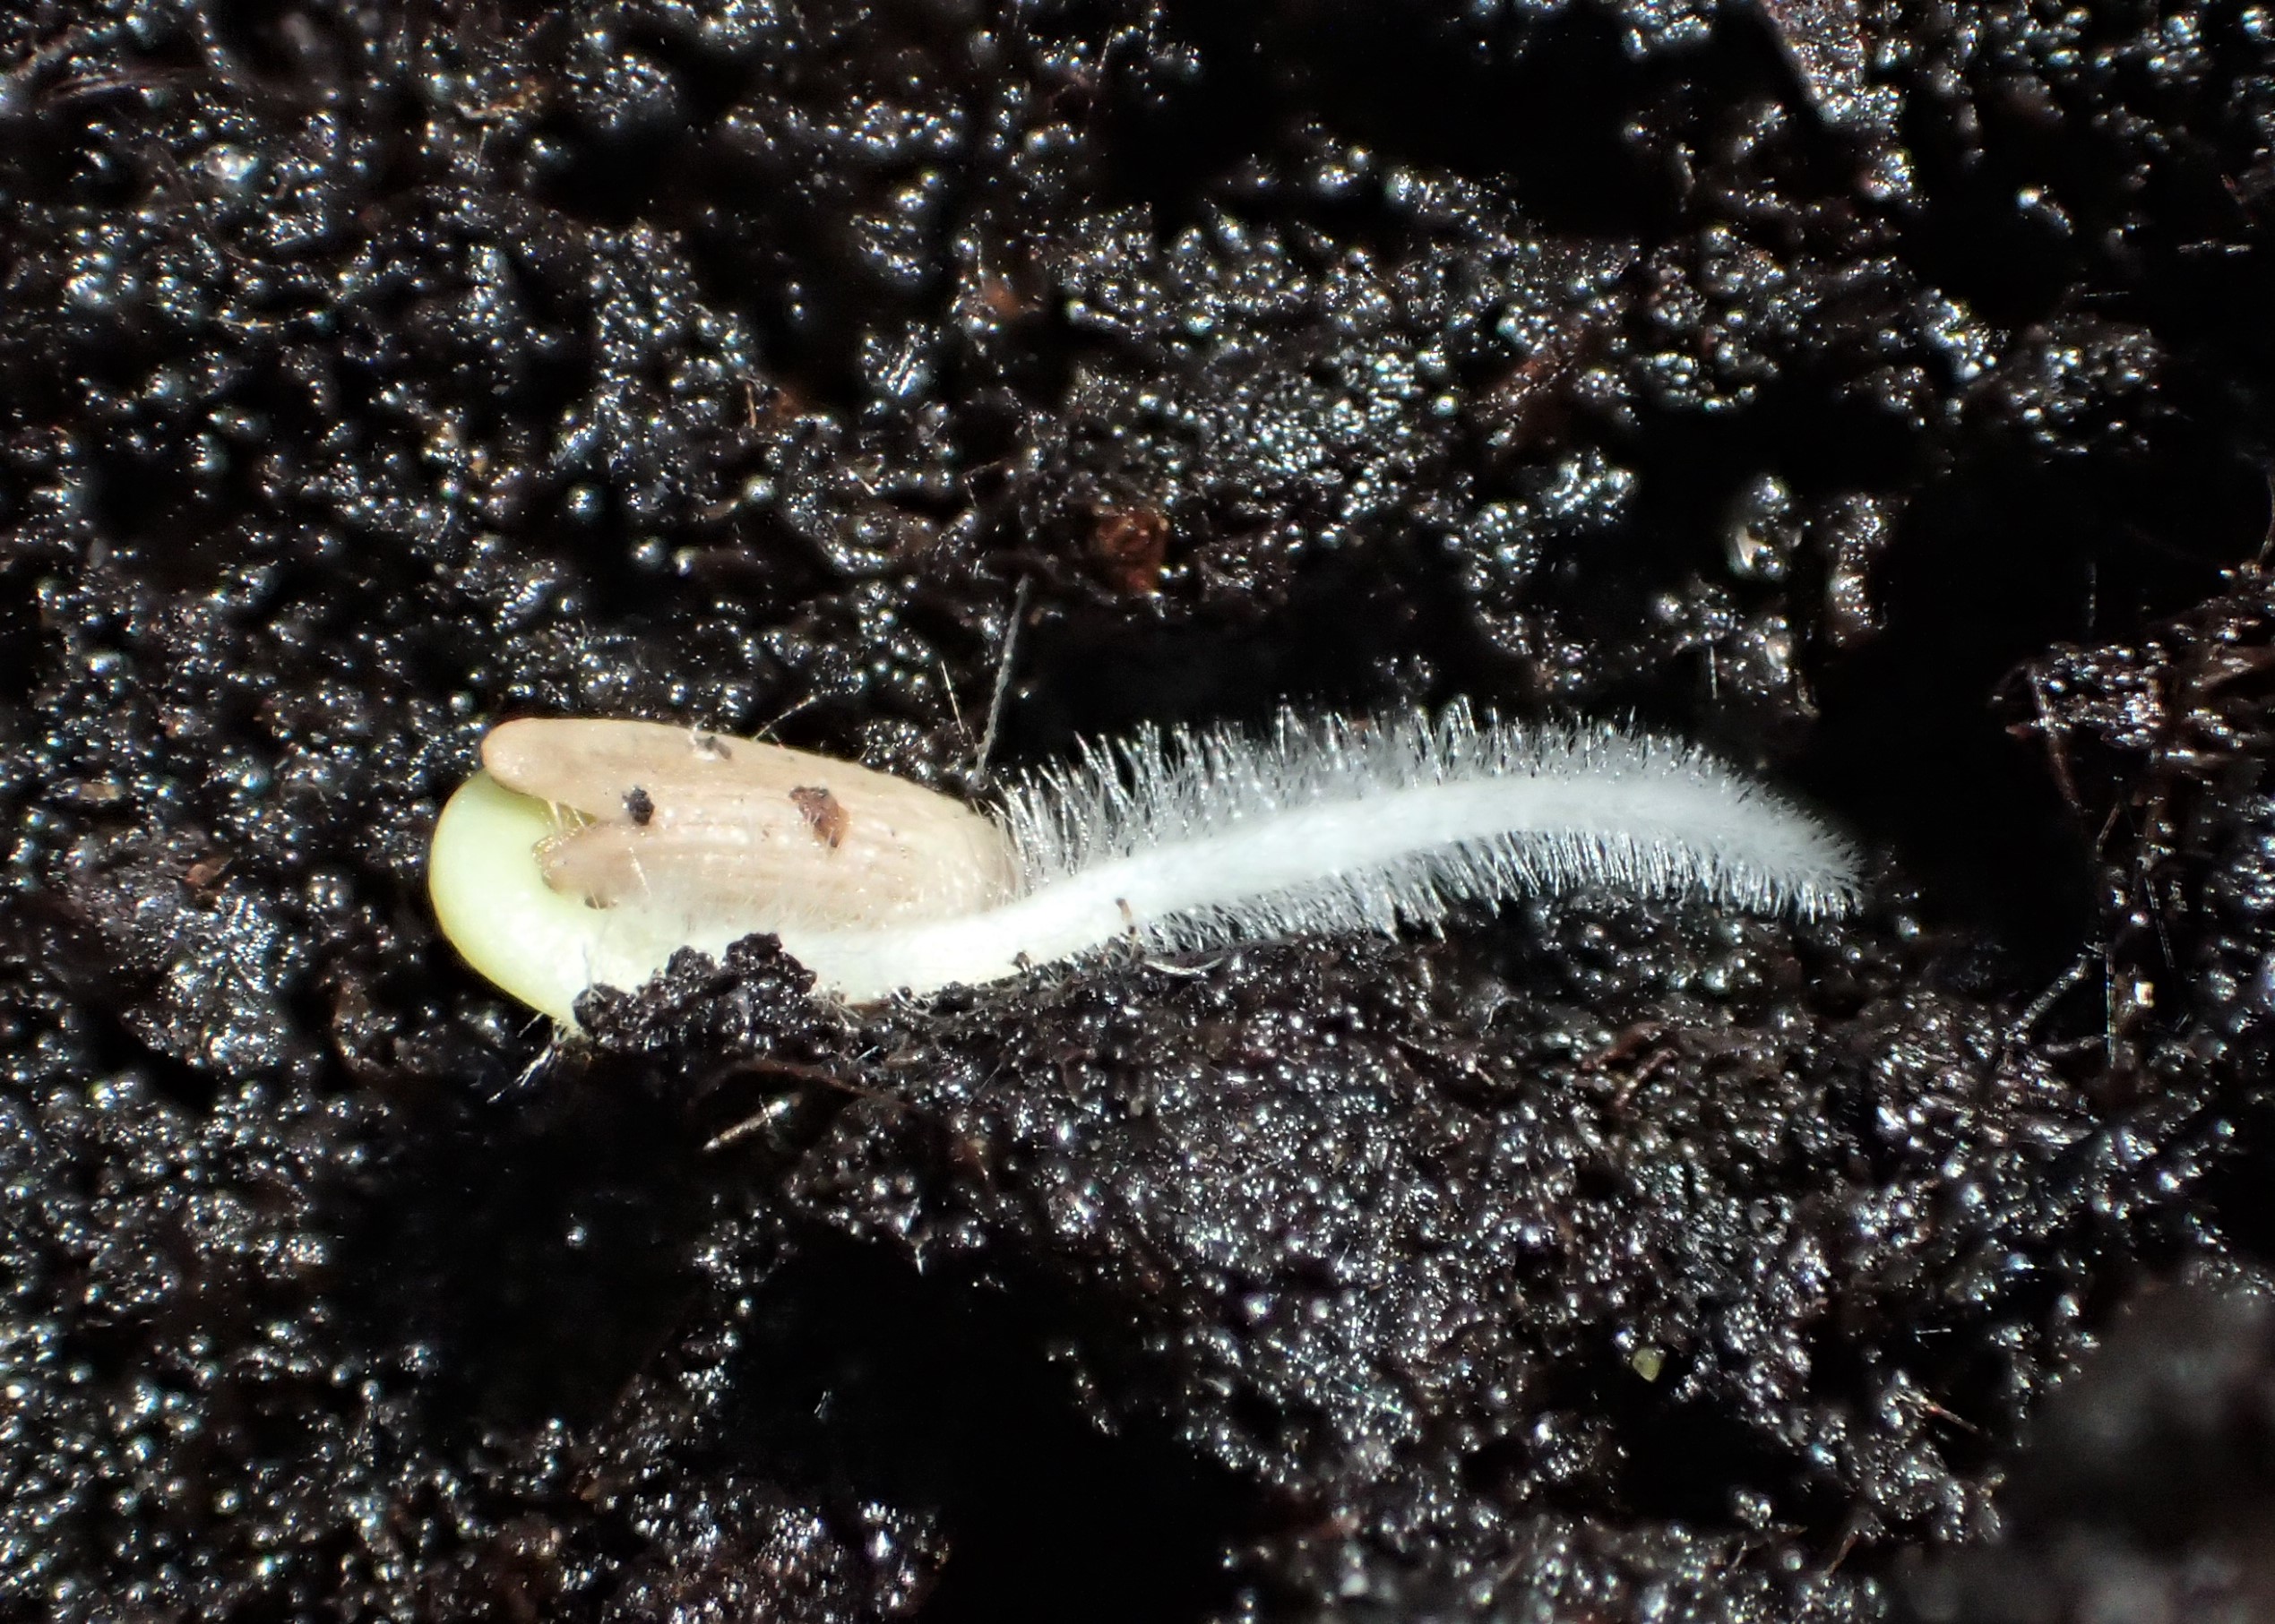 Figure 89: Root hairs (Carduus nutans kz06.jpg. (2025, March 5). Wikimedia Commons.
Activity: Root Hairs
Carefully dig up some turfgrass. Make sure to get all of the roots. Gently wash the roots in a bucket of water. Keep washing until most of the soil is gone. Look at the roots using a magnifying glass or microscope to see the root hairs.
Habitat for Wildlife
Turfgrasses and their roots provide food and/or homes for many animals, sometimes just for a part of their life (while larvae, while in a nest, etc.). Insects, arachnids, mammals, birds, amphibians, reptiles, single-celled organisms and even bacteria are common residents or visitors in lawns. Some examples of animals that use the lawn and soil underneath in a variety of ways:
As Food
June beetle larvae eat grass roots while developing into adults. Billbugs lay eggs in leaves and stems of grass, and the larvae burrow into the stems. Chinch bugs pierce grass blades to get the liquids inside and inject a toxin that kills the leaves. Voles are herbivorous and eat all plant parts, including roots.
As Hunting Ground
Ladybird beetles hunt the turf for their prey, such as aphids. Fleas and ticks use the tips of grass to get closer to potential hosts. Moles make tunnels underground, looking for lawn prey such as earthworms and larvae. Frogs and lizards hunt insects in the grass. Armadillos dig for grubs underneath the lawn. Birds often eat insects in lawns.
As Shelter
Ants and ground bees use the soil under the lawn to make nests. Moles make their nests underground. Rabbits make nests just a few inches underground. Animals that burrow also include chipmunks, mice and shrews. Millions of bacteria and single-celled creatures such as amoebas also find homes in soil.
Activity: What’s in a Lawn?
Determine what types of animals are found in a lawn. Look carefully at the ground level to see movement and find animals such as ants. Maybe a snake will pass through, or a bird will come along. Do you see any evidence of an animal visit (manure, flattened vegetation, broken grass)? After finding all that you can on the surface, use a shovel or a soil probe to collect some soil from the top ten inches or so. Spread the soil sample on a piece of white paper. Use magnifying glass to look for the really small animals in the soil.
Finally take a small amount of soil and put it in a small cup. Add some water, stir and use an eyedropper or pipet to remove a drop of water. Use a compound microscope to see what single-celled organisms or perhaps eggs are in the soil as well.
Repeat this using a sample from bare soil. What differences do you notice?
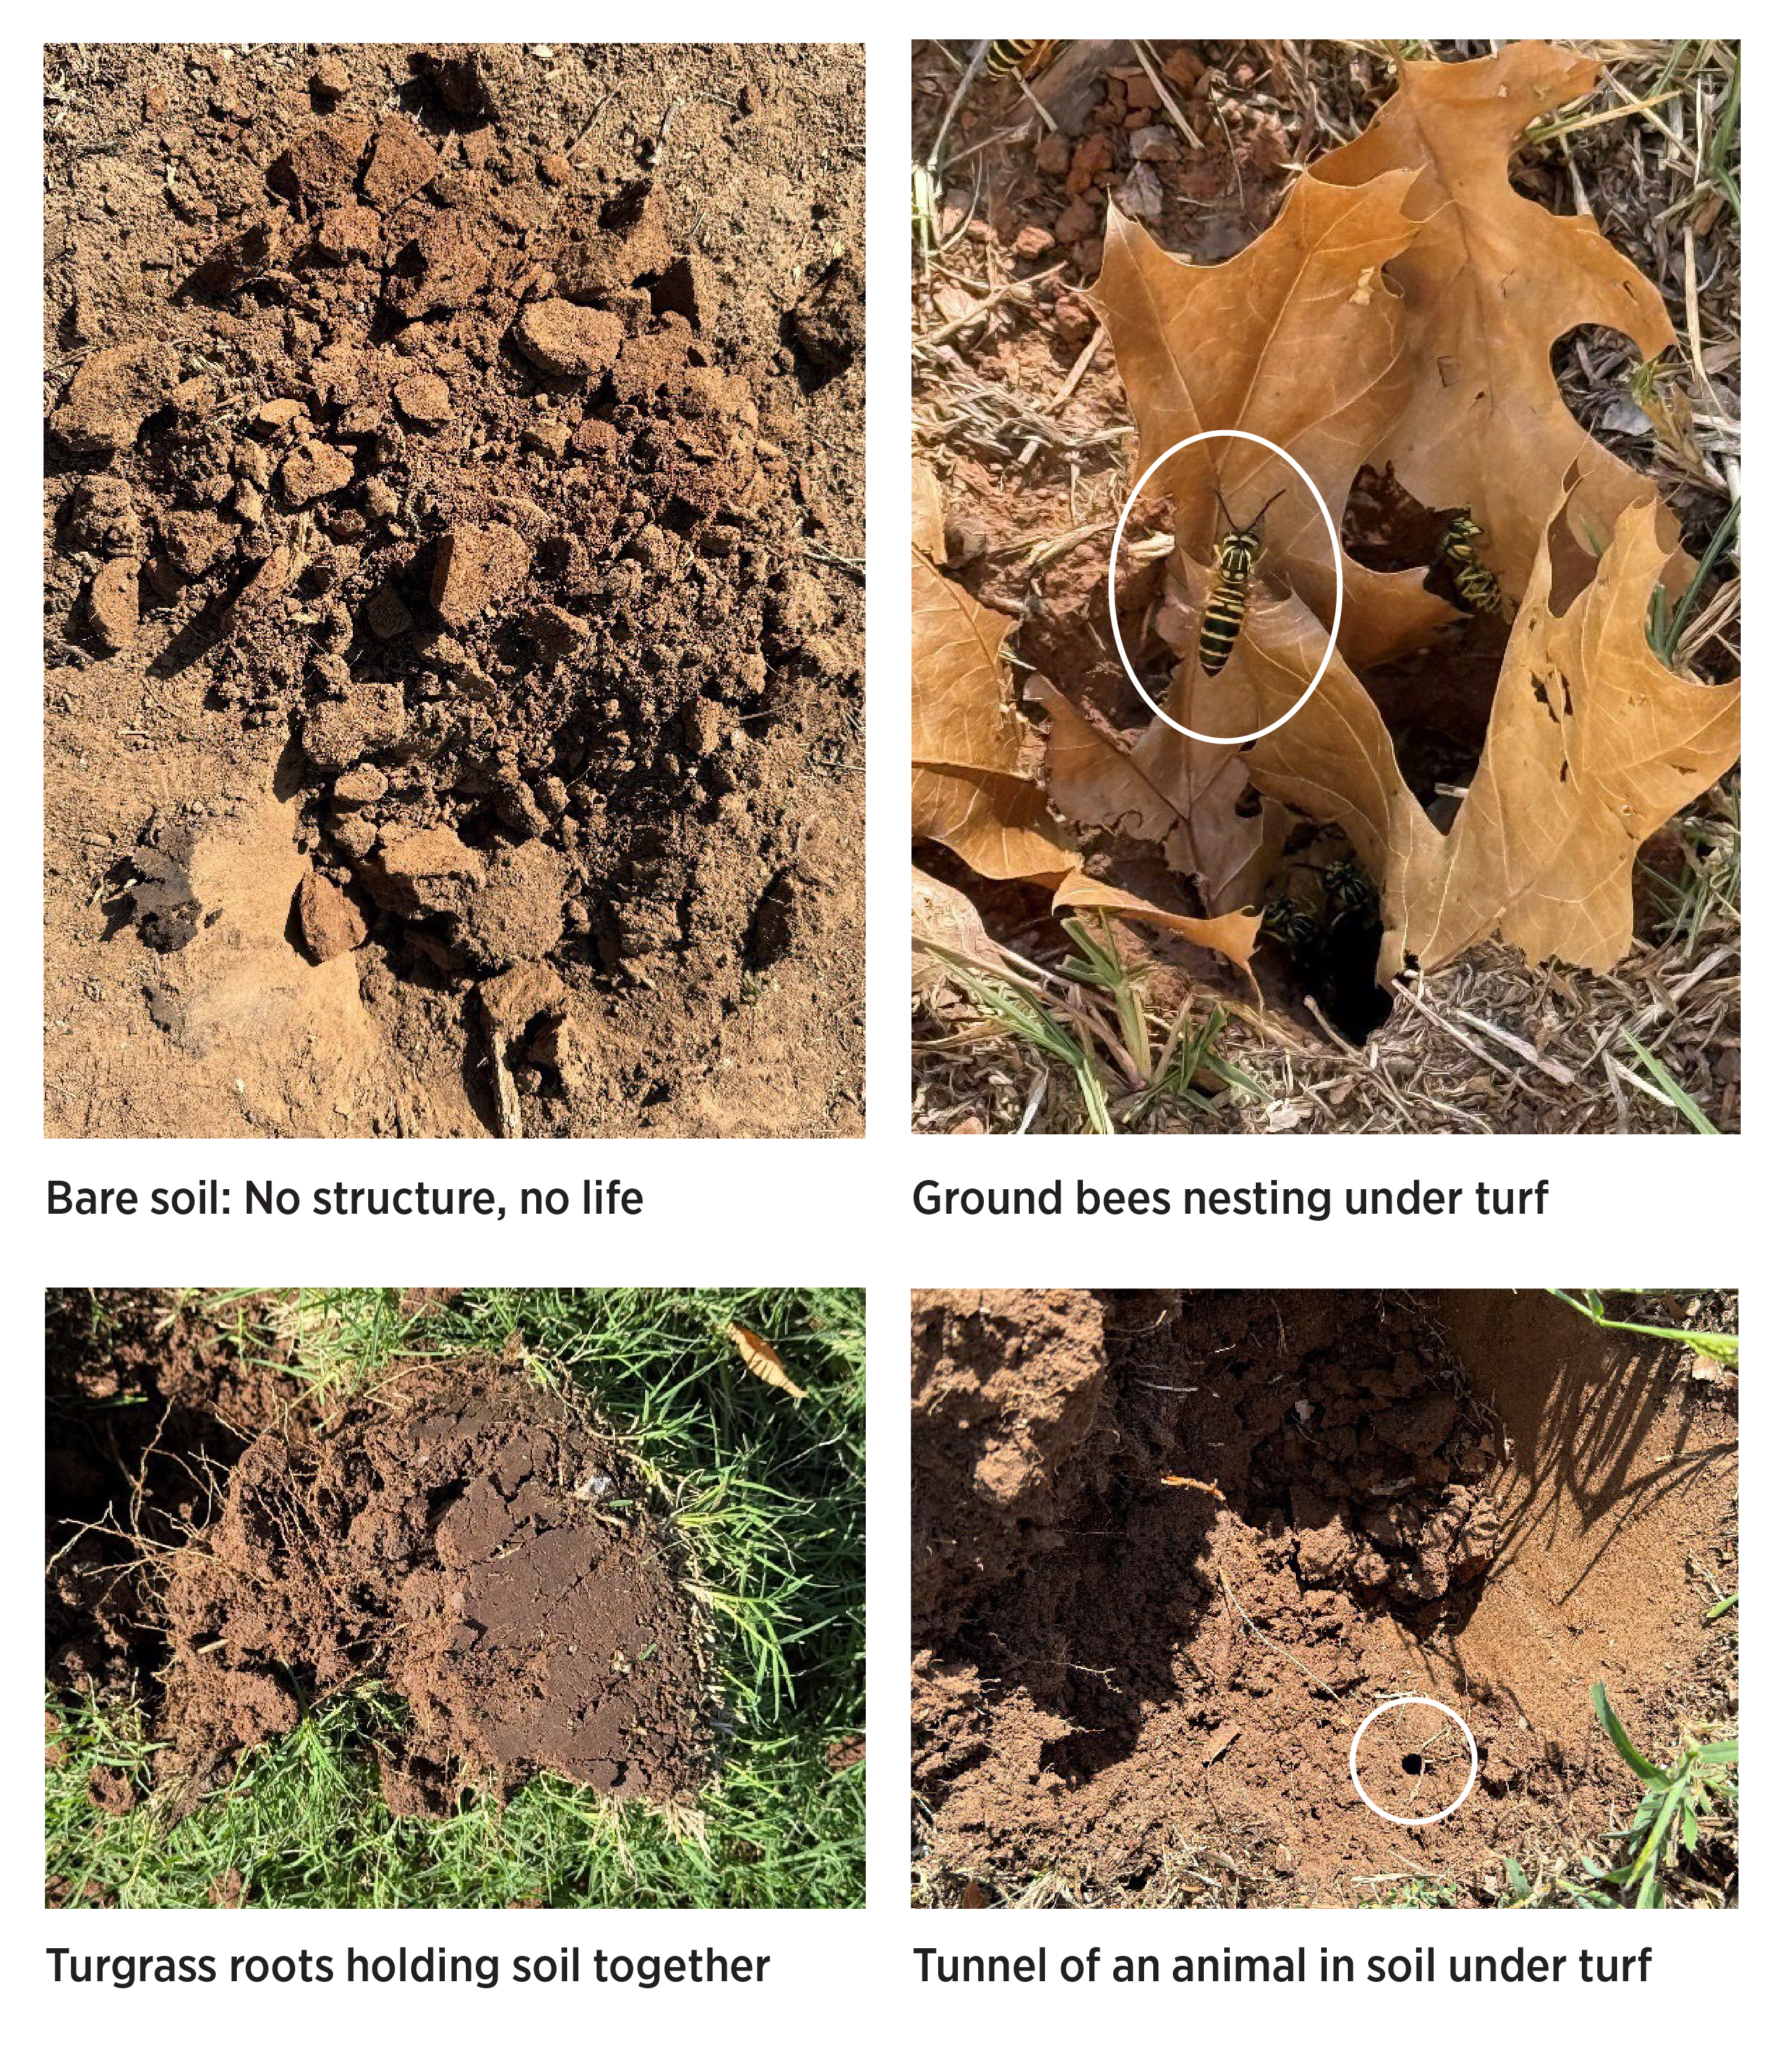 Figure 90: Animals found in a lawn.
Recreation and Relaxation
Grassy areas have been used for sports since at least the 1100s. The first turfgrass areas established exclusively for sports were probably used for lawn bowling or cricket. By the 1500s, many European towns had a common area with grass used for sports and recreation. At that time, people started playing football (soccer) on public greens in England, and Scotland modernized golf on their seaside grasses. Before lawn mowers, turfgrass was kept short with grazing animals or laborers with scythes (handheld mowing tools).
In modern times, many sports are played on turfgrass. Football, soccer, baseball, softball, rugby, golf and even tennis are played on grass. Recreational games such as bocce, croquet, lawn darts and badminton are a few activities played on grass.
Being outside in green spaces, whether engaged in a sport or game or not, has positive effects on people. Turfgrass and other plants absorb sound, making places quieter and reduce noise pollution, making areas more peaceful for the well-being of people. Parks and other green areas reduce anxiety, provide safe spaces to explore, create opportunities to socialize, increase health (lower blood pressure, better mental health, etc.) and the ability to cope with stressors. Hospital patients with a view of nature and lawns recover more quickly than those in rooms with no view to the outside. Landscaped areas provide employees with greater job satisfaction and increase work productivity. Caring for turf and other plants can provide therapy for many people and even help the elderly stay engaged and active.
Activity: Grassy Caterpillars
Supplies Needed:
- Knee high stocking
- Potting soil
- Grass seed
- Googly eyes
- Bobby pin
- Hot glue gun
- Waterproof plate
- Tiny rubber bands
Let’s have a fun time planting grass and even mowing it.
To plant grass in a fun way, we are going to make a grassy caterpillar. To start, take a couple of pinches of grass seed and put them at the end of the knee high. Add a handful of potting soil and massage the end of the knee high so that the grass seed is dispersed throughout the potting soil, staying close to the outside (so the grass seed will be able to get light). Either tie a knot very close to this first section or use a tiny rubber band (you can find them with the hair care supplies at stores) to keep that section separate from the next section. You could also use pipe cleaners to divide into sections after you make one potato-sized ball. (Then you will have legs.)
Repeat with the grass seed and potting soil for the next section, and then tie of or rubber band that section. Repeat the process until you have several sections with a handful of potting soil and grass seed mixed in around the edges.
On the first section (the toe part in the knee high), spring open a bobby pin and push it through the knee high to make antennae. Hot glue two googly eyes below the antennae.
Now put the whole caterpillar on a waterproof plate and pour water over all sections of the caterpillar. Put your caterpillar under a grow light or next to a window. After a few days (depending on the species) the grass will sprout and make a hairy caterpillar. You can use scissors to mow the grass as it grows. You may have to mow the face pretty close so that you can see the eyes more easily. Keep watering and mowing your caterpillar.
 Figure 91: Planted grass caterpillar.
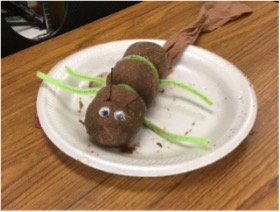 Figure 92: Grassy caterpillar before planting.
Ball Rolls
For sports like soccer, softball, baseball, golf, cricket and polo, that use balls as part of the sport, the type and height of the turf matters. A ball will roll further on a smooth surface.
To measure ball roll, the ball is rolled down a ramp at such an angle that the ball doesn’t bounce upon impact with the turf. The ramp and angle must be kept consistent throughout testing, as ball roll is measured over several parts of a playing field. The ball roll distance is measured from the point of contact with the turf to the center of the ball when it stops rolling.
Wind speed must be accounted for when doing a ball roll test. The results of the ball roll indicate what maintenance the field needs (cutting height, direction of cut, moisture, etc.).
Different sports have different ball roll test equipment and measurements:
For soccer turf, ball roll distance is tested with a soccer ball rolling from a ramp at a 45˚ angle, with wind speed less than 4.5 miles per hour, in six different locations on the field (figure 93).
Measurements are repeated, with the average being recorded. In golf, ball roll distance on the putting green is referred to as green speed and measured with a Stimpmeter (a small ramp manufactured by the USGA (US Golf Association), named after the inventor Edward
S. Stimpson). The goal of a golf course superintendent is to keep the green speed consistent throughout the course.
Optimum conditions for testing green speed are a reasonably level test area that is cleanly mowed, has little to no wind, on a smooth dry surface. The ball is placed in a specified notch on the Stimpmeter, and the Stimpmeter is slowly raised until the ball starts to move. The Stimpmeter is kept steady while the ball rolls of and across the turf.
Green speed represents how far golf balls roll on a putting surface. The higher the number, the faster the roll. A moderate speed is nine feet. Speeds of 13 to 14 feet are very fast. Many golfers refer to green speed as stimp.
Factors affecting green speed are mowing height, surface moisture (such as dew), grain (direction of cut), rolling, fertilization rate and frequency — anything that affects growth or physical characteristics. Green speed may change every day depending on the weather, how low the green was cut, etc.
The green speeds of tournaments are made longer so that they play faster, and require more skill, than the green speeds of regular play.
In baseball, how fast a ball travels after hitting the surface (basepath soil, natural grass or artificial grass) is called playing surface pace. Generally, when a baseball hits a piece of turf, it loses more energy than when it hits a dirt surface. Pace is determined using the coefcient of restitution — the velocity of a baseball after surface impact divided by the velocity of the baseball before impact. This is not an easy thing to measure, but research has shown that artificial turf plays faster than natural grass.
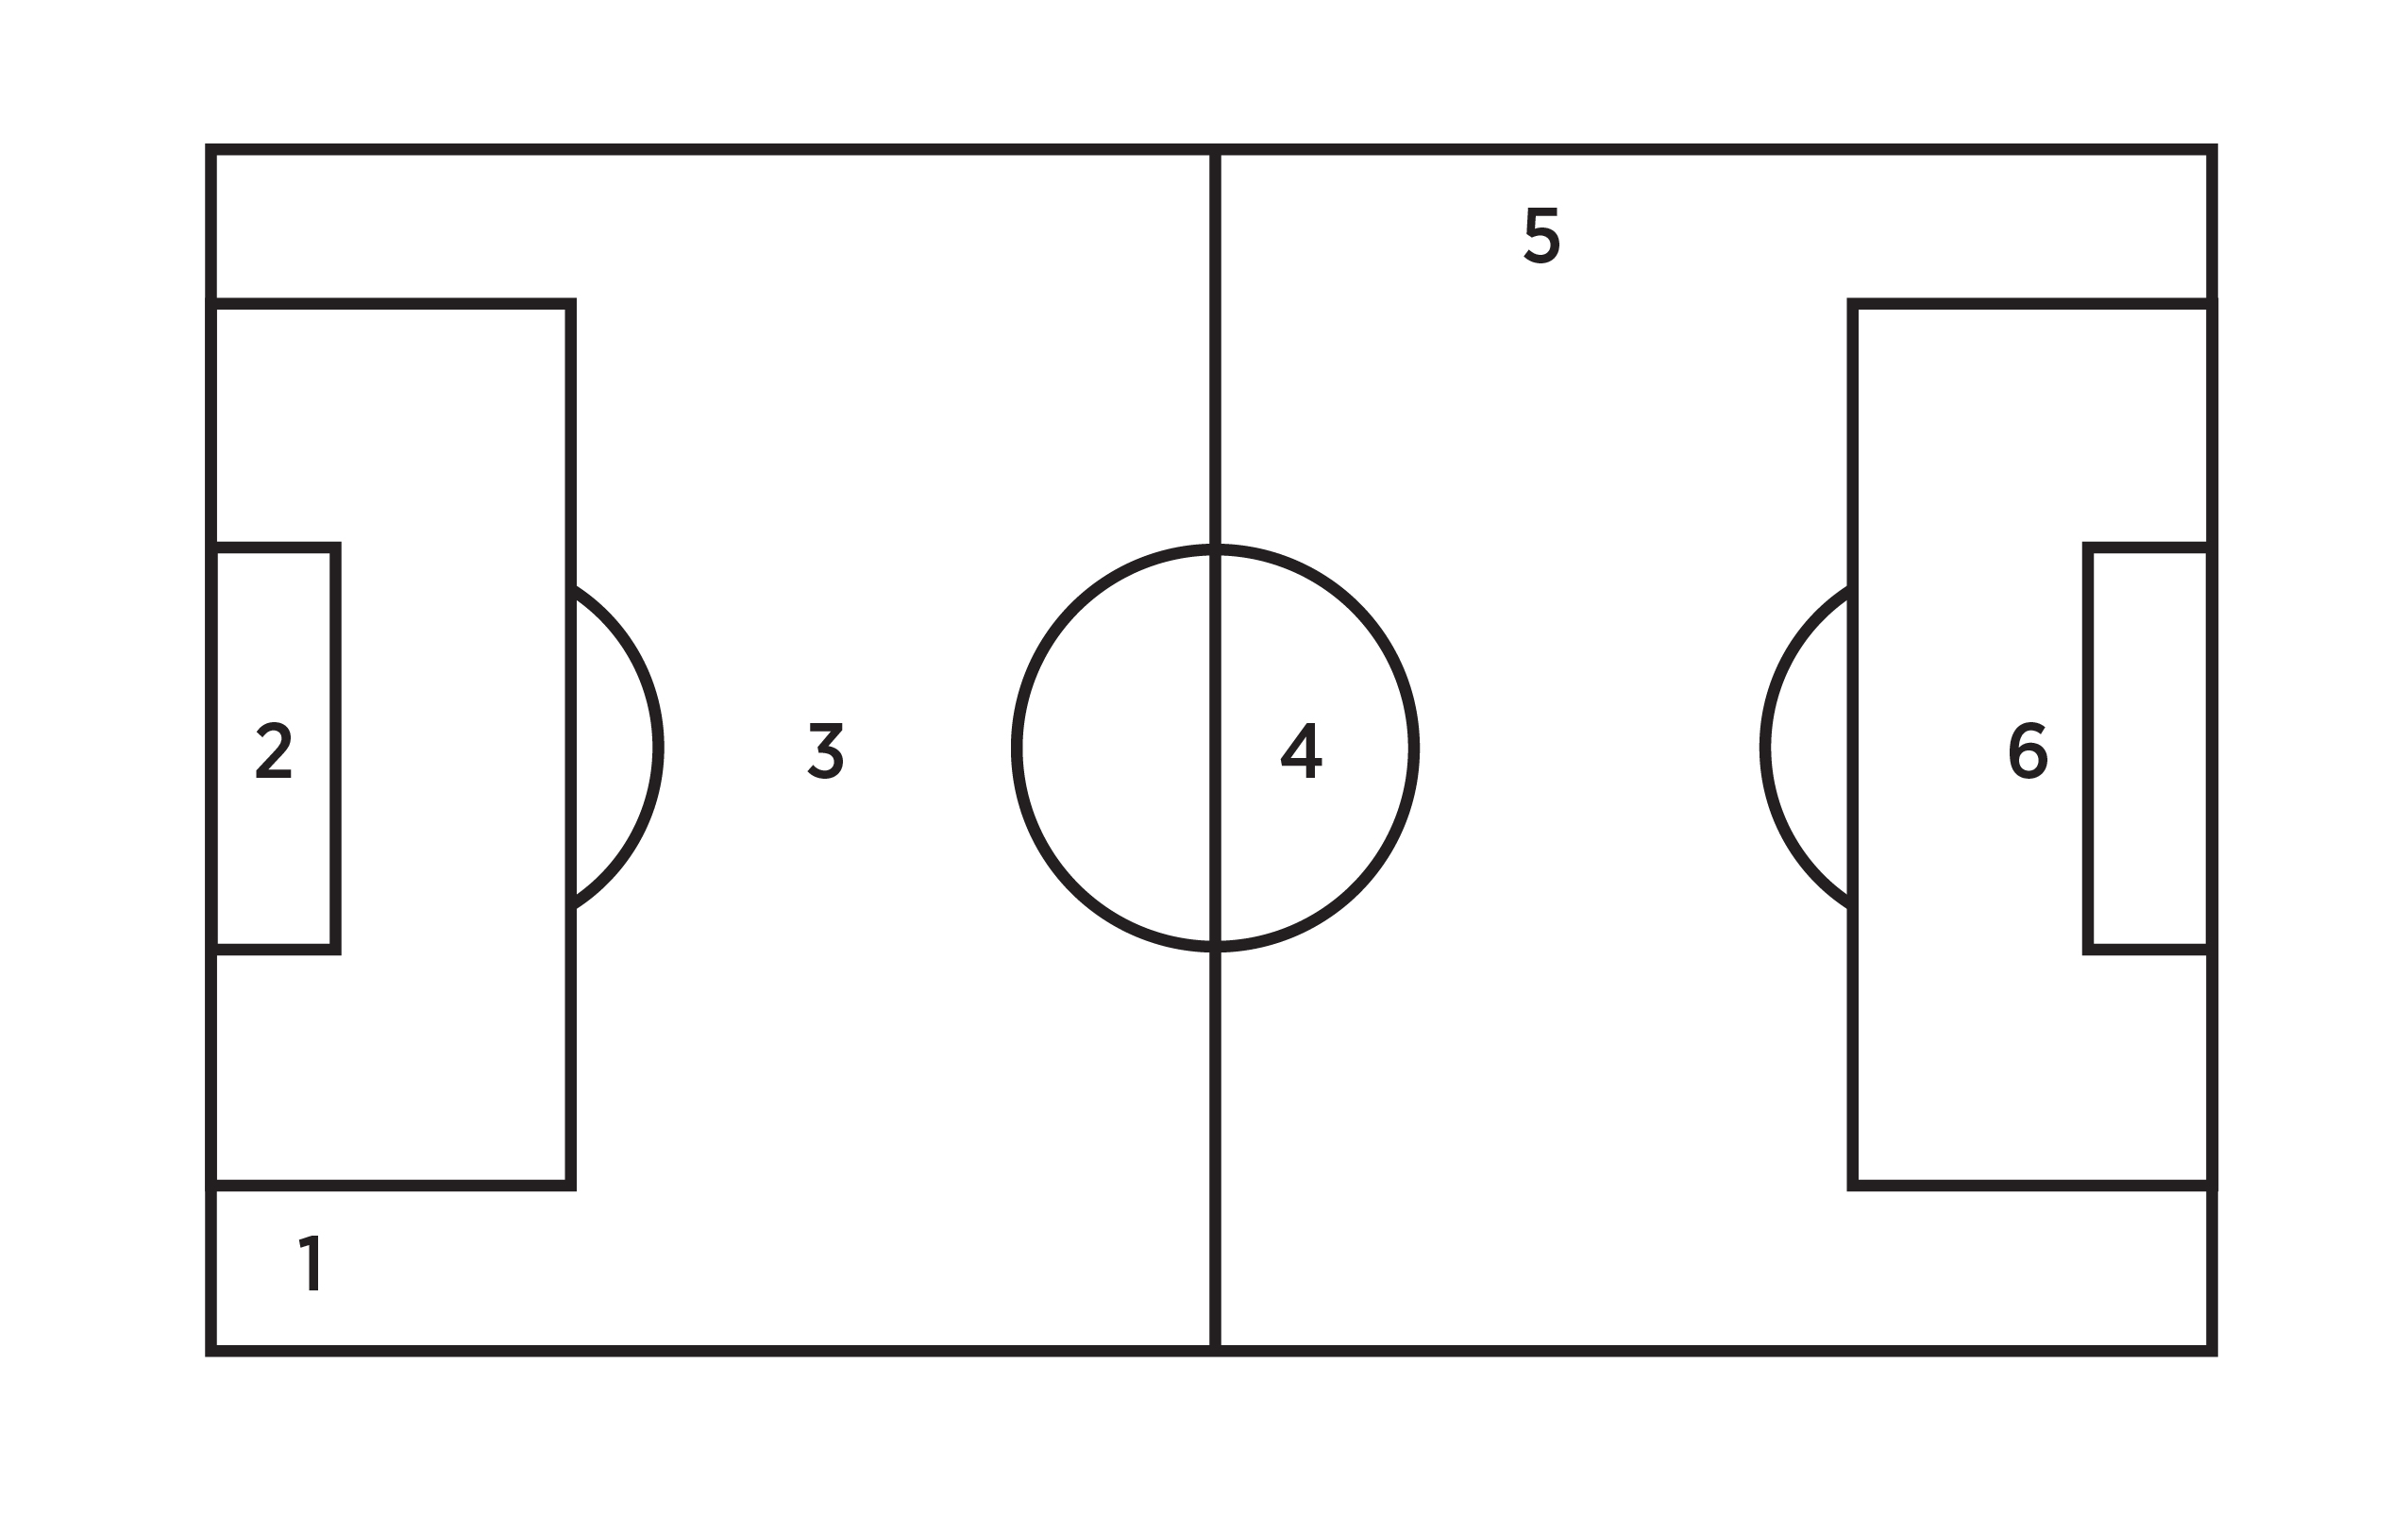 Figure 93: Soccer field test locations (Penn State).
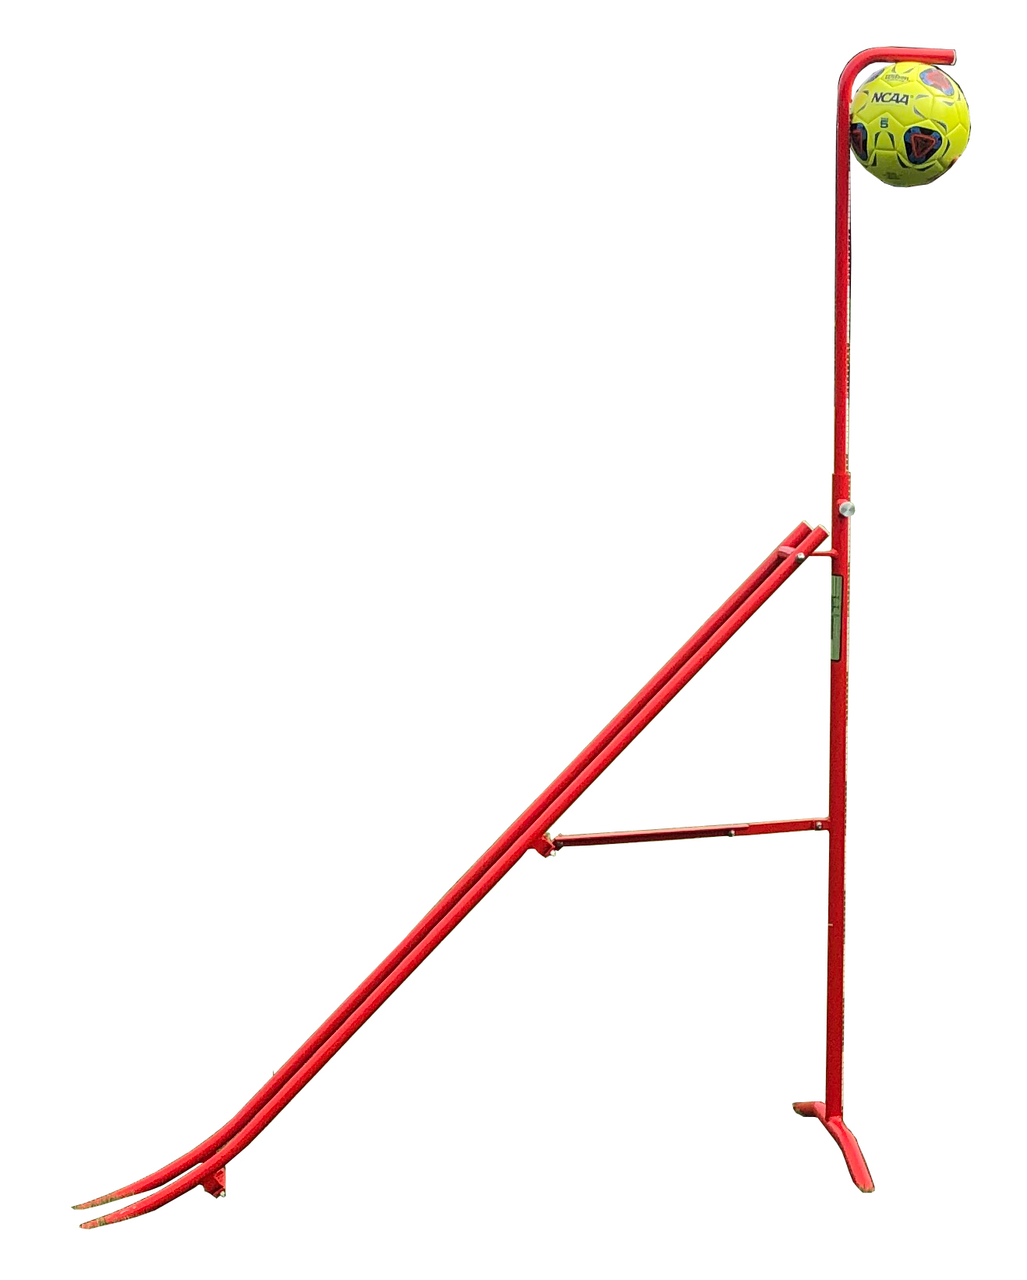 Figure 94: FIFA ball ramp set for ball roll testing of soccer fields.
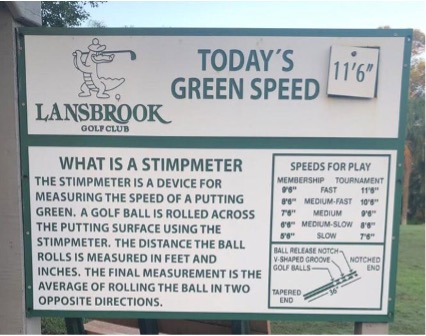 Figure 95: The green speed for the day (Lansbrook Golf Club).
Activity: The Effects of Surface Material on Ball Rolls
Test ball roll on multiple surfaces (concrete, carpet, grass, etc.). Roll a ball down a ramp (gutter, angle iron, etc). Measure how far it rolled. Repeat with the same ball several times to find the average distance. How does the surface affect the distance that the ball rolls? Use different types of balls (tennis balls, volleyballs, playground balls, soccer balls, etc.) to see if size makes a difference. Be sure to use the ramp at the same angle as the first ball for a fair test.
Activity: Measuring Stimp
Calculate the stimp of a smooth grass surface. Find a piece of angle iron, a groove in a piece of wood, a gutter, a cardboard tube — anything a golf ball can roll down smoothly — that is at least 36 inches long.
This will be your “Stimpmeter” (you can also buy Stimpmeters online or maybe borrow one from a golf course). Mark it at 30 inches; this is where the golf balls will be placed at the start. To get good measurements, you need to keep everything consistent. Measurements start at the bottom of the Stimpmeter. To mark the start of the measurements, place a golf tee next to the end of the Stimpmeter.
Place a golf ball at the 30-inch mark on your Stimpmeter, and gradually lift the Stimpmeter until the ball starts rolling on its own. Keep the Stimpmeter at the same angle until the ball rolls of. Place a golf tee at the spot that the ball stopped rolling. Do this three times from the exact same spot, so you can find the average stopping distance. The balls should end up within 8 inches of each other.
Mark the average stopping spot with another golf tee. Measure from that golf tee to the golf tee at the starting mark (the golf tee near the end of the Stimpmeter) in feet and inches (for example, 8 feet 3 inches). This is the green speed (example, 8.3) in one direction.
Now put the Stimpmeter next to the golf tee at the average stopping point and roll three balls toward the starting tee from the last test.
Repeat the rolls and measurements to find the green speed in the other direction on the same line.
Add the two green speeds together and divide by two (to get the average). You should get a number below 20.
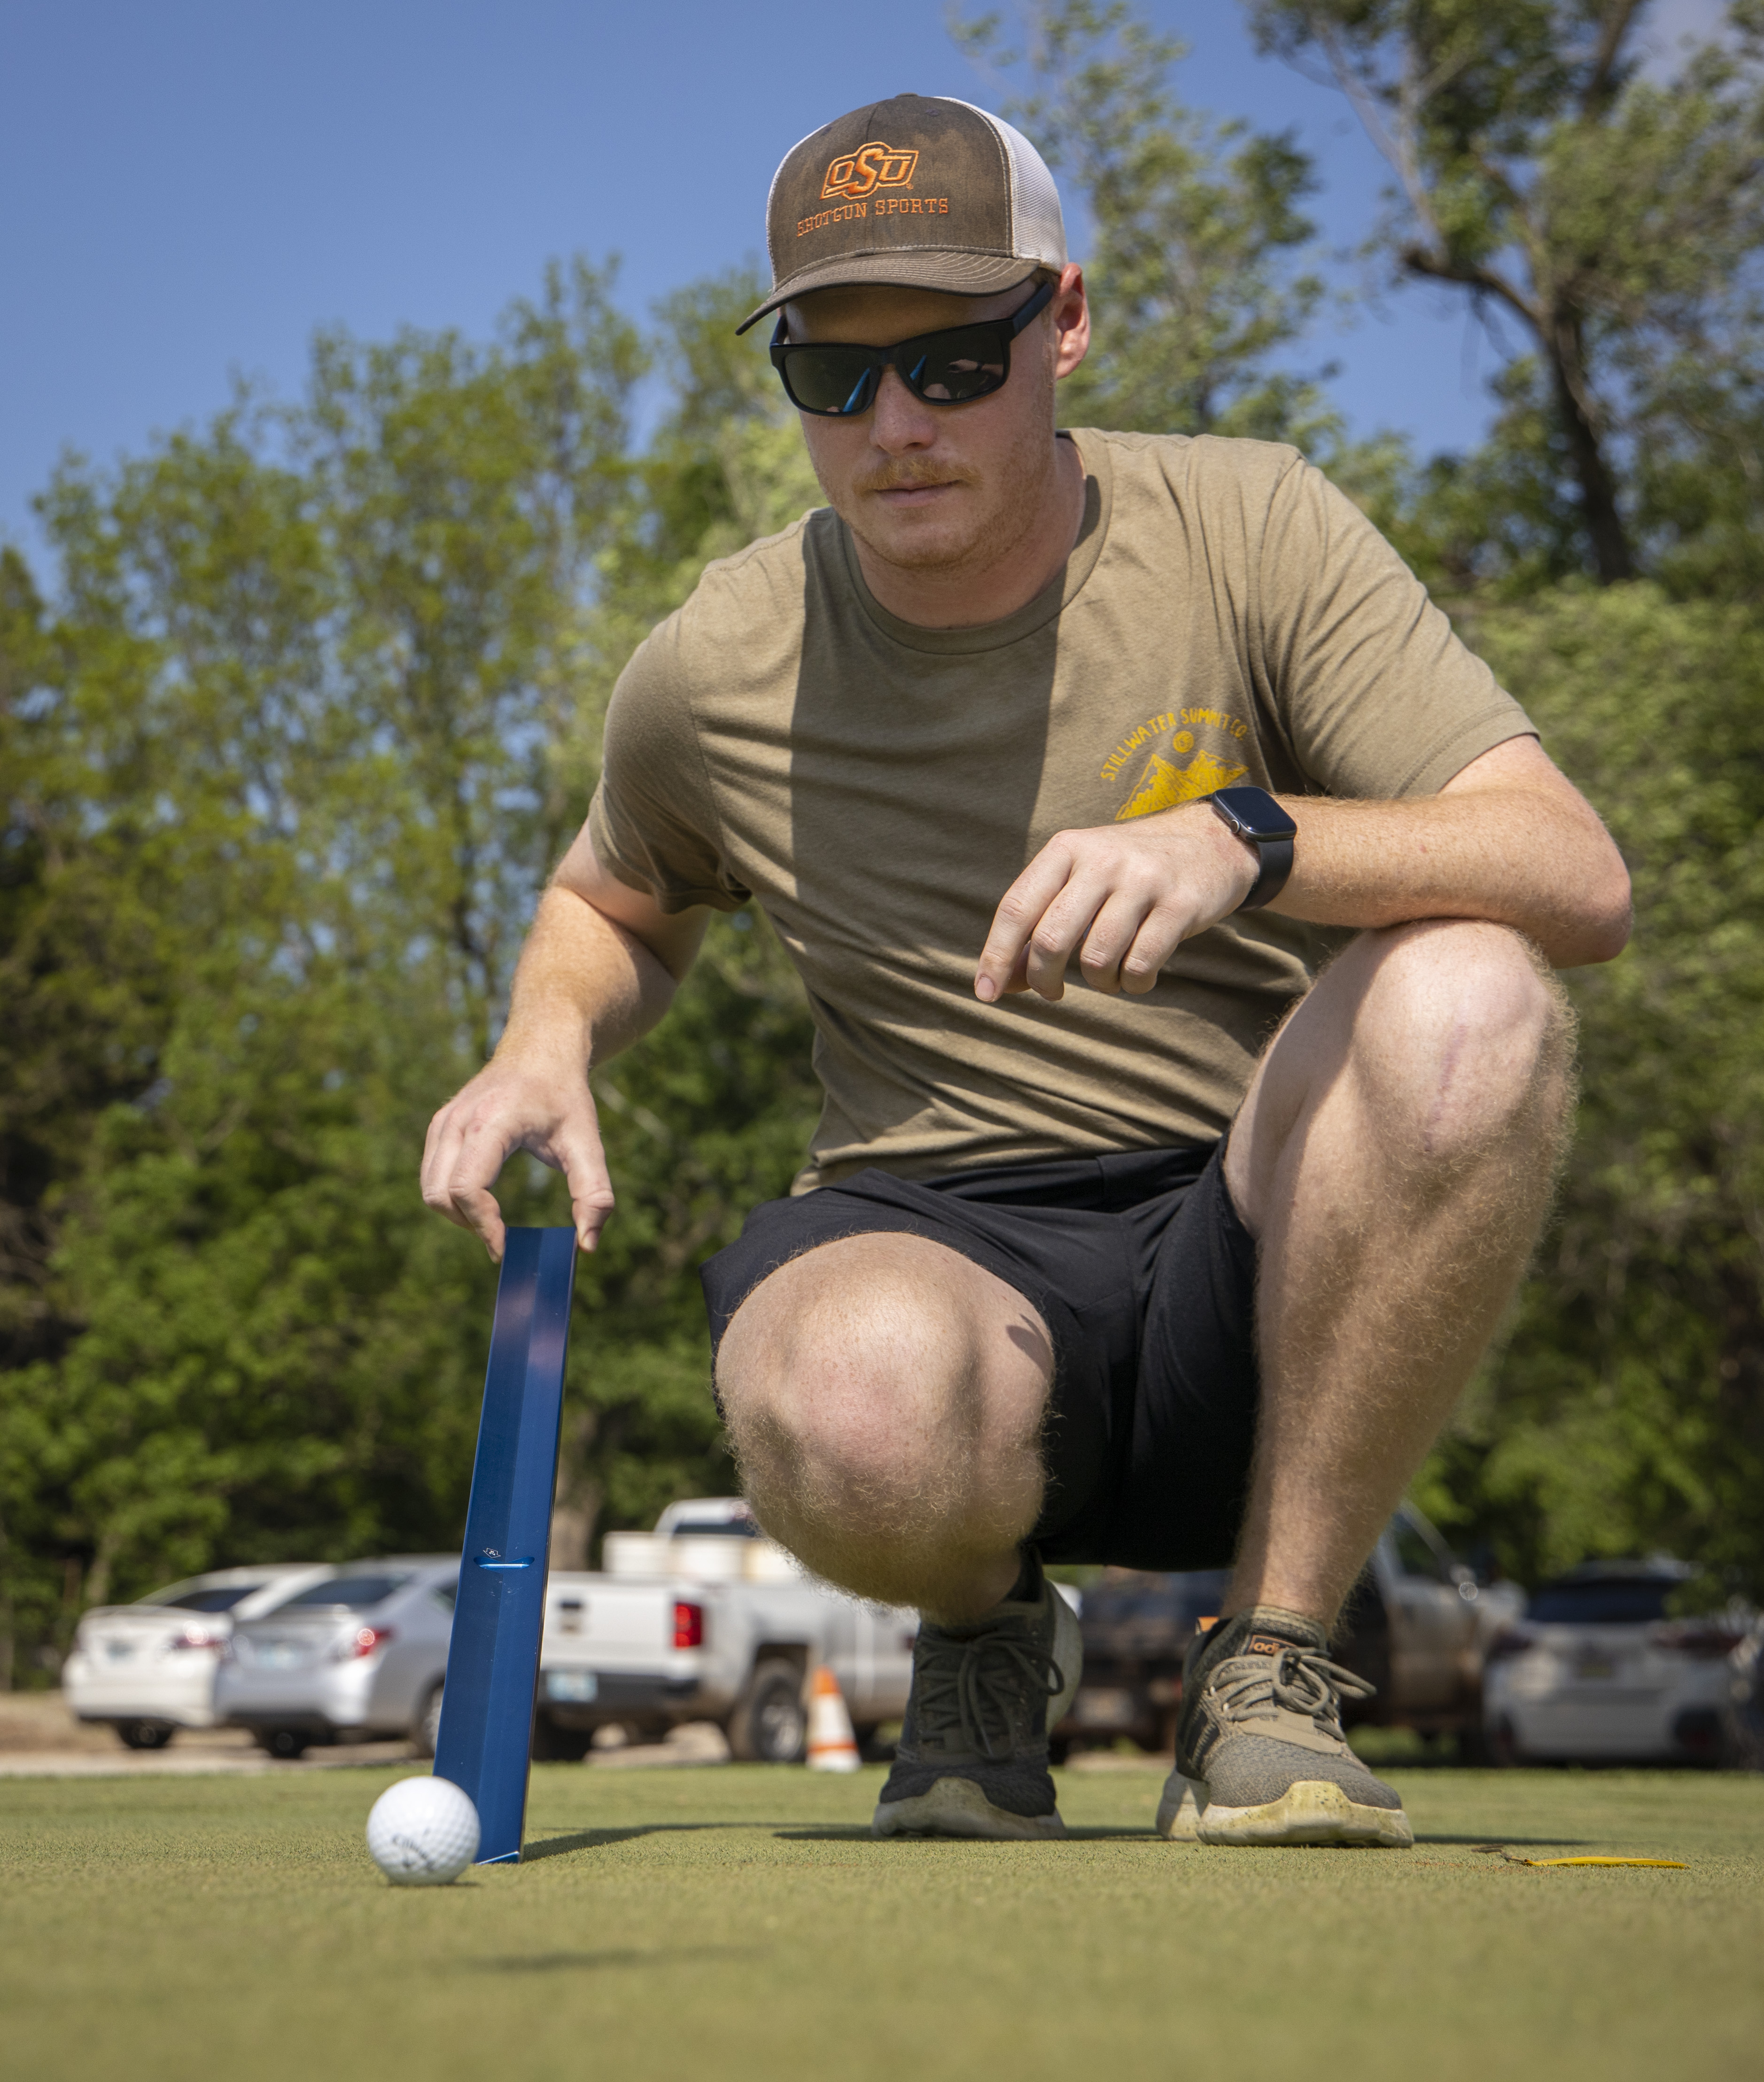 Figure 96: Measuring stimp (Oklahoma State University).
The Life Cycle of Turfgrass
Grasses can be annual or perennial. Annual grasses, such as annual ryegrass and annual bluegrass, live for one growing season. Since they have no sugar storage organs such as rhizomes or stolons, they cannot reproduce vegetatively and must reproduce by seed.
Perennial grasses, such as tall fescue, perennial ryegrass and bermudagrass, live through several seasons, even years, and may reproduce vegetatively through rhizomes and stolons, or by seed.
The life cycle of grass occurs in three phases: vegetative, transition and reproductive. During the vegetative stage, which begins at germination, grasses are busy producing leaves. The leaf blades are important to the plant since they catch the sunlight for photosynthesis. The growing roots anchor the plant, take in water and nutrients and store the sugars produced during photosynthesis.
During the transition phase, the grass becomes sensitive to environmental changes that can lead to flowering. Cool-season grasses are induced to flower when temperatures are between freezing and 50 F and/or as the daylight hours get longer. Warm- season grasses are induced to flower as the daylight hours get shorter, although some warm-season grasses flower without regard to the amount of daylight hours.
Upon induction, the top of the shoot vegetation transforms into a flower head, called an inflorescence. It contains spikelets, which contain flowers. Depending upon the arrangement of the spikelets, inflorescences can be classified as a panicle, spike or raceme.
Figure 97: Raceme, spike and panicle. On a raceme, the spikelet has supporting stems attached to central axis. On a spike, the spikelet is attached to the central axis with no supporting stems. On a panicle, the spikelets are supported by branches attached to supporting stems attached to the central axis.
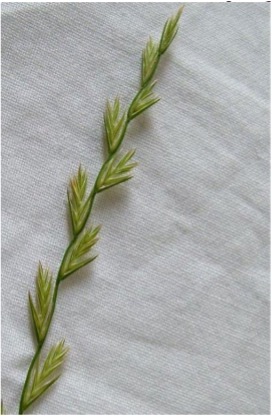 Figure 98: Perennial ryegrass spike.
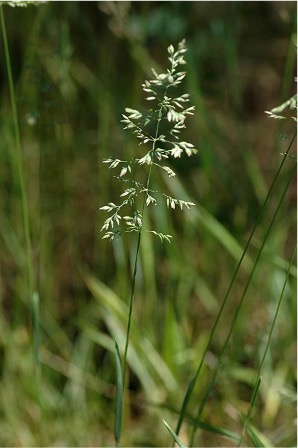 Figure 99: Kentucky bluegrass panicle (University of Maine.)
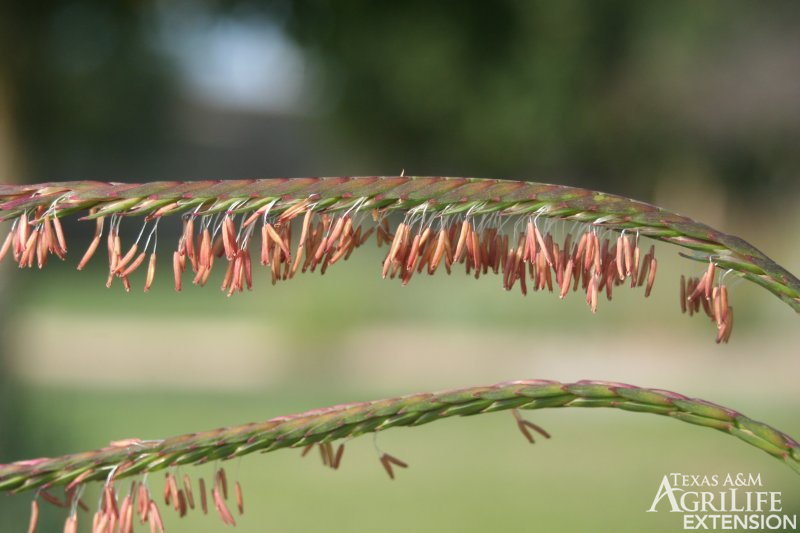 Figure 100: Eastern gamagrass raceme (Texas A&M AgriLife Extension.
Grasses are wind-pollinated, and one may have flowers of both sexes or just one sex. Once pollinated and fertilized, the ovaries transform into fruits called caryopses. The fruits and seeds of grasses are often fused together.
Activity: Harvest Some Grasses
Harvest some grasses to see if you can identify what type of inflorescences they have. It will be easier to find inflorescences if you find an unmowed area where the plants are taller.
Turfgrass Science
The United States has three times more land growing turfgrass than any other irrigated crop. The industry contributes about $40 billion to the United States economy. Many scientists work in the turfgrass field, and for decades they have bred turfgrasses that lessen environmental impact (using less water and chemicals, etc.), tolerate heat or cold, survive drought, stand up to wear and tear and/or look more aesthetically appealing.
Developing new breeds of turfgrass takes years. Turfgrasses with the most desirable traits are chosen and cross-pollinated, then the resulting seeds are grown and assessed for multiple seasons. When a desirable turfgrass breed emerges, they breed it many times to make sure they get consistency in the offspring. This is a lot like developing a new breed of dog — choose the parents with traits that are desirable, assess their offspring and keep crossing the offspring until the traits that are desirable show up reliably in all offspring.
The National Turfgrass Evaluation Program (NTEP) coordinates uniform evaluation trials for new breeds that have potential within the United States and Canada. New grass breeds are planted in sample plots, often in multiple locations across the country and assessed over several years. This helps determine where the new breed will perform successfully and gives other scientists a chance to assess its traits. The data collected by NTEP assesses traits such as color, density, heat and cold tolerance, resistance to wear, diseases and insects. NTEP is internationally known and used by individuals and breeders in 30 countries to help them select grasses that meet their needs. The few new grass breeds that are the most useful and desirable get named. Those are then grown by plant breeders as seed or sod, and sold within the industry.
One of the challenges of the turfgrass industry is that maintaining a healthy turfgrass lawn requires a lot of water, which is costly and can use a significant portion of local resources. Turfgrass also requires regular mowing, fertilizing and pest control to look aesthetically appealing, and this takes a lot of time and effort to do. Chemicals are often applied to lawns, and needless application can lead to polluted waterways and get into groundwater.
Scientists are working on creating new breeds of turf that are more sustainable for the environment and save money on maintenance. Making grass that is tolerable of salty or unpotable water would lessen the drain of freshwater resources. Grasses that need less chemical inputs, such as for pest or disease control also save time and money.
Activity: How Much Water is 1 Inch?
Supplies Needed:
- Clear or flat container
- Water sprinkler on grass
- Permanent marker
Between 25 and 50% of all residential water is used for landscapes. On average, lawns need one inch of water a week, but that amount varies due to type of grass, season of the year and temperature. Rain gauges will tell you how much rain has fallen in your area, but you’ll have to determine how much to water (if needed) to make up the amount of water your lawn needs each week. If you water too much or too little, your lawn may get fungal problems or other diseases, or your lawn grass may die. It is important to know how much water you are putting on your lawn.
People often water their lawns using lawn sprinklers, which they turn on and leave on until they think the plants have received enough water. But water pressure, the type of sprinkler and the location of the sprinkler affect how much water is applied, and where.
To determine how much time it takes to put one inch of water on your lawn, measure up one inch from the bottom of your container and make a mark. Set out your container where the sprinkler will reach it. Turn on the sprinkler. Note the time. Every few minutes, check to see if it has reached the mark. When the level of water in the container reaches the mark, note the time. That is how long it takes to apply one inch of water to your lawn.
Without moving the sprinkler, repeat this activity to see if other areas of your lawn also get one inch. If not, you may have to move the sprinkler around to reach everywhere you need to whenever you water.
You can do this activity with any type of container (tuna cans, mugs, glasses, etc.). You can do this for family members or neighbors to help them see how long it takes for their lawn to get one inch of water. If they are applying too much water, you may save them money.
Activity: Soil Testing
Supplies Needed:
- Garden trowel
- Plastic bucket
- Basic soil test kit
- Soil sample bag
- Soil
- Testing lab
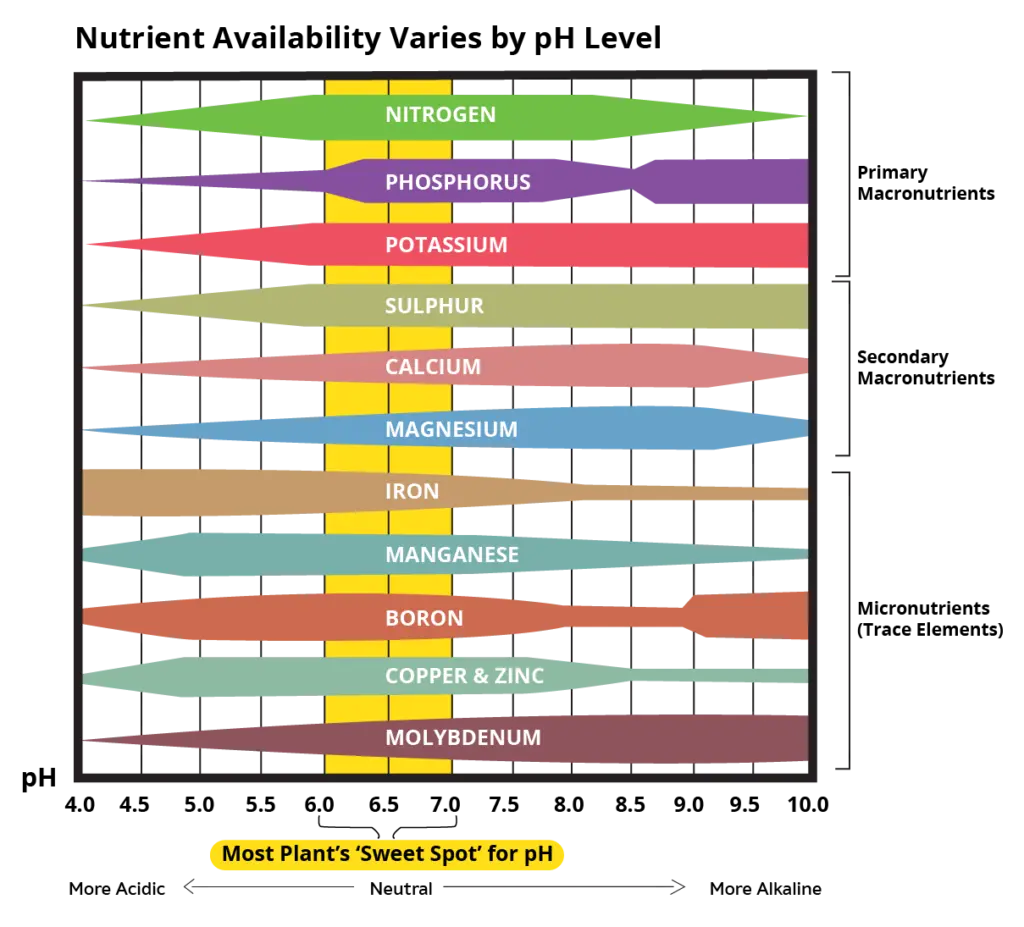 Figure 101: Nutrient availability depending on pH level of soil (Betach Laboratories).
Before planting flowers, trees, gardens, or grass, you need to find out if the soil in that location will be ready for what you are planting. You need to know if there are enough nutrients (such as nitrogen, phosphorus or potassium) in the soil already, or if you will need to add more. Another thing you will need to check is the pH of the soil.
Some nutrients cannot be taken up by the plant if the pH is too high or too low, even if the nutrients are in the soil already. There are soil test kits that you can buy locally or online to check the pH and the nutrient levels in your soil. You can do the tests yourself and get a general idea of the pH and nutrients in the soil. If you want a detailed analysis, plus recommendations about what to do with the information, you can take a soil sample to your county Extension office to be tested. They will take it to Oklahoma State University for testing at the Soil, Water and Forage Analysis Laboratory (these labs may be hosted by other places outside of Oklahoma).
The data you want will only be as dependable as the quality of the soil sample you submit. To get a high quality analysis of your soil, you need to take a representative sample — a sample that is a good representation of the area you want analyzed. This requires taking samples from about 20 locations within the area you want analyzed.
You will need a trowel and a plastic bucket to take the soil sample. Randomly select about 20 locations that cover most of the area you are sampling. Do not take samples from only one side, or one small area. Avoid any areas that are different, such as salty areas, submerged areas, etc. You will take all 20 soil samples from the same soil you want analyzed. If you have another area to test, such as a garden, you will need to keep those soil samples separate for their own analysis.
To take a sample, push your trowel into the ground into the root zone of most plants in the area (4–6 inches). Remove the trowel and push it into the ground an inch or two away from the first cut, making a “v”. Put the soil removed from the “v” into the bucket. Do not put any plant matter into the bucket.
After repeating this 20 times, thoroughly mix all the soil samples together in the bucket. Remove any grasses, roots, leaves, rocks or small animals/bugs. When all the samples are thoroughly mixed, fill a soil sample bag to the top.
On the front of the soil sample bag is a place to note the location of the sample (lawn or garden) as well as to select which tests you want the laboratory to run (each test costs money). In many instances, a routine nutrient test and pH measurement is enough. There is also a space to write what crops you are growing.
Different crops need different amounts of nutrients, so grasses will need different amounts than vegetable gardens, and even different grasses will have different requirements. By telling the lab exactly what you are wanting to grow, they can be sure to recommend exactly what you need.
Take a soil sample and submit it to your local Extension office or testing lab. Also use store-bought soil testing kits to see how close those measurements are to the more precise ones provided by the lab.
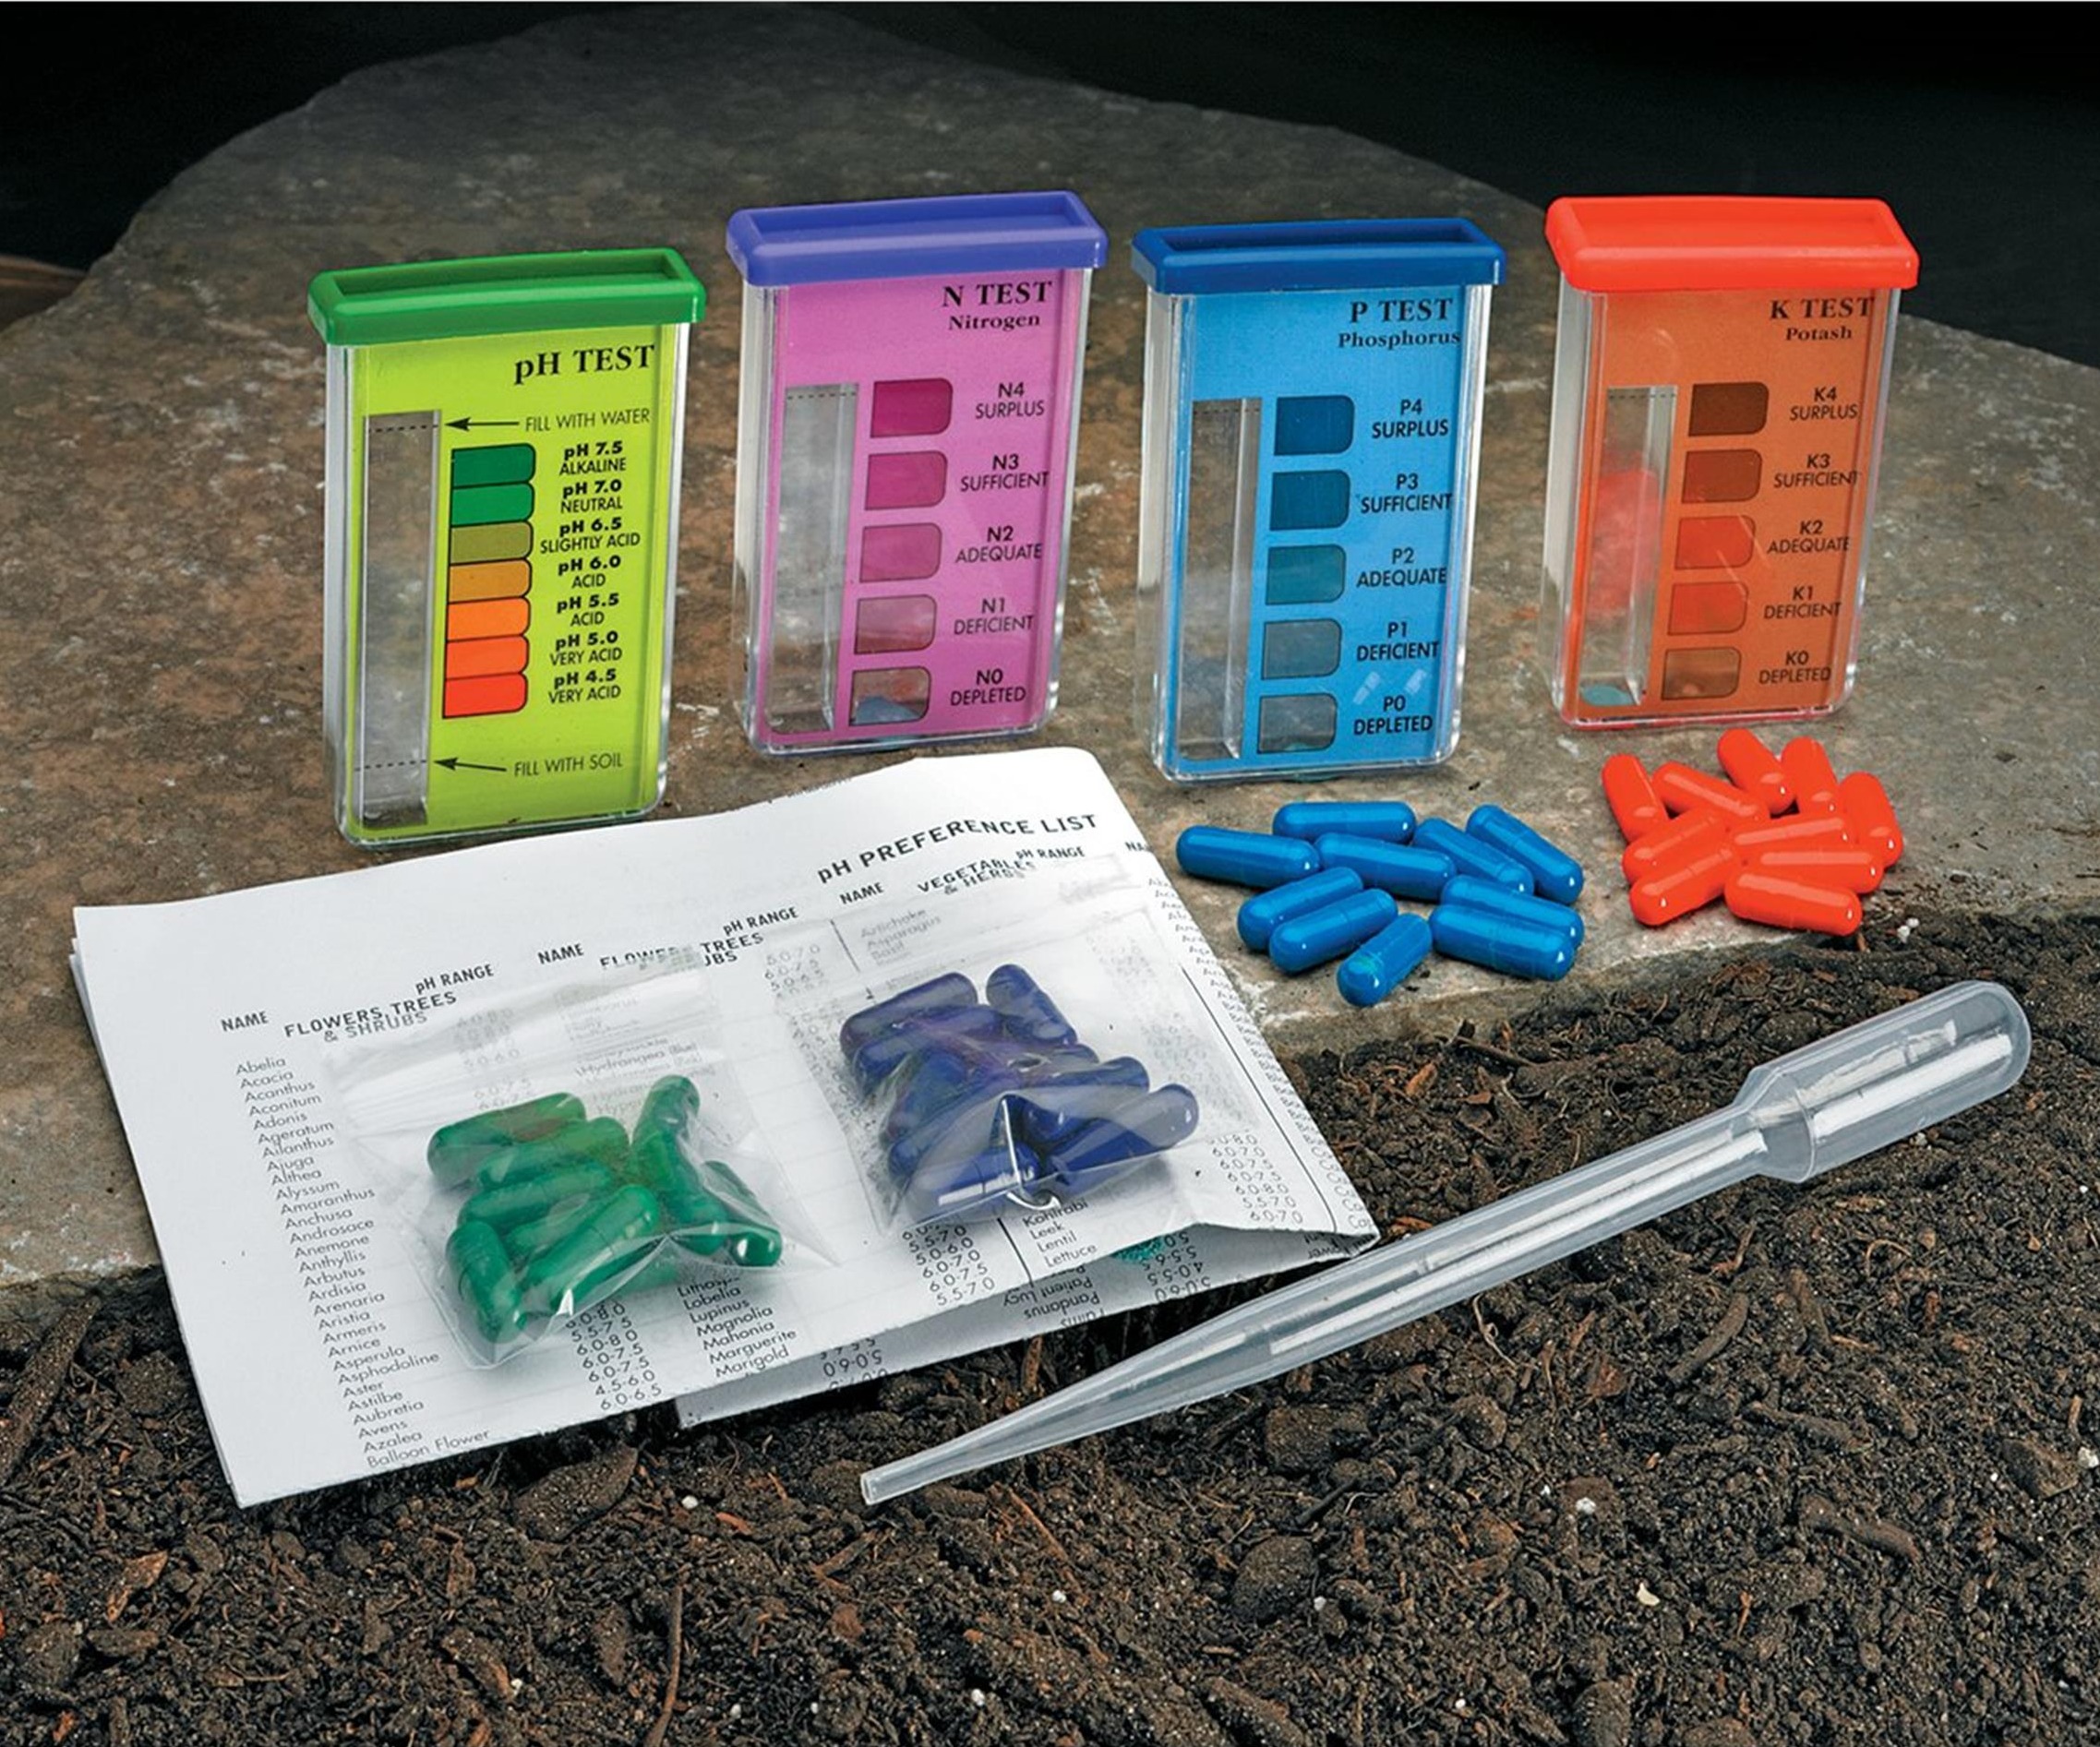 Figure 102: Soil testing kit.
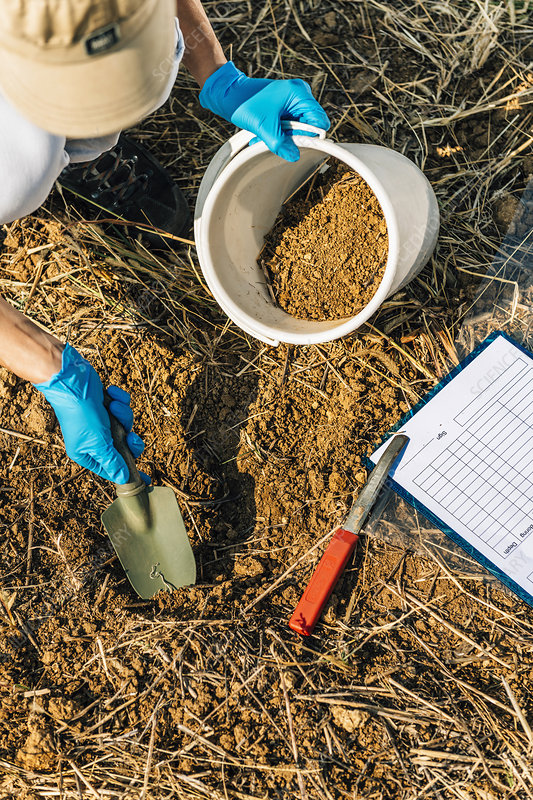 Figure 103: Soil testing.
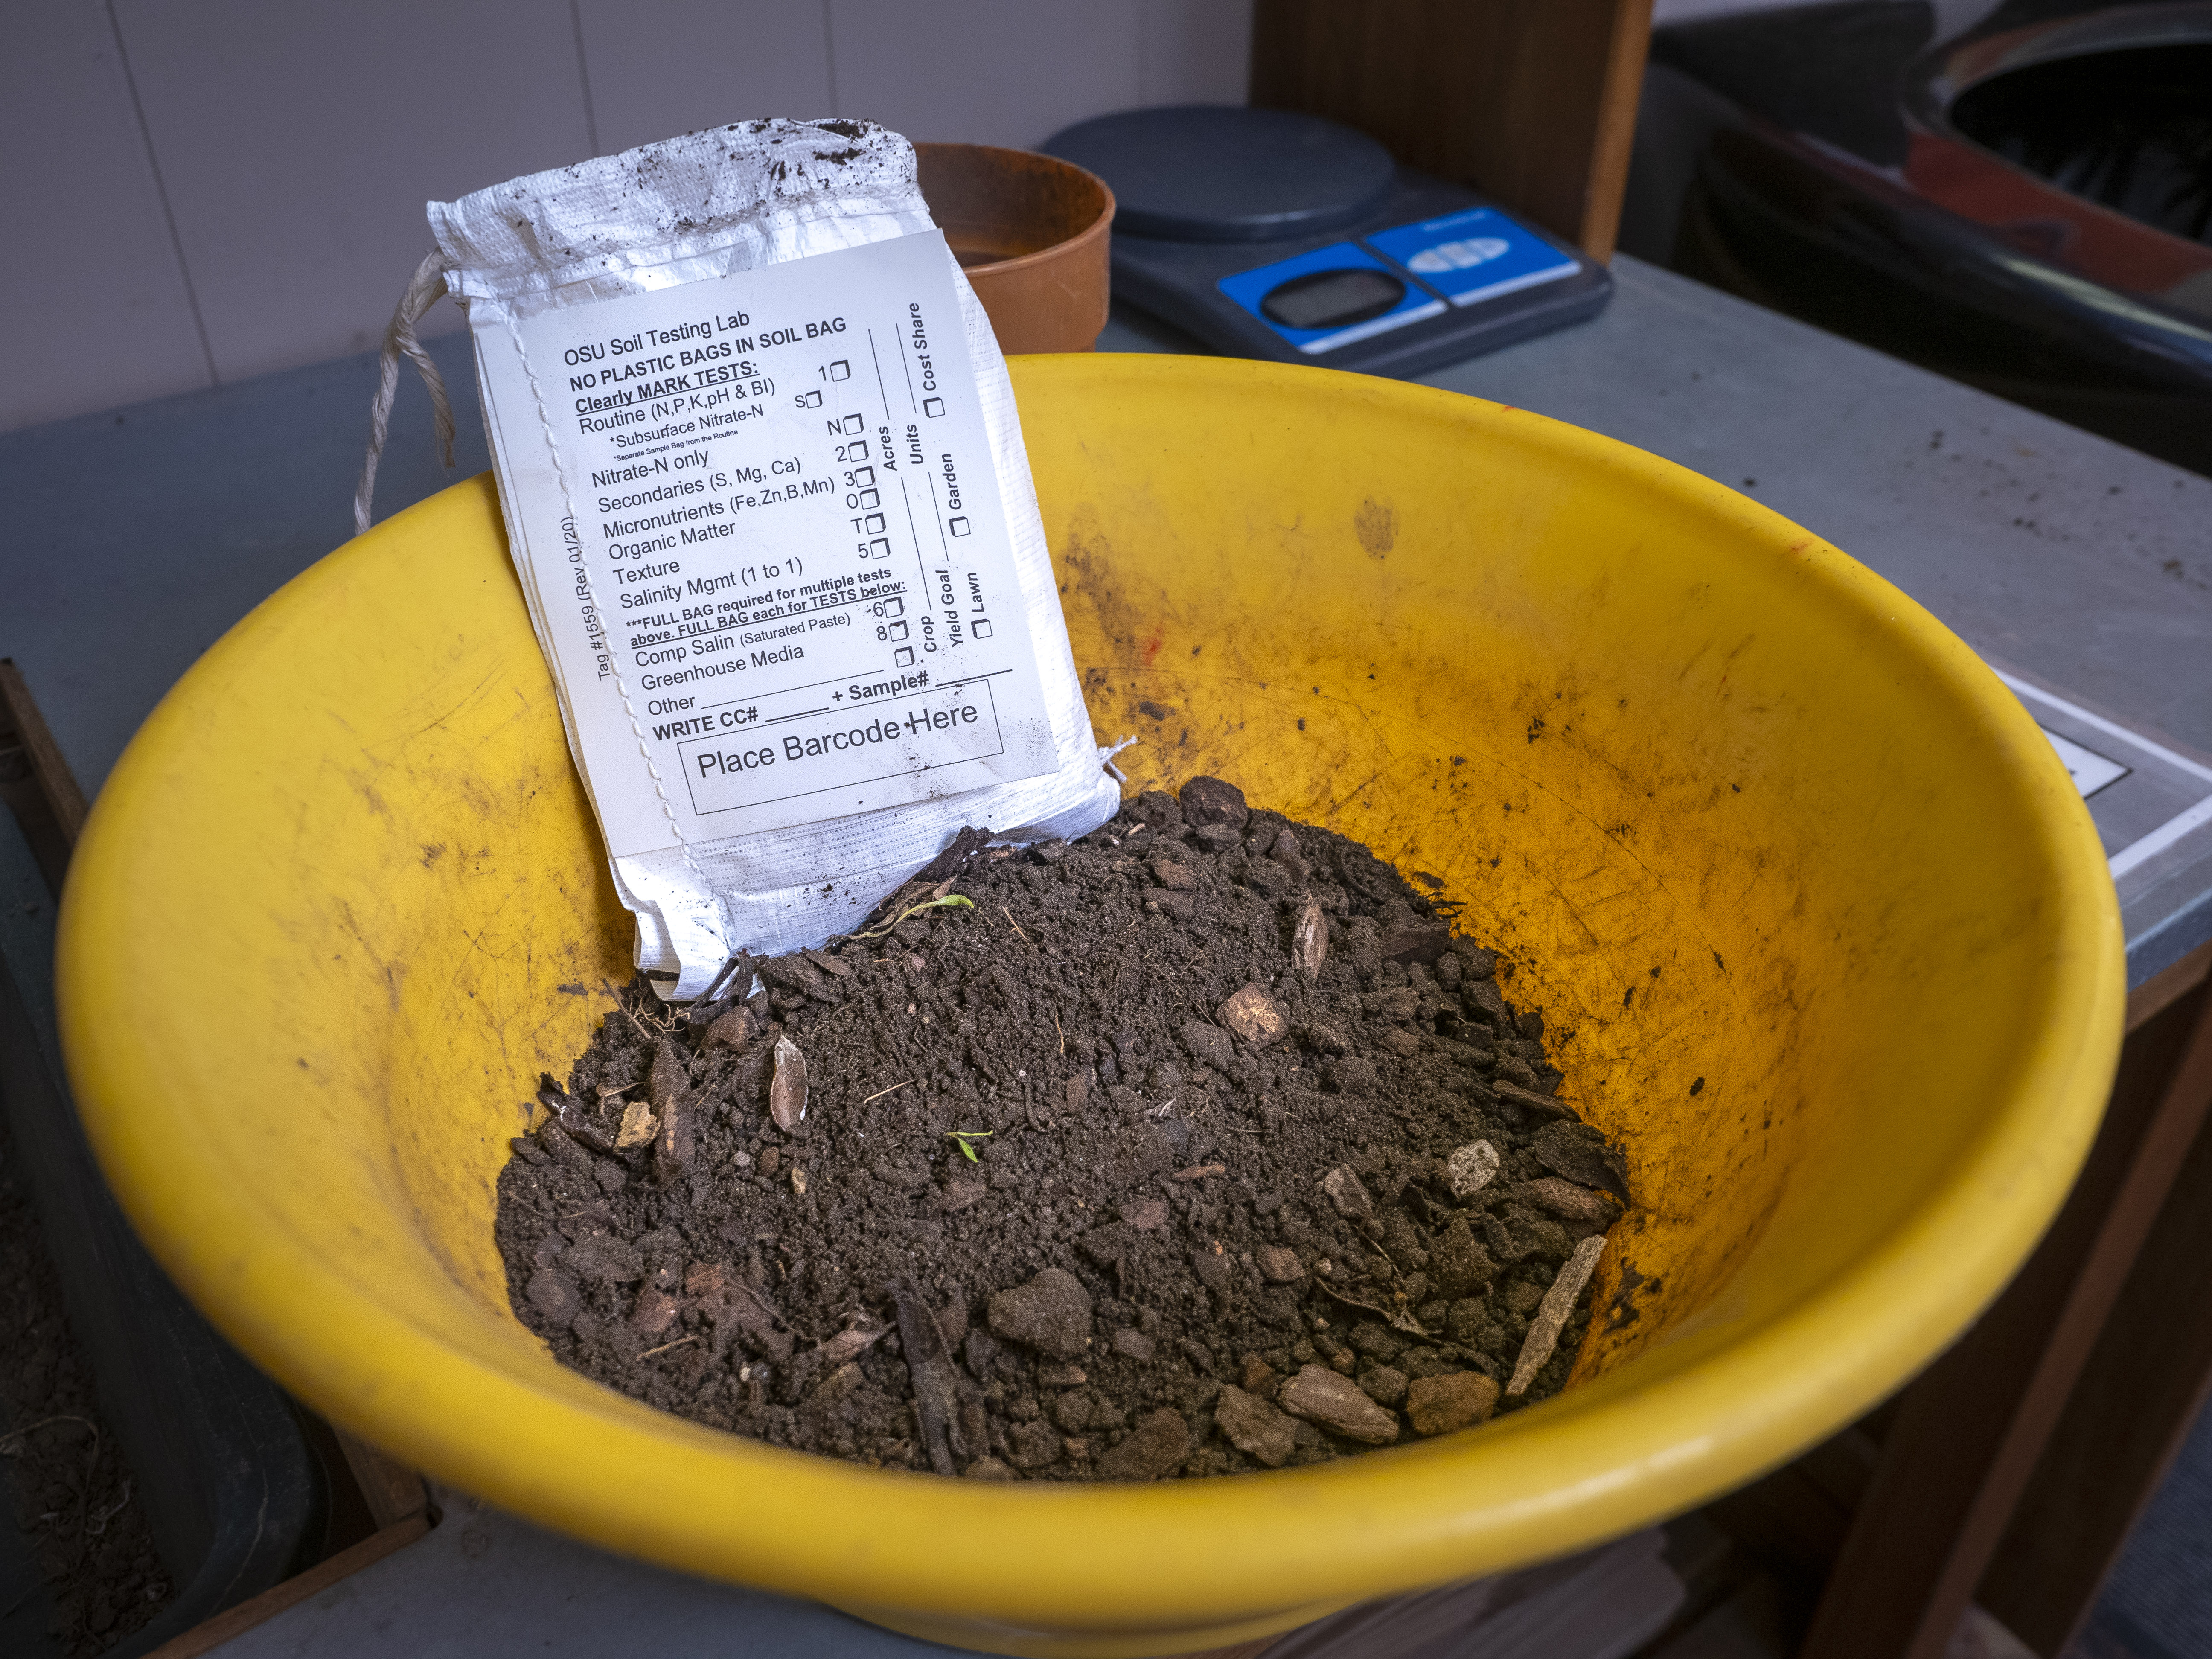 Figure 104: Soil testing bag (Oklahoma State University Extension).
Additional Information and Resources
- HLA-6460 Plants in the Classroom: The Story of Oklahoma Turfgrass
- Alien Classification Print Out Activity Part 1
- Alien Classification Print Out Activity Part 2
- The Plant Game Print Out Activity
- Flower Classification Print Out Activity
- Leaf Classification Print Out Activity
Appendix
Page 14
- Figure 26: Texas A&M University, https://aggieturf.tamu.edu/texas-turfgrasses/buffalograss/
- Figure 27: Oklahoma State University Extension. https://extension.okstate.edu/programs/plantid/plant-profiles/buffalograss/
- Figure 28: Oklahoma State University Extension. https://extension.okstate.edu/programs/plant-id/plant-profiles/buffalograss/
Page 15
- Figure 29: Purdue University. https://purduelandscapereport.org/article/spotlight-on-weeds-common-bermudagrass/
- Figure 30: Purdue University. https://purduelandscapereport.org/article/spotlight-on-weeds-common-bermudagrass/
- Figure 31: Oklahoma State University Extension. https://extension.okstate.edu/programs/plant-id/plant-profiles/bermudagrass/
Page 16
- Figure 32: Jim Brosnan. Figure 33: North Carolina State University. https://content.ces.ncsu.edu/zoysiagrass
- Figure 34 North Carolina State University. https://content.ces.ncsu.edu/zoysiagrass
Page 17
- Figure 35: North Carolina State University. https://content.ces.ncsu.edu/st-augustinegrass
- Figure 36: North Carolina State University. https://content.ces.ncsu.edu/st-augustinegrass
- Figure 37: Shelley Mitchell, Oklahoma State University
Page 18
- Figure 38: University of Maine. https://extension.umaine.edu/publications/2264e/
- Figure 39: Clemson University. https://www.clemson.edu/cafls/research/weeds/weed-id-bio/grasses-parent/grasses-pages-perennials/kentucky-bluegrass.html
- Figure 40: University of Maine. https://extension.umaine.edu/publications/2264e/
Page 19
- Figure 41: University of California Agriculture and Natural Resources. https://ipm.ucanr.edu/TOOLS/TURF/TURFSPECIES/tallfesc.html
- Figure 42: Purdue University. https://turf.purdue.edu/tall-fescue/
- Figure 43: Purdue University. https://turf.purdue.edu/tall-fescue/
Page 20
- Figure 44: https://warcapps.usgs.gov/PlantID/Species/Details/1646
- Figure 45: North Carolina State University Extension. https://content.ces.ncsu.edu/perennial-ryegrass
- Figure 46: Clemson University. . https://www.clemson.edu/cafls/research/weeds/weed-id-bio/grasses-parent/grasses-pages-perennials/ perennial-ryegrass.html
- Figure 47: Jeffery Borger, Penn State University
- Figure 48: North Carolina State University. https://content.ces.ncsu.edu/perennial-ryegrass
Page 21
- Figure 49: Michigan State University. https://www.canr.msu.edu/ipm/diseases/creeping-bentgrass?language_id=
- Figure 50: North Carolina State University Extension. https://content.ces.ncsu.edu/creeping-bentgrass