

Sustainable Landscapes: Creating A Hügelkultur For Gardening with Stormwater Management Benefits
What is a Hügelkultur?
“Hügelkultur” (pronounced hyoo-gul-kulture) is a German word that means mound culture or hill culture. A hügelkultur is a sloped and raised planting bed filled with topsoil, wood and organic materials. German and European people have practiced it as a gardening method for hundreds of years. Figure 1 shows a typical hügelkultur in the field. A well-built hügelkultur is a self-watered, self-composting raised garden with few irrigation and fertilization needs. This garden bed is perfectly designed to capture rainwater runoff for sustainable stormwater management and can serve as a windbreak.
This factsheet describes the benefits and construction of a hügelkultur. A hügelkultur case study built by landscape architecture faculty and students of LA 3894 Sustainable Construction class in Stillwater, Oklahoma, demonstrates how to find the best spot for a hügelkultur on a property and what steps it takes to create one.
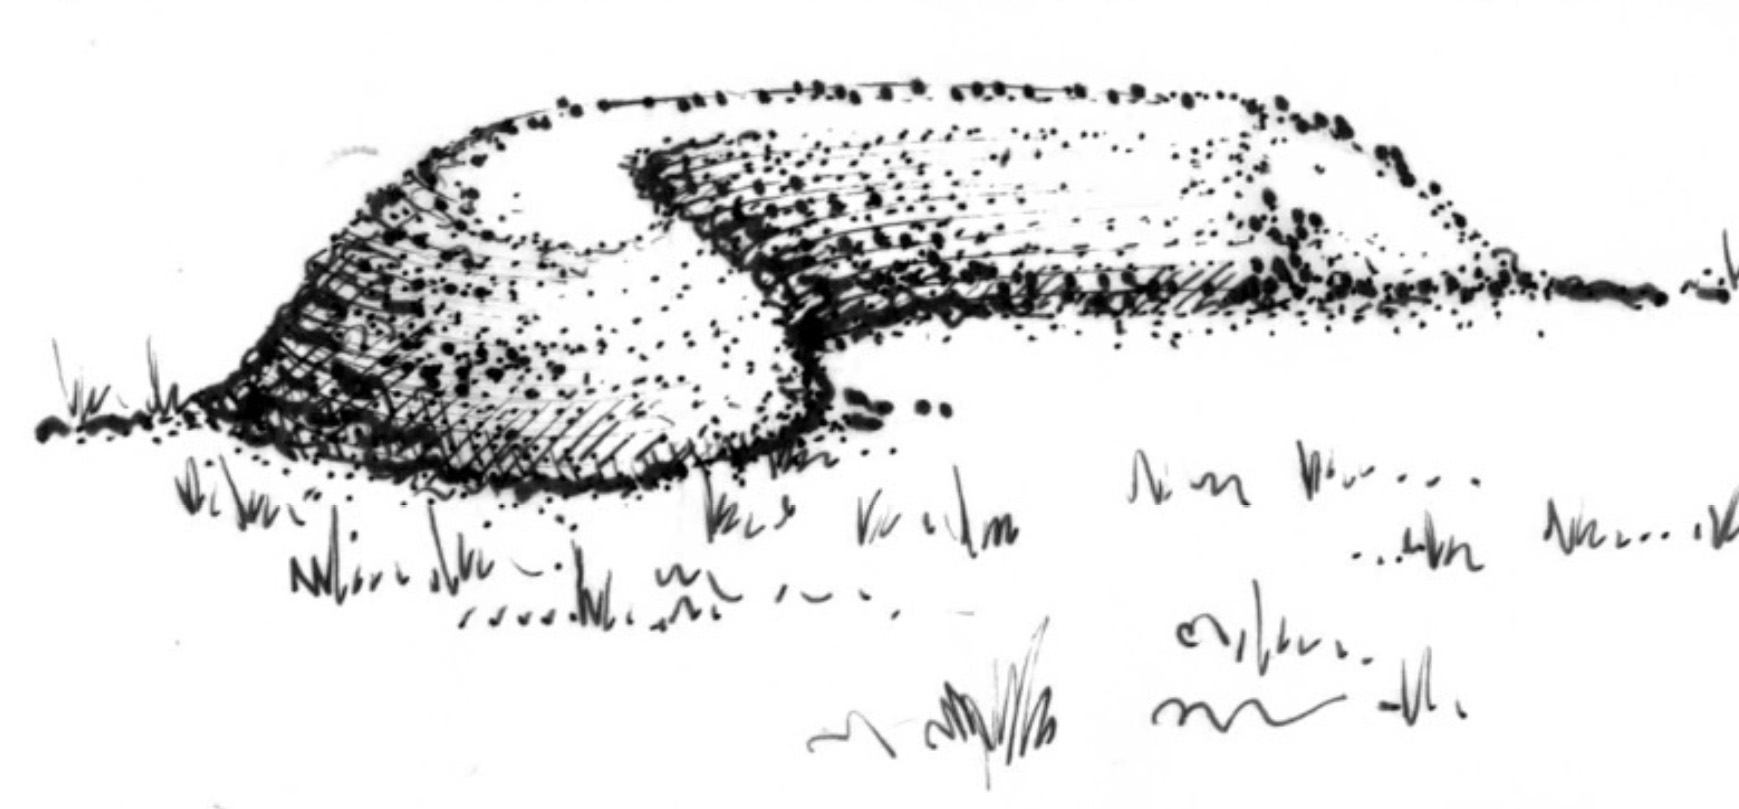 Figure 1. A typical hügelkultur that looks like a curved mound about 3 to 4 feet wide and approximately 3 feet tall, planted with small vegetables, herbs, or grasses. The mound follows the natural contour of the land to effectively capture rainwater runoff.
Benefits of Hügelkultur
- Hügelkultur conserves water. It works as a self-irrigated garden and needs little supplemental water if constructed correctly in a location where it can capture surface runoff. As the surrounding surface water runs into the mound, the organic material in the hügelkultur acts as a sponge to absorb the water and wick it up to the roots of the plants.
- Hügelkultur is low maintenance. It requires minimal maintenance due to its drought resistant nature. As with any garden, it will still need weeding.
- Hügelkultur is a sustainable stormwater management practice. It works as a raised rain garden with the mound providing a water retention function. Thus, it is a sustainable stormwater management practice as the mound slows down the water runoff and allows a place for water to infiltrate into the ground.
- Hügelkultur produces food. Growing crops in the beds is a highly regarded self-sufficient farming practice. Wider use of hügelkultur in gardening and agriculture can be an efficient way to increase crop yields and reduce hunger.
- Hügelkultur improves the soil. The organic matter in soil conducts a dynamic self-composting process over time inside the mound. It is also a tool for carbon sequestration and makes use of landscape debris that might otherwise be burned or sent to a landfill.
- Hügelkultur is permaculture. It mimics natural ecosystems by recycling wood and organic matter into fertile, self-sustaining soil, and serving as a productive practice for gardeners, farmers and homeowners.
- Hügelkultur is easy and affordable. It is generally inexpensive and easily adaptable to different environmental/site situations and materials.
Designing a Hügelkultur
A hügelkultur should be designed with the location in mind, therefore the final garden can take many forms to ft the site. A simple hügelkultur will resemble a long, straight mound, as was built by class of LA3894 (Sustainable Construction) demonstrated and shown later in this factsheet. A hügelkultur can also have many other design characteristics. The mound system can have a curved shape or be grouped together to create a destination in a garden for people to enjoy. See Figure 2 for examples of different hügelkultur forms.
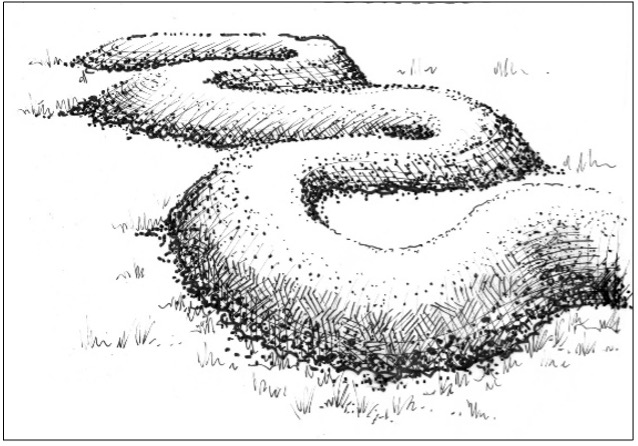
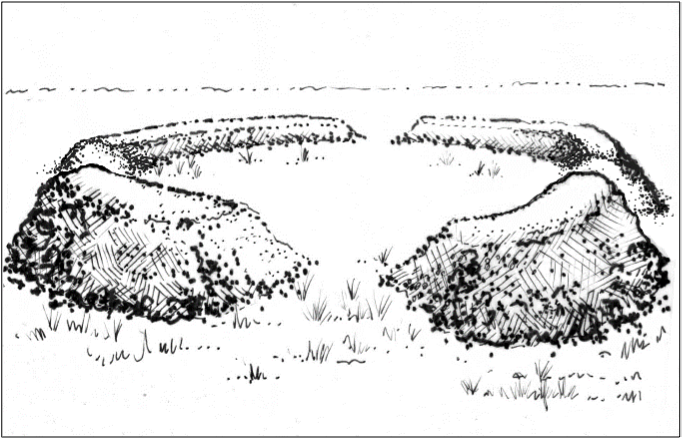
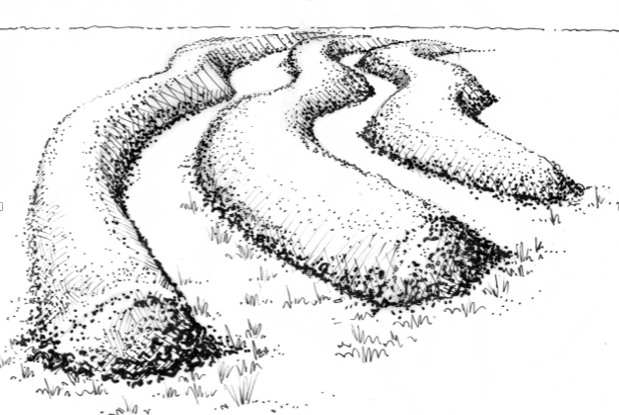
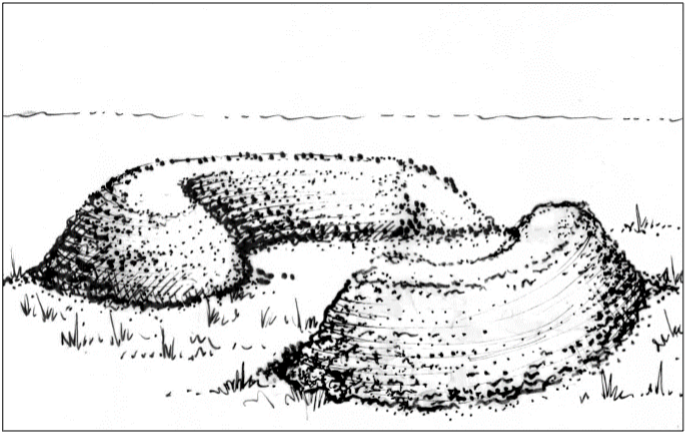 Figure 2. A series of four diagrams showing different Hügelkultur mound layouts, each with distinct shapes and spatial arrangements. The upper left diagram shows a serpentine mound that curves smoothly across the landscape. The upper right diagram features four curved mound segments arranged like petals of a flower, forming a circular central space for people to use. The lower left diagram shows three gently curved, parallel mounds aligned side by side. The lower right diagram shows two curved mound segments forming an incomplete circular ring that creates a more open, crescent-shaped gathering space.
Types of Hügelkultur
Anatomy of a Typical Hügelkultur
A typical hügelkultur has multiple layers of materials: large logs, branches, small twigs, grass clippings, manure and topsoil. Figure 3 shows the anatomy of a typical mound.
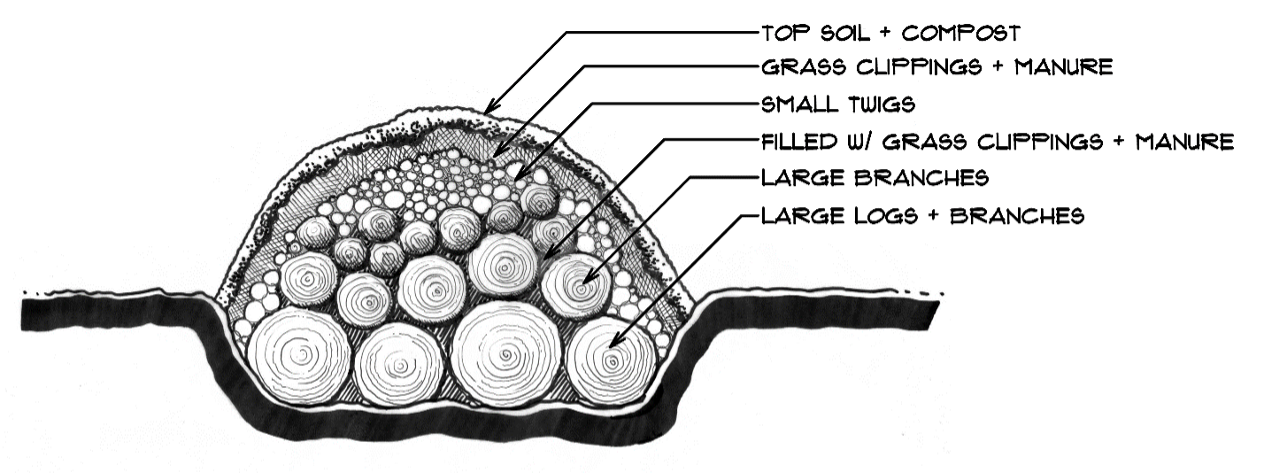 Figure 3. A typical section drawing, which is a cutaway drawing of a hügelkultur mound showing multiple layers from bottom to top: large logs at the base, smaller branches and twigs above them, followed by organic matter such as leaves and compost, and finally a top layer of top soil and compost.
Sizes and Slopes
A hügelkultur can be built at any scale. The length and height of the garden should be based on the site and available materials. The sides of a hügelkultur can be steeper or more gently sloped depending on your needs. Keep in mind that the steeper the sides are, the more difficult it may be to plant seeds without them washing away.
Depth and Borders
Hügelkultur can be built in-ground or above ground (see Figure 4). Digging into the ground can help capture more runoff, but may require more materials to create the desired height. Also, depending on the depth and soil, digging may require additional tools/machinery. A mound can also be constructed with or without base boarder (see Figure 5 & 6). A border at the foot of the mound can stabilizes the shape and prevent the top layer from washing away. The border materials can be wood, brick or stone. The photographs from the built example hügelkultur in this article show an in-ground type without a base border.
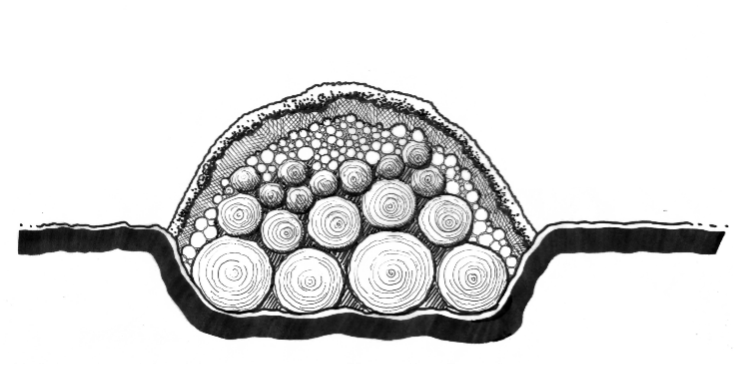
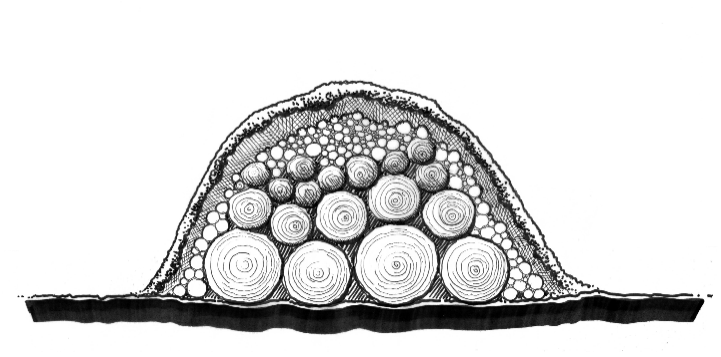 Figure 4. Two side-by-side diagrams compare construction styles. Left: a mound partially recessed into the ground, showing soil depth below the surface. Right: a fully above ground mound built up on top of existing soil. Both versions have similar layers of logs, branches and topsoil as in the typical section.
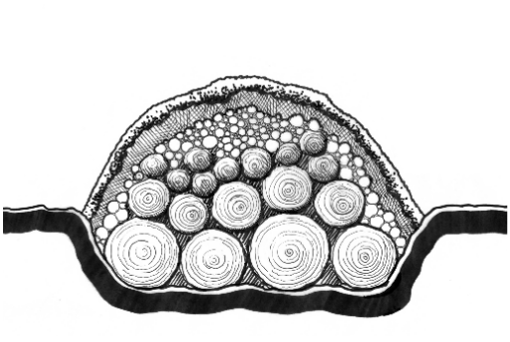 Without border
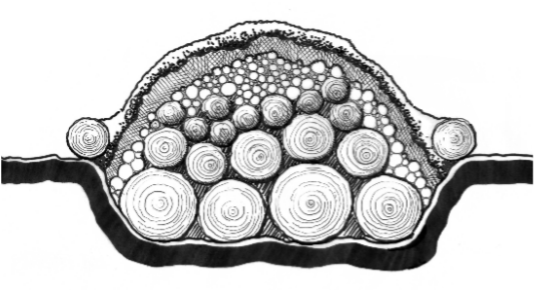
Wood border
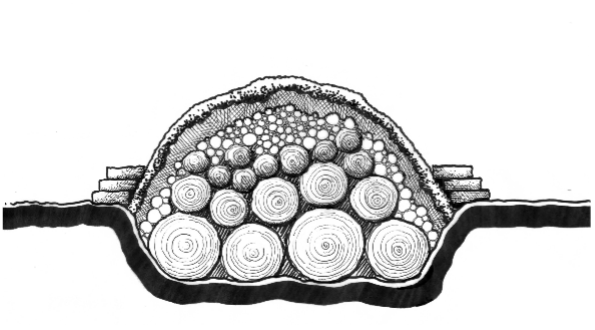 Stone border
Figure 5. A sequence of three images showing variations of in-ground hügelkultur edges: (Top) a mound without any border, where soil slopes naturally into the ground; (Middle) a mound framed with wooden logs forming clean, straight edges; (Bottom) a mound edged with stacked stones that stabilize the soil and add a rustic appearance.
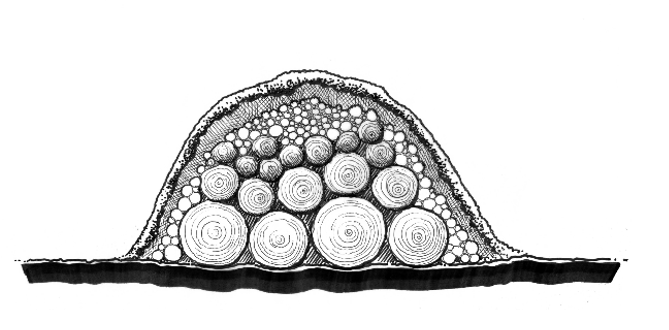
Without border
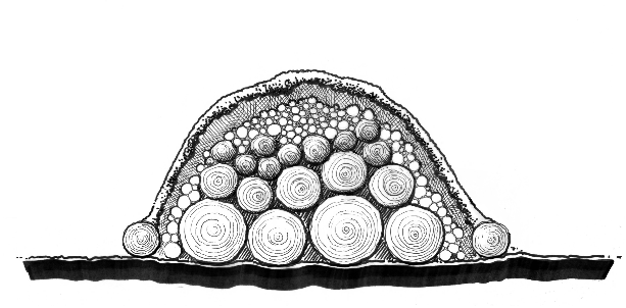
Wooden border
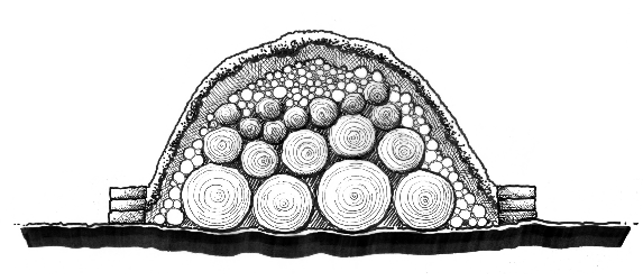
Stone border
Figure 6. Three comparative images showing above-ground mound edges: (Top) an open mound with sloped soil and no border; (Middle) a mound contained by wooden frames; (Bottom) a mound enclosed by stone edging.
Construction Process
Hügelkultur utilizes a lasagna gardening or sheet composting process, meaning one layer of material is stacked on top of another, alternating carbon and nitrogen sources of organic material that will decompose over time.
Basic Material List
- Tree logs, branches and leaves. Hardwoods are the best, including alder, aspen, birch, cottonwood, maple, oak, poplar and willow. Avoid using the following: tree species that may have allopathic qualities (e.g. black walnut), trees that resist decay (i.e. cedars), cut green trees that sprout easily (e.g. willows), or wood with antifungal and antimicrobial properties, such as railroad ties and painted lumber.
- Manure, kitchen waste and grass clippings that are appropriate for composting. These are nitrogen-rich materials, which help to maintain a proper carbon-to-nitrogen ratio in the decomposing process.
- Topsoil and mulch to cover the planting surface at the top of the mound 1 to 2 inches deep. If the hügelkultur is built slightly into the ground, the excavated topsoil can be used.
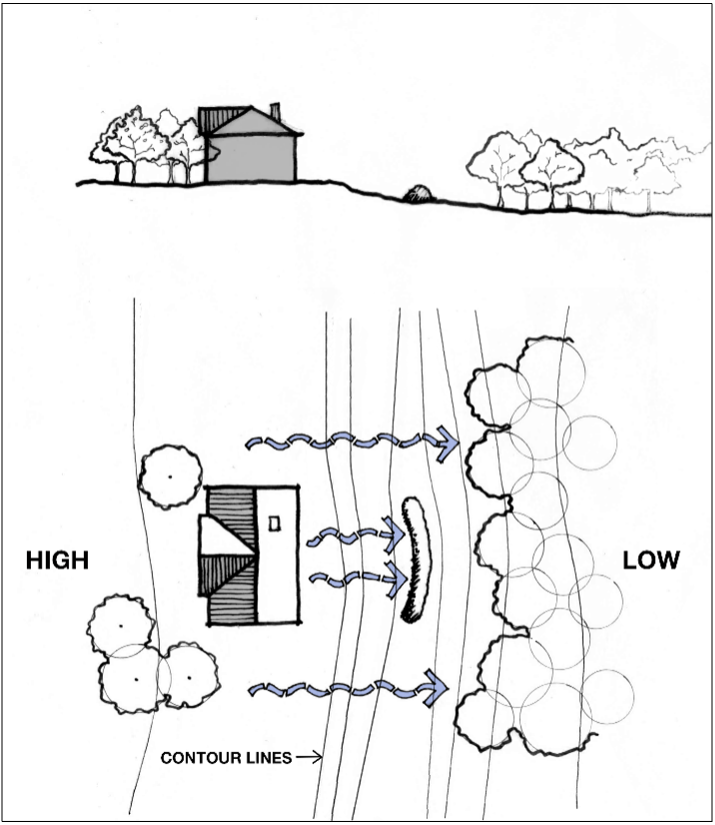 Figure 7. A site diagram showing the correct hügelkultur orientation where a sloped piece of land with arrows indicating downhill water flow. A long hügelkultur mound is placed parallel with contour lines, intercepting runoff and allowing rainwater to soak into it effectively.
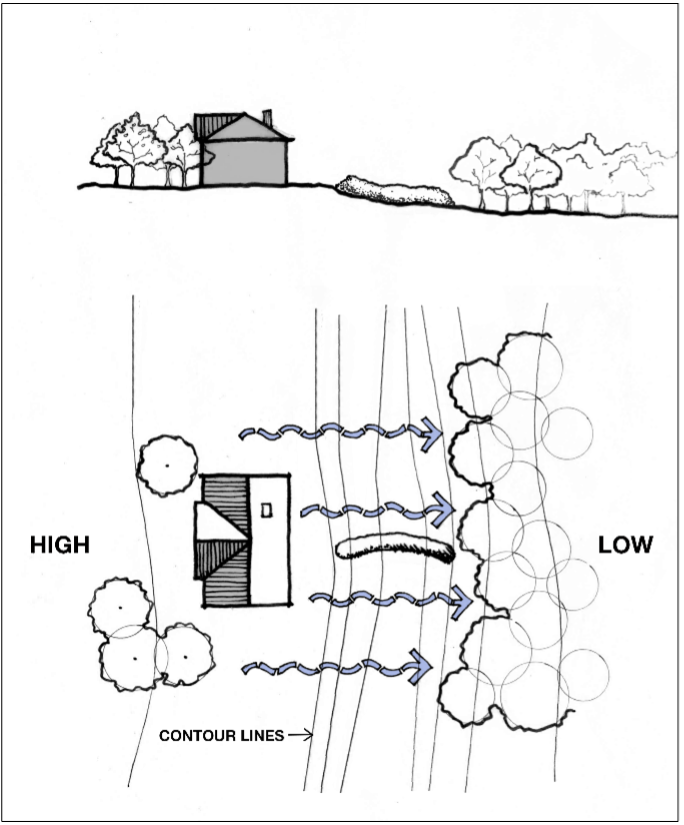 Figure 8. A similar site diagram showing incorrect hügelkultur orientation where the mound is placed perpendicular to the arrows showing water flow. Because it runs in the same direction as the runoff, the water bypass-es the mound instead of being absorbed, illustrating poor water capture.
Construction Steps
- Locate a lower elevation spot on the property where the mound can capture surface runoff. Ideally, this location receives six to eight hours of sun for greater planting options. Observe topography and construct a hügelkultur bed parallel to site contours or perpendicular to the downhill flow of water. Water runoff will be captured in the hügelkultur and encourage decomposition (Figure 7). Do not place the hügelkultur parallel to the water run off direction, as it will not be able to capture the runoff effectively (Figure 8).
- Dig a trench 1 to 2 feet deep and to your desired length and width (this may depend on the amount of material you have collected). For a residential yard, a proper size can be a rectangle shape at of 3 ft x 6 ft. For a larger site, dimensions can be scaled up. Figure 9 shows a trench much larger as it was built on a fairly large property. For Oklahoma residents, remember to call Okie 811 to locate underground utility lines before digging. Residents in other states should check their local call before you dig program.
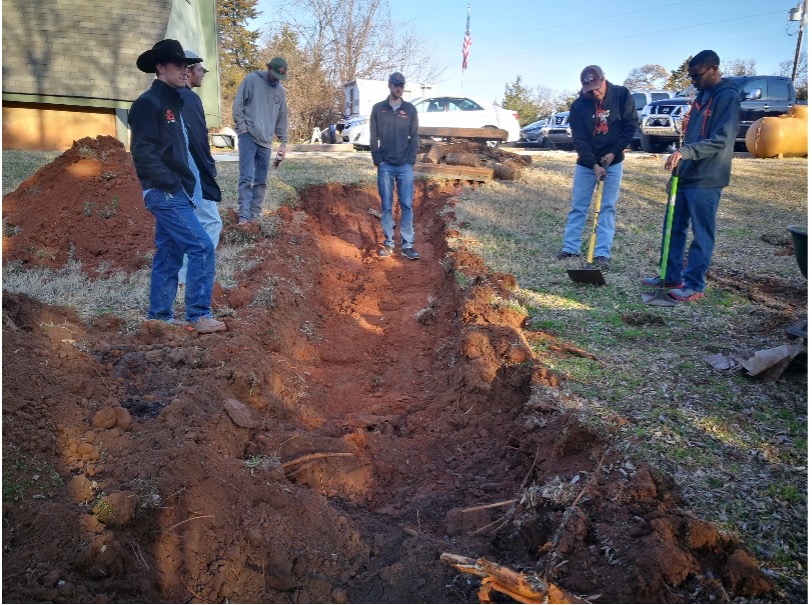
Figure 9. Digging the trench. A trench, approximately 2 feet deep, dug into the soil. This trench will serve as the base for building the hügelkultur mound. - Lay the largest logs at the bottom of the pit as the base layer (Figure 10).
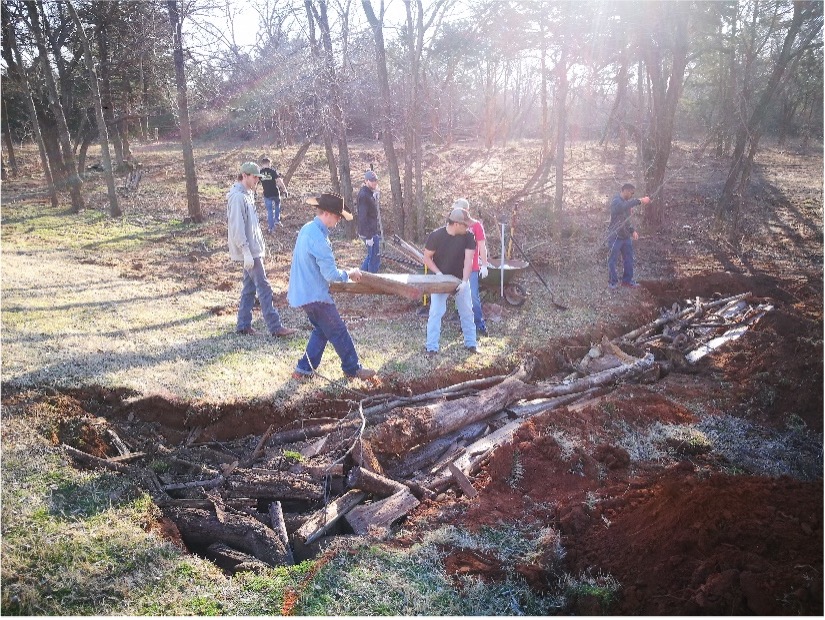 Figure 10. Base layer of large logs. Thick tree trunks and large branches are laid horizontally in the bottom of the trench, forming the foundation of the hügelkultur. The logs vary in diameter and length, creating an uneven but stable base.
 - Add a layer of branches, then smaller twigs (Figure 11).
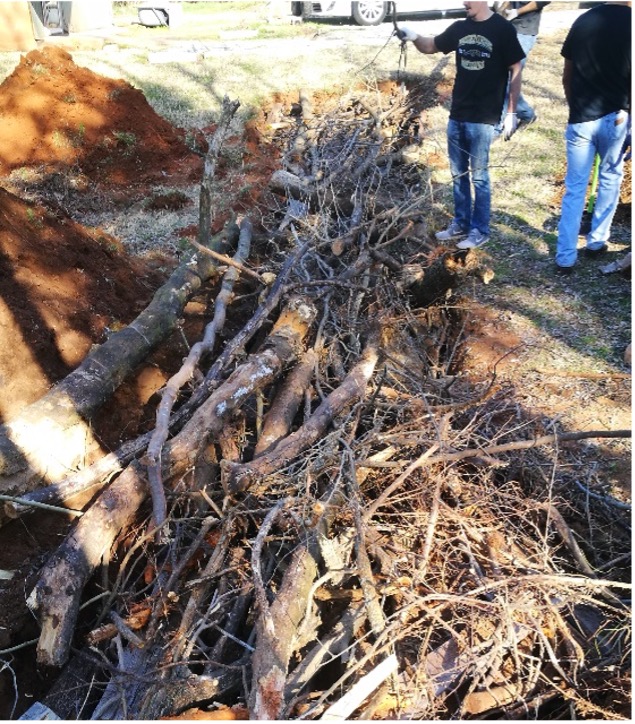
Figure 11. Adding branches and twigs. A layer of medium and small branches stacked over the large logs, filling gaps and creating a rough, textured surface. - Fill in spaces between the logs and branches with leaves, manure, grass clippings and/or kitchen waste (Figure 12).
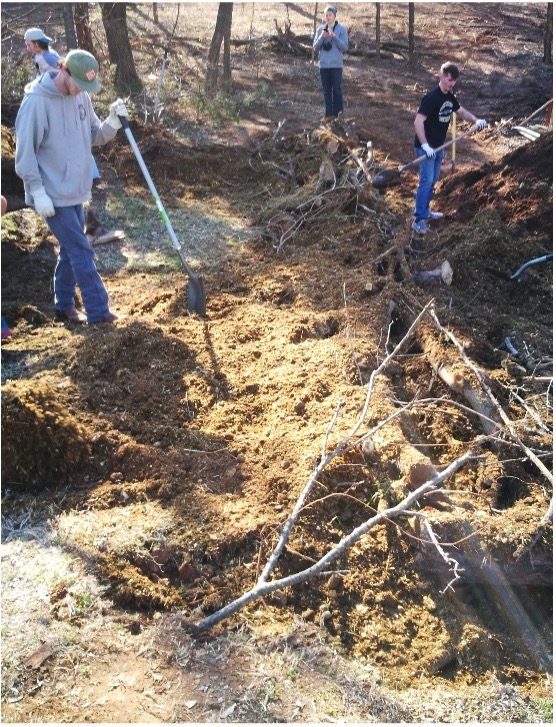
Figure 12. Filling with organic material. Grass clippings, leaves, manure and other compostable materials are spread over the pile of logs and branches. The colors range from green and brown to tan, indicating mixed materials. This layer begins to round out the shape of the mound. - When the mound is approximately 3 to 5 feet tall above ground, add 1- 2 inches of topsoil (Figure 13). Keep in mind that the height of the hügelkultur will continue to shrink as the materials break down over time.
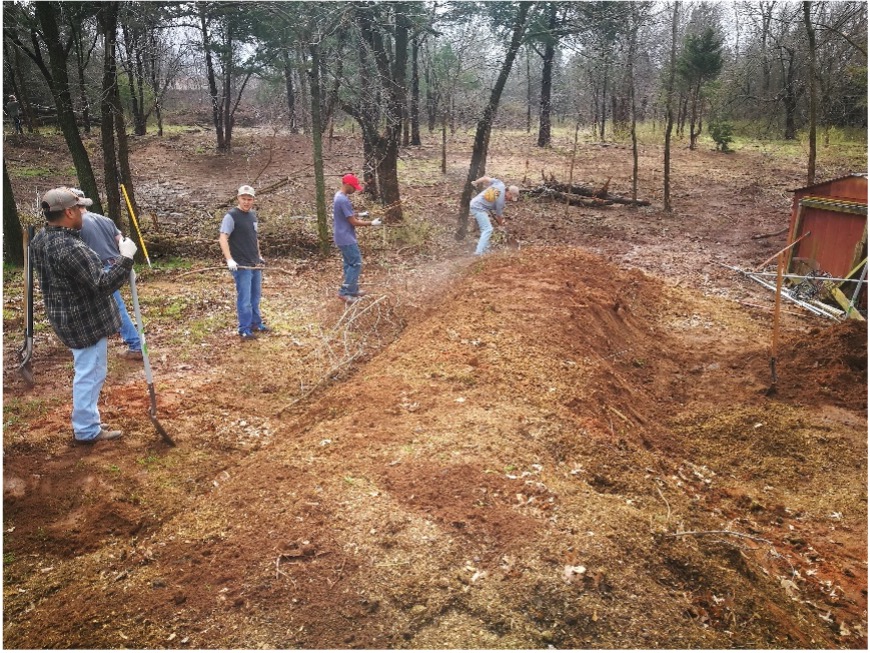
Figure 13. Adding topsoil. A thick layer of topsoil and compost at 6 to 12 inches covers the mound, smoothing its surface into a continuous slope. The mound now stands a few feet high with gently curved sides and an even top, ready for planting.
Special note: Water each layer thoroughly before adding the next layer. Use a tamper to compact the pile after each layer is added to improve decomposition and reduce voids that can cause safety concerns. This hügelkultur was built at 20-feet x 8-feet x 4-feet tall since the site was very large. A scaled down version such as 6-feet x 3-feet x 3-feet would be a more appropriate size for a typical residential yard. Figure 14 shows the completed hügelkultur before planting.
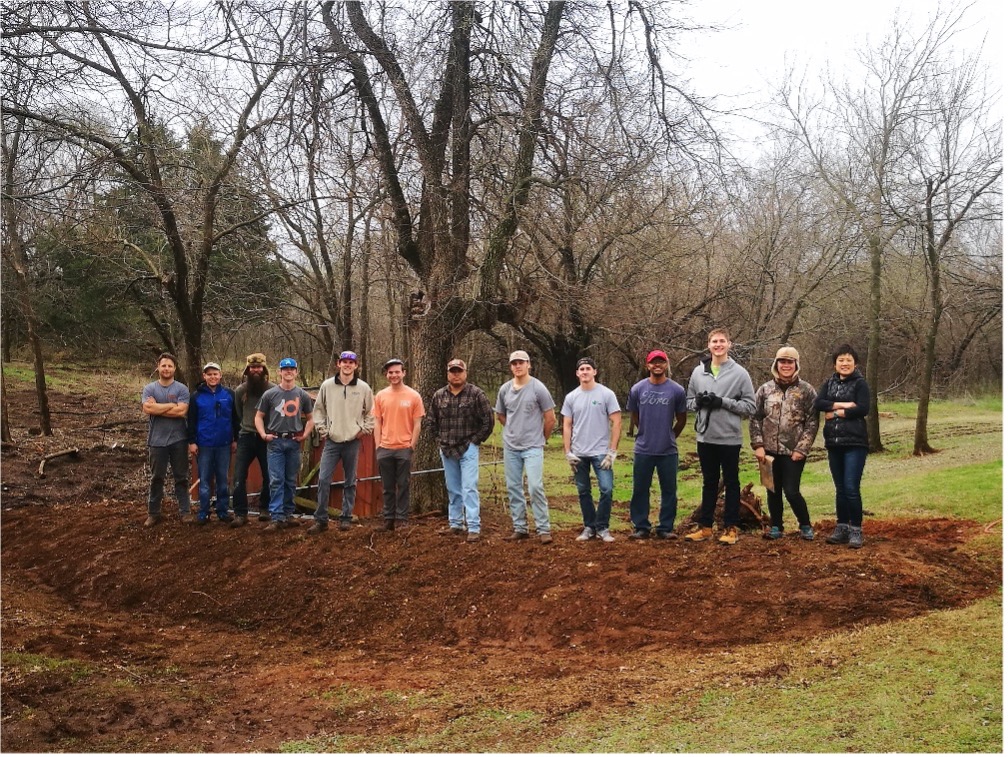
Figure 14. Completed hügelkultur before planting. A fnished mound about four feet tall. The surface is compacted and uniformly shaped.
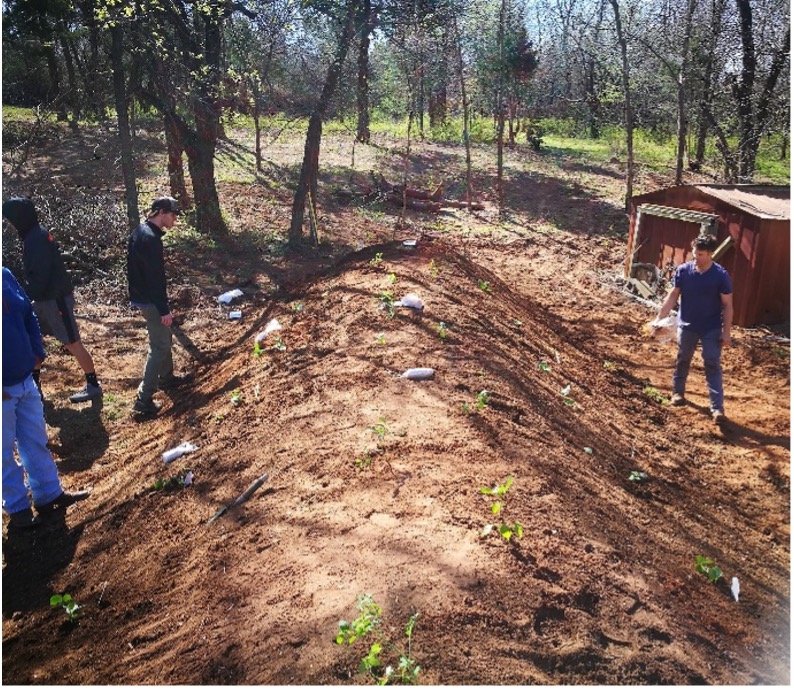
Figure 15. Planted hügelkultur. The completed mound is now covered with leafy green plants such as pumpkins, squash and other vegetables. Plants are irrigated. - Plant the hügelkultur.
After the final layer of topsoil is added to cover the hügelkultur, vegetables or other plants can be installed on the top and slopes of the mound (Figure 15). Depending on the carbon-to-nitrogen ratio of the materials used in the hügelkultur bed, new plants may require supplemental nitrogen fertilizer, as this nutrient can become limited during the decomposition process and hinder strong plant growth. To fix nitrogen in the soil without adding fertilizer, plant legumes for the first couple of seasons. Legumes like peas can be a harvested crop or used as a cover crop.
Vegetables planted in this hügelkultur example included pumpkin, multiple squash varieties, asparagus, horseradish and tomato. Pay attention to these things when planting on a hügelkultur:
- As with composting, the best practice is to build the mound in fall for spring planting as it will benefit from curing time before planting.
- Hügelkultur beds can also be planted immediately. The above example was planted right away after the bed was raised.
- Both seedings and transplants will work, depending on what plants are used.
- Water the plants at their establishment stage with a simple hose. As the materials continue to decompose, the water retention in the hügelkultur will improve and your plants will require less watering.
- Plants selection should still be based on amount of sun exposure the hügelkultur receives. Most vegetables require six to eight hours of sunlight. Therefore, if you have a hügelkultur in the shade, it may not be an appropriate location for vegetables.
- A special note should be made that hügelkultur is a dynamic process where the wood and organic materials are biodegrading and sinking over time.
- In terms of maintenance, hügelkultur is relatively low-maintenance but benefits from seasonal care. As the mound settles and materials decompose, add compost or topsoil each year to maintain planting depth. Regular weeding, watering at plant establishment and topping of the hügelkultur with soil or compost will keep the system productive over time.
- Watch for nitrogen deficiencies during the first few seasons and consider planting legumes or adding supplemental fertilizer.
| Cover Crops | Vegetables/fruits | Ornamentals |
|---|---|---|
| Clover* | Tomatoes | Viburnum |
| Winterpeas* | Peppers | Salvia |
| Vetch* | Squash | Amsonia |
| Wheatgrass* | Melons | Agastache |
| Buckwheat | Blackberry | Helleborus |
| Cowpeas | Okra | Ornamental grasses |
*Cool Season Crops
Additional Plant Information Sources
- Oklahoma Proven
- HLA 6436, Cover Crops – Healthy Garden Soils
- HLA 6439, Shrubs – Selecting Shrubs for the Landscape
A Hügelkultur Variation Practice within Raised Beds
In recent years, hügelkultur has evolved into more variations, driven by its compelling sustainable benefits and practical applications. One notable adaptation integrates hügelkultur into framed raised planting beds.
In this practice, traditional hügelkultur layers — comprising logs, branches, twigs and leaf little— are strategically placed at the base of the raised beds (Figure 16). These organic materials are then topped with planting soil to create an optimal growing medium (Figure 17).
This approach offers several advantages:
- Cost efficiency: By occupying the lower portion of the bed with organic debris, the overall volume of purchased soil re-quired is significantly reduced.
- Enhanced soil fertility: As the woody materials decompose, they foster a self-sustaining, nutrient-rich environment that continuously feeds plant roots.
- Water retention: The decomposing layers function much like a sponge, absorbing and storing rainfall. This is particularly beneficial when beds are positioned to intercept upstream stormwater flows, promoting passive irrigation.
- Space saving and aesthetic flexibility: This raised-bed hügelkultur technique is especially well-suited for urban and back-yard gardens where space constraints, suboptimal soil conditions or aesthetic considerations render traditional hügelkultur mounds less feasible.
It is important to note that this method is best implemented in raised beds that are at least 17 inches in height. Beds shorter than this generally lack the necessary depth to accommodate both the hügelkultur layers and an adequate volume of quality planting soil above. As a guideline, fill approximately the lower half of the bed with the hügelkultur materials, reserving the upper half for planting soil and compost to ensure direct root contact with fertile, well-structured growing media. All other conventional hügelkultur techniques apply in this practice. As the organic material breaks down the soil level will settle so topping of the beds with additional soil or compost will likely be needed each year until the majority of the organic matter has decomposed.
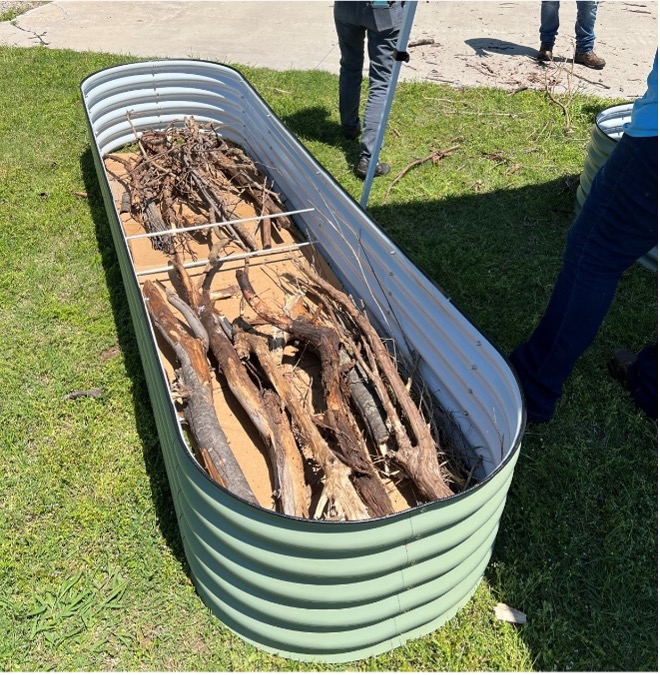 Figure 16. Raised bed hügelkultur variation. Inside a metal-framed raised garden bed about 17 inches tall, thick logs and larger branches fill the lower half. The wooden logs give structure and height to the bed.
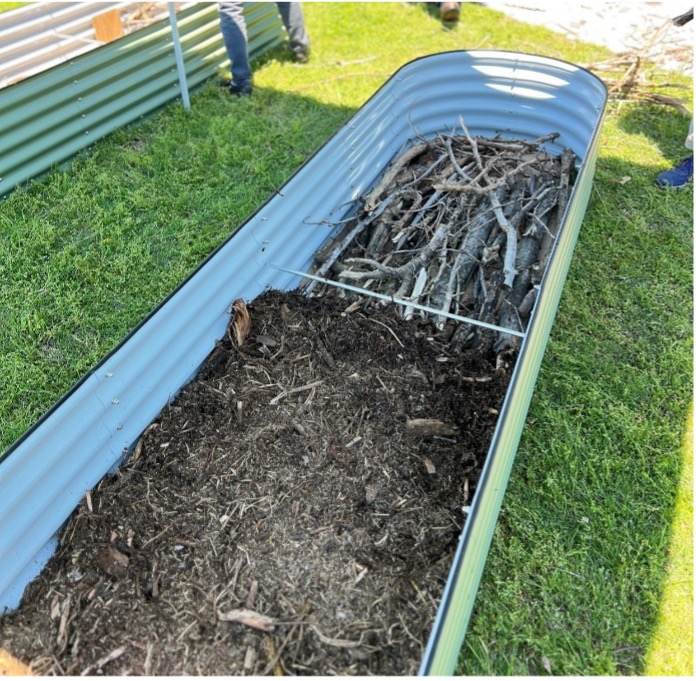 Figure 17. Compost and Soil Added. The same raised bed now filled with a top layer of compost and planting soil above the logs and branches. Soil also fills up the gaps between the lower logs and branches. The top of the soil surface is filled to the top edge of the raised bed planter, ready for planting herbs or vegetables.
Also watch for potential nitrogen deficiencies. If there is an imbalance of carbon to nitrogen due to the high content of carbon material (logs, limbs, twigs), nitrogen can get tied up in the soil and be unavailable to the plants. In this case supplemental nitrogen may be needed. All other conventional hügelkultur techniques apply in this practice.
Summary
Overall, hügelkultur is a simple and practical method for gardening and urban farming that brings environmental, social, educational and economical benefits together. It is a truly sustainable practice that should be widely advocated and implemented.