Poultry Litter Spreader Truck Operation and Calibration
Introduction
This document gives facts and pointers for getting a good, uniform, precise application of poultry litter using spreader trucks. The information also can be used for calculating litter applied by towed manure spreaders, but the exact mechanisms of spreading may be different. This fact sheet does not pretend to describe poultry litter subsurface injectors, or spreading any other type of manure besides dry poultry litter and poultry litter cake. Calculation methods for determining application rates and distribution patterns can be used for other types of dry manure as long as the spreader uses horizontal spinners to distribute manure.
Parts of Typical Spreader Truck
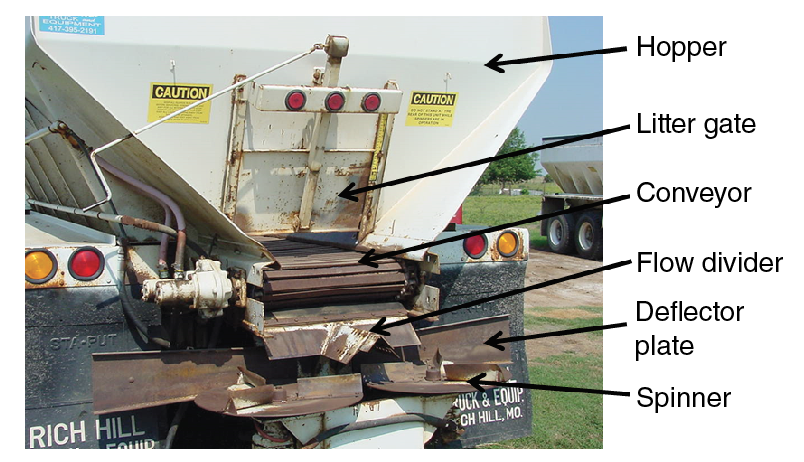
The working parts of a poultry litter spreader truck are shown in Figure 1. The equipment shown represents most of what can be found in service today, even on the newest equipment.
Hopper. Sometimes called the bin or the payload, the hopper is the part of the truck that holds litter. As shown in Figure 1, the sides of the hopper are usually sloped inward towards the hopper-emptying mechanism. This ensures that litter flows smoothly down the side of the hopper. In Oklahoma, hoppers used for over-the-road transport of litter must be covered except when litter is being spread in a field.
Figure 1. Working Parts of a Typical Litter Spreader Truck.
Litter gate. The litter gate controls the flow of litter out of the hopper. The wider it opens, the more litter passes through the gate. The gate in Figure 1 is raised and lowered manually by a crank connected to a long shaft. Newer, digitally controlled spreaders use hydraulic actuators to open and close the gate so litter flow rate can be adjusted during application.
Conveyor. All spreaders have some type of mechanism to remove material from the hopper. The spreader truck shown in Figure 1 uses a conveyor to remove litter. The conveyor runs the entire length of the hopper, and drops litter on top of a flow divider that distributes it onto the spinners below. Some spreaders use a chain drag to move litter. Others, especially those with vertical hopper walls, may have a hydraulic ram that pushes manure to the back of the hopper.
Flow divider. After passing out of the hopper, litter falls on a flow divider that distributes it onto two separate spinners. The divider shown in Figure 1 is fixed, and litter is distributed more or less evenly between the spinners. On newer machines, flow divider mechanisms allow the operator to adjust litter distribution between the spinners.
Spinners and deflector plates. Litter flows over the flow divider onto the spinners. The spinners throw litter to the left and to the right of the spreader. The deflector plates in Figure 1 are fixed and prevent litter from being thrown forward, underneath the truck. Deflector plates on some spreaders are adjustable and allow the operator to manipulate the distribution pattern of litter behind the spreader.
Machine Application Rate
The machine application rate, or the weight of litter spread by the truck averaged over a given area as it drives through the field, is a determined by the flow of litter out of the hopper, speed of the truck across the ground, and the width of spread behind the truck. These factors come together as shown in Equation 1.
The amount of litter hitting the ground given in Equation 1 is not the same on every spot in the field. Litter is spread in a distribution pattern. Application rate is generally heaviest behind the center of the truck – right underneath the spinners – and becomes lighter to the left and to the right – away from the center. To get a uniform application throughout the field, overlap distribution patterns. First though, how does the distribution pattern come about?
Litter Distribution Pattern
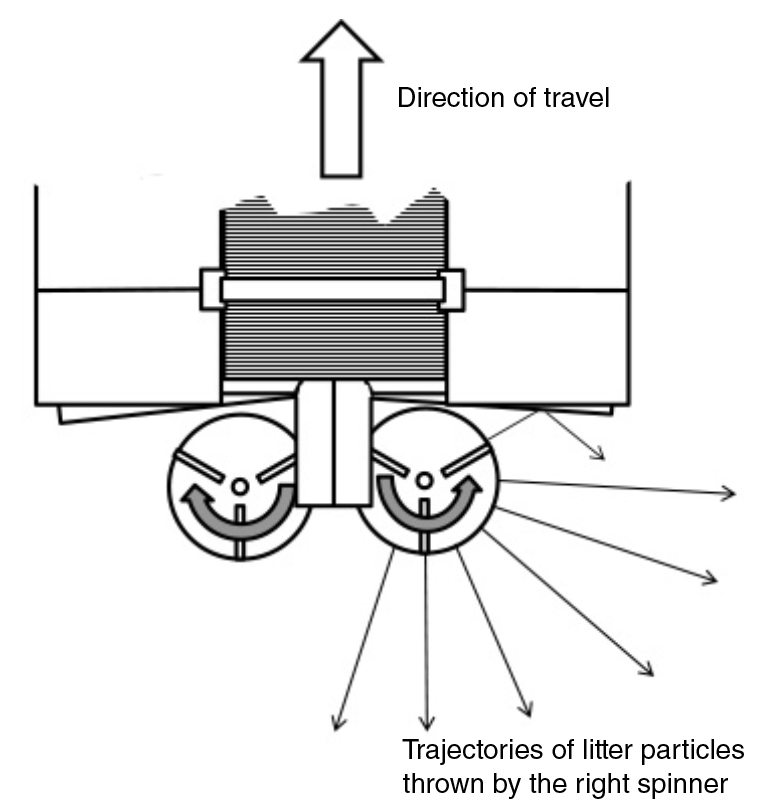
Figure 2 is a schematic of the working parts of a spreader truck. These are the same parts shown in Figure 1, but looking down from above. The spinner on the left spins clockwise, and the spinner on the right spins counterclockwise. When litter falls onto the flow divider, a portion hits the left spinner, which throws litter particles to the left. Litter falling to the right hits the right spinner and is thrown to the right. Any litter thrown forward by either spinner hits the deflector plate and drops down or is ricocheted backwards.
Figure 2. Top view of the working parts of a spreader truck; right spinner turns counterclockwise, left spinner turns clockwise.
Not all the particles fly off at the same angle, and some particles fly further than others. Poultry litter is a mixture of many sizes of particles. Smaller particles do not fly very far and drop down right below the spinners. Larger pieces fly further. The result is a distribution pattern of litter on the ground: application rate is heaviest near the center of the truck and becomes lighter further away from the truck (Figure 3).
Figure 3. Rear view of spreader truck showing cloud of litter thrown behind the truck; flight paths taken by a few particles thrown by the right spinner are highlighted.
Measuring Distribution Patterns
If you lined up a number of paper plates across the field, drove a spreader truck down the middle of the line of plates, and then weighed the litter caught on each plate, you might see a distribution pattern similar to the one shown in Figure 4. (A procedure to do this is given at the end of this fact sheet.)
Figure 4. Litter application rate measured on paper plates placed on the ground across the path of spreading.
The distribution pattern shown in Figure 4 is typical of poultry litter spread by horizontal spinners. Application is heaviest right below the spinners (2.7 tons per acre) and falls off in a roughly linear fashion to 0.24 tons per acre about 26 feet on either side of the truck. There are spikes of higher application rates every few feet (2.4 tons per acre 8 feet away from the center; 1.3 tons per acre around 16 feet away; and 1.5 tons per acre 20 feet away). Researchers call this distribution pattern the W pattern: application is highest in the middle, drops off a few feet from the center, and spikes again some distance away from the center. The W pattern arises because poultry litter is made of different sized particles. Same sized particles are thrown the same distance away from the spinners. The pattern in Figure 4 has at least three spikes – at 8 feet, 16 feet and 20 feet from the center. It just so happens that the batch of litter spread by this truck has lots of particles of sizes that are thrown 8, 16 and 20 feet.
The most important point to see in Figure 4 is that no litter was thrown further than 34 feet away from the truck. Since litter was thrown 34 feet on both sides of the truck in this example, the distribution pattern has a width of 68 feet (34 feet + 34 feet = 68 feet). Or, the width of spread (Equation 1) is 68 feet. Equipment manufactures call the expected width of spread for a piece of equipment the swath width.
There are a few more things we can pick up from Figure 4. Let’s say the spreader was driven over the center of a 12-foot wide tarp. If the litter collected on the tarp was weighed, then we divided the weight of litter collected by the area of the tarp, the application rate within 6 feet of the center of the truck would be 2.0 tons per acre (2.7 + 2.05 + 2.05 + 1.44 + 2.05 + 2.05 + 1.44 divided by 7 ≈ 2.0). If all the litter on several tarps laid out across the entire width of spread was gathered, then we divided by the area of the tarps, the application rate would be 1.1 tons per acre. So, for this pattern, the application rate right behind the truck is 2.0 tons per acre, and average application rate over the entire width of spread is 1.1 tons per acre.
Measuring Uniformity
The average rate over the entire pattern in this example is a little more than half the rate measured right behind the spreader. Since the application rate is not the same at every point in the distribution pattern, litter distribution after one pass is not uniform. In fact, the Coefficient of Variation, CV, (Equation 2) of the pattern shown in Figure 4 is calculated to be 0.70.
Don’t worry about the math in Equation 2. Just remember the higher the CV, the less uniform the application. Under field conditions, it is nearly impossible to get a CV less than 0.10. A CV of 0.15 to 0.20 means distribution is fairly uniform.
Overlapping Distribution Patterns to Achieve Uniform Application
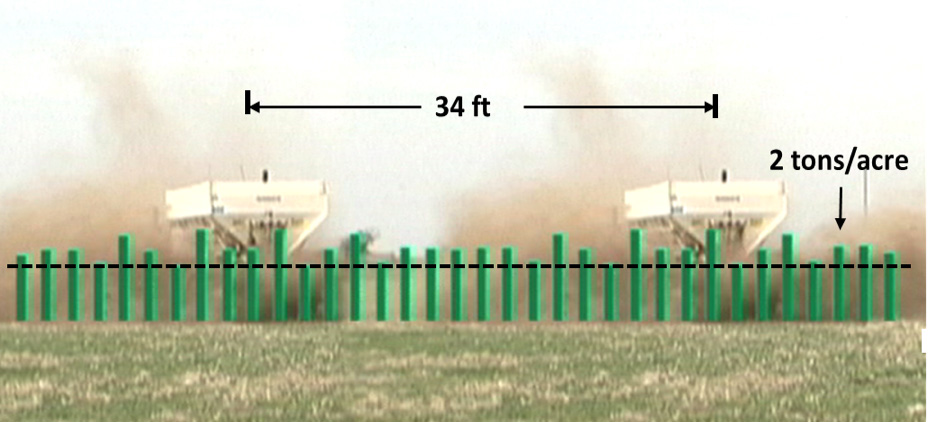
Distribution of litter throughout an entire field is most uniform if single distribution patterns are overlapped. In windless conditions using a single source of litter, the most uniform application occurs when spreading lanes (the distance between two adjacent equipment passes) are 0.55 times the width of spread. To make things simple and account for the unexpected, a good rule of thumb is to line up passes so they are one-half width of spread away from the previous one. Another way of saying this is, make spreading lanes one-half width of spread wide. Using Figure 4 as an example, since the width of spread is 68 feet, spreading lanes should be 34 feet wide. Setting up spreading lanes one-half width of spread apart means the furthest few particles thrown by adjacent passes will touch the center of the middle pass. Since two adjacent passes add to the middle pass, average rate taken over the whole field will be slightly greater than the rate right behind the spreader measured after a single pass. Let’s go through a series of examples to show how this works.
Figure 5 shows the distribution pattern made by a single pass of a litter spreader in the field. This is the same pattern shown in Figure 4. Width of spread is 68 feet. Application rate measured right behind the spreader is 2.0 tons per acre. Average application rate measured over the entire field is 1.1 tons per acre. Coefficient of variation of the spread is 0.70.
Figure 5. Distribution pattern measured after one pass of the spreader; width of spread is 68 feet.
Figure 6 shows what happens when passes are made exactly one width of spread, or 68 feet, apart. The result is a pattern that looks like two separate single applications. The average application rate taken over the whole field is 1.1 tons per acre, and CV for the whole field is 0.70 – the same as a single pass. When the grass grows out, bands of tall green grass will be seen where litter landed, alternating with low yellow grass that received no litter.
Figure 6. Combined distribution pattern of two truck passes made 68 feet, or one width of spread apart.
Figure 7 shows spreading lanes moved closer together – one-half width of spread apart. Average application rate for the whole field is 2.3 tons per acre with a CV of 0.17. Average application rate is a little higher than application right behind the spreader after one pass (2.0 tons per acre), since passes overlap. Grass growth would be uniform.
Figure 7. Combined distribution pattern of two truck passes made 34 feet, or one-half width of spread apart.
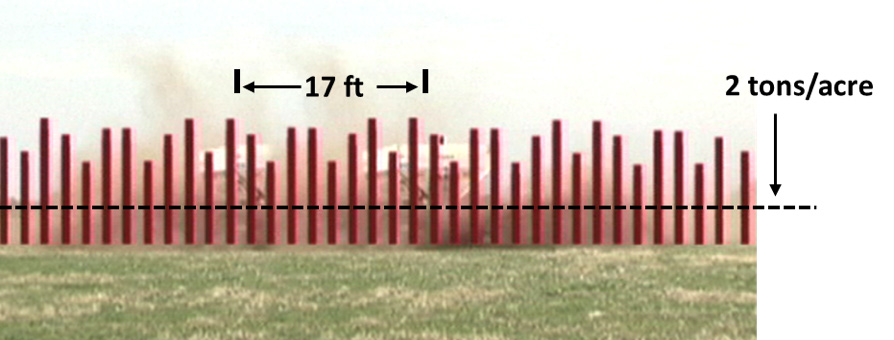
Figure 8 demonstrates what happens when spreading lanes are one-fourth the width of spread. Average application rate for the whole field is 4.7 tons per acre, with a CV of 0.14. Application is uniform, but at a rate more than twice the rate measured right behind the spreader after one pass. If a Nutrient Management Plan (NMP) called for an application rate of 2.3 tons per acre, the applicator would have overshot the recommended rate, and the farmer would have received twice the amount of litter for which they paid.
Figure 8. Combined distribution pattern of two truck passes made 17 feet, or one-fourth width of spread apart.
Effect of Wind Direction on Distribution Pattern
Which way the wind is blowing relative to the spreader’s direction of travel has a great effect on distribution pattern. Figure 9 gives a rear view of a cloud of litter behind a spreader truck without any wind.

Figure 9. Cloud of poultry litter behind a spreader truck with no wind.
Head Wind. Wind blowing against the spreader truck’s direction of travel narrows the distribution of litter (Figure 10), and slightly increases the application rate right behind the spreader. To widen the distribution pattern, increase spinner speed.
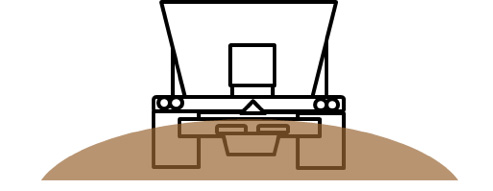
Figure 10. Cloud of poultry litter behind a spreader truck heading into the wind.
Tail Wind. Wind blowing from behind the spreader widens the distribution pattern (Figure 11), and decreases the rate measured right behind the spreader. To narrow the distribution pattern, slow spinner speed.

Figure 11. Cloud of poultry litter behind a spreader truck with a tail wind.
Cross Wind. Wind blowing across the spreader skews litter distribution (Figure 12). Application rate is heavier and litter is not thrown as far on the upwind side of the truck.

Figure 12. Cloud of poultry litter behind a spreader truck with wind blowing from the right.
Application is lower and litter is thrown farther away on the downwind side of the truck. Overall width of spread is not affected by a cross wind, but the distribution pattern is shifted to the downwind side.
Effect of Field Slope on Distribution Pattern
Spreading on a slope also affects distribution pattern. As shown in Figure 13, the effect of field slope is similar to a side wind (Compare Figure 13 to Figure 12). Application is heaviest and litter is not thrown as far on the upslope side of the truck. Litter is thrown farther and application is lightest on the downslope side of the truck.
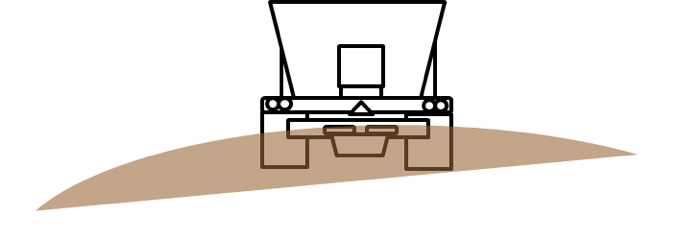
Figure 13. Cloud of poultry litter behind a spreader truck spreading on a slope.
Effect of Litter Characteristics on Distribution Pattern
As if adjusting to a head, tail, or side wind does not make getting a uniform application difficult enough, whether the litter is wet or dry, dusty or chunky also makes a difference in distribution.
Wet, heavy litter. Adding moisture to litter increases its bulk density. Litter containing dense material, such as sand, also increases bulk density. Increasing the size and mass of a particle tends to make it fly farther; however, heavy litter falling on the spinners can cause the spinners to slow (lug), narrowing the width of spread similar to the effect of a head wind (Figure 10). Increase spinner speed to compensate for wet, heavy litter. Also, closing off the litter gate will reduce spinner lugging. A narrower litter gate means reduction of ground speed will be needed to maintain application rate (Equation 1). Once it is in the air, heavy litter is less affected by wind direction than light litter.
Dry, light litter. Light, dry litter is not thrown as far as wet, heavy litter. Without wind, light particles accumulate directly below the spinners. Application rate measured over the middle 10 to 12 feet of the pattern may not be all that different than heavy litter, but there will be a small streak of high application down the center of the pattern. Wind speed and direction have a great effect on the distribution pattern of light litter. The effects seen in Figures 10, 11 and 12 are all exaggerated with light litter. Dry, dusty litter also has a tendency to drift off the field into undesired places.
Chunky, clumpy litter. Some litter, especially cake-out litter, breaks off into large chunks. It is extremely difficult to get uniform distribution with chunky litter. Large pieces are thrown far away from the general pattern. Be careful when applying close to the field’s edge or spreading near people, animals, buildings and vehicles. Chunks may fly over fences like missiles and strike unsuspecting bystanders.
Down and Back vs. Raceway Spreading
There are two basic ways to spread litter: Down and Back, and Raceway.
With Down and Back (sometimes called Up and Down) spreading, the spreader travels down the field, turns around at the end of the field, and comes back in the opposite direction (Figure 14). Spreading is usually stopped during the turns as the truck leaves the field. The important thing to remember about down and back spreading is two adjacent passes are made in the opposite direction of each other. Cross winds and sloping fields are not much of a problem during down and back spreading. The skewed patterns overlap for a fairly uniform distribution, as long as the driver maintains the proper lane spacing (one-half width of spread). It is nearly impossible to achieve a uniform application during a head wind/tail wind situation, however. The alternating narrow and wide patterns do not overlap well. The grass will grow out with narrow high streaks (head wind) alternating with broad low bands (tail wind). When the wind is blowing down the narrow side of a field, it is best to switch to raceway spreading.
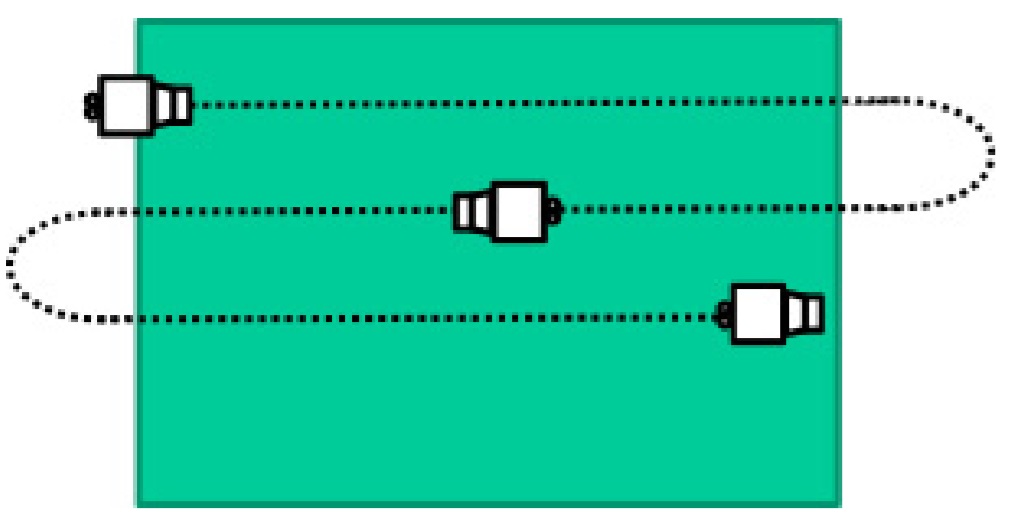
Figure 14. Down and back spreading.
With Raceway spreading, the spreader circles the field in an ever decreasing spiral (Figure 15). Two adjacent passes are made in the same direction. Side winds and sloping fields do not affect uniformity much, as long as the driver maintains the proper lane spacing (one-half width of spread). Head and tail winds do not effect distribution patterns with raceway spreading as much as they do with down and back spreading. The applicator may need to narrow lane spacing when heading into the wind, and increase lane spacing when heading down wind. Variable rate control spreaders can be adjusted to compensate for the changing lane spacing; otherwise, the applicator will have to speed up heading into the wind and slow down when heading downwind to maintain a constant application rate. This will be discussed a little further in the spreader calibration section.
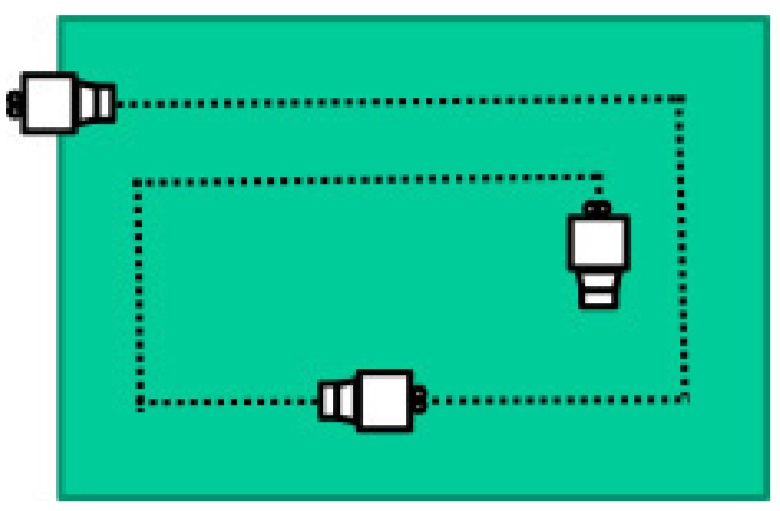
Figure 15. Raceway spreading.
Spreader Calibration
Calibration is the process of fine tuning machine adjustments to achieve a desired result. For litter spreaders, this means adjusting the width of spread, measuring the application rate behind the spreader, making changes to one or more adjustments shown in Table 1, measuring the application rate again and repeating the process until the desired application rate is reached.
Table 1. How adjustments made to a typical litter spreader truck affect application rate.
|
Adjustment
|
To Increase Application Rate
|
To Decrease Application Rate
|
|---|---|---|
|
Ground Speed
|
Decrease ground speed
|
Increase ground speed
|
|
Conveyor
|
Increase conveyor speed
|
Decrease conveyor speed
|
|
Litter Gate
|
Open up litter gate
|
Close down litter gate
|
|
Spinners
|
Decrease spinner speed
|
Increase spinner speed
|
Calibrating a Spreader Truck in Three Steps
Step One. Adjust width of spread heading upwind. Using the paper plate method (Attachment 2), determine the width of spread of the unadjusted spreader. It is best to do this heading into the wind – or as close as field orientation will allow. Width of spread is determined by finding the last paper plate where hardly any litter is visible and doubling the number of feet from the center of the spreader. Increase spinner speed to increase width of spread. Decrease spinner speed to decrease width of spread. It usually takes at least three passes over the plates to find the proper width of spread.
For convenience, adjust width of spread in multiples of 33 feet. For instance, if width of spread is 66 feet, lane spacing is 33 feet (one-half width of spread), and for every one-fourth mile the spreader travels, 1 acre will be covered (1,320 feet X 33 feet = 43,560 square feet = 1 acre).
Step Two. Adjust application rate right behind the spreader. Still heading into the wind, use the tarp method (Attachment 1) to determine application rate right behind the spreader. Since passes overlap, target rate should be lower (15 to 20 percent) than the desired average rate for the field. If the first pass over the tarp shows the application rate is lower than the target rate, make one of the adjustments in Table 1 (except spinner speed) to increase application rate. If application rate right behind the spreader is higher than the target, make one of the adjustments in Table 1 (except spinner speed) to decrease application rate. Measure the application rate again. Keep measuring and making adjustments until you reach the desired application rate right behind the spreader. It usually takes at least three passes over the tarp to calibrate the proper application rate.
Step Three. Make adjustments for the downwind run. Turn the spreader around and head downwind. Drive over a line of paper plates (Attachment 2) and record the width of spread with a tail wind. Use lane spacing one-half downwind width of spread when spreading with the wind coming from behind. Drive over a tarp (Attachment 1). Record the application rate right behind the spreader. Adjust ground speed to achieve the same application rate as the upwind run.
Calibration Example
Let’s say an applicator wants to apply litter at 2 tons per acre over the entire field. This means they will set a target rate right behind the spreader of 1.8 tons per acre to take account of overlap. The wind is blowing hard, so raceway spreading is chosen to reduce the effect of head and tail winds.
Step 1. Adjust Width of Spread. Driving into the wind, spinner speed is adjusted to get a width of spread of 66 feet.
Step 2. Adjust Application Rate. The applicator drives over a tarp at 5 miles per hour. Application rate right behind the truck is 1.5 tons per acre. Since the target rate is 1.8 tons per acre, application rate needs to increase. Ground speed is slowed to 4 miles per hour (1.5/1.8 X 5 mph = 4.1 mph). Driving over the tarp a second time gives an application rate of 1.9 tons per acre. This time the rate is a little high. The applicator closes down the litter gate and measures application rate again. This time the 1.8 ton per acre target is met.
Step 3. Downwind Adjustments. The applicator keeps same gate, conveyor and spinner adjustments; turns the spreader around and drives over a line of plates. The downwind width of spread is 72 feet. Driving over the tarp downwind gives an application rate of 1.6 tons per acre. The applicator slows ground speed to 3.5 miles per hour, and a second pass over the tarp records an application rate of 1.8 tons per acre.
With a headwind, the applicator will travel at 4 miles per hours with a lane spacing of 33 feet. With a tailwind, lane spacing will be 36 feet and ground speed will be 3.5 miles per hour.
How Often Should You Calibrate?
Nutrient Management Plans in Oklahoma follow the requirements of USDA-NRCS Code 590, Nutrient Management, which state “calibrate application equipment to ensure accurate distribution of material at planned rates.” It would be best to calibrate before each load of litter is spread on a field, but calibration is time consuming. A good practice is to calibrate equipment whenever litter origin or conditions change, or when a new field requires a different application rate than the previous one. At a bare minimum, new employees should calibrate application rate and determine distribution pattern under varying wind, field and litter conditions until they develop a feel for equipment operation.
Newer application equipment and spreaders using variable rate control are able to adjust machine application rate during application. Application rate directly behind the spreader and distribution patterns still need to be periodically checked to achieve precise application. It is a good idea to check width of spread each day to achieve uniform application under the prevailing wind conditions.
Matching Calibrated Application Rate to Field Conditions
With a good working knowledge of field, wind, and litter conditions gained through periodic equipment calibration, a savvy operator can use ground speed and passing lanes to control application uniformity.
Wind
Say it is a windy day, and the wind is blowing hard out of the south. Field orientation is north and south. Figure 16 shows how an operator makes adjustments for a strong wind blowing from the south using racetrack spreading.
The spreader was calibrated heading into the wind. Litter is spread in a clockwise direction. Without adjusting the litter gate opening or conveyor speed, the operator can adjust application rate by varying ground speed and tightening or widening lane spacing. A spreader with variable rate technology will make adjustments to application rate, so the operator can choose any speed he wishes without affecting application rate right behind the spreader. Even with variable rate technology, adjustment of lane spacing to compensate for headwinds or tail winds is needed.
After calibration, the applicator continues heading into the wind, traveling south on the east side of the field. Approaching the end of the field, he makes a turn to the right. The wind is now blowing hard from the left side of the truck. The applicator steers slightly into the wind, so litter is thrown just to the south edge of the field.
Reaching the west end of the field, the applicator turns right again and heads north with a strong tail wind. He steers further away from the edge so that litter is thrown just to the edge of the field. The applicator also slows down, so application rate behind the spreader is the same as the calibrated rate. Making a quick pass over the plates and tarp on the downwind run will tell exactly how much to slow down and widen the passes.
At the north end of the field the applicator turns right, steering wide of the north edge so litter just touches the north edge due to the strong wind blowing from the south. He also returns to the original head-wind ground speed. At the end of the field the applicator turns south, heading back into the wind.
On the second and later passes around the field, the applicator uses the upwind calibrated lane spacing and ground speed heading south, west and east. Heading north, the downwind adjustments to lane spacing and travel speed are used.
The wind rarely blows with a perfect head, tail or side wind. It is still best to calibrate the spreader heading closest to the teeth of the wind. Maintain a constant spacing between passes. Slow down when the wind is more or less coming from behind. Return to calibrated speed heading into the wind. With variable rate technology, keep the same lane spacing and let the computer adjust application rate for you.
Figure 16. Adjusting speed and lane spacing to achieve uniform application with a strong wind blowing from the south in a flat, rectangular field oriented north and south.
Field Slope
Say the wind is not strong enough to affect distribution patterns, but a field has major changes in field slope. Figure 17 shows how an applicator makes adjustments to a field with an intermittent stream running from the middle to the northeast corner of the field.
Figure 17. Adjusting application method to achieve uniform application in a field containing slopes.
A 50-foot buffer protects the stream from litter runoff. An embankment slopes upwards from the buffer, and tapers off to a fairly level field surrounding the stream and its valley. Field slope outside the buffer is less than 15 percent, so poultry litter application is allowed. (For more information on application restrictions within nutrient management plans, see BAE-1768, Poultry Applicators’ Guide to Nutrient Management Plans).
The applicator starts spreading over the southern, level portion of the field using Down and Back application with a calibrated lane spacing and application rate. Once the applicator reaches a point in the field where corners are cut off by sloping areas, she switches to raceway spreading. Without changing lane spacing or ground speed, the applicator follows field contours to fill in the cutoff areas. As the applicator approaches the stream, she steers the truck along the contour so litter falling on the downslope side falls just short of the buffer zone.
Measured and Apparent Application Rate
Calibration is the act of adjusting equipment to spread at a target application rate, uniformly throughout the field. Measured application rate is recording the amount of litter spread over the area of a field after the fact. Equation 3 gives a mathematical definition of measured application rate.
When Oklahoma Certified Poultry Waste Applicators report “total and per acre application” on their annual report to the Oklahoma Department of Agriculture Food and Forestry, they are reporting measured application rate. The idea of measured application rate is simple, but in practice it may be difficult to calculate. The difficulty is getting accurate measurements of poultry litter mass and acres spread.
You cannot simply use the spreader’s listed capacity in tons as the mass of poultry litter in Equation 3. Hoppers are measured by volume, not weight. Each load of litter may have a different bulk density; therefore, each full hopper will not have the same weight. Also, you cannot count on each hopper leaving the farm or storage area being filled to the exact same volume. Newer equipment and machines that use variable rate technology, have scales that constantly weigh the mass of litter in the hopper. With older equipment, accurate empty and full mass can be measured by driving onto a full-truck grain scale, or measuring each axle with portable axle scales. Weight of litter in the hopper equals weight of the truck loaded minus weight of the truck empty.
Accurate assessment of acres spread can be equally difficult. If litter completely covers a field, the field’s spreadable acres listed in the farm Nutrient Management Plan can be used in Equation 3. There are many apps available for use with GPS equipment that calculate acres covered given measurements along the field edge. If spreading lanes are 33 feet wide, distance measured by the truck odometer can be used to calculate acreage – each quarter mile covered in a 33-foot wide lane is one acre.
Measured application rate should approximate the calibrated application rate and the machine application rate calculated in Equation 1. For small fields, measured application rate will be lower than the calibrated rate, because the edges of the field were not overlapped. Also, some parts of the field may not have been covered due to obstacles, such as trees, steep slopes, stony areas, etc
If measured rate is calculated once the field is covered, apparent rate is calculated on the go, using the weight of litter removed from the hopper and the area already covered. Use apparent application rate as a check on machine calibration. Say the application rate listed on a nutrient management plan is 2 tons per acre and the field area is 20 acres. It should take 40 tons, or eight 5-ton loads to cover the field. If half the field is already covered after spreading two loads, the calibration must be off.
Summary
Uniformly spreading poultry litter over a field at a prescribed rate is challenging, but it is not impossible. Pay close attention to the adjustments that affect manure application rate and distribution: litter gate opening, conveyer speed, spinner speed and ground speed. Improve your spreading skill by regularly calibrating the spreader using the tarp and plate methods. Pay attention to the effects of wind and slope on litter distribution. Record measured application, being careful to remove areas not covered because of obstacles.
References
ASABE Standards. 2018. S341.5, Procedure for Measuring Distribution Uniformity and Calibrating Granular Broadcast Spreaders. St Joseph MI: ASABE.
NRCS, OK. 2012. Conservation Standard Code 590: Nutrient Management. Stillwater, OK: United States Department of Agriculture Natural Resources Conservation Service.
Smith, D.B., M.H. Willcutt, J.C. Doler, Y. Diallo. 2004. Uniformity of granular fertilizer applications with a spinner truck. Applied Engineering in Agriculture 20(3):289-295.
Virk, S.S., J.P. Fulton, O.O. Fasina, and T.P. McDonald. 2013. Influence of broiler litter bulk density on metering and distribution for a spinner-disc spreader. Applied Engineering in Agriculture 29(4): 473-482.
Wilhoit, J.H., C.W. Wood, K.H. Yoo, M.Y. Minkara. 1993. Evaluation of spreader distribution patterns for poultry litter. Applied Engineering in Agriculture. 9(4): 359-363.
Appendix 1. Measuring Application Rate Directly Behind the Spreader (Tarp Method)
The idea behind this method is to catch litter on a sheet or tarp as the spreader drives over it. Knowing the weight of litter caught on the tarp and the surface area of the tarp, you can calculate tons of litter per acre dropped directly behind the spreader.
You need to collect a few items before you start:
- A tarp, drop cloth or plastic sheet
- A bucket
- A fish scale or top loading scale
- Four to 12 tent stakes
With these items in hand, you are ready to measure. Use the following steps:
- Fold the tarp and place in the bucket.
- Weigh the clean bucket and tarp. Record this as weight before.
- Stake the tarp down in the field so it does not blow in the wind. (Figure A1).
- Start the spreader about 50 feet behind the tarp and drive over the tarp with the same machine settings and at the same speed you expect to use in the field. Drive the spreader over the center of the tarp (Figure A2).
- Drive past the tarp another 50 feet.
- Carefully unstake the tarp taking care that no litter falls off or blows away.
- Fold the tarp and place in the bucket.
- Weigh the bucket and litter covered tarp. Record this as weight after.
- Calculate application rate directly behind the spreader using Equation A1.
Important note about tarps! A tarp may be labelled as 6 feet by 8 feet or 8 feet X 10 feet, but it probably does not have those exact dimensions. Measure the tarp before spreading, and use the measured width and length in Equation A1. Experience shows you may underestimate application rate by 10 to 20 percent using nominal width and length instead of the actual ones. Table A1 also can be used to calculate application rate. This table was made using the actual dimensions of tarps purchased in Stillwater, OK.
What if you can’t stuff the tarp back in the bucket once it’s covered with litter? With larger tarps, it may be difficult to get the litter covered tarp back in the bucket. Carefully sweep the litter to the center of the tarp and pour it into the bucket. Scrape any litter sticking to the tarp into the bucket. Weigh the litter filled bucket. This is weight after. Dump the litter out of the bucket and weigh again. This is weight before. Use equation A1 to determine application rate right behind the spreader.
One more thing about tarps. As a general rule, the larger the tarp, the more accurate the measurement. Tarps wider than 12 feet may underestimate the application rate right behind the spreader, since distribution of litter starts to taper off farther from the center of the spreader.
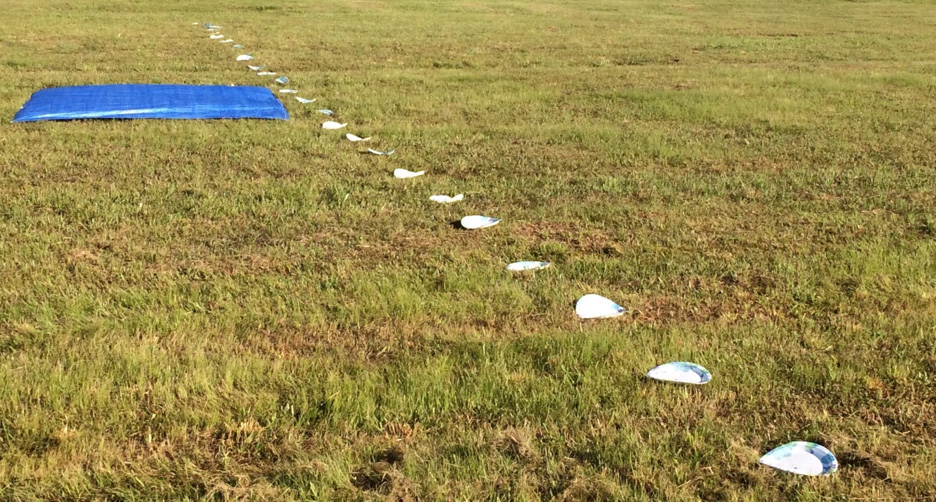
Figure A1. Tarp staked down in field in Step 3 of Tarp Method, and paper plates stuck into the soil in Steps 4 through 6 of the Paper Plate Method.
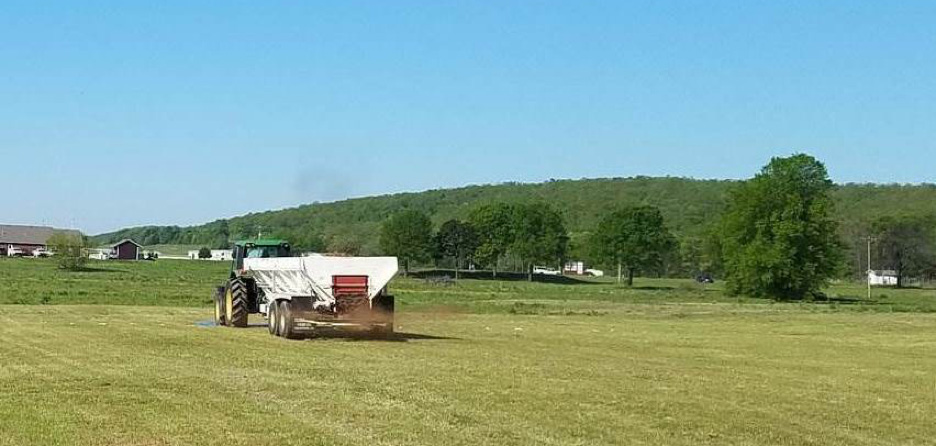
Figure A2. Driving over center of tarp in Step 4 of Tarp Method and over plate 0 in Step 7 of the Paper Plate Method.
Table A1. Application rate directly behind the spreader using commonly sized tarps.
|
|
|
Tons of Litter Applied per Acre
|
|
|---|---|---|---|
|
|
|
Nominal Size of Tarp
|
|
|
|
6’ X 8’
|
8’ X 10’
|
10’ X 12’
|
|
Pounds of Litter Applied to Sheet
|
|
Actual Size of Tarp
|
|
|
|
5’8” X 7’6 3/16”
|
7’5 ¼” X 9’7 ¾”
|
10’ ¾” X 11’ 9 3/8”
|
|
1
|
0.5
|
0.3
|
0.2
|
|
2
|
1
|
0.6
|
0.4
|
|
3
|
1.5
|
0.9
|
0.6
|
|
4
|
2
|
1.2
|
0.7
|
|
5
|
2.6
|
1.5
|
0.9
|
|
6
|
3.1
|
1.8
|
1.1
|
|
7
|
3.6
|
2.1
|
1.3
|
|
8
|
4.1
|
2.4
|
1.5
|
|
9
|
4.6
|
2.7
|
1.7
|
|
10
|
5.1
|
3
|
1.8
|
|
11
|
5.6
|
3.3
|
2
|
|
12
|
6.1
|
3.6
|
2.2
|
|
13
|
6.6
|
3.9
|
2.4
|
|
14
|
7.2
|
4.2
|
2.6
|
|
15
|
7.7
|
4.5
|
2.8
|
|
16
|
8.2
|
4.8
|
2.9
|
|
17
|
8.7
|
5.1
|
3.1
|
|
18
|
9.2
|
5.4
|
3.3
|
|
19
|
9.7
|
5.7
|
3.5
|
|
20
|
10
|
6
|
3.7
|
|
21
|
11
|
6.3
|
3.9
|
|
22
|
11
|
6.6
|
4
|
For best results measure actual width and length of sheet and use the following equation.
Appendix 2. Measuring litter distribution pattern and width of spread (Paper Plate Method)
To get uniform spread of litter, you need to know the distribution pattern thrown by the spinners. In this method, litter is collected on several paper plates laid out perpendicular to the direction of travel of the spreader. By graphing the weight of litter caught by the plates, you can see how litter is distributed by the spreader.
To determine just the width of spread, use the second, shorter version of this procedure.
Collect a few items before you start:
- A hundred or so paper plates
- A box of nails, 16d or larger
- Tape measure
- A small scale reading in grams or 1/10 oz.
- Permanent marker
Steps to determine full distribution pattern
- Measure the length across the plates. Write this down as plate diameter.
- Mark one paper plate 0. Mark thirteen plates 3R, 6R, 9R, etc. through 39R. Mark thirteen more plates 3L through 39L
- Weigh each plate on the scale. Write this as weight before on the plate.
- Place plate 0 directly in the middle of the spreaders path. Hold the plates in place using a nail through the center of the plate.
- Place plates 3R to 39R 3 feet apart to the right of plate 0, perpendicular to the spreaders path. Use nails to hold the plates in place.
- Place plates 3L to 39L 3 feet apart to the left of plate 0, perpendicular to the spreaders path. Use nails to hold the plates in place.
- Starting about 50 feet behind the line of plates, start the spreader and drive directly over plate 0.
- Stop spreading about 50 feet beyond the plates.
- Weigh each plate in the field. Be sure to remove nails before weighing. Write this as weight after on the plate.
- Calculate application rate in tons per acre on each plate using Equation A2.
- Graph or draw application rate versus distance with the rate on 39L as furthest left through 39R furthest right, with rate on plate 0 at the center.
Steps to determine width of spread
- Mark one paper plate 0. Mark 13 plates 3R, 6R, 9R, etc. through 39R. Mark 13 more plates 3L through 39L.
- Place plate 0 directly in the middle of the spreaders path. Hold the plates in place using a nail through the center of the plate.
- Place plates 3R to 39R 3 feet apart to the right of plate 0, perpendicular to the spreaders path. Use nails to hold the plates in place.
- Place plates 3L to 39L 3 feet apart to the left of plate 0, perpendicular to the spreaders path. Use nails to hold the plates in place.
- Starting about 50 feet behind the line of plates, start the spreader and drive directly over plate 0.
- Stop spreading about 50 feet beyond the plates.
- Starting at plate 0, walk to the right and write down the number of the last plate on which you can see any litter. Write this down as right plate number.
- Return to Plate 0. Walk to the left and write down the number of the last plate on which you can see any litter. Write this down as left plate number.
- Calculate width of spread using Equation A3.
Douglas W. Hamilton
Waste Management Specialist

