DNA Sample Collection
Producers may wish to collect DNA samples on animals for a variety of reasons including parentage testing, quantitative trait testing, testing for genetic defects or archival purposes. There are a variety of options for collection of these samples (Figure 1). All of the following methods are used to submit DNA samples for genetic testing. However, there may be preferred sample types for specific tests, so always remember to check with your testing provider for specific directions.
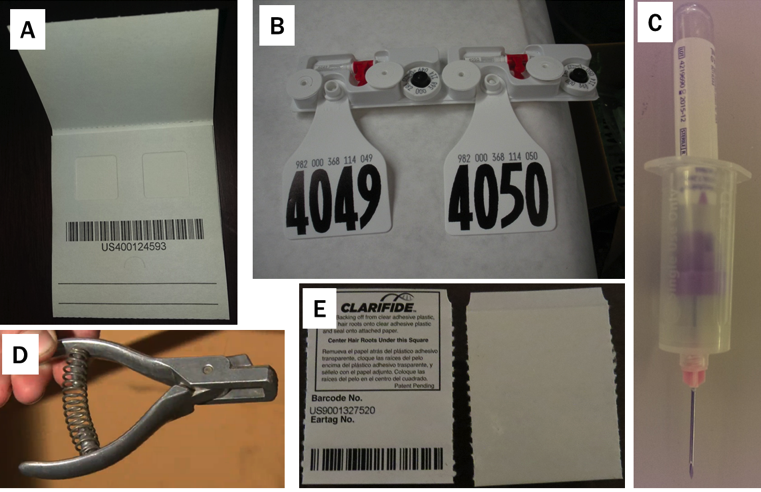
Figure 1. Options for DNA collection include: (A) blood samples on FTA cards, (B) tissue collection using all-in-one sample collection products, (C) blood collection using vacutainer tubes, (D) tissue collection using ear punches, and (E) hair samples. (photo B courtesy Alison Van Eenennam and photo D courtesy Matt Sangler)
Semen
Semen samples can be submitted for testing, which is useful if an animal is deceased or other types of samples are unavailable. When submitting semen samples, it is best to remove the sample from the liquid nitrogen and allow to gently thaw in the refrigerator or at room temperature. Do not store the samples at room temperature for long periods of time before submitting the sample or it may mold. If mailing the semen sample in a regular or manila envelope, the sample may be subjected to a mail sorter, which can crush the straw and ruin the sample. This can easily be avoided by sending samples in a box or by placing semen samples in a hollowed out ball point pen (in place of the ink) before mailing (Figure 2).
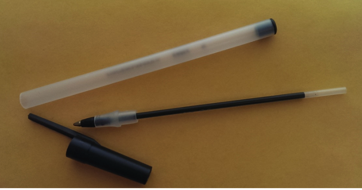
Figure 2. Semen samples can be shipped easily by placing them inside a hollowed-out ball point pen in place of the ink. When the cap is replaced, it will securely hold the straw for shipping.
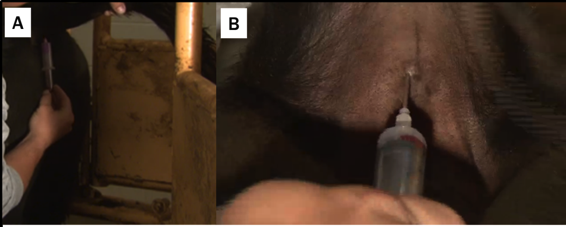
Figure 3. Blood samples can be obtained by (A) utilizing vacutainer blood tubes that contain an anti-clotting agent or (B) drawing blood from under the tail. If using a syringe, blood must be applied to a FTA card before clotting. (photos courtesy Matt Spangler)
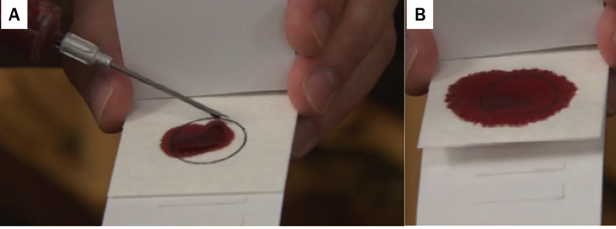
Figure 4. FTA card containing a blood sample. Blood myst be dropped onto the card before clotting to get a good sample (A). Note that the sample reservoir (circle) on the card needs to be fully covered (B), but should not be so saturated as to bleed through the cover. Dry completely before storing. (photos courtesy Matt Spangler)
Blood Samples
Blood samples can be submitted in one of two ways: blood tubes or FTA cards. To collect a tube of blood, use a standard blood collection needle, hub and tube to collect blood from either directly underneath the tail or the neck (jugular). It is important to use a tube that has anti-clotting additives to prevent blood from clotting, such as Vacutainer tubes with purple tops (containing EDTA; Figure 1C). Because the tubes are under a vacuum, blood should flow easily into the tube from the blood vessel.
Alternatively, it may be easier to collect blood from the vein underneath the animal’s tail utilizing a syringe and a large-gauge needle commonly used for vaccinations. If using this approach, be aware that blood will often clot very quickly, and it’s imperative that the blood sample be injected into the vacutainer tube using the attached needle before clotting occurs. For questions about whether a tube will work for sample collection, contact the testing company to ensure they will accept samples collected using that tube type. If collecting multiple samples, these tubes should be kept cool, but do not submerge in ice or water unprotected, as the labels and glue are water soluble and can slip off the tube or disintegrate if left submerged for too long.
Blood samples can also be submitted using FTA cards, which contain a specialized paper that traps DNA and adheres it to the paper. When using this method, collect blood from the tail with a syringe as above, but instead drop the blood slowly onto the FTA card in the designated holes or circles (Figure 5). Samples can also be collected using a small needle to puncture the tip of the ear and blotting the blood droplets onto the FTA card wells. This method can take longer than pulling blood directly, and care should be taken that the ear is clean to prevent contamination. Do not collect blood after performing an ear tattoo because the ink can contaminate the sample. It is important to completely cover the circle or hole with blood, but not to add so much blood that it is difficult to dry and sticks to the card covers. After the blood has been added to the card, allow it to dry completely in an area where it will not be contaminated with another blood sample, dirt or manure. If too much blood has been added to the card, or is has not been allowed to dry completely, the sample can mold during storage, ruining the DNA sample. When dry, close the flaps and double-check for proper labeling with the animal’s ID. Store the cards in a cool, dry place until submission.
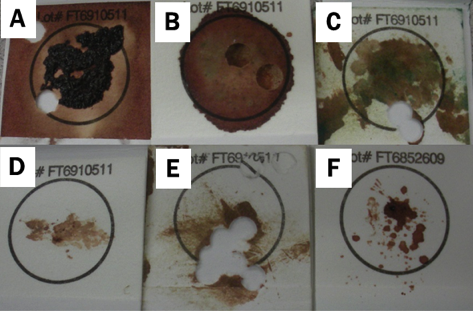
Figure 5. Examples of poor blood card samples. (A) clotted blood, (B) moldy sample due to insufficient drying, (C) tattoo ink contamination, and (D through F) too little blood on the card.
Tissue Samples
Tissue samples can be submitted by utilizing an ear notch, or specialized tissue sampling products packaged individually or with ear tags (such as the one shown in Figure 1 Panel B) that collect and store tissue samples. If using a regular ear notch (like a pig ear notcher), take the notch from the thin part of the edge of the ear and place into a tube (Figure 6.). Freeze the tube to store it until sending it to the lab. There are several newer options for commercially available tissue sampling products that are often packaged with both a collection tube and corresponding ear tag. If utilizing these tissue collection products, such as those depicted in Figure 1 (Panel B), follow the labeled directions to collect the sample and tag the animal. The advantage of these systems is that the tissue sample is directly tied to the animal ID through barcoding and identification numbers, which helps prevent human error and sample mix-ups. Additionally, most of these types of systems immediately seal the tissue sample, which helps prevent contamination. Be sure to follow all label directions for proper utilization of these collection products and direction from the testing lab for storing and submitting any tissue samples for testing.
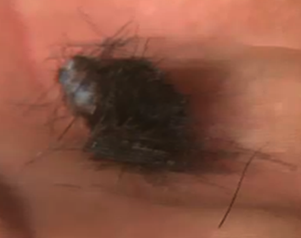
Figure 6. Ear notch sample. (photo courtesy Matt Spangler)
Hair Samples
Hair samples should always be collected from the tail switch. Hair itself does not contain DNA in the shaft, so it is vital that the hair sample contains the follicle, or root bulb, because that is from where the DNA will be extracted. Select 20 to 25 hairs (approximately the width of a straw) from a clean part of the switch, free of manure and dirt. Pull the hairs out by the root (utilize pliers to get a better grip, if necessary) and place the root ends directly onto the hair collection card (Figure 7). Make sure the root bulbs are sealed under the collector card tape so they are not dislodged and lost before DNA extraction. Once the root bulbs are sealed in the collector, the excess hair can be trimmed off to allow easier storage. Hair sample collection is not the recommended method for younger animals (earlier than weaning) because the hair follicles can still be developing, but are a very effective collection method for older animals. If you are sampling young animals, sample a larger number of hairs (approximately the width of a pencil), because each follicle contains less DNA than is found in older animals.
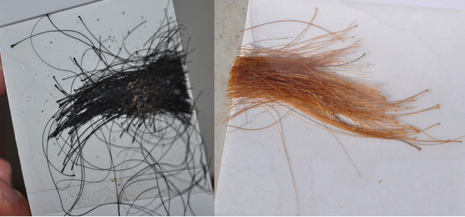
Figure 7. Tail hair samples. Note that the root bulbs (where the DNA is located) attached to the hair shaft are underneath the protective film and the excess hair past the edge of the hard has been removed. (photos courtesy Alison Van Eenennam)
Tips for DNA Sampling Success:
- Make sure the animal ID is clearly labeled on each sample. It is sometimes helpful to label the collector cards before collecting the sample, especially for FTA cards where the sample needs to dry before closing the flaps.
- Make sure samples are not contaminated by manure, dirt or tissue and blood from other animals.
- Use a different needle and syringe for each animal to prevent sample contamination.
- Do not store your samples on a vehicle dashboard or anywhere in the sun and/or heat. Heat denatures and degrades DNA, so take care that samples are stored properly.
Megan Rolf
Former Assistant Professor
