April 2024 Hort Tips
Monday, April 1, 2024
Don’t Cut Back Spring Flowering Bulbs too Early!
David Hillock
As spring flowering bulbs such as tulips, daffodils, hyacinths, etc. finish blooming, if possible, allow the foliage to turn yellow and die back. The leaves should be easily removed by just tugging on them when they have completely died back. Allowing the leaves to remain on the plant until they turn yellow allows the photosynthesis process in the green leaves to replenish the bulb with plenty of energy for next year’s blossoms. Removing them too early robs the plant of food needed to produce spectacular blooms.
In Oklahoma, most tulip bulbs are treated as annuals, meaning they are replanted every year. The high heat and humidity along with heavy clay soils makes it difficult to maintain most tulips as a perennial plant in the garden. A gardener interested in a challenge could dig them up after the leaves have turned yellow and store them in a cool, dark area and then replant them in the fall.
Daffodils are one of our most reliable species that is perennial in Oklahoma and typically needs little care. Locating daffodils in an area such as a perennial border or shrub and groundcover area where they can be left to die back after flowering is best. Occasionally they will need to be thinned out to encourage vigorous growth and lots of blooms.
Giving your spring flowering bulbs a light feeding after flowering, but before leaves turn brown will help in developing stronger plants.
Pruning Hydrangeas
David Hillock
Hydrangeas are one of the more popular plants in the landscape. They have attractive foliage and typically produce large, striking flowers. Hydrangeas are generally easy to grow and tolerate a wide variety of soil. About the only care they need is pruning, however, there are different types of hydrangeas that require different pruning techniques depending on the time of flowering.
Hydrangeas that bloom in the spring, usually before May and June, bloom on last year’s growth. Those that bloom later flower from buds formed on the new wood that growing season. Varieties that bloom in spring should be pruned after they flower while those that bloom on new wood can be pruned, if necessary, in late winter, early spring before new growth develops.
So, which are which? The types that bloom on old wood include the mophead, big leaf, and lacecap types, which are Hydrangea macrophylla varieties, and the oakleaf hydrangea, H. quercifolia. These all produce flower buds on last year’s wood.
Types that bloom on new wood include the panicle hydrangea, often referred to as PeeGee types, Hydrangea paniculata, and the smooth hydrangea, often referred to as the Annabelle types, H. arborescence.
The one exception is the variety ‘Endless Summer’, which blooms on old and new wood. In all cases it is helpful to remove old blossoms as they fade.
If you’re not sure of which type you have, the safest approach is “no pruning is better than the wrong type of pruning.” However, you can also take a simplified approach which is suitable for all types. The simplified approach includes removing only winter-killed wood or all dead stems in the spring before or as the buds are opening. You can check for live wood by scratching the stems with your thumbnail or a knife, if it is green, it is still alive, brown, and hard it is dead and should be removed. Rejuvenation is another way to keep your plants healthy by removing dead or very old stems by cutting them back to the ground, this will stimulate new growth and produce more blooms later.
Today there are a wide variety of hydrangeas; make sure you choose a variety that will suit your landscape needs, as well as the site. Most like some water and most prefer a little protection from the hot Oklahoma afternoon sun. With good choices, and correct timing with pruning, your hydrangeas will be the envy of the neighborhood.
Cucumbers and Zucchini – Getting Ahead of Pests
David Hillock
Many are excited by the thought of fresh cucumbers and squash and eagerly set about planting them in the garden. But before long, enthusiasm can dwindle when the squash bugs arrive. Squash bug is the most serious pest of squash and pumpkins in the US and seems to be particularly troublesome in southern regions where it produces multiple generations per year. Their feeding behavior causes plants to wilt, yellow, and often die back, as they transmit viral infections from plant to plant. Squash bugs are by far the insect that we receive the most questions about. It is also one of the most difficult to control.
Squash bugs feed on summer squash, winter squash, pumpkins, melons, and cucumber. However, some cultivars are more susceptible than others to squash bug feeding and damage. So, our very first line of defense against squash bug damage is in the vegetable varieties we select for the garden. For example, yellow straightneck and yellow crookneck summer squash are highly susceptible to squash bug damage. Substituting zucchini for the yellow squash because it has demonstrated higher tolerance to squash bugs in numerous studies can reduce squash bug problems. However, there is one zucchini cultivar called ‘Cocozelle’ that has shown considerable susceptibility to squash bugs and should be avoided. Experiment with different cultivars of squash listed as resistant to determine which works best in your garden.
While cucumbers are also attacked by squash bugs, cucumber beetles tend to be a greater problem. Again, many cultivars are resistant to or are tolerant of cucumber beetle damage. Cucumber beetles are stimulated to feed by the chemical cucurbitacin, which is the chemical that gives some cultivars a bitter taste and causes gas in some people. Varieties listed as “burpless” or “non-bitter” contain little to none of the chemical compound and so are less attractive to cucumber beetles.
Selecting resistant cultivars is just one line of defense against squash bugs and cucumber beetles. We need to implement multiple strategies to manage these pests. Covering planted rows with floating row covers excludes both squash bugs and cucumber beetles from the plants, preventing egg-laying. The row covers must be tightly secured to the ground to exclude pests. We have used bags of sand, which are gentler on our row covers than rocks, bricks, or boards.
Cucumbers and squash are insect pollinated crops, so we must remove the row covers once plants begin flowering. At that time, hand picking insects and smashing egg masses provides additional control. You can also place wooden boards near the plants, where the squash bugs will congregate overnight. In the morning, you can lift the boards and remove the insects. The key to successful control of these pests is frequent monitoring for their presence and then taking immediate action to reduce the potential infestation.
N-P-K and Plant Growth
David Hillock
Plant growth and health is dependent on several mineral elements in the soil. Nitrogen (N), phosphorus (P) and potassium (K) are considered macronutrients, not because they are larger than the other essential elements, but simply, they are used in larger quantities by the plant. These are also the three numbers you will see on most fertilizer bags and always in that order, N-P-K.
Nitrogen is needed for the development of dark, green color in plants. It is essential for rapid and continuous vegetative growth. Of all the nutrients, N is most commonly deficient, especially when plant vegetation is removed from the area where it grew (bagging lawn clippings).
Phosphorus aids plants in getting off to a rapid, vigorous start, promotes early root formation, stimulates blooming and seed production, and hastens maturity. Phosphorus deficiency in mature landscapes and gardens is uncommon because plants use only about 1/8 as much phosphorus as they do nitrogen. Since phosphorus is also immobile in the soil, it accumulates and will be adequately supplied by soils that have a history of annual applications of phosphorus.
Potassium or potash is needed for plant health and disease resistance. It is important in the ripening of fruit and helps to develop full, plump seeds. Potassium deficiency is common in high rainfall regions such as eastern Oklahoma.
Where needed and applied in required amounts, commercial fertilizers do not injure the soil. They do not poison vegetables or other plant growth. They do not destroy animal life—earthworms or bacteria—in the soil. On the contrary, the addition of fertilizer provides both plant and animal life in the soil with nutrients essential to their welfare.
Organic fertilizers or organic soil amendments may also be used. Organic fertilizers are products derived from the remains or by-products of a once-living organism. Some organic products have a nutrient guarantee, such as blood meal and bone meal, but others are sold as soil amendments with no nutrient guarantee, even though they have nutrient values.
In general, organic fertilizers release nutrients slowly and gradually because organic fertilizers depend on soil organisms to break them down to release nutrients. An organic amendment may only release 50 percent of the total N during the first growing season. In contrast, N in commercial synthetic fertilizers is readily available. Therefore, a doubled amount of total N from an organic source needs to be applied to supply the needed N. During cold, wet periods, organic sources may not be able to supply the needed nutrients to a plant because the microorganisms that break it down are inactive. During these times if there is a need for nutrients then supplementing with synthetic fertilizers may be needed to meet the demands of the plants.
To make sure your plants have the required nutrients to encourage lush and vigorous growth and production have your soil tested every few years. Soil tests can be conducted through your County Extension Office. For more information on improving soil fertility and taking soil samples see fact sheets HLA-6007 - Improving Garden Soil Fertility and PSS-2207 - How to Get a Good Soil Sample.
Resistance, Our First Defense to Pests
David Hillock
One of our best defenses to common pest problems in the garden and landscape is plants with natural resistance. By selecting varieties of plant species, or species that are inherently resistant to common pest problems, the use of pesticides needed to keep our plants looking good can be reduced.
When buying seeds or plants, try to choose those with built-in resistance to diseases, insects, and nematodes. Sources for this information include OSU Extension Fact Sheets, seed catalogs, and plant and seed packages. It may be better to forego some production capability in favor of the increased pest resistance, if you must make such a choice.
During the growing season, stressed plants can lose their resistance to pests, so be sure the crop has the water and nutrients it needs. When shopping for seeds and plants, check the labels for indications of pest resistance. For example, many garden phlox and crapemyrtles are susceptible to powdery mildew fungal disease; however, several varieties are available that are resistant to powdery mildew. When purchasing vegetables, check labels or packaging for abbreviations like these, used to designate various types of pest resistance or tolerance:
- A—Alternaria stem canker
- ALS—angular leaf spot
- ANTH—anthracnose
- CMV—cucumber mosaic virus
- DM—downey mildew
- F—Fusarium (race 1)
- FF—Fusarium (races 1 & 2)
- L—leafspot
- MDM—maize dwarf mosaic
- N—nematode
- NCLB—northern corn leaf blight
- PM—powdery mildew
- SCLB—southern corn leaf blight
- St—Stemphylium (gray leaf spot)
- SW—Stewart’s wilt
- TMV—tobacco mosaic virus
- V—Verticillium
Scouting Bermudagrass for Spring Regrowth
Mingying Xiang, Assistant Professor, Turfgrass Sciences
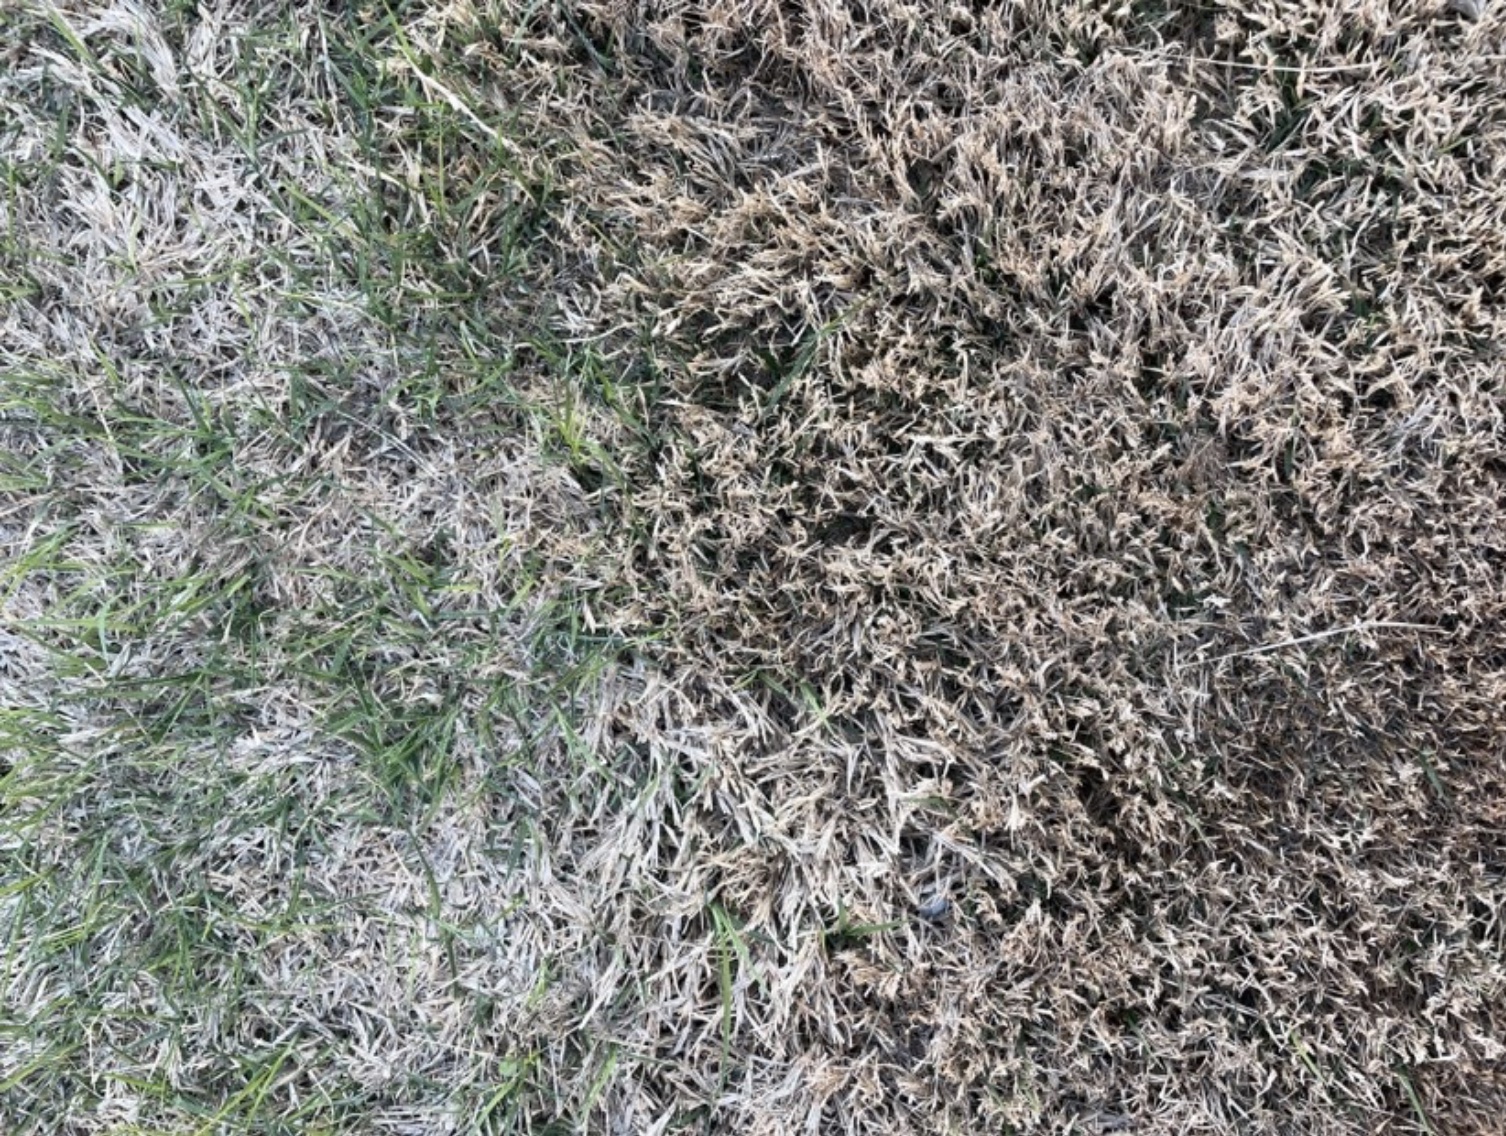
As we are in spring, a critical concern for those growing bermudagrass is the risk of winter kill. This condition results in partial or complete die-off of the turf during the colder months. Currently, as bermudagrass starts to green up, it's essential to pay attention to areas that exhibit delayed greening or fail to green up at all (image 1), which could raise alarms for homeowners and turf managers. Particularly in regions experiencing lower rainfall or suffering from localized dry spots, bermudagrass is more prone to winter kill when winter desiccation (low soil moisture level) exits.
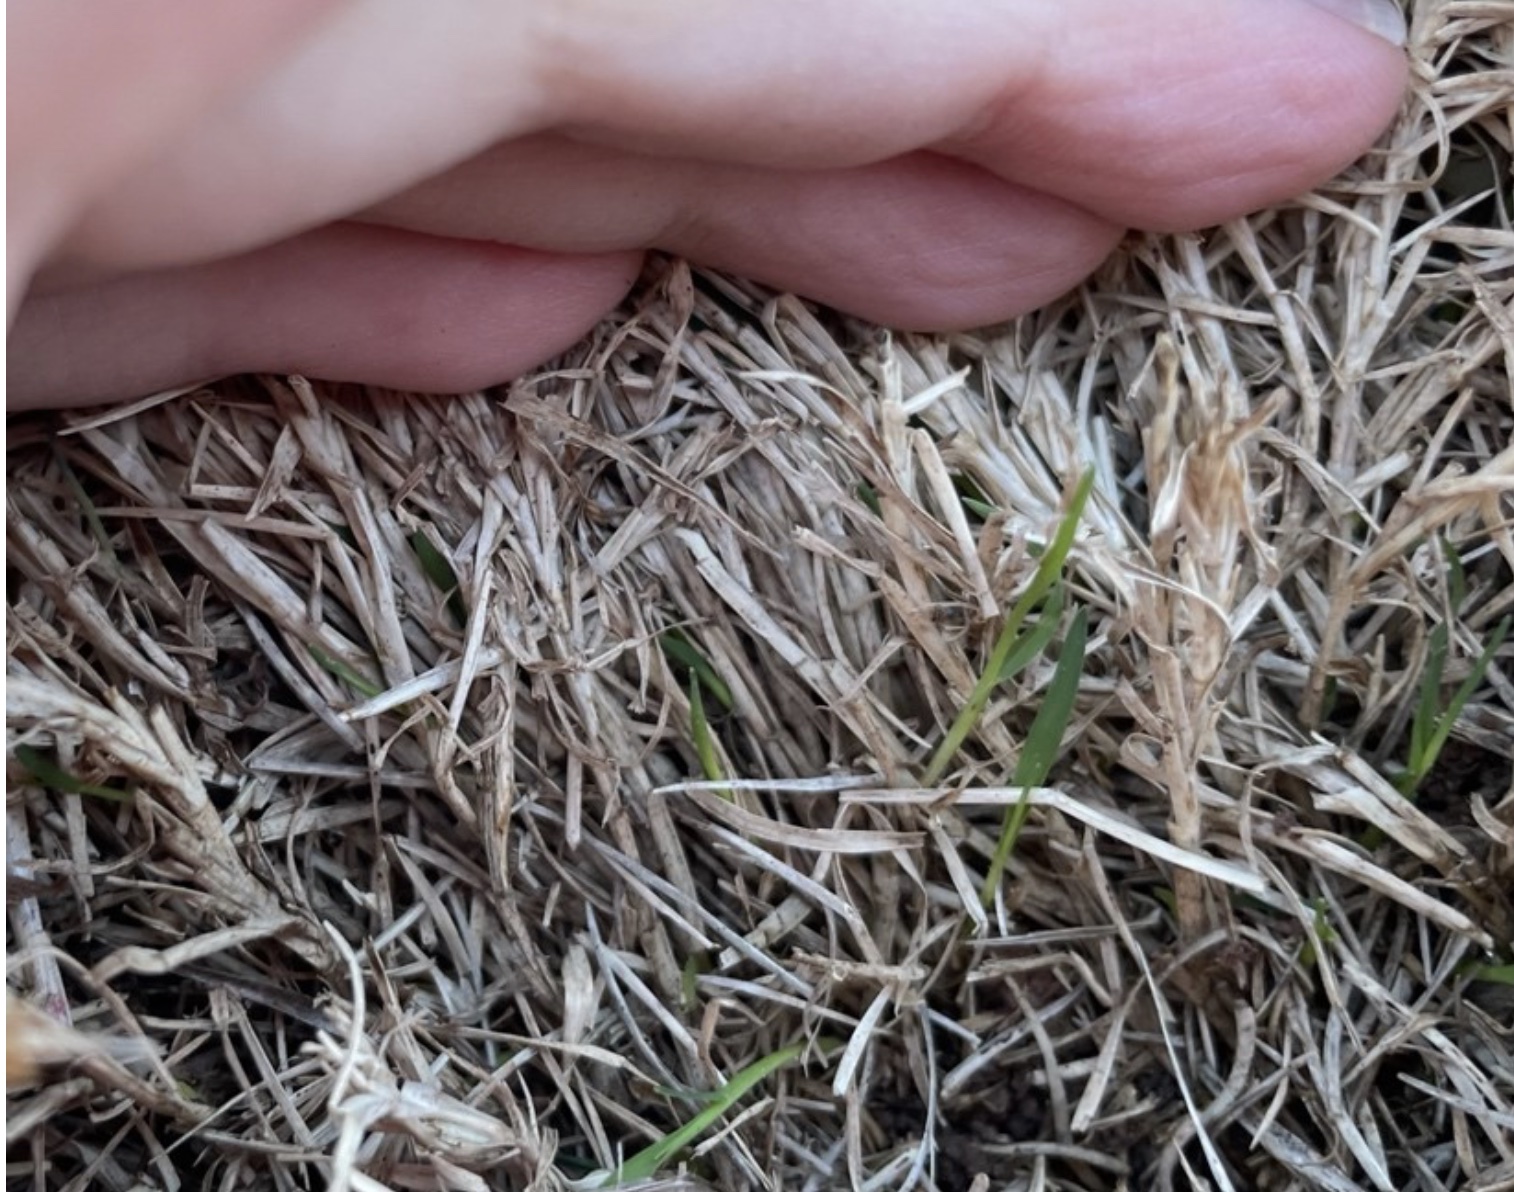
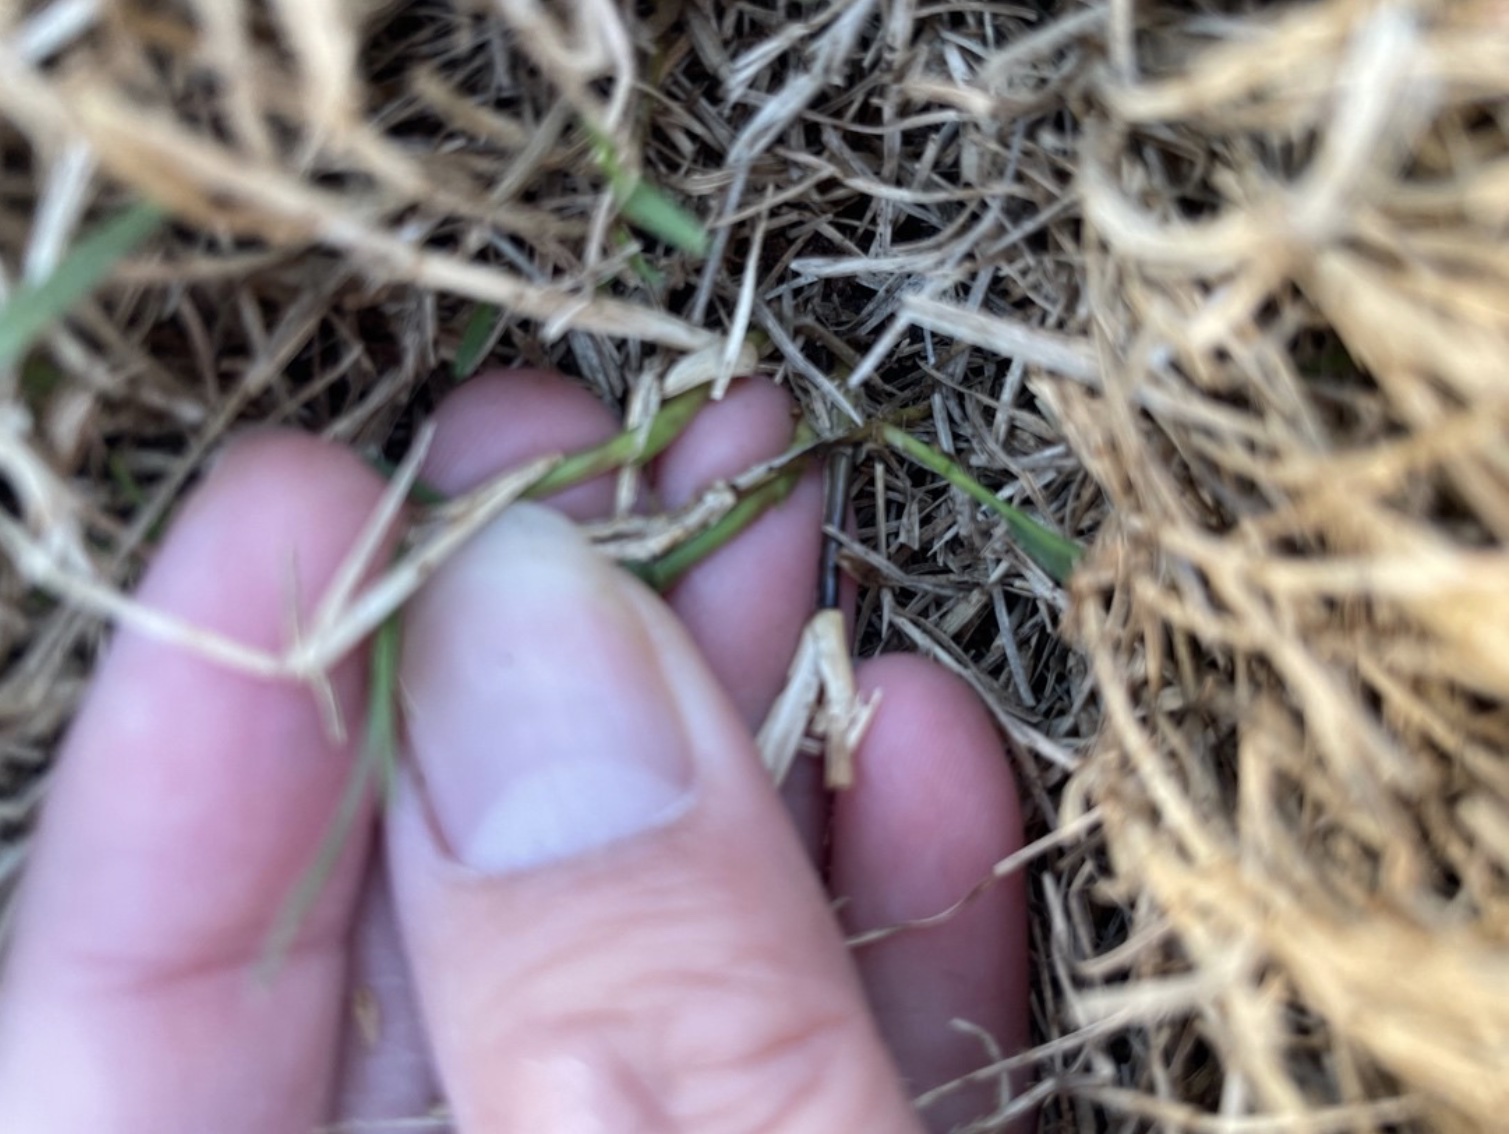
One method to assess the potential of regrowth of the areas that is delayed in green up is by brushing the canopy to check for green aerial shoots (image 2). Excessive dead leaves on the canopy can delay soil warming compared to lawns that are mowed in early spring. The excessive dead leaves can also obstruct the direct exposure of green tissue from the canopy. Brushing the canopy could exam if any healthy (firm, green or purple) stolon presents (image 3).
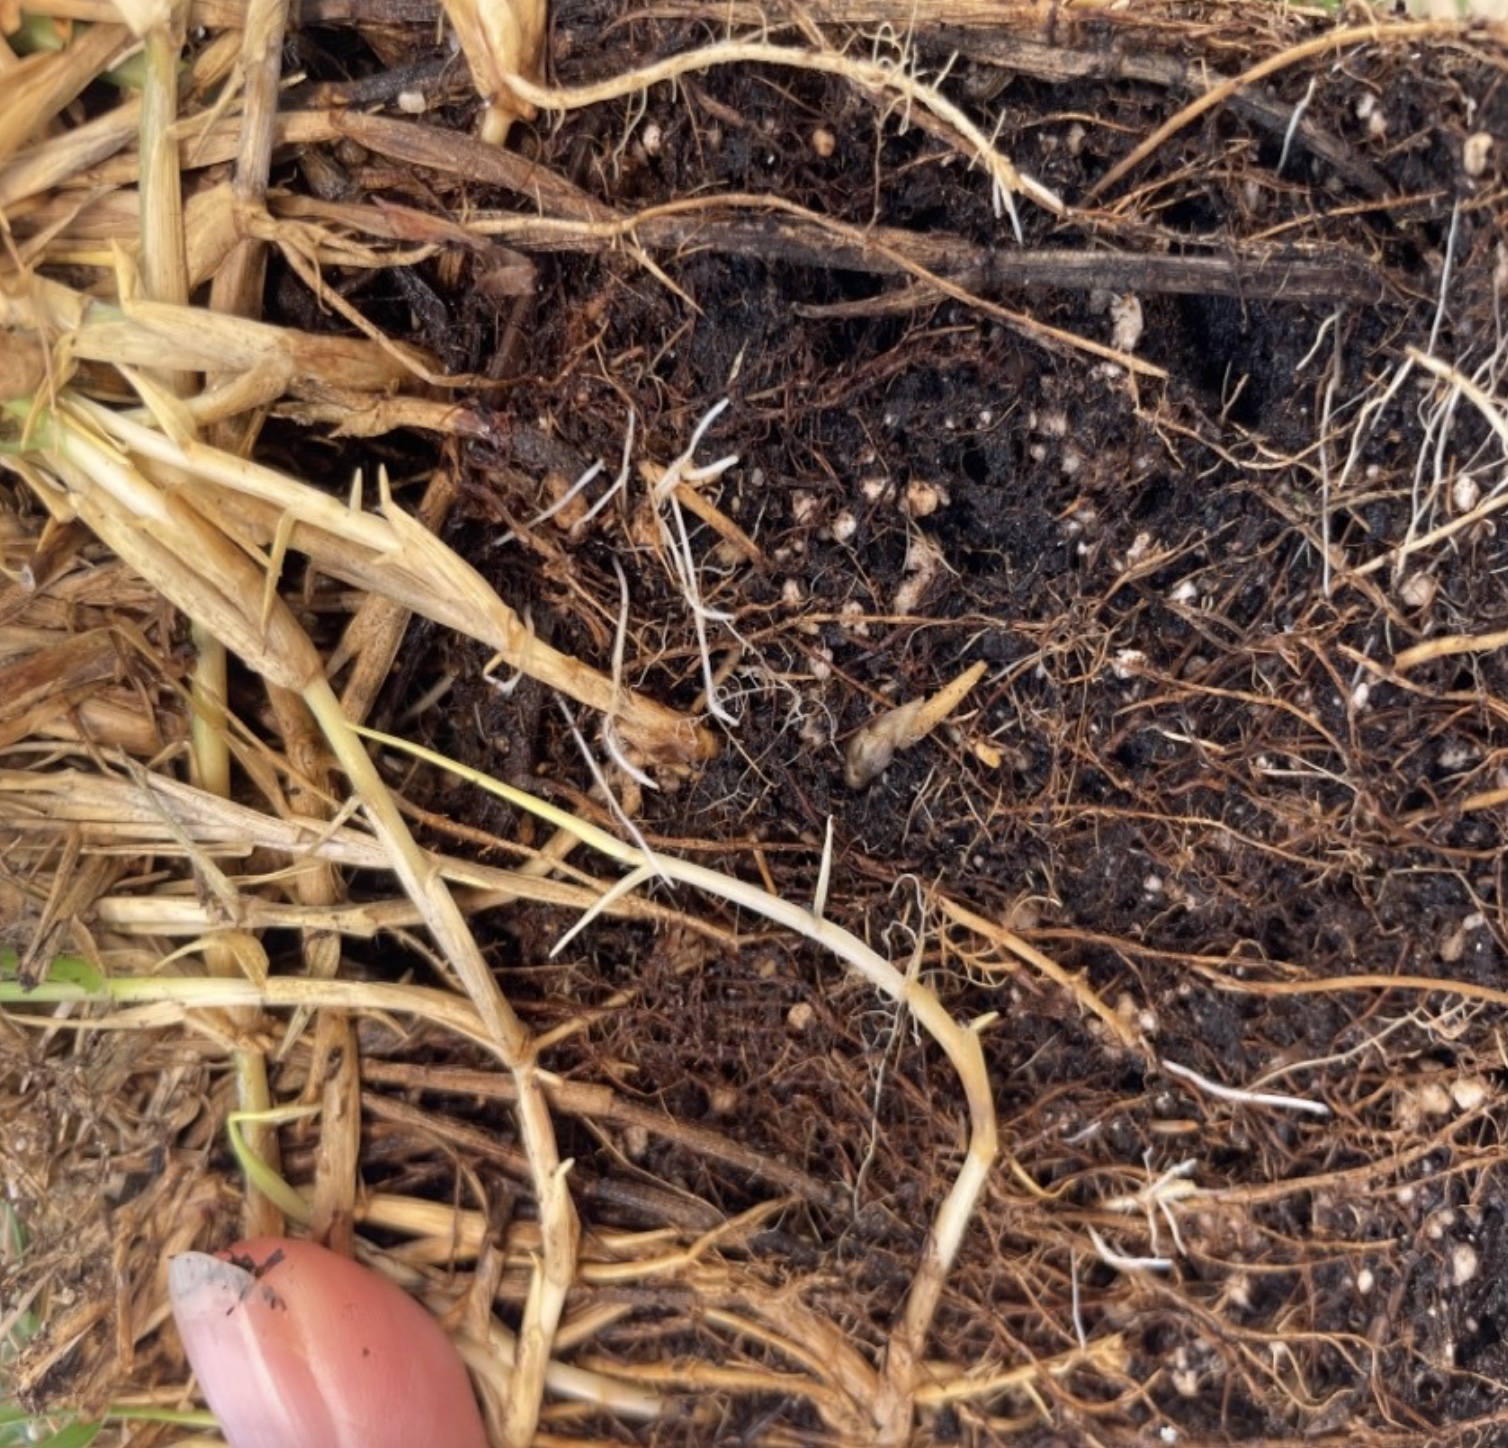
If you don’t see any survival aerial shoot or stolons, there is still a silver lining for well-maintained turfs. A structure called rhizome, which is horizontal underground stems that play a crucial role in the growth, and survival of bermudagrass (image 4). Even if the crown and stolons are damaged by freeze, robust rhizomes lying beneath the soil can regenerate, possibly a few weeks later than those recovered from the crown. Before processing with overseeding or renovating the brown lawn areas, it's crucial to scout for healthy rhizomes in bermudagrass as an indicator of the lawn's ability to bounce back from winter injury.
To determine whether a grass stand has healthy rhizomes, you can take a sample plug from areas of brown grass that are slow to recover and rinse off the soil around the root zone. If you discover multiple white, firm rhizomes, it's a good indication that the grass will very likely regenerate. However, grass stands that have been under significant stress during the growing season may not develop any, or only a few rhizomes. If the rhizomes appear brown and mushy, they are likely unhealthy and cannot regenerate new tissue. Areas that have been recently sodded, or those experiencing high stress from factors like frequent foot traffic, poor drainage, or persistent standing water, are less likely to develop a strong rhizome. And it is important to mitigate the impact of these conditions in order to promote healthy grasses for overwintering.
Image 1. Lawns exhibiting delayed greening up.
Image 2. Brushing canopy to inspect green vertical shoots.
Image 3. Brushing canopy to inspect healthy stolons.
Image 4. Examining the root zone for healthy rhizomes.
Planting Trees
David Hillock
The best time to plant most trees is spring or fall; however, many containerized trees can be planted any time if handled properly. Plants installed during the growing season are susceptible to high transpiration rates leading to drying of plant tissues.
To learn more about planting trees, visit the Tree Planting Guide fact sheet.
Early Bloom and Cold Temperatures this Past Week
Becky Carroll, Senior Extension Specialist
This year as people were enjoying the 70- and 80-degree unseasonable temperatures, I kept thinking about the fruit trees and potential fruit crop that was flowering weeks earlier than normal. Although the sunny warm temperatures made getting outside nice and comfortable, the warm temps set the fruit trees and pecans up for some potential cold damage. After the trees meet their chilling requirements and break their rest period, they begin to accumulate heat units and then start their spring growth. Well, this year, that was too early for many types of fruits. I had someone tell me that they had small plums on their trees back during the first week of March.
Earlier this week the OSU Urban Horticulture class was touring the fruit tree demonstration block at the Cimarron Valley Research Station. They were able to observe apple, pear, peach, pawpaw, and a few other fruit trees flowering. Some fruit had already been set and growing like the apricots. They were about the size of a dime. Peach varieties were at varying stages of bloom but mainly petal fall to shuck split. Apples were from tight cluster to bloom but mostly at pink stage. Pears were mainly at post bloom but some were still blooming and others had fruit set. The plums and almonds were past bloom and had been damaged by an earlier cold spell.
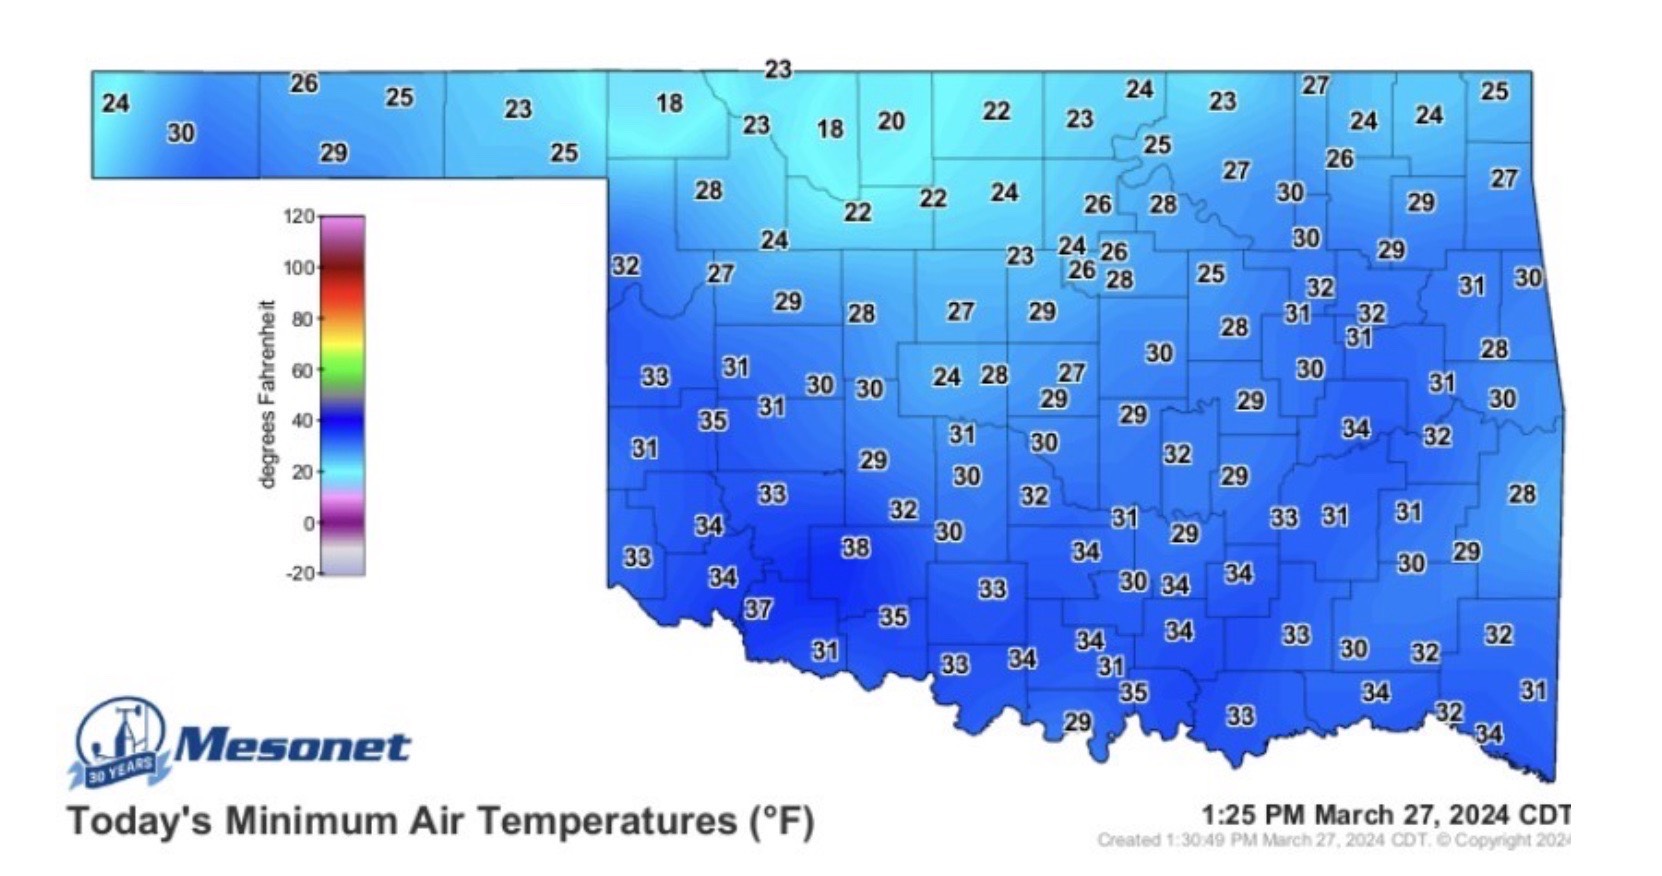
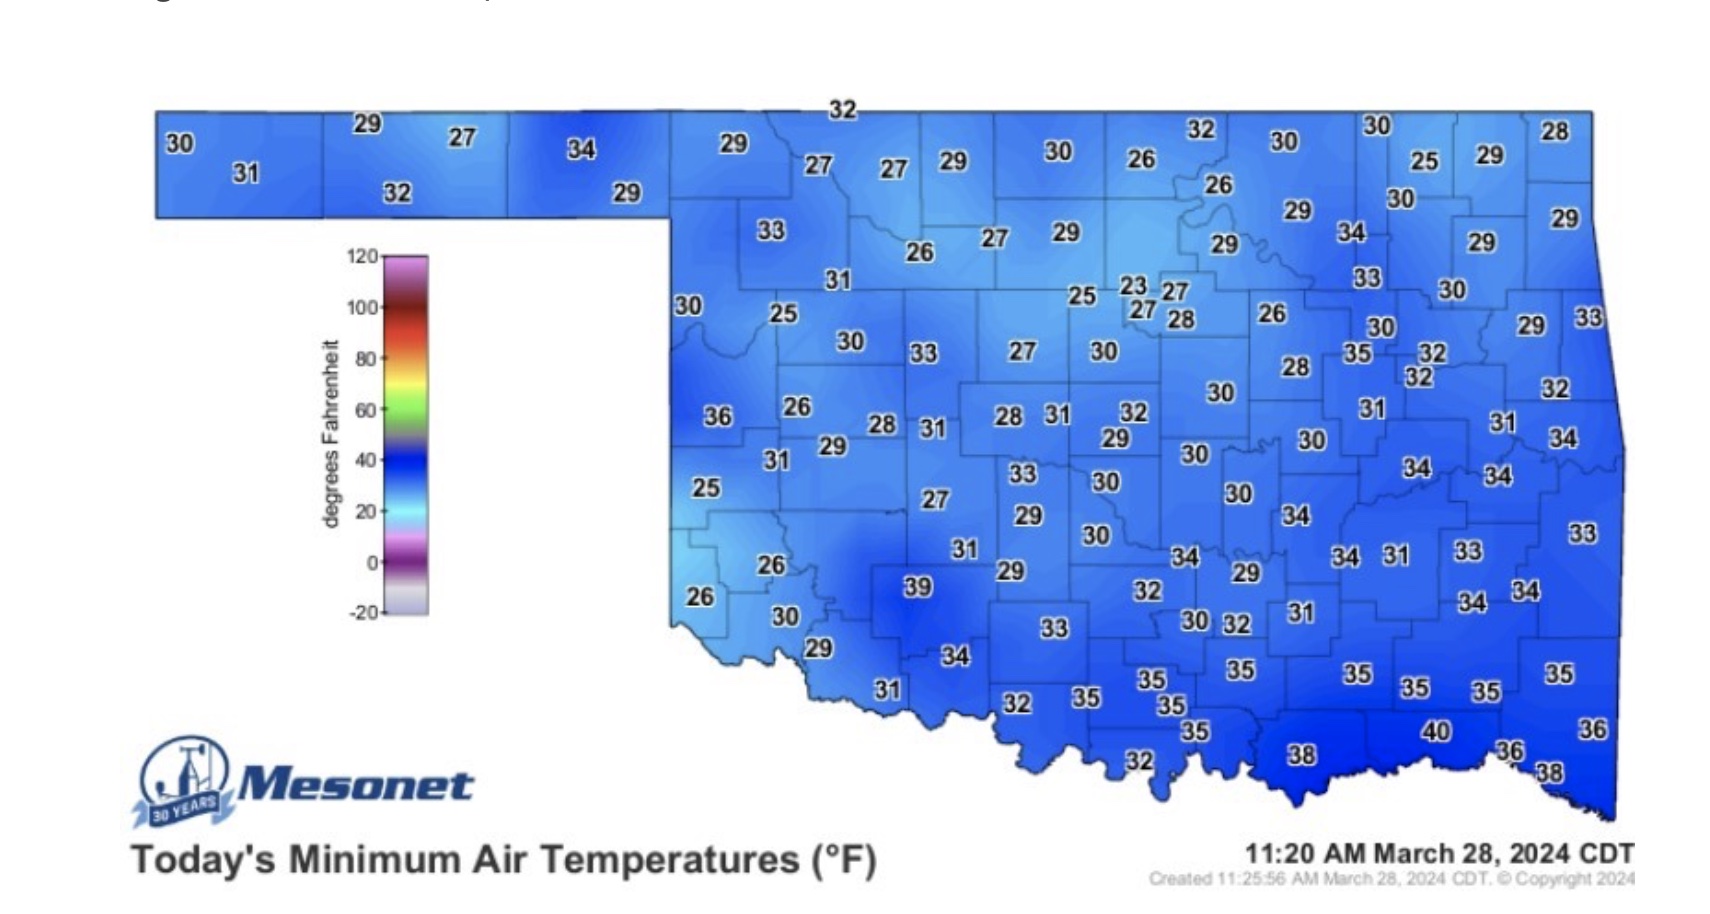
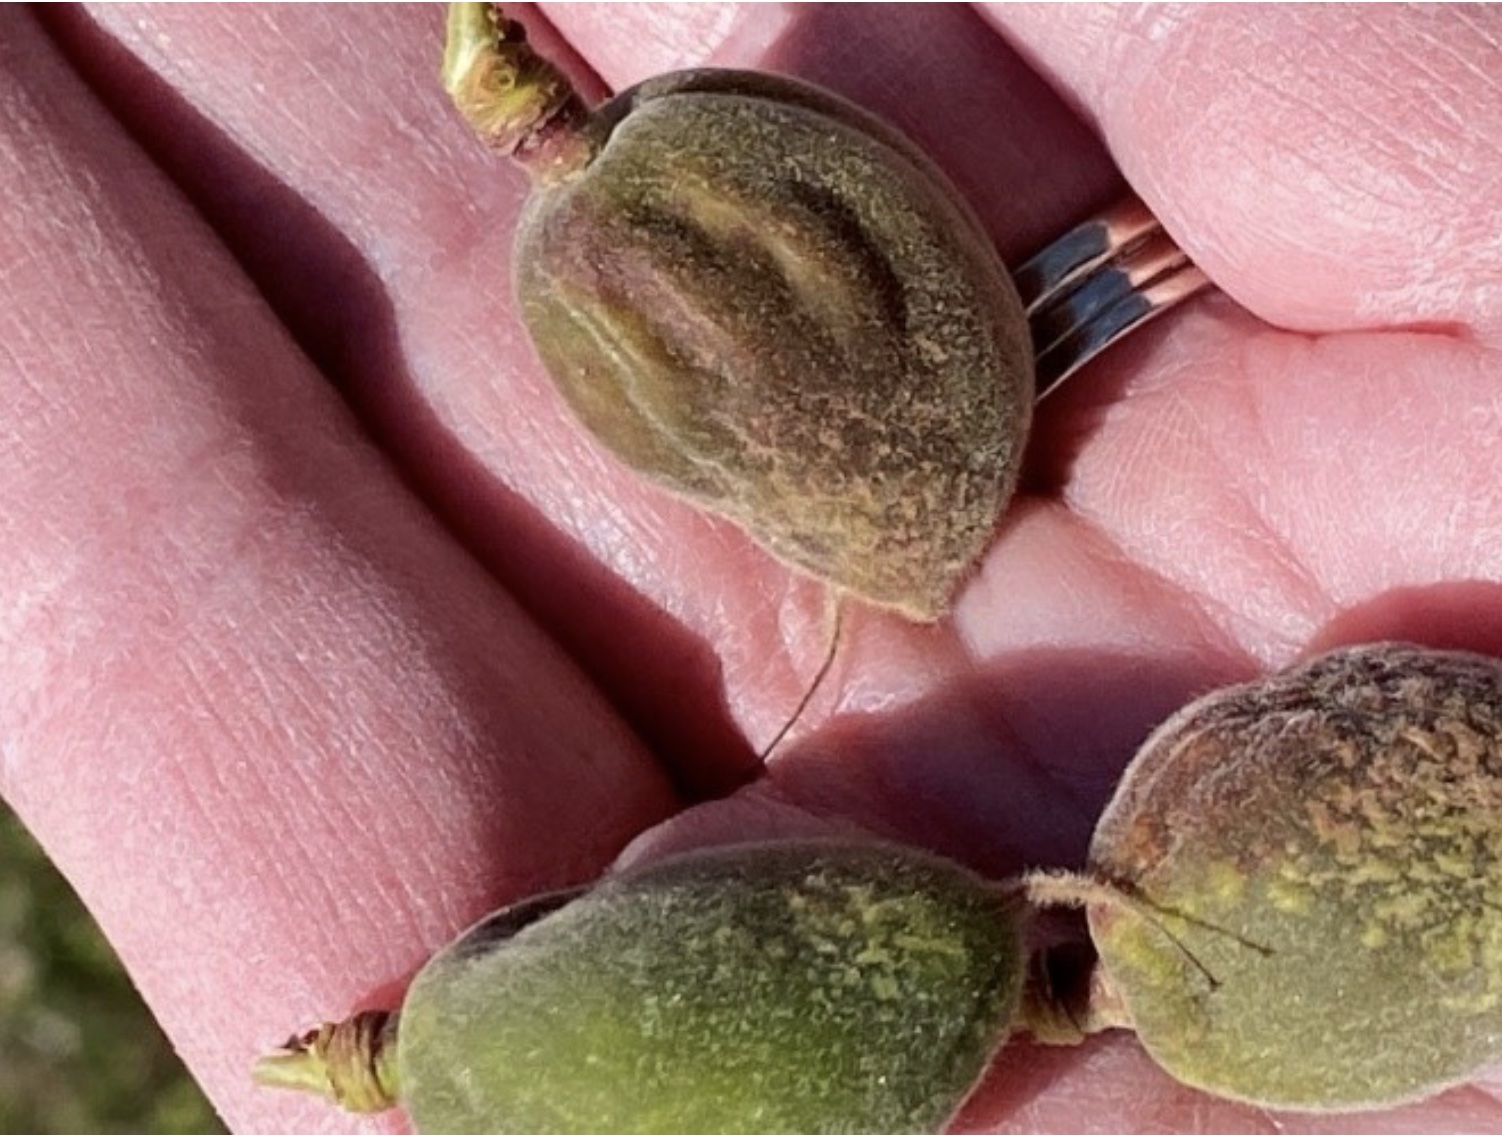
On March 26-28, 2024, areas of the state experienced several nights of cold temperature. At the CVRS, the Mesonet station recorded lows of 31, 28, and 28 degrees but in some areas, they dropped down much colder. I have included two Mesonet minimum temperature maps from March 27-28. But how do we know if we experienced fruit loss or damage to the blooms? Some are easy, like the apricot. It was starting to shrivel and was soft and squishy. Fruit at that stage can be damaged at 32 degrees. For most fruits, stage of development is key for surviving a freeze. If peaches are at full bloom some damage will occur at 27 degrees but at 24 degrees, 90% of the fruit will be lost. As the flowers advance in development, they become more susceptible to cold temperatures. Flowers at petal fall can have some damage at 28 degrees but 25 will kill about 90%. Those at shuck split will only be hardy to about 32 degrees, 31 will kill about 10% and 29 will damage about 90% of the flowers. Many of our peaches were at shuck split prior to the cold event.
About 24 hours after a freeze event, fruit buds or blooms can be assessed for damage. If the flower bud is dissected, you can see the different parts. If any parts are injured, the fruit will not produce properly. If any part of the pistil (stigma, style or ovary) or stamen (anther, filament) show browning or if the ovary is soft instead of firm, the fruit will not make. I’ve seen some with ovaries that are bright green, but the stigma and style are dried up. A good indicator is by cutting the flower in half and looking at the color of the ovary. A bright green or white is good, slight browning or dark brown is bad. You can assess the damage by cutting a number of flowers and determine the percentage alive. Remember if you have 10 - 20% of the good flowers, that may be enough to have a full crop.
Pecan growers in the northeast portion of the state where temperatures dropped significantly, are reporting some damage to new leaves and catkins. Pawnee cultivars seem to be opened earlier and experiencing some burned leaf tissue. Secondary buds can be fruitful on some pecan cultivars. It is too early to tell how much damage will be seen. The pecans buds at CVRS are still fairly tight. There are some buds with bud scales opening but no damage was observed.
Figure 1. Mesonet map for March 27, 2024.
Figure 2. Mesonet map for March 28, 2024.
Image 5. Chinese Morman Apricot at CVRS on 28 Mar 24. Temperatures dropped to 28 degrees or lower the previous two nights.
Pecan Educational Opportunities Across the State
Becky Carroll, Senior Extension Specialist
View the upcoming pecan events below.
- April 9, 2024, 5:30 pm – Beckham County Pecan Program. Please contact Greg Hartman for more information.
- April 25, 2024, 1:00 pm – LeFlore County Grafting Demonstration & Management Workshop. Register by calling (918) 647-8231.
- April 30, 2024, 10:00 am – Cotton & Stephens County Pecan Grafting Demonstration, Tour, & Lunch at Wade Pecans near Ringling. Please register by April 23 by contacting either the Cotton or Stephens County Extension Offices.
- May 1, 2024, 6pm – Payne County Grafting Demonstration with Dick Hoffman, Payne County Expo Center. To register, please call Laura Payne at (405) 747-8320.
- May 30-June 1, 2024, Oklahoma Pecan Growers Conference & Trade Show at the Ardmore Convention Center, Ardmore, OK. The Oklahoma Pecan Growers Association has more details and a link to register online on their website. Registration costs increase after April 15. Extension educators can get free registration by contacting becky.carroll@okstate.edu.
Field Day Site on Saturday: Buchanan Family Pecan Farm, north of Dickson (about 20 minutes from Convention Center)
Convention Hotel: Holiday Inn I-35 Ardmore (reserve by April 30, 2024, and ask for
an OPGA rate of $109/night) Phone: (580) 226-3333

