May Horticulture Tips
Monday, May 1, 2023
Pecan Flowers Emerging
Becky Carroll, Associate Extension Specialist
Pecan growers are scouting their groves & orchards looking for female pecan flowers this time of the year. For some reason, northeastern growers are reporting earlier flower development compared to the south.
Pecan trees are monecious plants. They have both male and female flowers on the same plant, but they have dichogamous flowering, meaning the male and female flowers are not maturing at the same time. This helps to ensure cross-pollination and increases genetic diversity in native groves. The male flowers or catkins are borne at the end of last year’s growth and start emerging at budbreak. They are responsible for releasing the pollen but may be earlier or later than the female flower’s receptivity. Female flowers are very small and not showy. They are found at the end of the current season’s new growth.
Pecan trees are wind pollinated. With high winds and very dry conditions, the pollen shed time is shortened while humid or rainy conditions may slow pollen shed. Growers hope for good winds and dry conditions for the best pollen movement in the orchard or grove during pollination. The female flowers (stigma) become sticky, and the pollen adheres to the surface. Recommendations are for planting no further than 150 feet for best pollination in the orchard. Growers will want to use both a protandrous or Type I cultivar that has early pollen shed and protogynous or Type II with a late pollen shed cultivar for best pollination. Even using a Type I and II cultivar may not always provide good timing for pollination. Large growers normally incorporate multiple cultivars for adequate pollination.
In a native grove, each tree is genetically different with a great deal of variability. Usually about half of the native trees will be Type I and half will be Type II. A producer with improved cultivars growing close to native trees may not have issues with pollination due to the diversity of the native trees.
Growers wanting to survey their orchards can see if they have a potential crop early prior to pollination, usually during the end of April or early May. Seeing flowers doesn’t mean that they will have a crop but gives them some idea of what is possible that season. Many things can affect pollination and fertilization, pest issues and weather can have an affect on the upcoming harvest. Getting out in the orchard or grove gives growers an idea of what management may be needed soon to prepare for the crop.
| Image | Caption |
|---|---|
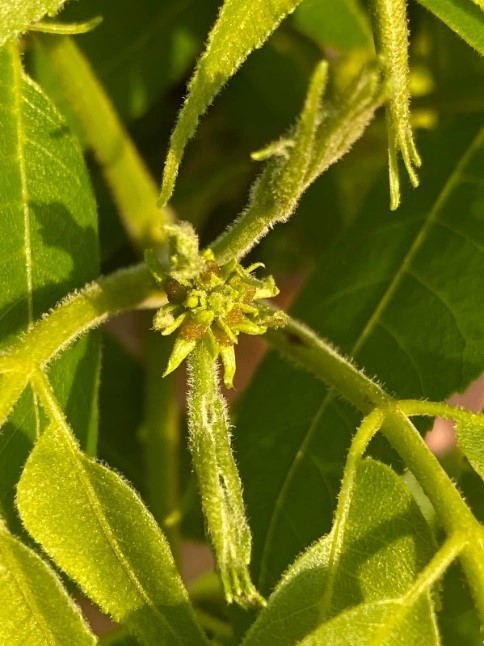 |
Figure 1. Female flowers just starting to show at the end of the current season’s growth. |
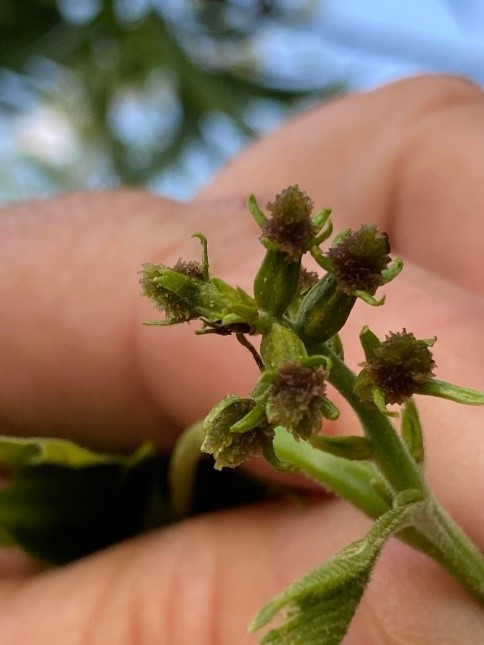 |
Figure 2. Female flowers will turn into the clusters. This cluster has the potential for about 7 pecans. |
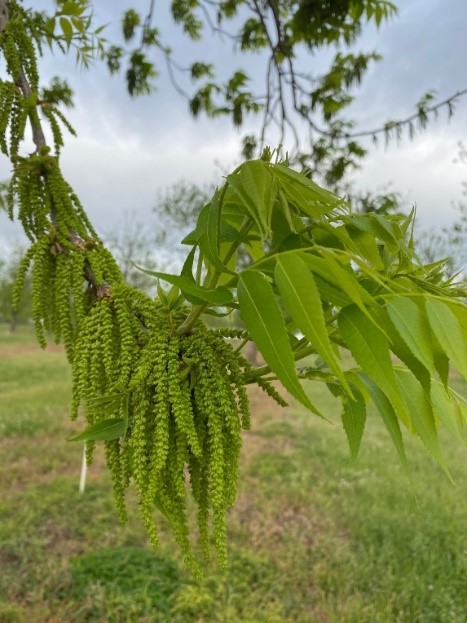 |
Figure 3. Male flowers or catkins develop on last year’s growth. The female flowers will be on the end of the new shoot growth. |
Scoville Pepper Garden
Casey Hentges, Associate Extension Specialist
Bailey Lockhart, Extension Assistant
The Scoville scale is used to measure the spiciness of peppers. The scale was originally developed by the pharmacist Wilbur Scoville in 1912. This organoleptic, or sensory test, takes an exact weight of the dried pepper and dissolves it in alcohol to extract the capsaicinoids. Capsaicinoids are what makes peppers hot, and most of it is specifically in the component capsaicin. Once this is extracted, it is then diluted in a solution of sugar water. Tasters are given decreasing concentrations of the pepper extract until the majority of them can no longer taste the heat. Scoville Heat Units (SHU), the heat rating, are then based off this dilution. This is somewhat of a subjective scale, as different people have different sensitivities to these capsaicinoids, however, it is better than just simply taking a bite out of pepper and trying to rank them.
While tastebuds can’t be controlled, there are two other factors that affect the heat of a pepper. One factor is the plants’ genetics while another is the environment. Peppers are genetically at a certain SHU range; however, the water and growing temperatures can also influence the actual heat of the pepper. For instance, a traditional jalapeno is around 2500-8000 SHU, growing under optimal conditions the pepper may be on the lower end of the range while a jalapeno grown under stressed conditions could be on the higher end of the SHU. This is why there are often ranges of heat on peppers. There are also jalapenos that have been bred to not have any heat in them. So genetically, the heat has been bred out of it, therefore no matter whether it is growing in optimal or stressed conditions, it will not be as hot as the standard jalapeno. There are other peppers similar to this, such as the heatless habanero.
Besides removing some of the heat, genetics have also been able to increase the heat in some peppers. Looking at the Latin names of these peppers will give some clue as to how hot they actually are. The genus of all peppers is Capsicum, sort of like the heat component capsaicin. These words come from the Greek word ‘Kapto’ that means “to bite”. So, it could be said, the more capsaicin, the more bite it has.
Most of the peppers mentioned below are Capsicum annuum, with the exception of the tabasco pepper which is Capsicum frutescens. The habanero is also a different species called chinense. Despite the inference of the species name chinense, they are not native to China. In fact, they are all native to Central and South America. The three spiciest peppers listed below are also included in the chinense species. This species has gained the most attention as people have tried to develop even hotter peppers. In 2007, the ghost pepper was named the hottest pepper at around 1 million Scoville units. In 2011, the ghost pepper was surpassed by the Trinidad scorpion coming in at 1.2 – 2 million Scoville units. And the hottest pepper listed is the carolina reaper that tops the scale around 2.2 million Scoville units.
| Pepper | Rating |
|---|---|
| 'Fooled You' Jalapeno | 0 SHU |
| Bell Pepper | 0 SHU |
| Banana Pepper | 0 SHU |
| Pimento Sweet Pepper | 100-500 SHU |
| Pepperoncini | 100-500 SHU |
| Anaheim | 500-1,000 SHU |
| Poblano | 1,000-2,000 SHU |
| Jalapeno | 2,500-8,000 SHU |
| Hungarian Wax Pepper | 5,000-10,000 SHU |
| Serrano Pepper | 10,000-23,000 SHU |
| Tabasco Pepper | 30,000-50,000 SHU |
| Cayenne Pepper | 30,000-50,000 SHU |
| Habanero Pepper | 100,000 SHU |
| Ghost Pepper | 1,000,000 SHU |
| Trinidad Scorpion | 1,200,000-2,000,000 SHU |
| Carolina Reaper | >2,200,000 SHU |
There is a wide selection of peppers to try, from no heat to exponential heat of the Carolina reaper. They can be used for their traditional, edible purposes, but they also offer a nice ornamental appeal to any garden.
Mulch, Mulch, and More Mulch!
David Hillock, Consumer Horticulturist
Mulch is one of the most common and practical tools a gardener can have. It can be relatively cheap, even free in some cases, comes in an array of sizes, shapes, and colors, is easy to install, and has many benefits. Benefits of using a mulch, depending on the type used, include reduced surface evaporation, improved water penetration and air movement, control of soil temperature fluctuations, protection of shallow-rooted plants from freeze damage and frost-heave, improved soil structure and nutrient availability, preventing weed growth, keeping fruits, vegetables, and flowers cleaner, and improved aesthetics of a landscape and addition to property values.
There are two types of mulches, organic and inorganic. Organic mulches include such things as wood and bark chips, straw, grass clippings, and seed hulls. Inorganic or inert mulches include polyethylene film, gravel, and weed-barrier fabrics.
The ideal mulch does not compact readily. It does not retard water and air movement into the soil, it is not a fire hazard, and it breaks down slowly. In addition, the ideal mulch is uniform in color, weed-free, attractive and does not blow away.
Selection
The selection of a mulch should depend on the intended use. Appearance is sometimes the goal and either organic or inorganic types would work but is largely based on personal preferences. When the goal is to improve soil conditions, organic mulches that gradually break down work well. The size of the area in relation to the cost of materials and availability should also be considered (Table 1). If the area is used primarily for annual flowers, it often is more practical to use a temporary organic mulch that can be turned under each fall.
When to Apply Mulches
A mulch is frequently applied soon after the emergence of the crop seedlings or following transplanting. A delay in the application of mulch may be desirable if the soil has not warmed sufficiently during the spring.
Mulches used to enhance appearance and control weeds may be applied at any time.
If the mulch is used to protect fall transplants by keeping soil temperatures above freezing longer into the fall (permitting better root growth), apply soon after transplanting.
If the mulch is to be used to reduce frost-heave and delay spring growth, apply after the ground has frozen. This type of mulch often is used to protect small bulbs such as squill and crocus and to prevent early emergence.
Depth of Mulches
Except where landscape fabric is used alone or in combination with chips, stones, or other material, apply most mulches to a depth of 2 to 3 inches. Apply straw, dried leaves, and similar materials to a depth of at least 4 inches.
Some mulches, particularly straw and loose leaves, may harbor rodents. When using these mulches, do not place closer than 6 inches to the base of woody plants. When these types of mulches are placed next to the plant, rodents living in the mulch might chew the bark of the plants, girdling and killing them.
Preventing Nitrogen Deficiency
As organic mulches decompose, the breakdown organisms use some of the soil nitrogen in contact with the mulch. Consequently, nitrogen deficiency may occur. A sign of nitrogen deficiency is yellowing, primarily of the lower leaves. When this occurs, add nitrogen fertilizers.
For every 100 square-feet of mulched area, add 2 pounds of a complete fertilizer, such as 10-6-4 or one-fourth pound of ammonium nitrate.
Never use a weed-and-feed type of fertilizer in mulched areas.
| Area | Depth of Mulch |
|---|---|
| 80 square feet | 4 inches |
| 100 square feet | 3 inches |
| 160 square feet | 2 inches |
| 325 square feet | 1 inch |
For more information on mulches see OSU Fact Sheet HLA-6005 Mulching Garden Soils.
Choosing a Pest Control Method
David Hillock, Consumer Horticulturist
Earth-Kind gardeners learn to live with some insect pests in their gardens but must also determine when to treat them with insecticides and which insecticides to use. They must become familiar with insect friends and foes to know which ones to fight and which to encourage.
Correct identification of an insect or other pest is the first step in selecting a control method. This means frequent inspections and monitoring of garden crops. Complete elimination of pests is nearly impossible. The goal of pest control is to lower the number of pests to a manageable level.
If you cannot diagnose the problem yourself, you can get help from your county Extension Educator, who has publications with pictures of the pests and the damage they cause. If necessary, the educator can also provide information on how to select, prepare and send specimens to OSU entomologists or pathologists for identification of insects or diseases.
Once you have identified the pest, use all available cultural and mechanical pest control measures first, which may include hand-picking and destroying insects.
Avoid using any insecticide when only minor damage is evident, and an action threshold has not been reached. An action threshold is the point when it is less expensive to use an insect control method than to endure damage to your plants—a smattering of grasshopper nibbles in a tomato planting or discovery of a few white grubs in the soil beneath your lawn normally are not serious enough problems to justify the use of insecticides.
If insecticide application is required, choose the material proven by research to be the safest and most effective. Consider spot treating areas rather than giving blanket treatments. Avoid improper use of pesticides—make sure you are not trying to use an insecticide on a problem caused by a fungus or bacterium.
For more information on Earth Kind Gardening and Integrated Pest Management (IPM) techniques, see OSU Extension Fact Sheets:
- HLA-6431 Earth-Kind Gardening Series: Mechanical Pest Controls
- HLA-6433 Earth-Kind Gardening Series Botanical Pest Controls
- HLA-6434 Biological Pest Controls for the Home Landscape
What are the Horizontal Holes on my Trees?
David Hillock, Consumer Horticulturist
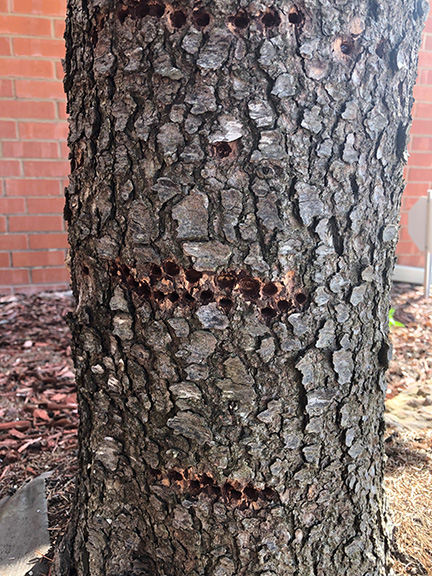
Sap suckers, a close relative of woodpeckers, cause damage to trees that is often attributed to wood boring insects. They visit a tree many times, feeding on sap accumulated in the holes they have drilled. Sap sucker damage appears as rows of holes circling or running vertically on the trunk or larger limbs of the tree. This contrasts with emergence holes of borers that occur in a random pattern on the trunk or in limbs of a tree. Contrary to popular belief, these birds rarely, if ever, dig through bark to capture wood-boring insects, but rather feed on cambium and sap in the phloem. The tree species most attacked by sap suckers are pine, sugar maple, birch, willow, magnolia, apple, and pecan.
In Oklahoma, the yellow-bellied sap sucker is the most common species that damages trees. They winter in the South and spend the summer in the northern part of the United States. Thus, they often cause damage during their migrations in the spring through early summer, and again in fall in Oklahoma.
Control
Woodpeckers are classified as migratory, non-game birds and are protected by the Federal Migratory Bird Treaty Act, so killing them is out of the question. To protect trees from sapsuckers, wrap barriers of 1/4-inch (0.6-cm) hardware cloth, plastic mesh, or burlap around injured areas to discourage further damage. This method may be practical for protecting high-value ornamental or shade trees. In orchards and forested areas, it may be best to let the sapsuckers work on one or more of their favorite trees. Discouraging them from select trees may encourage the birds to disperse to others, causing damage to a greater number of trees.
Frightening Devices
Visual
Stationary model hawks or owls, fake and simulated snakes, and owl and cat silhouettes are generally considered ineffective as repellents. Toy plastic twirlers or windmills fastened to the eaves, and aluminum foil or brightly colored plastic strips, bright tin lids, and pie pans hung from above, all of which repel by movement and/or reflection, have been used with some success, as have suspended falcon silhouettes, especially if put in place soon after the damage starts. The twirlers and plastic strips rely on a breeze for motion. Large rubber balloons with owl-like eyes painted on them are included in the recent array of frightening devices used to scare woodpeckers. A good deal of attention has recently been given to round magnifying-type shaving mirrors installed over or adjacent to damaged areas to frighten woodpeckers with their larger-than life reflections. Success is sometimes reported by those using the method and this encourages further testing.
Sound
Loud noises such as handclapping, a toy cap pistol and banging on a garbage can lid have been used to frighten woodpeckers away from houses. Such harassment, if repeated when the bird returns, may cause it to leave for good. Propane exploders (gas cannons) or other commercial noise-producing, frightening devices may have some merit for scaring woodpeckers from commercial orchards, at least for short periods. Because of the noise they produce, they are rarely acceptable near inhabited dwellings or residential areas. Around homes, portable radios have been played with little success in discouraging woodpeckers. Expensive high-frequency sound-producing devices are marketed for controlling various pest birds but rarely provide advertised results. High-frequency sound is above the normal audible hearing range of humans but, unfortunately, above the range of most birds too. Woodpeckers can be very persistent and are not easily driven from their territories or selected pecking sites. For this reason, visual or sound types of frightening devices for protecting buildings — if they are to be effective at all — should be employed as soon as the problem is identified and before territories are well established. Visual and sound devices often fail to give desired results and netting may have to be installed.
Repellents
Taste
Many chemicals that have objectionable tastes as well as odors have been tested for treating utility poles and fence posts to discourage woodpeckers. Most have proven ineffective or at least not cost-effective.
Odor
Odors such as from naphthalene (mothballs) and wood treatments, such as creosote and pentachlorophenol, are of doubtful merit and do not resolve the woodpecker problem.
Tactile
Sticky or tacky bird repellents such as Tanglefoot®, 4-The-Birds®, and Roost-No-More®, smeared or placed in wavy bands with a caulking gun on limbs or trunks where sapsuckers are working, will often discourage the birds from orchard, ornamental and shade trees. These same repellents can be effective in discouraging birds if applied to wood siding and other areas of structural damage. A word of caution: some of the sticky bird repellents will discolor painted, stained or natural wood siding. Others may run in warm weather, leaving unsightly streaks. It is best to try out the material on a small out-of-sight area first before applying it extensively. The tacky repellents can be applied to a thin piece of pressed board, ridged clear plastic sheets, or other suitable material, which is then fastened to the area where damage is occurring.
Trapping
Live traps have been tried in attempts to capture woodpeckers for possible relocation rather than killing the birds. None of those explored were very successful, and more research is needed to develop an effective woodpecker live trap.
Black Spot of Roses
David Hillock, Consumer Horticulturist
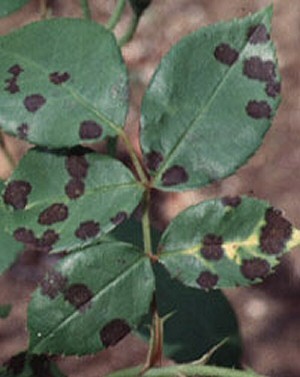
Black spot (caused by the fungus Diplocarpon rosae) is a very serious disease of rose plants. It is characterized by nearly circular black spots on leaves. The spots are distinguished from other leaf spot diseases by the fringed margins and consistently black color of the spots.
The spots vary in size from less than 1/16 to 1/2 inch or more in diameter. Spots may merge to produce large irregular lesions. Yellowing often occurs over the entire leaf, but it may develop only around the spots. When plants are badly infected, leaves drop prematurely and canes may become completely defoliated, thereby reducing the quantity of the flowers, and eventually killing the plant.
Warm, wet weather favors the spread of pathogens. Spores of the fungus are spread mainly by splashing water or rain. They germinate in water and infection takes place only when water remains on the leaves for periods of six hours or longer.
Control
- Remove and destroy infected leaves during the season; remove infected twigs when pruning.
- Avoid overhead watering.
- Plant roses in an area with good soil drainage and ventilation. Avoid shady spots in dense plantings.
- Prune out old and diseased canes in the fall or winter.
- Mulch soil around plants and sprinkle dusting sulfur on the mulch during the spring (see OSU Extension Fact Sheet HLA-6403 Roses in Oklahoma).
- If one wishes to not have to spray for black spot and powdery mildew control, there are some resistant cultivars that can be grown in Oklahoma. For more information about disease resistant roses see OSU Extension Fact Sheet EPP-7607 Disease of Roses or visit your local garden center/nursery.
- For chemical control on disease-susceptible cultivars, visit your local garden center/nursery or contact your County Extension Office. It is important that weekly fungicide applications begin with new growth in the spring and continue until frost in the fall. Sprays may be omitted during hot, dry periods in the summer. Many general-purpose rose dusts and sprays are available that contain compatible materials for control not only of black spot and powdery mildew, but also for common insect pests. These materials have been well formulated and, if used properly, will give excellent results. During the dormant season, spray with lime sulfur.
Repairing Tree Injury
David Hillock, Consumer Horticulturist
Injuries to trees that expose the wood or kill the bark may allow insects or disease organisms to enter the tree. Proper treatment protects the tree and promotes faster sealing of the wound. Few trees reach maturity without receiving one or more wounds from a variety of sources. Yet trees have survived for centuries to become the oldest living creatures on earth despite wounding. Some recent work has involved dissecting trees to understand how they compartmentalize and close an injury. Trees do not heal in the true sense of the word. Injured tree tissue is never repaired and returned to the former state, as is a cut on a person's hand. Trees react by closing the wound and compartmentalizing or isolating the injured tissue from the surrounding tissue. During compartmentalization enclosure, contents from the injured cells leak onto the uninjured surface where they oxidize and form a barrier to prevent further infection. Then the most recently laid down wood is altered, as is the tissue around the injury. This is accompanied by discoloration, the extent of which depends on the kind of tree, the vigor, kind of wound, location of the wound and the time of wounding. New growth rings are laid down the following spring and new tissue begins to grow over the injured tissue. Over a period, the new tissue closes the wound.
Homeowners can help the plant compartmentalize the damage more rapidly than it does in nature. If the bark has been crushed or stripped from the trunk, remove the injured bark and shape the wound. Cut away all damaged bark and remove isolated scraps from the wound area. Remove all splintered wood and smooth the surface of the exposed area with a chisel.
Some true injuries result in cavities or hollows within the main trunk or large branch of a tree. For many years gardeners have tried to fill these cavities with bricks, concrete and other materials to seal the cavity from rain, insects and diseases. Armed with the knowledge of the plant's ability to compartmentalize any wound it is not recommended to fill tree cavities. If water does not drain easily out of the cavity, many arborists will recommend trimming the cavity opening so that water can drain out. Creating a weep hole by drilling into the bottom of the cavity to allow water to drain freely is not necessary and will create a new wound that may be subject to further decay. Other than these actions, simply keeping the cavity clean of debris and leaves is all that is recommended.
For a year or more after a tree has been struck by lightning, it is often difficult to determine the extent of damage since much of the injury may be internal. Trees that seem badly damaged may live while others apparently only mildly injured may die. If the tree can be saved, remove all shattered parts and damaged limbs; then smooth.
In storm-damaged trees, remove all broken branches and reshape the tree as well as possible at the time. Try to encourage new branch development in areas with broken branches. Broken trunks, split crotches or cracked limbs often are mended by restoring the damaged part to its original position and holding it there permanently. Consult professional arborists to install screw rods or cables in trees where this work is necessary.
For more information on proper pruning and managing storm-damaged trees see OSU fact sheets:
- Pruning Ornamental Trees, Shrubs, and Vines OSU Fact Sheet
- Managing Storm-Damaged Trees OSU Fact Sheet
Bagworms
David Hillock, Consumer Horticulturist
Bagworms can be a real nuisance on many plants. In Oklahoma, the most common hosts are eastern redcedar, other junipers, and arborvitae. Other hosts sometimes damaged include pines, spruce, bald cypress, maple, boxelder, sycamore, willow, black locust, oaks, and roses. The bagworm has been recorded on 128 different plant species in various parts of the United States.
Symptoms
Bagworm larvae damage their hosts by feeding on the foliage. Heavy infestations can completely defoliate small plants. Defoliation usually kills hosts such as redcedar and other junipers. Broadleaf hosts are not killed but are weakened and become more susceptible to borers and diseases.
Life Cycle
The overwintered eggs (in the year-old female bags) begin to hatch in late April or early May and the young larvae begin to feed and construct bags immediately. The first evidence of an infestation is normally a small bag, about 1/4-inch long, standing almost on end. As larvae grow, silk and fragments of the host plant foliage are added to the bag until it reaches 1 1/2 or 2 inches long. When larvae are mature, they fasten the bag to a plant stem with silk. Pupation occurs in the bag in August and males emerge in late August and September. They engage in a mating flight in search of the wingless females still inside their bags. After mating the female lays several hundred white eggs inside her old pupal case, drops from the bag, and dies. There is one generation per year.
Description
Adult males are small, clear winged moths with a black, hairy body and a wingspread of about 1 inch. Adult females are wingless, have no functional legs, eyes, or antennae, and are almost maggot-like in appearance. The female’s body is soft, yellowish white, and practically naked except for a circle of woolly hairs at the posterior end of the abdomen. Mature larvae have a dark brown abdomen, and the head and thorax are white, spotted with black. They are about 1 inch long. Both larvae and adult females are found in silken bags on the host plants.
Cultural Control
Infestations can be reduced by handpicking bags (and overwintering eggs within bags) during fall, winter, or spring before eggs hatch. Eggs remain viable within bags so be sure to destroy bags upon removal by crushing or burning them. When larvae become active, bagworms can still be removed by hand if the numbers are small and the affected host plants are small enough to reach the canopy. Again, take care to destroy the bags once they are removed.
Biological Control
There are several naturally occurring parasitic wasps and predatory insects that attack bagworms. The activity of these natural enemies apparently explains the fluctuation in bagworm populations observed from year to year.
Chemical Control
Chemical controls are most effective if applied early when larvae are small. In Oklahoma, it is normally a good practice to make applications of insecticide by early June. Bacillus thuringiensis var. kurstaki, a bacterial insecticide, is reported to provide good control of bagworms. Also effective are products that contain the active ingredient Spinosad, another microbial agent. These insecticides must be ingested by the caterpillars to achieve kill, so be patient as it will take some time to see results. Repeat applications may be needed later in the summer to keep susceptible plants free of bagworms. This is not due to the occurrence of multiple generations. Rather, not all eggs will hatch at the same time in some years and there may be migration of larvae between host plants. In most years, treatment in early June will catch most of the emerging larvae and provide good, season‐long control. The larger, older larvae can be controlled with products containing acephate (Orthene), carbaryl (Sevin), bifenthrin, cyfluthrin, and lambda‐cyhalothrin.

