Modular Tire Planter Bed Instructions
For over 25 years, the Noble Research Institute has been researching the use of discarded tires to support the production of specialty crops, more particularly in the creation of raised bed and container growing systems. The NRI Modular Tire Planter represents our latest effort in developing an adjustable height, environmentally friendly, sustainable growing platform that is inexpensive to construct and maintain.
The Modular Tire Planter derives its name from a stack of tires. Each tire in the stack serves as either a base module or a growing module. Depending on configuration, a planter can consist of one or more base or growing modules.
A module can range in depth from six inches to twelve inches depending on the size (width) of tires chosen. The average depth of the modules used in our modular planters is about eight inches. A growing module with an 8-inch rooting depth is sufficient to grow most vegetable and floral crops if close attention is given to irrigation scheduling. However, based on our experience, we recommend using two growing modules for best results. Not only does the increased volume of growing medium increase rooting area, water and nutrient holding capacity, it acts as a buffer against the increase in soil temperature, thus reducing temperature related stress on crops during the summer.
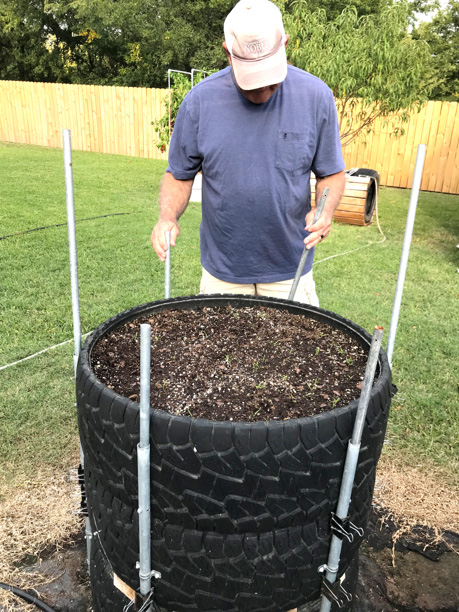
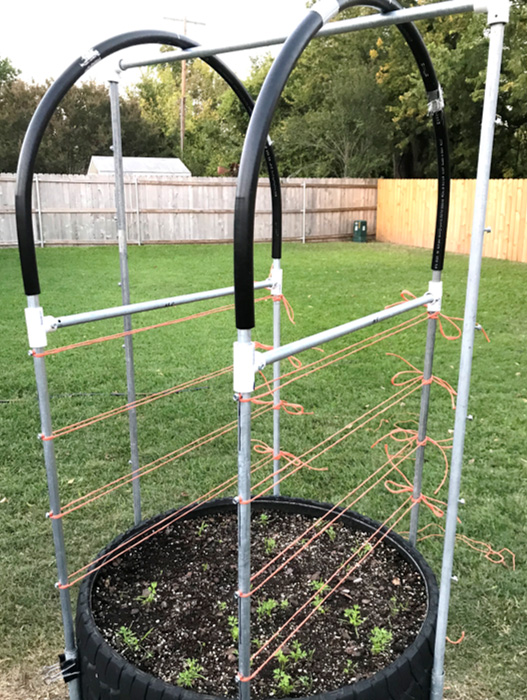
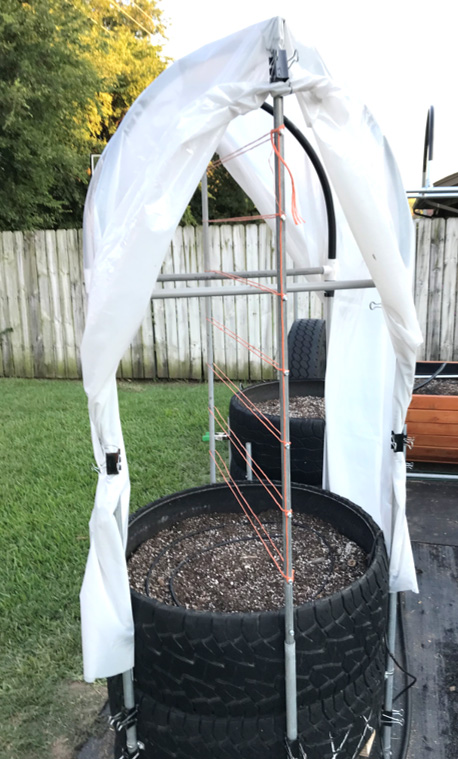
The planter is equipped with a frame which ensures the integrity of the structure and which serves as a point of attachment for accessories such as a mini greenhouse, shade structure and crop trellis
The planter can be assembled with or without an elevated floor. The addition of an elevated floor (bottom) reduces the amount of growing medium required to fill the planter. As an added benefit, the floor component serves as a natural vent that aids in the dispersal of hot air that can build up during hot, summer days.
Planters equipped with elevated floors have both growing modules and base modules. The base modules support the elevated floor and as such contain no growing medium. Planters equipped with elevated floors are technically classified as containers. To ensure adequate drainage, they should only be filled with a soilless growing medium.
The bottom module of a planter that does not utilize an elevated floor serves as both a base module and a growing module. To avoid confusion, the bottom module of a floorless planter will be referred to as a base module.
Depending on the desired height, two, three or four tires are required to construct a planter. A set of four identical, used automobile or light truck tires is recommended for construction. While it is possible to construct a planter using different brand tires of similar size, it is not recommended due to the requirement for shims. A set of four identical, used automobile or light truck tires is typically available at most tire shops.
Instructions
- Parts List for a Module Planter
- 3 Auto/light truck tires*
- 2 EMT conduit tubing (3/4 inch x 10 foot)
- 1 box (40 count) Sharp point, self tapping sheet metal roofing screws (no. 10 x 1 inch)
- 1 box (50 count) Hex-drive Tek screw (no. 10x 3/4 inch)
- One box (40 count) Deck screws (no. 10x2.5 inch)
- One bag (20 count) Pipe hangers 2/3 inch ETM)
- 1 Treated lumber (2 inch x 4 inch x 8 foot)
- 1 weed barrier fabric (3 foot x 50 foot roll, 5 oz.) NOTE: Enough fabric to equip 16 planters
- 1 roll Duct (Gorilla) tape
- 3 Potting soil (2 cubic foot bag)**
*Tires should be identical in size and preferably at least 30 inches in diameter. Note: 4 tires required for a 4-module planter.
**Volume of soil required dependent on size of tires selected. - Tool Requirement
- Jig saw
- Cut off saw
- Angle grinder
- Impact driver
- Circular saw
- Plastic long tape
- Retractable tape measure
- Carpenter's pencil
- Sharpie paint marker
- Utility knife-hook and standard blades
- Carpenter's square
- Bolt cutters
- Torpedo level
- Carpenter's level: 4-foot
- Construct Planter Base
- Step 1: Choose one tire to be the base module.
- Step 2: Designate post location on the base. Using a tape measure and a white marker, make six evenly spaced vertical lines on the tire as shown. For ease of calculation, use a tape measure that measures in tenths of inches. A carpenter’s square or level can be used to ensure lines are plumb. If a level is used, make sure the tire is positioned on a level surface.
- Step 3: Using conduit, cut six posts to the desired length. Remove burrs on the tubing. Note: 30-inch posts are sufficient for a stack of three tires. 40-inch posts may be required for a stack of four tires.
- Step 4: Install pipe hangers. Align the center of the hangers over the lines as shown and attach one side using sheet metal screws.
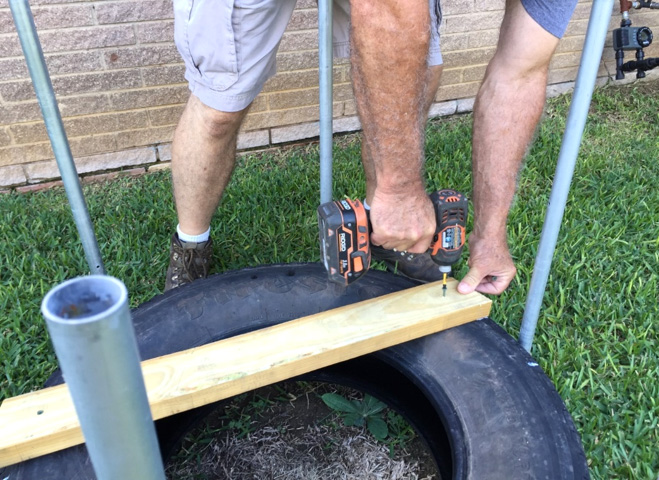
- Step 5: Install conduit posts. Insert posts into the hangers. Prior to attaching the other end of hangers, place a short piece of 2x4-inch lumber under the post to ensure all posts are installed uniformly.
Note: If you choose to utilize two base modules in order to construct a taller planter, place a second tire on top of the first. Secure posts using pipe hangers and sheet metal screws. When using a second tire, one pipe hanger per post is sufficient. There is no need to mark the second tire, however, use a torpedo level to ensure the posts are plumb before attaching to the tire.
- Move Planter Base
Move planter base to desired location and level. It is best to level the site before locating the planter, however, if this is not possible, use shims to level the planter. Pieces of rubber pavers make excellent rot and rust proof shims.
- Install Elevated Floor Cross Supports
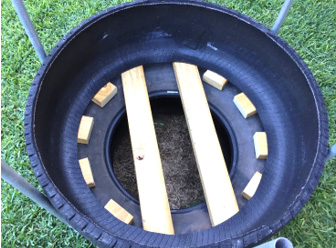
- Step 1: Install two, 2-inch x 4-inch cross supports on the upper surface of the base module as shown. Cut boards to size being sure to angle the ends to match the curvature of the tire. The boards should be five inches apart plus or minus an inch depending on tire (rim) size. To prevent slipping, attach the boards to the sidewall using 2-½-inch deck screws.
- Step 2: Prepare eight, 2-inch x 4-inch x 4-inch support blocks for installation at a later stage.
- Prepare Growing Modules
- Step 1: Choose one tire to create the lower growing module. On one side of the tire use a paint marker and tape measure to mark the side wall along the midpoint (crown) as shown. Using a utility knife, cut along the line to remove the side wall. This section of side wall may be discarded.
- Step 2: Flip the tire over and remove the side wall. Use a utility knife to prepare a slit large enough to insert a jigsaw blade. Cut as close to the tread as possible without exposing the steel belting. Choose a fine toothed hacksaw blade (17-24 teeth per inch) for best results. If you happen to cut into some of the steel belts by accident there is no need to panic. The steel wire exposed on the tread can be removed using an angle grinder. Save the side wall.
- Step 3: If desired, choose another tire to create an upper growing module. When fabricating an upper growing module, completely remove both sidewalls. Discard the sidewalls. Note: for best results, choose two (upper and lower) growing modules.
- Fabricate Floor Panel
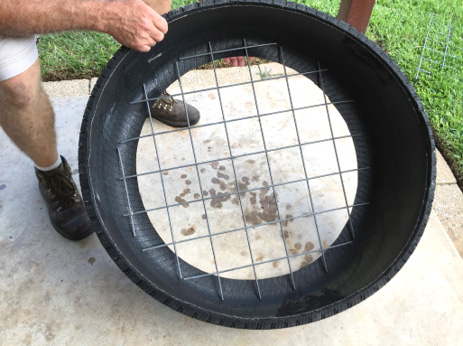
- Step 1: Fabricate a floor panel for the lower growing module using a piece of goat panel. Using the saved sidewall as a template, mark off the panel as shown. Use a pair of bolt cutters to cut the panel. Trim edges of panel to lay flat on the bottom of the module.
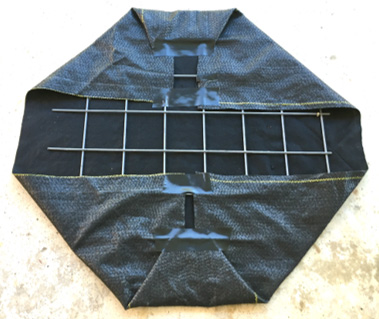
- Step 2: Prepare a liner for the floor panel using a piece of heavy weight weed barrier fabric such as Dewitt Pro 5. Gather the fabric on the back side as shown and secure using duct tape. If a lighter weight fabric is chosen, several layers may be needed to prevent liner failure.
- Install Growing Modules
- Step 1: Wash the interior surface of the growing module(s) prior to installation.
- Step 2: Insert the lower growing module into the frame and position on top of the cross supports.
- Step 3: Insert the 2-inch x 4-inch x 4-inch support blocks as shown.
- Step 4: Attach the lower growing module to the frame as shown using pipe hangers and sheet metal screws. Prior to attaching, adjust each post as necessary using a level to ensure they are plumb. One pipe hanger per post is sufficient.
- Step 5: Use an angle grinder to remove protruding screw tips. Sweep out filings.
- Step 6: Install the floor panel.
- Step 7: If used, insert the upper growing module into the frame and position on top of the lower growing panel.
- Step 8: To prevent slippage, secure each post to its corresponding pipe hanger on the base module using a self tapping 'Tek' screw.
- Fill Planter
Fill planter using a soilless growing mix high in organic materials such as peat moss and composted pine bark.
To reduce the volume of growing mix required for modular planters not equipped with elevated floors, the base module(s) can be filled with chunks of wood, bricks, etc. If support blocks are used to create a vent, additional fill material will be required to prevent loss of the growing mix. A fill composed of small sticks serves as an excellent screen for retaining growing medium. To be effective, the screening material needs to be added to a depth several inches above the vent.
- A Word of CautionThe vent openings present in planters equipped with elevated floors create an ideal habitat for black widow spiders. Web covering the vent openings is a sign that spiders have taken up residence in the vent openings and possibly the base modules. Spiders are easily controlled by injecting an insecticide labeled for controlling spiders into the vent openings. The use of an insecticide in such a manner will not harm the crop nor make it unfit for consumption.
- Accessorize Your Planter
- Drip irrigation
- Reflective wrap - to reduce soil temperature during the summer months, consider installing a reflective insulation wrap on the south and west sides of your planters. Use binder clips to attach the wrap to the frame.
- Butterfly crop cover
- Basic crop shelter
- Jumbo crop shelter
- Trellis possibilities
Butterfly Crop Cover - Assembly and Installation Plans
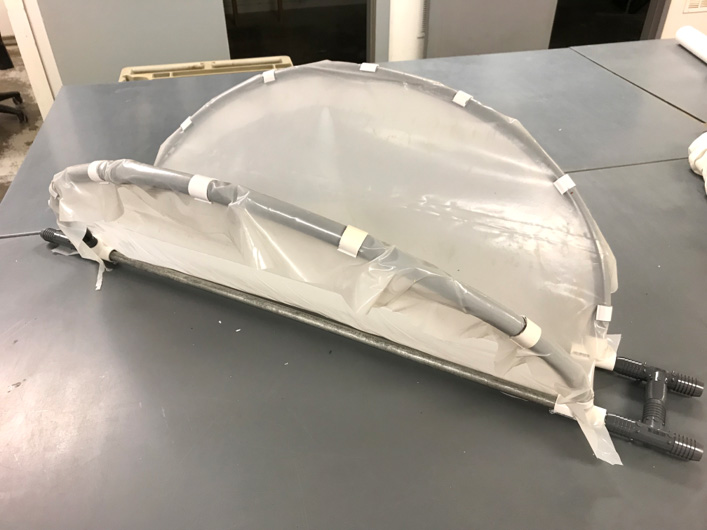
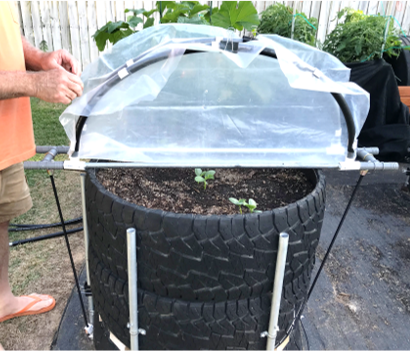
The butterfly cover is designed to be used in conjunction with a modular planter. The cover derives its name by the way it pivots in the middle. When placed on top of a modular planter it creates an ideal environment for seed germination and seedling development during cool weather. Ventilation is achieved by raising one or both of the “wings”, the degree of ventilation attained determined by the position of the wings. The cover can also be used to protect young transplants when used in combination with an additional tire module placed on top of the planter. These construction plans provide details for constructing a cover sufficient in size to accommodate a wide range of modular planters. Custom sized covers can be made by making a few modifications to the individual components.
- Butterfly Crop Cover Parts List
- 1 Polyethylene sheeting (clear) 10 foot x 25 foot, 6-mil*
- 1 EMT steel conduit (1/2 inch x 10 foot)
- 2 Bungee cord (2 foot)
- 4 PVC Tee fitting (1/2 inch slip)
- 10 pack PVC snap clamp (1/2 inch x 4 inch)**
- 1 roll ADS 100-PSI Poly Coil Pipe (3/4 inch x 100 foot)***
- 1 box (50 count)Hex drive Tek screws (no. 10x 3/4 inch)
- 4 Plastic barbed coupling (3/4 inch)
- 4 Plastic barbed Tee fitting (1 inch)
*Construction grade film. Greenhouse film preferred but more expensive. a 10-foot x 25-foot roll will equip 12 butterfly crop covers.
**Available at Greenhouse Megastore
***A 100-foot roll of poly pipe will equip 12 butterfly crop covers. - Prepare SpindlesUse a chop saw or angle grinder to cut two, 42-inch long spindles from the ½-inch metal conduit. Remove burrs on the ends of the spindles.
- Assemble Hinges
Use an angle grinder to reduce the barb size (coupler diameter) on one end of all four plastic barbed couplers. Remove just enough plastic to allow a snug fit when the couplers are inserted into the poly pipe. Insert a spindle through a PVC tee as shown. Insert the non-scuffed end of a coupler into the PVC tee until it comes to rest on the spindle. Insert a Tek screw to lock the coupler into place. Remove the PVC tee hinge from the spindle and repeat the procedure for the remaining tees.
- Assemble Wings
Cut two, 48-inch pieces of poly pipe. Insert the free (scuffed) end of a barbed coupler into both ends of a piece of poly pipe as shown. Slide two of the PVC Tee hinges with attached poly pipe onto a spindle as shown. Center the assembly on the spindle. Repeat process using the second piece of poly pipe and spindle.
- Assemble Wing Connectors
From the remaining piece of metal conduit, cut two pieces and insert into the plastic (barbed) tees as shown. When cut to the proper length, the conduit will fit snug inside the tees and not be visible. The pieces of conduit used in our cover are 5-inches in length. Use Tek screws to secure the tees to the conduit.
- Connect Wings
Slide a set of wing connectors onto each end of the spindles as shown and connect using Tek screws. Make sure the spindles are seated against the conduit inside each wing connector before inserting screw. Also, make sure the screws are all inserted on the same side of the frame.
Move each PVC hinge along the spindle until it comes to rest against the corresponding wing connector (barbed tee). To keep the hinges from sliding on the conduit, insert a Tek screw into the conduit next to the tee as shown. Do not insert the screw too deep or it will interfere with the movement of the hinge on the spindle.
- Check Movement of Wings
Check movement of wings. Raise and lower the wings to make sure they move freely without binding. There should be just enough tension on the hinges to keep the wings in place once released.
- Prepare Plastic Clips
Use a chop saw to cut the PVC clamps into 14, 1-inch wide clips. Attaching the clamps to a two-foot section of ½-inch PVC pipe while cutting will make the job easier and safer.
- Prepare Poly Film
From a roll of plastic film cut a 4-foot X 4-foot piece.
- Attach Film to Frame
Center the frame on top of the plastic cover with screw heads facing up. Attach film to frame using the clips as shown. Evenly space the clips on the pipe. Install every clip with the exception of the four clips that are to be located at the ends of the tubing next to the hinges. The recommended minimum number of clips to use is 14. The use of additional clips will ensure a more secure fit.
Flip the frame over. To enable the use of clips close to the hinges, make a few cuts in the film located on top of the connectors as shown. You should now be able to attach the remainder of the film to the poly pipe.
Use scissors to trim excess film from the cover. Finished butterfly crop cover ready to install on planter.
- Installation
Center the crop cover on the top of the planter with the wing connectors centered on and directly above a set of planter posts. Attach using two bungee cords as shown. If necessary, tie a knot in the bungees to increase tension.
- Utilization
Maximum protection, partial ventilation, maximum ventilation or use the butterfly cover in combination with an extra module to protect pepper transplants.
Basic Crop Shelter - Assembly and Installation Plans
The Basic crop shelter is designed to be used in conjunction with a modular planter. The shelter consists of a frame and a cover of some type. The shelter can be used for season extension when equipped with a poly film cover or to shelter crops from high wind, hail, intense solar radiation and many pest insects when equipped with a shade fabric cover.
Because of its low profile, the shelter is best suited for protecting low growing crops and crops that do not require trellising such as strawberry, leafy greens, cole and root crops. Growers needing to protect tall and/or trellised crops grown in a modular planter should install a ‘Jumbo’ Crop shelter. See ‘Jumbo Crop Shelter’ section for assembly instructions.
The Basic shelter’s unique design enables it to be vented at the top while remaining in a closed position. Whether equipped with poly film or shade fabric, the shelter enables access to the crop for pruning, spraying and harvesting without removing the cover from the frame.
- Basic Crop Shelter Parts List
The 2020 cost total was $76.00.
- 1 - Polyethylene sheeting (clear) 10-foot X 25-foot, 6-mil*
- 2 - EMT steel tubing (1/2-inch X 10-foot)
- 2 - PVC Schedule 40 slip elbow (1/2-inch)
- One roll - ADS 100-PSI poly coil pipe (3/4-inch x 100-foot)**
- One box (50 count) - Hex drive Tek screws (no.10 X ¾-inch)
- Two, 12 packs - Binder clips (2-inch)
*Construction grade film. Greenhouse film preferred but more expensive. A 10-foot X 25-foot roll will equip eight Basic crop shelters.
**A 100-foot roll of poly pipe will equip 10 Basic crop shelters. - Prepare Frame Posts
Prepare frame posts. Use a chop saw, angle grinder or jigsaw to cut four, 16-inch posts and two, 28-inch posts from the ½-inch metal conduit. Remove burrs on the ends of the posts. The two longer posts will serve as the center posts and the other four are designated as secondary posts.
- Install Frame Posts
From the top of each planter post, measure down six inches and install a Tek screw. Designate a set of opposing posts on the planter to receive the center posts. Insert the secondary cover posts into the four remaining planter posts.
- Install Spacer Bar
Install spacer bar. Measure distance between center posts (inside surface to inside surface). Take measurement at the base of the posts. Cut a piece of ½-inch EMT conduit to serve as a spacer bar. To calculate the length of the spacer bar, add one inch to the center post to center post measurement. Attach the ells to each end of the spacer bar using Tek screws as shown. Be sure the bar is inserted all the way into the ells before fastening. Attach the spacer bar to the center posts.
- Install Poly Pipe Hoops
Install poly pipe hoops. Cut to fit, two pieces of ¾-inch poly pipe and place each end over a set of secondary posts as shown. When installed, the hoops should contact the spacer bar at the top of the frame at their midpoints. For ease of installation, consider designating the midpoint on each hoop using a piece of tape or a paint pen. The hoops should fit snug on the posts but not excessively so. Depending on the diameter of the planter, the length of the hoops can vary from 52-56 inches in length.
- Prepare Poly Film Cover
Unroll film on the floor or better yet an elevated work surface. From a 10-foot wide roll of plastic film, cut off a 6.25-foot (75 inch) piece. A total of eight covers can be cut from a 10-foot by 25-foot roll of film by making the 75–inch cut first. Unfold the film and cut the 10-foot sheet at the midpoint (60 inches) creating two, 60-inch by 75-inch pieces. Note: Expect the film to measure a few inches wider than the listed 10 feet. You may remove the excess film or leave it, the choice is yours. To ensure a straight cut use a straight edge and a permanent marker to designate the cut line.
Locate the midpoint (37.5 inches) of one of the 75-inch long cover pieces and use the straight edge and marker to designate the center line. The center line makes the job of centering the film on the frame much easier. Repeat process on the other piece if a second cover is needed.
- Install Cover on Frame
Attach a minimum of three binder clips to each planter post for easy access. Drape the cover over the frame and center.
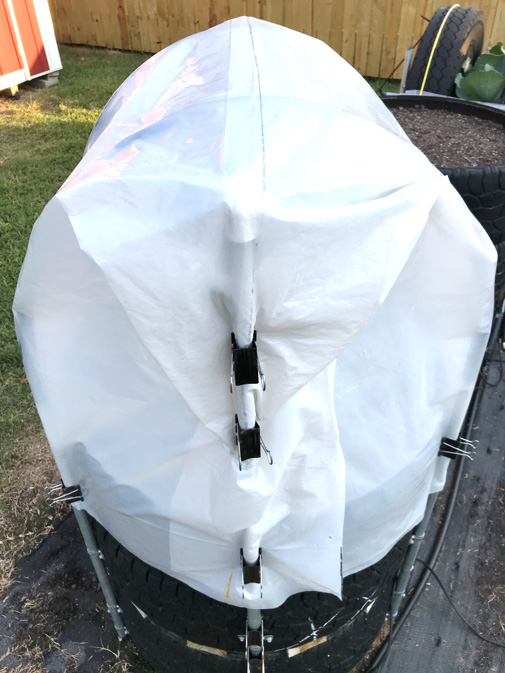
When installed properly, the center line will be aligned with the spacer bar and the cover will hang over both ends of the spacer bar evenly. Using binder clips, attach the base of the cover to the four planter posts housing the secondary frame posts. To achieve a tight fit, remove any wrinkles in the film prior to clipping. To close the cover, pull each flap over the adjacent center post one on top of the other and attach to the post using binder clips as shown.
To vent the cover at the top, separate the flaps at the top of the frame and roll the film back on itself as shown. Secure opening using binder clips. To close the top vents, remove the clips and unroll the film. Pull the film up at the top (center line) with one hand and use the other hand to fold one flap over the other at the center line. Fold the gathered film over the center post as shown and secure with a clip.
To vent one side of the shelter, remove all clips on the center post. Roll/fold back both flaps as shown and secure to the adjacent secondary post and hoop as shown. Repeat process on the other side to create a fully vented shelter.
- Optional Cover
If you only need one or two covers, consider using a clear shower curtain (liner). Most curtains are large enough to be used in conjunction with a basic shelter frame. You may pay a little more for a shower curtain cover but when you consider it can be used straight out of the package, it’s worth the price.
Jumbo Crop Shelter - Assemble and Installation Plans
The Jumbo crop shelter is designed to be used in conjunction with a modular planter. When outfitted with a poly film/insulated protective fabric cover, the shelter can be used to protect large plants in the event of a late cold spell or extend the production of frost sensitive plants late into the season. Shelter from high wind, hail, intense solar radiation and many insect pests can be achieved by replacing the poly film with shade fabric.
The frame is dual purpose. Not only does it support the cover, it can be used to support a trellis when growing crops such as tomato and pepper. Its unique design enables it to be vented at the top while remaining in a closed position. Whether equipped with poly film or shade fabric, the shelter allows access to the crop for pruning, spraying and harvesting without removing the cover from the frame.
- Jumbo Crop Shelter Parts List
The 2020 cost was $85.80.
- 1 - Polyethylene sheeting (clear) 10-foot X 25-foot, 6-mil*
- 4 - EMT steel tubing (1/2-inch X 10-foot)
- 2 - PVC Sch 40 slip elbow (1/2-inch)
- 4 - PVC Tee fitting (1/2-inch)
- One roll - ADS 100-PSI poly coil pipe (3/4-inch x 100-ft)**
- One box (50 count) - Hex drive Tek screws (no.10 X ¾-inch)
- Two, 12 packs - Binder clips (2-in)
*Construction grade film. Greenhouse film preferred but more expensive. A 10-foot X 25-foot roll will equip 4-5 Jumbo crop covers.
**A 100-foot roll of poly pipe will equip 10 Jumbo crop covers - Prepare Frame Posts
Use a chop saw, angle grinder or jig saw to cut two, 50–inch and four, 40-inch long posts from the ½-inch metal conduit. Remove burrs on the ends of the posts. The two longer posts will serve as the center posts and the other four will serve as secondary posts.
The frame posts serve a dual purpose. Not only do the posts support an array of covers, they also serve as supports for the various types of trellising you may choose to install. All of the posts are equipped with self tapping (Tek) screws that serve as points of attachment when using twine. The screws make twine installation much easier and prevent the twine from slipping on the posts.
Starting 12 inches from one end of each of the shelter posts, install Tek screws in a line every six inches. Install a total of seven screws on the 50-inch posts and a total of four screws on the 40-inch posts. Do not insert screws to depth but leave about ¼-inch of the stem exposed. For ease of installation, use a workbench for this task.
From the top of each planter post, measure down six inches and install a Tek screw. Designate a set of opposing posts on the planter to receive the center posts and insert posts. Insert the secondary posts into the remaining four planter posts.
- Install Center Post Spacer Bar
Measure distance between center posts (inside surface to inside surface). Take measurement at the base of the posts. Cut to fit a piece of ½-inch metal conduit to serve as a spacer bar. To calculate the length of the spacer bar, add one inch to the center post to center post measurement. Attach a PVC ell to each end of the spacer bar using Tek screws as shown. Be sure the bar is inserted all the way into the ells before fastening. Slide the spacer bar assembly over the center posts as shown. The spacer bar is required to keep the center posts plumb when attaching a trellis.
- Assemble Secondary Post Spacer Bars
The secondary post spacer bar consists of two, ½-inch PVC tees fitted to a section of ½-inch EMT conduit at each end. You will need to assemble two spacer bars, one for each set of opposing secondary posts. The spacer bars are required to keep the secondary posts plumb.
Select two secondary posts located to either side of one of the center posts and measure the distance between the two secondary posts. Cut a piece of ½-inch metal conduit to match the secondary posts measurement. Slide a PVC tee over each end of the conduit as shown. To enable the spacer bar to slide up and down on the posts, do not insert the conduit all the way into the tees. To set the depth of the conduit, insert a short piece of conduit through the open end of the tee as shown. With the spacer bar set at the proper depth (both pieces of conduit touching inside the tees), attach the spacer bar conduit to the tees using Tek screws. Remove the short piece of conduit. Repeat process to assemble the second spacer bar.
- Install Secondary Posts Spacer Bar
Slide each spacer bar assembly over a set of secondary posts until they come to rest on the Tek screws. Spacer bar installation is now complete.
- Install Poly Pipe Hoops
Cut to fit, two pieces of ¾-inch poly pipe and place each end over a set of secondary posts as shown. When installed, the hoops should contact the spacer bar at the top of the frame at their midpoints. For ease of installation, consider designating the midpoint on each hoop using a piece of tape or a paint pen. The hoops should fit snug on the posts but not excessively so. Depending on the diameter of the planter, the length of the hoops can vary from 52-56 inches in length.
- Trellis Installation
A quick and inexpensive crop trellis can be installed on the shelter frame using baler twine. The ‘narrow cage’ trellis configuration used on modular planters is very flexible, making easy work when guiding plant growth through and up the trellis.
A complete trellis may be installed prior to or just after a crop is planted or in phases as the crop grows. A trellis may be installed between the two center posts or between a set of opposing secondary posts. Notice all of the shelter posts are oriented with screw heads facing away from the center of the bed.
Install the trellis one run (level) at a time. Each run consists of a separate piece of baler twine. The length of twine required to complete a run will vary depending on the width of the planter. An 8-foot piece of twine should be sufficient to complete one run of a center post trellis. There are several techniques one can use to attach twine to the frame. Depending on the technique you choose, the shelter posts may have a tendency to spin in the planter posts when installing twine. To prevent spinning, use Tek screws to connect the two. Regardless of the technique you choose, the twine should be wrapped around the protruding screw shanks on the posts to ensure it doesn’t slide downward when supporting the weight of the crop. To form a ‘cage’, the twine must be positioned on both sides of the posts.
- Prepare Poly Film Cover
From a 10-foot wide roll of plastic film, cut off a 5-foot X 10-foot piece. This width of film will accommodate a modular tire planter with a 32-inch diameter. For smaller diameter planters, a smaller width will suffice. Better to have an oversize cover than one too small. Keep in mind it is easier to trim a little off one edge than to prepare another piece.
Spread film on the floor or better yet an elevated work surface. Locate the mid point (60 inches) on the 10-foot piece of film. Using a straight edge and a permanent maker, designate the center line of the cover as shown. The center line makes the job of centering the film on the frame much easier. Note: Expect the film to measure a few inches wider than the listed 10 feet. Be sure to take a measurement before marking the film.
- Install Cover on Frame
Attach three binder clips to each planter post for easy access. Drape cover over frame and center. When installed properly the center line will be aligned with the center post spacer bar and the cover will hang over both ends of the spacer bar evenly.
Using binder clips, attach the base of the cover to the four planter posts housing the secondary frame posts. To achieve a tight fit, remove any wrinkles in the film prior to clipping.
To close cover, pull each flap over the corresponding center post, one on top of the other and attach to the post using binder clips as shown.
To vent the cover at the top while still closed, separate the flaps at the top of the frame and roll the film back on itself as shown. Secure opening using binder clips.
To close the top vents, remove the clips and unroll the film. Pull the film up at the top (center line) with one hand and use the other hand to fold one flap over the other under the crown as shown. Fold the gathered film over the center post as shown and secure with a clip.
To vent one side of the cover, remove all clips on the center post. Roll back both flaps as shown and secure to the adjacent secondary post as shown. Repeat process on the other side to create a fully vented cover.

