Composting System for Small Horse Farms
Why compost?
Gardeners understand the value of composted horse manure for improving soil fertility, tilth, and moisture holding capacity. Horse stall compost has almost a perfect proportion of nutrients to organic matter for garden crops. Horse owners should consider other reasons for composting. (1) Maintaining a compost pile reduces the volume of waste produced on the farm. (2) Composting is a clean alternative to storing manure and dirty bedding in piles. (3) The high temperatures created during composting kills fly eggs, and well-composted cleanings will not attract adult flies.
Composting Basics
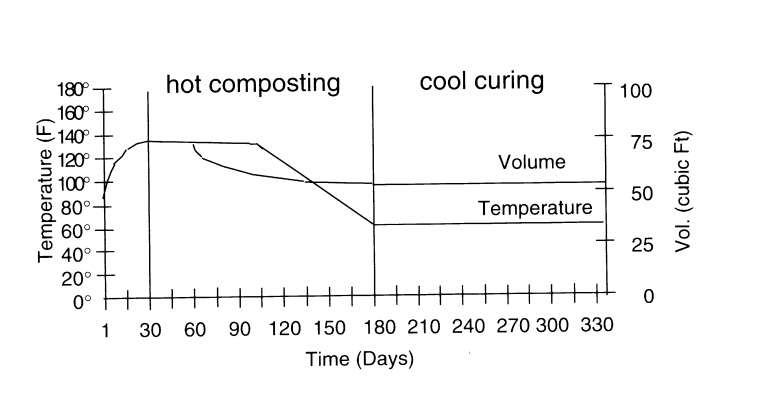
Composting is easy. There is not a complicated recipe to produce good compost from horse manure and wood shavings. Just add water and stir. The stall waste will compost on its own. Figure 1 shows the temperature and volume changes taking place in a compost pile made with stall waste from horses bedded on wood shavings.
Composting takes place in three phases:
- A short warm-up phase lasting a few days to a month
- A hot composting phase lasting three to four months
- A cool curing phase lasting another three to four months
Bacteria create the heat during the hot composting phase. Curing takes place at lower temperatures, and it is the work of fungus, worms, and other animals. Stall waste that has gone through hot composting makes good fertilizer, but the nitrogen and organic matter in cured compost are more stable than in uncured compost. Most gardeners want cured compost because adding this is like giving the garden an extra dose of fertilized soil. It takes six to eight months to produce cured compost from raw stall waste.
Figure 1. Temperature and volume changes in a static compost pile made with stall cleanings from horses bedded on wood shavings.
Continuous Composting System
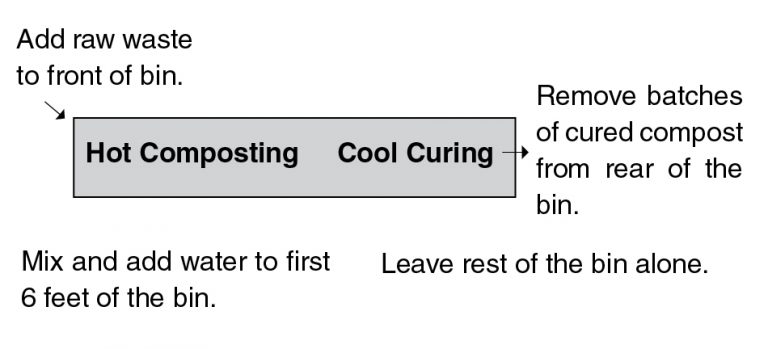
The continuous composting system developed at Oklahoma State University reduces the drudgery of making good compost. Figure 2 illustrates the concept behind the process. The idea is to keep adding fresh stall waste to a pile of hot compost. The pile grows as new material is added. The old compost in the back of the pile will cure if no new waste is added to it. After six or eight months, remove the cured compost and start adding stall waste to the backside of the hot pile.
Figure 2. Composting processes take place in different parts of a continuous composting bin.
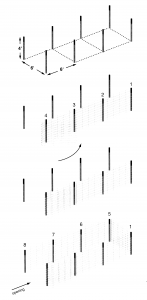
How to build a 18′ Continuous Composting bin
Materials Needed:
- Eight, 6’ T-posts.
- 50’ roll of 4’ tall fencing, openings 3” X 4” or smaller.
- Fencing wire.
Construction Steps:
- Drive T-posts so that they form three, 6’ X 6’ areas. Decide which end needs an opening.
- Divide the 50’ roll of fencing into two, 25’ pieces. Securely fasten one end of a fencing piece to T-post number 1. Keeping the fencing taut, wire the piece to the inside of posts 2, 3, and 4. Wrap the remaining fencing around post 4, and bend the wire fingers so that the gate attaches to the fencing at post 3.
- Securely fasten the other piece of fencing to T-post 8. Wire fencing to the inside of posts 7, 6, and 5. Turn the remaining fencing towards post 1, pull it tight, and securely wire to post 1. Make sure there is no slack in the fencing between posts 1 and 5. Compost will be piled against this section.

Figure 3. How to build a 18′ Continuous Composting bin (Good for 1 to 3 Stalls)
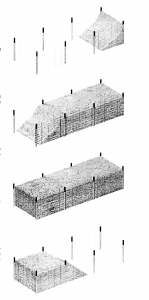
Using a Continuous Composting Bin
- Place loads of stall cleanings and/or strippings against the enclosed end of the bin. Mix and add water.
- Each time material is added, take a pitchfork and pull out the first six feet of the pile. Dump new loads of stall waste on the compost.
- Add water, mix, and throw the moist mixture back up against the pile. Add just enough water that the pile appears wet, but does not ooze liquid.
- Eventually, the end of the bin will be reached. Close the opening and even out the pile, completely filling the bin.
- Restart the process by opening the fencing that held up the pile in step 1. Remove cured compost until the hot portion of the pile is reached. Continue filling the bin from the new opening.

Figure 4. Using a Continuous Composting Bin
Douglas W. Hamilton
Waste Management Specialist


